Steve Jobs needed money for his new company NeXT. To avoid scaring off an investor, the expensive cars had to disappear from the company parking lot for a few hours.A former employee of Jobs, Randy Adams, tells this story.
When was that? In 1985, Steve Jobs left the Apple Corporation and founded his own company: NeXT. The company particularly developed workstations for use in higher education and business. Due to the very high prices, NeXT was never really able to establish itself.
Shortly after the founding, also in 1985, Jobs hired the engineer Randy Adams, who had just bought a Porsche 911.
As luck would have it, Steve Jobs had recently bought himself a Porsche 911 as well. So there were always two models in the company parking lot. However, for a “deal,” the luxury cars had to disappear. This was reported by colleagues from Forbes.
A Porsche gives the impression that the company has too much money
Why did the Porsches cause a problem? At a strategic moment, the two Porsches were parked at the back of the office to avoid any impression that the company NeXT had too much money. Adams explained that one day Steve Jobs had come into his office and said:
We have to hide the Porsche (…) “Ross Perot is coming and considering investing in the company. We don’t want him to think we have too much money.
What was the outcome? Ross Perot, a prominent American entrepreneur and billionaire, actually decided to invest in NeXT: He subsequently invested approximately 20 million US dollars in the company. This was intended to ensure that NeXT could remain an independent company until 1996.
In 1996, NeXT was finally taken over by Apple. The software from NeXT is still considered an important foundation for today’s operating systems from Apple (macOS, iOS, and iPadOS).
However, it remains unclear to this day whether hiding the two Porsche vehicles was crucial for the deal. In the end, Perot might have invested in the company despite the luxury cars. We can no longer ask Ross Perot, as the businessman died of leukemia in Dallas on July 9, 2019.
A user wanted to take the defective hard drive back after the repair of his MacBook Air because he was missing important data. However, Apple Support could not help him. The customer then wrote an email to Steve Jobs and received a call the next day:
Even the most powerful wizard is powerless without the right spell. And there are quite a few in the world of Harry Potter. But which spells are actually the strongest?
What was the ranking based on? Which spell seems particularly powerful at the moment is certainly very situation-dependent. For example, the Bubble-Head Charm can decide life and death when one has to spend a long time underwater. However, it will certainly do little good in a wizard duel.
Therefore, in this ranking, we have tried to look at the question of “power” as generally as possible.
In Harry Potter, there are also numerous mysteries that were created in one way or another by spells. However, it is often not explained how exactly this happened.
We therefore limit ourselves here to spells whose incantation is known, or whose execution can explicitly be seen in the books or films.
[toc]
Warning Spoilers: To explain the ranking, various events from the films and books will be discussed.
Start video
Harry Potter and the Deathly Hallows Part 2 – Movie Trailer
10. Expelliarmus
In last place in this ranking is the trademark of Harry Potter himself: the disarming charm Expelliarmus. At first glance, the spell doesn’t seem to make much of an impact. Harry also receives mockery for his frequent use of it.
However, over the years, Harry has proven more than once how useful this little spell can be. After all, disarming the opponent almost always leads to an immediate victory. Because what is a wizard without a wand?
9. Legilimens
The spell Legilimens in conjunction with firm eye contact allows the caster to somewhat read the thoughts and feelings of the other person. This makes the spell a powerful tool in many situations.
Lord Voldemort himself used the spell to keep his Death Eaters under control.
However, with strong willpower, it is possible to protect one’s mind from intruders. Therefore, Legilimens only ranks in ninth place in this ranking.
8. Fidelius Charm
With the complicated Fidelius Charm, it is possible to hide entire buildings from unwanted eyes. Only one person, the so-called Secret Keeper, can make the location findable for others. Other than that, the charm creates the ultimate, untouched, and unreachable hideout.
Overall, the charm is therefore very powerful. However, the need for a Secret Keeper also poses a high security risk. Lily and James Potter painfully experienced this when they were betrayed by their Secret Keeper Peter “Wormtail” Pettigrew to Voldemort. Therefore, the charm only ranks eighth.
7. Unbreakable Vow
The Unbreakable Vow is a powerful magical ritual where a binding contract is made between two people. If the vow-taker breaks their promise, it inevitably means their death.
Thus, the spell is not only life-threatening, but it is also an exceedingly powerful means of controlling others. There is also no way to revoke the contract, even if both parties wish to do so.
However, the promise can become void or be circumvented through clever interpretation. The spell’s weakness lies in the exact wording. The vow only relates to the precise phrasing of the promise, any deviations are not considered. Overall, the spell therefore ranks seventh.
6. Obliviate
With the memory charm Obliviate, it is possible to erase specific memories or even the entire identity of a person from their mind. This ability to deprive people of their experienced memories is undoubtedly very powerful.
For example, Gilderoy Lockhart stole fame for the achievements of others and made himself a celebrity.
Even more powerful is the spell in combination with the False Memory Charm, which implants false memories into the victim. However, the exact spell for this is unknown. With both memory spells, for example, the young Voldemort framed his uncle for the murder of his father.
This is an AI-powered translation. Some inaccuracies might exist.
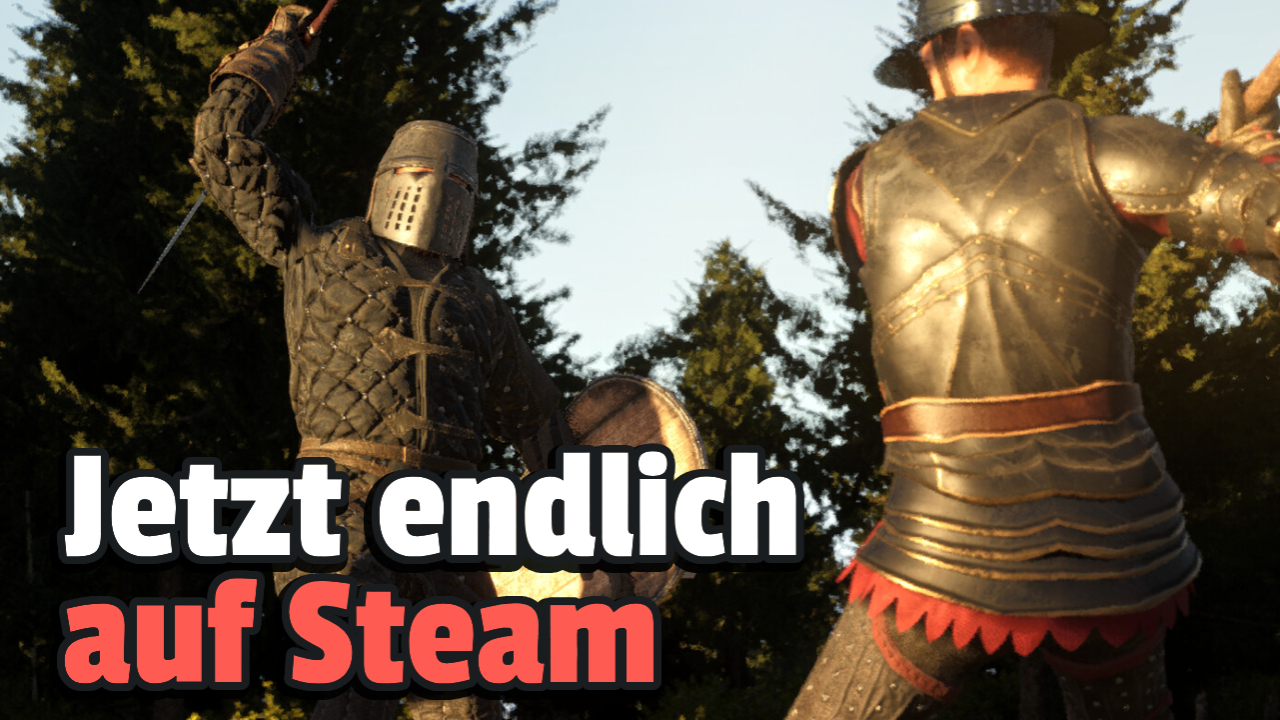
Today, a new building game starts on Steam, which particularly reminds of Mount & Blade with its graphics. Everything you need to know can be found here.
Which game is this about? Bellwright is a new building game from the developer studio Donkey Crew. The inspiration for their new game was drawn from the titles Mount & Blade and Rimworld, and you can see this in the graphics and gameplay.
As a character and player, you become the leader of the revolution and want to rebel against an evil queen. In the medieval setting, you gather allies, build outposts and settlements, and try to free your homeland piece by piece from the terrible ruler.
The game is supposed to launch today on Steam, as recently announced by a trailer:
Start video
Bellwright zeigt neues Gameplay im Early Access Trailer
Who is behind it? Donkey Crew is a studio made up of a group of modders from the Mount-and-Blade community.
With Bellwright, the developer studio wants to take a fresh start. In March 2020, they launched their first project, Last Oasis, which received quite a bit of negative criticism. Among other things, because players eventually believed that the developers were distancing themselves from the project to focus on other things.
What can you expect from Bellwright? Bellwright promises to do many things better than its predecessor. Graphically, the game definitely reminds of its inspiration Mount & Blade. The gameplay, on the other hand, is inspired by Rimworld.
In essence, Bellwright is a building game in Unreal Engine 5 that incorporates many good aspects of the genre and a third-person perspective. You also place buildings in third-person before they are constructed by NPCs. When it comes to foraging for food, the NPCs are also very self-sufficient and simply look for what they need.
More information on Bellwright and the game mechanics has been compiled for you by MeinMMO author Benedict Grothaus after he was able to test the game in advance.
This is an AI-powered translation. Some inaccuracies might exist.
The director of the action film Tears of the Sun, Antoine Fuqua, once revealed in an interview that he couldn’t get along with Bruce Willis on set.
Bruce Willis is known as one of Hollywood’s greatest action stars. With films like The Sixth Sense, Die Hard, and Sin City, the actor made a name for himself internationally.
However, it seems not every director got along well with the actor’s working style, as became evident in an interview with Antoine Fuqua, the director of Tears of the Sun.
Here you can see a trailer for Tears of the Sun:
Start video
English trailer for Tears of the Sun with Bruce Willis
Professional Differences on the Set of Tears of the Sun
In a BBC interview in September 2014, Antoine Fuqua was asked who the biggest pain in the neck was that he had ever worked with.
The director responded with Bruce Willis’s name and said, “He got on my nerves.”
He went on to explain that there were no personal disputes involved, but only differences related to their professional collaboration.
The two got along very well off-camera. However, their working styles and perspectives on the set of Tears of the Sun were so different that they simply did not harmonize:
[…] Some men just don’t get along when it comes to work – you have different work ethics, different opinions, different views, different methods of filmmaking – and we didn’t understand each other.
Off-camera, we were friends – Bruce is great – but we just can’t get along when it comes to work, and that’s all there is to it.
For FC 24 EA and Amazon Prime have released the 7th Prime Gaming Pack of the current season. We present you the latest package and show you how to secure the improved rewards.
What is behind the Prime Gaming Pack? The cooperation between EA and Amazon started with FIFA 21. Since then, Amazon Prime members have been able to enjoy monthly recurring packs that they can redeem for free.
This partnership has also continued in FC 24, allowing us to present you the now 7th edition of the Prime Gaming Pack. The new drop has been available since April 23.
As always, the pack offers some nice content that grants you a bonus in the form of players and consumables.
Start video
EA Sports FC 24: Update teaser for the UEFA Euro 2024
Prime Gaming Pack 7 loans you a base icon for 20 matches
What rewards does Prime Gaming Pack 7 include? The contents of the package typically always include a prominent loan card, a player pick, some random gold players, and other consumables such as contracts or healing cards.
The highlight of this drop is a base icon, which you receive as a loan player for 20 matches. After opening the pack, you will be assigned a random legend. With a bit of luck, you might draw Pelé, Gullit, or other strong icons.
The loan cards are perfect for trying out players for a few matches. Moreover, strong loan cards can give you an advantage in important games.
Contents of the new Prime Gaming Pack 7 (all untradeable):
Why does Prime Gaming Pack 7 have better rewards? While previously there were 4 rare gold players, a player pick, and 6 consumables, the newest package holds double the number of rewards.
a base icon as a loan player for 20 matches
8 rare gold players
two player picks with 3 players to choose from (min. 81+)
12 rare, gold consumables
Until when can you claim Prime Gaming Pack 7? The 7th drop is available until May 20, 2024.
First, you need an Amazon Prime account to take advantage of the Prime Gaming bonuses. If you already have one, proceed to step 2.
Open your browser and go to the EA FC section of Prime Gaming. You can find the corresponding link here (via Prime Gaming).
Look for Prime Gaming Pack 6 and click on it.
If prompted, link your Prime account with your EA account.
Now press the “Get in-game content” button.
Now you should switch to the game, the web app, or the companion app. There you should receive a notification that the Prime Gaming Pack has been successfully redeemed. You can find it in the shop under “My Packs”.
In some cases, there may also be delays of up to an hour before the pack appears in the game.
The next Prime Gaming drop will likely appear after the current pack expires, on May 21, 2024. We will keep you updated.
Holly Longdale, Executive Producer & Vice President for World of Warcraft, spoke in an interview about how the acquisition by Microsoft has affected Blizzard after the first few months.
What did Holly Longdale say? The Executive Producer for World of Warcraft talked about life at Blizzard under the Microsoft banner. First, Longdale explained how helpful it is to be closely connected with all the experienced minds from Team Xbox now.
They have already had intensive exchanges with the developers of Mojang (Minecraft) and Zenimax (The Elder Scrolls Online), discussing what has worked in the past and what hasn’t. Blizzard can now benefit directly from these experiences.
Furthermore, the WoW head explained that there has been no outside influence so far:
No one is asking us to do anything. World of Warcraft is doing very well, and they [Microsoft, note of the editorial team] are very proud of what WoW has achieved, so it’s almost as if we can just do our thing and continue to be fantastic. They have supported us enormously, and it’s as if Blizzard can just be Blizzard.
How should I evaluate these statements? During BlizzCon 2023, Mike Ybarra had already emphasized that Blizzard has become more independent, self-responsible, and confident due to the acquisition by Microsoft than it was in previous years under the leadership of Activision and Bobby Kotick.
With The War Within, WoW is starting a new chapter this summer:
Start video
World of Warcraft: The War Within – Cinematic Trailer
It seems very unlikely that all these things happened without Microsoft’s direct influence.
Moreover, one must not forget that Blizzard had already transformed into a giant service-focused corporation due to the immense success of WoW long before Activision could negatively influence the culture and projects of the creators of Diablo, Starcraft, and Warcraft.
The current corporation Blizzard, with its thousands of employees, can never become the “good old Blizzard” again, but must continue to rely on service products, tap into new demographics (for instance, through mobile releases), and milk its core franchises.
However, we can hope that in the future—thanks to Game Pass and the resources of Microsoft—there will be at least sporadic player experiences from Blizzard that remind us of old classics and provide great single-player experiences. Obsidian and the small Pentiment prove that such projects are possible under Microsoft.
The PS5 is now in many homes. But you should also give your console a break. There are several good reasons why you should turn off your PS5.
The PS5 is now a widely used gaming console. However, players often wonder if they can leave the console running all day long.
We will name several reasons why you should turn off your console when you are not using it and why the rest mode might be an alternative.
Start video
PlayStation Showcase 2023 Accessories Sneak Peek Trailer
3 reasons why you should turn off your PS5 overnight
Overheating: In general, there is a risk that your PS5 can overheat. Normally, the PS5 is capable of regulating its temperature without any issues.
However, if you are gaming in the summer in a hot and poorly ventilated attic apartment, or if your PS5 is in a cramped TV cabinet, then the risk of your PS5 overheating is greater.
Faster pollution: When you turn off your PS5, the fan also shuts down. If your PS5 remains on, the fan pulls dust and dirt into the console. The more your PS5 gets dirty, the worse the cooling system works. In rare cases, strong dirtiness can damage internal components. You can find cleaning tips and tips against pollution for your PS5 on MeinMMO.
Wear of components: Consoles like the PS5 generally last for several years. However, a console that runs 24 hours a day wears out much more quickly than a device that you only turn on for 3 or 4 hours. Severe wear is also an argument often cited regarding used mining graphics cards.
In particular, mechanical components like the drive, the fans, and other moving parts wear out more quickly and will eventually need to be replaced.
Rest mode as an alternative to turning off with residual risk
What is rest mode? The alternative to turning off is the “rest mode” of the PS5. In this mode, the PS5 can
continue to automatically upload save data (with PS Plus subscription)
install software updates for the console and the games
and the console will remain powered to charge controllers or other accessories.
What risk is there? It may sound unlikely, but in the event of a power outage or if you accidentally turn off the power, there is a risk of data loss and damage to your console. If you are unlucky, your game files may become corrupted, and you would then have to download the entire game again. Depending on the size of the game, this can take some time.
Therefore, we would advise you, if you don’t need the console for a longer time, to simply turn it off. This minimizes risks and potential problems.
Movies and series on the PS5: On the PS5, you can not only play current games like Horizon: Forbidden West or Elden Ring but also watch movies or series via streaming service. However, that is not the best idea if you want to get the most out of your series or save resources.
The manga of One Piece is one of the longest-running anime stories. The speed at which the story is told does not please every fan. According to mangaka Eiichiro Oda, the manga could end faster, but that would come at the cost of one of the coolest features of the anime.
Why does One Piece take so long? In an interview, Oda explained that the characters are “alive.” They act according to their own sensibilities, and readers immediately notice when the mangaka forces a character to act in a certain way.
As an example, he cites Luffy. He is the worst problem in the manga:
The characters function on their own, and the reader knows that, and if I force a character to move for the sake of the story, then they say, “This character would never do that.” That’s why Luffy… That’s the hardest part about it. If I don’t intersperse different episodes and hit the brakes, the boss is defeated immediately. The characters are alive.
Thus, One Piece could be even shorter if Oda didn’t hit the brakes with Luffy. Otherwise, the straw hat would probably just use his strongest attacks and defeat the biggest villains immediately. Thus, the longest fight in anime history would have ended faster. But then we would miss a spectacular feature of the anime.
One Piece is currently heading towards its end. Here you can see the trailer for the Egghead arc:
Start video
One Piece: New trailer shows first images from the Egghead Island arc
One Piece leaves amazed fans with animations
Would the missing boss fights be a problem? Especially the fights against the final boss of each arc are the highlight in One Piece. Luffy often surpasses himself in battles and shows new techniques. This was also the case with Gear 5 in the fight against Kaido. It would be a shame if they were ended merely due to faster pacing in an episode.
Each of the Seven Samurai has received their own appearance. By including each of the characters in the story, Oda had to slow down the pacing.
The same goes for the Worst Generation. Oda regrets that he included a total of eleven pirates in this group. Almost all pirates of the Worst Generation have received an elaborate appearance so far. Urouge is, for example, a pirate who has hardly been seen so far.
If Oda had packed fewer people into these groups, the story would have been completed faster. When exactly One Piece will end is not known. The mangaka has postponed the deadline for the end of the story several times already.
The ominous Vault 69 sounds like a cheeky joke in Fallout. It is. But at the same time, it’s more serious than one might think…
In the universe of Fallout, it’s not just about bizarre monsters and the radiation of the world, but also about the Vaults. These safe bunkers are designed to provide refuge from radiation and allow humans to repopulate the surface in a few decades. However, some of these Vaults appear a little “curious”.
We’ll reveal what the mysterious Vault 69 is all about.
Spoiler alert: Those who have not seen the series “Fallout” or played the games will encounter some light spoilers regarding both in this article.
Start video
The official trailer for the Fallout series on Amazon in German
What are the Vaults? Vaults are massive underground complexes in the Fallout universe, built to protect against the radiation of the inevitable nuclear war. Particularly important and wealthy individuals could book a place here as a precaution for the atomic war.
What most didn’t know, however, was that the Vaults were simultaneously used for various social experiments. For example, one Vault claimed that one resident must be sacrificed each year for the Vault to continue to exist. Other Vaults serve research purposes, where residents are drugged.
So the Vaults are only superficially intended for safety. Aside from some Vaults that are for “management,” the others almost always serve some weird purposes.
The poster for Vault 69 from the never-released Van Buren game.
What is Vault 69? Vault 69 might be one of the strangest Vaults, and if you have a mischievous grin on your face with that number, you are absolutely right.
Because the experiment of Vault 69 had a very special arrangement for its residents. There was one man and 999 women. He is basically the rooster in the henhouse.
Of course, Vault 69 is based on the common meme “69” that pops up from time to time, such as in games like Borderlands 3. The 69 refers to a sexual practice or sometimes just sex in general, and accordingly, the Fallout universe had to create a somewhat questionable “social experiment” with “Vault 69”.
Whether the lonely gentleman experienced his personal harem, some amazonic submission, or something completely different, we will hopefully find out someday.
Just a small picture – everything that is known about Vault 69.
Where does the info come from? The few pieces of information available about Vault 69 come from the Fallout Bible and the comic “One Man, and a Crate of Puppets.” Additionally, it appeared in an artwork for the “Van Buren” Fallout, which was never published. There, the corresponding Vault is mentioned.
Are there other curious Vaults? There are plenty. For the majority of the Vaults, the creators have not released anything yet. The purpose or the experiments conducted in these Vaults are still unknown until they are mentioned in a game, series, or another medium someday.
However, it is known that there was also a Vault 68. This reversed the experiment: Here there are a total of 999 men and only one woman. Again, one should carefully consider whether one really wants to know how that turned out.
In Pokémon GO the Kanto event has started, finally bringing a new monster to the wild. However, it is not available everywhere. We at MeinMMO will show you which Pokémon it is, where you can find it, and what the trainers say about it.
This event now focuses on the new biomes and brings you the first new wild Pokémon of the year: Schligda. We explain why you need to head to the beach for this and how trainers are reacting to the release.
We show you a preview of the major update in the following video:
Start video
Pokémon GO: It’s time to #RediscoverGO!
How to secure Schligda now
What kind of Pokémon is it? Schligda is a water Pokémon from the 9th game generation. With the help of 50 candies, you can evolve it into Schligdri. You can recognize the new Pokémon by its white, worm-like body which peeks out of a hole in the ground and its red nose. It is therefore also referred to as the Eel Pokémon.
Its evolution, on the other hand, consists of three red eel-like bodies that peek out from a rock. They visually remind one a bit of Digda and Digdri, but they are by no means the same Pokémon. A shiny version of Schligda is not currently available in the game.
Why do you have to go to the beach for Schligda? To secure a specimen, you need to pay attention to the new biomes in the game that were activated by the major update. You can recognize these by the different backgrounds in the catch mask. Since Schligda, being a water Pokémon, particularly likes to stay at the beach, you can reportedly find it exclusively in the beach biome according to the Pokémon GO blog.
However, the beach, as some trainers have now discovered, is not only immediately along the sea according to Niantic. Players have already asked in the Reddit community whether it can really only be found at sea beaches, and according to the responses, they can breathe easy.
There are reportedly also beach biomes near larger rivers, such as the Thames, where according to comments on Reddit, Schligda has already been spotted. Other bodies of water have also allegedly yielded results for players:
Mesoplodon: Definitely yes. They spawn here in London near the Thames. Edited: I said definitely before considering that the Thames might only trigger a “beach” biome. I have the sand/water background near the river.
piratedashel: It definitely spawned near the lake where I got it!
SituationOdd: I think it’s more of a “water biome” – we have some at a lake and some along the promenade near downtown.
How to identify the right biome? So when searching for Schligda, definitely keep an eye out for the corresponding beach biome. This shows a beach with water in the background when catching. However, as seen in the post by Reddit user joaco_ds, Schligda can also be found when the background shows a bare meadow with a body of water behind it.
Recommended editorial content
At this point you will find external content from Reddit that complements the article.
I consent to external content being displayed to me. Personal data can be transmitted to third party platforms.
Read more about our privacy policy.
How are trainers reacting to the release of Schligda?
Trainers are excited about the special release: Opinions on Schligda are divided within the community. Some trainers are glad that there is finally a new wild Pokémon in the game. As players noted a few days ago on Reddit, no other new monster has celebrated its release in the wild this year.
But the implementation in combination with the new biomes is also a special and above all positive surprise for some. For instance, Reddit user HiOnFructose writes in the comments: It looks like they heard the wishes for more biome-specific Pokémon, as in the past. That’s great. I don’t live near a beach, but I’m just going to assume that Schligda will eventually get some kind of global event.
Criticism of the release: However, the release in special biomes has also led to criticism in the community. Some trainers are concerned that Schligda will be one of the Pokémon they will likely never catch since they do not live near a beach or larger bodies of water.
Others criticize in this context that the majority of trainers are disadvantaged by this release. Many have to drive by car to the nearest beach to catch the new monster, which is not environmentally friendly.
Techbear72 explains in the Reddit comments: With every announcement, there’s always something that’s objectively bad for the majority of players. In this case, it’s Schligda, which is not available for most. And especially in environmental week, one would think that Niantic wouldn’t try to encourage people to get into their car to drive to the nearest beach, even if they have one at a reasonable distance. What, in turn, the vast majority of players do not.
Whether Schligda will soon be catchable in special events outside of the biomes and whether more biome-specific monsters will follow remains to be seen. If there are new updates, you’ll find them here at MeinMMO.
What do you think of the release of Schligda? Do you live near a beach and have already secured one? Or did you also have to drive somewhere to catch it? Feel free to let us know in the comments and exchange ideas with other trainers.
Actually, with Patch 3.23, the personal player hangar, cargo elevators, and other cargo features were supposed to land in the Alpha of Star Citizen. Now, one of the developers explained why the new features had to be postponed.
What was the plan for the Alpha update 3.23 of Star Citizen? The new patch of the ambitious space MMO was supposed to bring the new cargo functions to the servers. These include:
A personal, instantiated hangar for players
Cargo elevators
Item banks
New cargo missions
Just last week, the developers announced in the official forum that these innovations failed the final test and therefore need to be postponed to a later update.
In the recent Q&A session on Youtube, Senior Gameplay Lead Engineer Chad McKinney explained in detail why the decision was made to postpone the cargo features. The short answer: The playability of the Alpha of Star Citizen was highly endangered.
Star Citizen is gradually approaching its final release – here is a trailer from the Alpha:
Start video
Star Citizen Alpha 3.22 Trailer
What is the long answer? The new cargo features are closely linked to various other systems of Star Citizen. McKinney cites instantiation, inventory, and ship calling as examples.
Not connecting functions that are not yet one hundred percent stable with all these systems could have led to a significant detriment to the gaming experience for all alpha testers, even to the point of unplayability. The developers want to avoid such a frustrating situation at all costs.
In addition, the developers need more time to revise the kiosk interface, the design of the cargo elevators, and the functioning of the cargo based on recent feedback.
What other news was there in the Q&A? The developer confirmed that the personal hangar will receive a ship lift that can accommodate your largest flyable spacecraft. Furthermore, players with a certain criminal inclination will be able to break into foreign hangar instances.
What about the other features of Alpha update 3.23? On the one hand, the people responsible for Star Citizen have confirmed that other innovations in the patch have passed the final tests. The features include:
Revision of the mobiGlas system, which provides you with various app functions.
A new loot window for the first-person perspective.
A new minimap for the interface in the first-person perspective.
The star map will receive a comprehensive update.
New hunting missions and creatures.
Diverse improvements for the Arena Commander mode will be implemented.
Furthermore, the developers announced that update 3.23 will bring official support for the Vulkan API (graphics interface) as well as improvements for water simulation and calculation.
In Dragon’s Dogma 2, a young man named Hugo ends up in the dungeon of the capital Bakbatthal through your intervention. But how do you get the bandit out of jail for the quest “Off the Path of Deception”?Back from prison?
What’s the deal with Hugo? When you first enter Batthal from the City of Rest, you receive reports about the crimes of the Coral Snakes bandits. Follow the road south and you will encounter a short sequence with Thor and Hugo.
Chase the fleeing man to track down the bandits’ camp. Through the events you trigger, Hugo eventually—betrayed by his leader—ends up in the dungeon of Bakbattahl. It also becomes clear that Hugo is not actually a bad guy.
The launch trailer of Dragon’s Dogma 2:
Start video
For the launch, Dragon’s Dogma 2 will receive a final trailer
Where does the quest start? Once you enter Bakbatthal, you will receive the task “Off the Path of Deception” near the cart station from Benjamin. Hugo longs for an honest life but needs help to leave his bandit career behind.
Follow the road northeast and enter the prison in the palace district. Warden Ekratt will guide you to the cell where Hugo is sitting. Here’s how to free Hugo:
Talk to Hugo until he tells you half of his life story.
Then hit up the young guard Dietrich, who gives you the tip that the warden could help you in freeing Hugo.
Ekratt explains that he needs 1,000 gold to initiate the release request. Processing may take some time.
Return to Ekratt a few days later. He doesn’t have good news for you: He needs more gold (2,500) and time for the release.
At this point, it seems irrelevant how many days you let pass: Ekratt tells you to be patient (it is unclear whether this is a bug).
Off the Path of Deception: How to Master the Quest
What’s next?
Over time, more members of the Coral Snakes may end up in the dungeon. When you speak with them, you learn information that you can pass on to Hugo – about the fate of his parents or where the bandits’ new hideout may be.
The appearance of bandit Brefft is said to be connected to the quest “The Toll of Peace,” which you can take on northeast of the City of Rest on the way to the Cenotaph.
When you tell Hugo the new information and return to the dungeon a day later, the guards may tell you about Hugo’s escape.
Now travel to the Ancient Battlefield, north of the City of Rest. If you are quick enough, you may be able to save Hugo from the leader of the Coral Snakes there. If you succeed, the young man can help find a new career path.
Some players report that they did not travel quickly enough to the Ancient Battlefields. No one was there. On their next visit to the dungeon, they learned that most other bandits had fled as well, and that they had found the bodies of Hugo and the leader of the Coral Snakes (via Gamespot).
Is there an alternative to free Hugo faster? You can open the cell door with a dungeon key from the start. There is even a key lying around in the first room of the prison area. However, if the guards see you during the escape, they will immediately attack you.
Since your followers had to wait outside the dungeon, you can expect a tough fight. If you get overwhelmed, you will end up in a cell yourself—and the bail for release is steep (30,000 gold). Additionally, by freeing Hugo quickly, you miss the information needed to trigger further events. Hugo simply disappears without a clear goal.
Through Counterspell, you can attempt to negate a spell with your reaction, preventing it from being cast by the opponent.
Level 7
Spell: Hunger of Hadar or Wall of Fire
Grizzly Invocation: Devil’s Sight
Hunger of Hadar causes AoE damage and additionally blinds those who are within the area of the spell. The area counts as difficult terrain. Hunger of Hadar continuously deals damage (over multiple rounds) as enemies remain in its area of influence. The area counts as difficult terrain, slowing everyone inside.
With Wall of Fire, you can conjure a huge wall of fire that deals damage to enemies as they approach it. Wall of Fire can be creatively used for tactical advantages – for example, to separate enemies. Overall, Hunger of Hadar and Wall of Fire provide opportunities to control the battlefield.
Devil’s Sight is a useful passive feature, allowing you to see normally in the dark. The range is 60 feet.
Level 8
Spell: Dimension Door
Dimension Door can be used in various ways. With this spell, you can teleport yourself and an ally to a location of your choice that is within your line of sight. Your ally can only be medium size.
With Dimension Door, you can reposition tactically or escape dangerous situations. Apart from that, you can also use this spell to overcome obstacles outside of combat and reach hard-to-access places in an elegant way.
Level 9
Spell: Hold Monster
Grizzly Invocation: Book of Ancient Secrets
Hold Monster is basically the same spell as Hold Person, but better. The spell is not limited to humanoids; with Hold Monster, you can immobilize all sorts of creatures, but not undead.
By using Book of Ancient Secrets, you gain the following spells: Silence, Ray of Enfeeblement, and Chromatic Orb. The cool thing is that you can cast all three spells once per long rest – without using a spell slot.
Level 10
Cantrip: Minor Illusion
Spell: Cone of Cold
With this cantrip, you can create an illusion of yourself, which makes nearby enemies curious and distracts them. This cantrip can even be cast while you are silenced. The spell Cone of Cold creates a cone area around the caster, dealing cold damage. The damage ranges from 8 to 64.
Level 11
Spell: Greater Flight
Mystical Arcana: Circle of Death or Create Undead
Mystical Arcana allows you to choose a 6th-level spell that you can cast once per long rest for free – without wasting a spell slot. Circle of Death is a powerful AoE necromancy spell that can deal 8-48 damage. Having area damage spells in your arsenal is generally always a good idea. Alternatively, we recommend Create Undead, which allows you to raise a corpse to fight by your side.
As a spell, you can actually choose freely whatever you like. We recommend the spell Greater Flight, to be even more mobile or to support your group members. Greater Flight lasts for 10 rounds and allows you or an ally to fly up to 60 feet per turn.
Warlock Build – What equipment is worth it in the endgame?
Legendary Staff: Markoheshkir (you can only obtain in Act 3)
Robe of the Weave (Act 3)
Head: Birthright (Act 3)
Hell’s Light Gloves (Act 3 House of Hope)
Quick Spell Gloves (Act 3)
Cloak of the Weave (Act 3)
Ring of Mental Health (Act 2)
Neck: Spellcrux Amulet (Act 2)
Shoes: Dissolving Nightwalker (Act 1)
If you don’t like this specific Warlock build or feel drawn to other spells, you can easily swap out and adjust some spells. This build simply shows one option of how you can play the Warlock.
Through Counterspell, you can attempt to negate a spell with your reaction, preventing it from being cast by the opponent.
Level 7
Spell: Hunger of Hadar or Wall of Fire
Grizzly Invocation: Devil’s Sight
Hunger of Hadar causes AoE damage and additionally blinds those who are within the area of the spell. The area counts as difficult terrain. Hunger of Hadar continuously deals damage (over multiple rounds) as enemies remain in its area of influence. The area counts as difficult terrain, slowing everyone inside.
With Wall of Fire, you can conjure a huge wall of fire that deals damage to enemies as they approach it. Wall of Fire can be creatively used for tactical advantages – for example, to separate enemies. Overall, Hunger of Hadar and Wall of Fire provide opportunities to control the battlefield.
Devil’s Sight is a useful passive feature, allowing you to see normally in the dark. The range is 60 feet.
Level 8
Spell: Dimension Door
Dimension Door can be used in various ways. With this spell, you can teleport yourself and an ally to a location of your choice that is within your line of sight. Your ally can only be medium size.
With Dimension Door, you can reposition tactically or escape dangerous situations. Apart from that, you can also use this spell to overcome obstacles outside of combat and reach hard-to-access places in an elegant way.
Level 9
Spell: Hold Monster
Grizzly Invocation: Book of Ancient Secrets
Hold Monster is basically the same spell as Hold Person, but better. The spell is not limited to humanoids; with Hold Monster, you can immobilize all sorts of creatures, but not undead.
By using Book of Ancient Secrets, you gain the following spells: Silence, Ray of Enfeeblement, and Chromatic Orb. The cool thing is that you can cast all three spells once per long rest – without using a spell slot.
Level 10
Cantrip: Minor Illusion
Spell: Cone of Cold
With this cantrip, you can create an illusion of yourself, which makes nearby enemies curious and distracts them. This cantrip can even be cast while you are silenced. The spell Cone of Cold creates a cone area around the caster, dealing cold damage. The damage ranges from 8 to 64.
Level 11
Spell: Greater Flight
Mystical Arcana: Circle of Death or Create Undead
Mystical Arcana allows you to choose a 6th-level spell that you can cast once per long rest for free – without wasting a spell slot. Circle of Death is a powerful AoE necromancy spell that can deal 8-48 damage. Having area damage spells in your arsenal is generally always a good idea. Alternatively, we recommend Create Undead, which allows you to raise a corpse to fight by your side.
As a spell, you can actually choose freely whatever you like. We recommend the spell Greater Flight, to be even more mobile or to support your group members. Greater Flight lasts for 10 rounds and allows you or an ally to fly up to 60 feet per turn.
Level 12
Grizzly Invocation: Pick your Favorite
Spell: Pick your Favorite
Feat: Combat Caster
Warlock Build – What equipment is worth it in the endgame?
Legendary Staff: Markoheshkir (you can only obtain in Act 3)
Robe of the Weave (Act 3)
Head: Birthright (Act 3)
Hell’s Light Gloves (Act 3 House of Hope)
Quick Spell Gloves (Act 3)
Cloak of the Weave (Act 3)
Ring of Mental Health (Act 2)
Neck: Spellcrux Amulet (Act 2)
Shoes: Dissolving Nightwalker (Act 1)
If you don’t like this specific Warlock build or feel drawn to other spells, you can easily swap out and adjust some spells. This build simply shows one option of how you can play the Warlock.
Through Counterspell, you can attempt to negate a spell with your reaction, preventing it from being cast by the opponent.
Level 7
Spell: Hunger of Hadar or Wall of Fire
Grizzly Invocation: Devil’s Sight
Hunger of Hadar causes AoE damage and additionally blinds those who are within the area of the spell. The area counts as difficult terrain. Hunger of Hadar continuously deals damage (over multiple rounds) as enemies remain in its area of influence. The area counts as difficult terrain, slowing everyone inside.
With Wall of Fire, you can conjure a huge wall of fire that deals damage to enemies as they approach it. Wall of Fire can be creatively used for tactical advantages – for example, to separate enemies. Overall, Hunger of Hadar and Wall of Fire provide opportunities to control the battlefield.
Devil’s Sight is a useful passive feature, allowing you to see normally in the dark. The range is 60 feet.
Level 8
Spell: Dimension Door
Dimension Door can be used in various ways. With this spell, you can teleport yourself and an ally to a location of your choice that is within your line of sight. Your ally can only be medium size.
With Dimension Door, you can reposition tactically or escape dangerous situations. Apart from that, you can also use this spell to overcome obstacles outside of combat and reach hard-to-access places in an elegant way.
Level 9
Spell: Hold Monster
Grizzly Invocation: Book of Ancient Secrets
Hold Monster is basically the same spell as Hold Person, but better. The spell is not limited to humanoids; with Hold Monster, you can immobilize all sorts of creatures, but not undead.
By using Book of Ancient Secrets, you gain the following spells: Silence, Ray of Enfeeblement, and Chromatic Orb. The cool thing is that you can cast all three spells once per long rest – without using a spell slot.
Level 10
Cantrip: Minor Illusion
Spell: Cone of Cold
With this cantrip, you can create an illusion of yourself, which makes nearby enemies curious and distracts them. This cantrip can even be cast while you are silenced. The spell Cone of Cold creates a cone area around the caster, dealing cold damage. The damage ranges from 8 to 64.
Level 11
Spell: Greater Flight
Mystical Arcana: Circle of Death or Create Undead
Mystical Arcana allows you to choose a 6th-level spell that you can cast once per long rest for free – without wasting a spell slot. Circle of Death is a powerful AoE necromancy spell that can deal 8-48 damage. Having area damage spells in your arsenal is generally always a good idea. Alternatively, we recommend Create Undead, which allows you to raise a corpse to fight by your side.
As a spell, you can actually choose freely whatever you like. We recommend the spell Greater Flight, to be even more mobile or to support your group members. Greater Flight lasts for 10 rounds and allows you or an ally to fly up to 60 feet per turn.
Level 12
Grizzly Invocation: Pick your Favorite
Spell: Pick your Favorite
Feat: Combat Caster
Warlock Build – What equipment is worth it in the endgame?
Legendary Staff: Markoheshkir (you can only obtain in Act 3)
Robe of the Weave (Act 3)
Head: Birthright (Act 3)
Hell’s Light Gloves (Act 3 House of Hope)
Quick Spell Gloves (Act 3)
Cloak of the Weave (Act 3)
Ring of Mental Health (Act 2)
Neck: Spellcrux Amulet (Act 2)
Shoes: Dissolving Nightwalker (Act 1)
If you don’t like this specific Warlock build or feel drawn to other spells, you can easily swap out and adjust some spells. This build simply shows one option of how you can play the Warlock.
Through Counterspell, you can attempt to negate a spell with your reaction, preventing it from being cast by the opponent.
Level 7
Spell: Hunger of Hadar or Wall of Fire
Grizzly Invocation: Devil’s Sight
Hunger of Hadar causes AoE damage and additionally blinds those who are within the area of the spell. The area counts as difficult terrain. Hunger of Hadar continuously deals damage (over multiple rounds) as enemies remain in its area of influence. The area counts as difficult terrain, slowing everyone inside.
With Wall of Fire, you can conjure a huge wall of fire that deals damage to enemies as they approach it. Wall of Fire can be creatively used for tactical advantages – for example, to separate enemies. Overall, Hunger of Hadar and Wall of Fire provide opportunities to control the battlefield.
Devil’s Sight is a useful passive feature, allowing you to see normally in the dark. The range is 60 feet.
Level 8
Spell: Dimension Door
Dimension Door can be used in various ways. With this spell, you can teleport yourself and an ally to a location of your choice that is within your line of sight. Your ally can only be medium size.
With Dimension Door, you can reposition tactically or escape dangerous situations. Apart from that, you can also use this spell to overcome obstacles outside of combat and reach hard-to-access places in an elegant way.
Level 9
Spell: Hold Monster
Grizzly Invocation: Book of Ancient Secrets
Hold Monster is basically the same spell as Hold Person, but better. The spell is not limited to humanoids; with Hold Monster, you can immobilize all sorts of creatures, but not undead.
By using Book of Ancient Secrets, you gain the following spells: Silence, Ray of Enfeeblement, and Chromatic Orb. The cool thing is that you can cast all three spells once per long rest – without using a spell slot.
Level 10
Cantrip: Minor Illusion
Spell: Cone of Cold
With this cantrip, you can create an illusion of yourself, which makes nearby enemies curious and distracts them. This cantrip can even be cast while you are silenced. The spell Cone of Cold creates a cone area around the caster, dealing cold damage. The damage ranges from 8 to 64.
Level 11
Spell: Greater Flight
Mystical Arcana: Circle of Death or Create Undead
Mystical Arcana allows you to choose a 6th-level spell that you can cast once per long rest for free – without wasting a spell slot. Circle of Death is a powerful AoE necromancy spell that can deal 8-48 damage. Having area damage spells in your arsenal is generally always a good idea. Alternatively, we recommend Create Undead, which allows you to raise a corpse to fight by your side.
As a spell, you can actually choose freely whatever you like. We recommend the spell Greater Flight, to be even more mobile or to support your group members. Greater Flight lasts for 10 rounds and allows you or an ally to fly up to 60 feet per turn.
Level 12
Grizzly Invocation: Pick your Favorite
Spell: Pick your Favorite
Feat: Combat Caster
Warlock Build – What equipment is worth it in the endgame?
Legendary Staff: Markoheshkir (you can only obtain in Act 3)
Robe of the Weave (Act 3)
Head: Birthright (Act 3)
Hell’s Light Gloves (Act 3 House of Hope)
Quick Spell Gloves (Act 3)
Cloak of the Weave (Act 3)
Ring of Mental Health (Act 2)
Neck: Spellcrux Amulet (Act 2)
Shoes: Dissolving Nightwalker (Act 1)
If you don’t like this specific Warlock build or feel drawn to other spells, you can easily swap out and adjust some spells. This build simply shows one option of how you can play the Warlock.
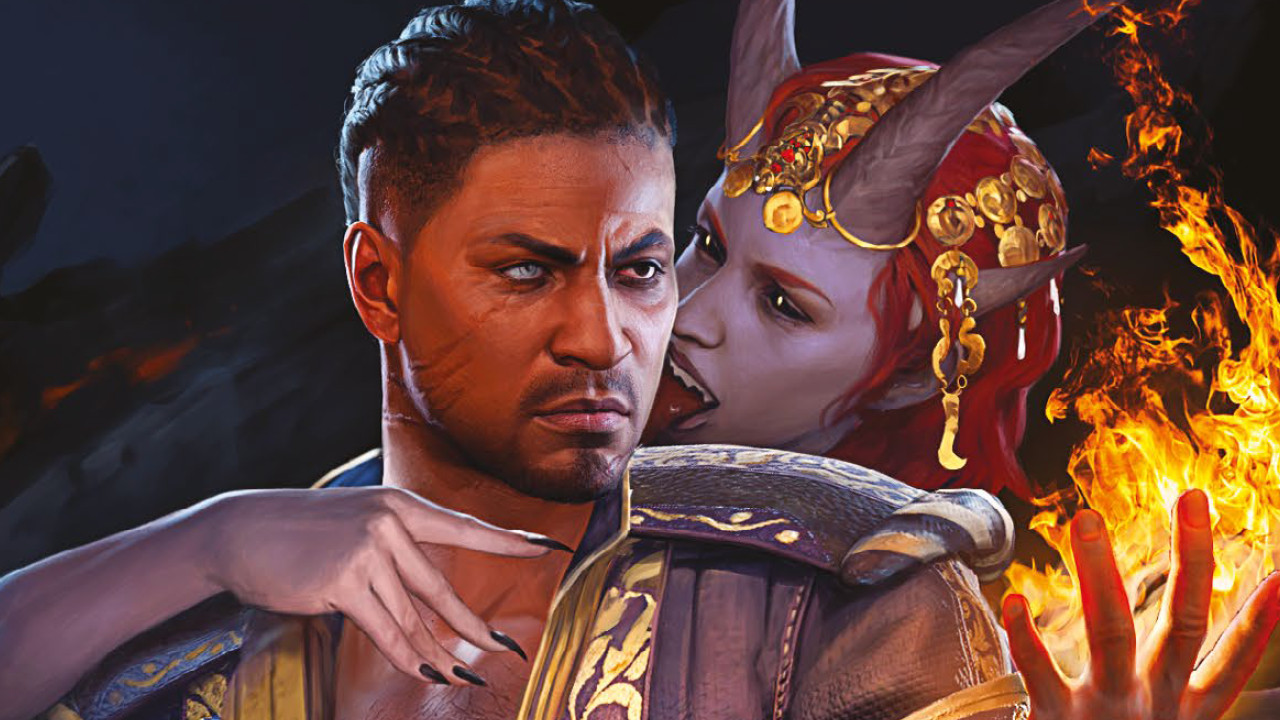
Wyll is a companion in Baldur’s Gate 3, who is a Warlock by default. In this guide, we show you how to get the most out of the class – whether as Wyll or your own character.
Who is Wyll? Wyll is a companion in Baldur’s Gate 3. As a brave hero, he made a name for himself as the Blade of Frontiers and stands against injustice. His noble heritage shaped his life story, and he is known for his heroic deeds.
However, Wyll is pursuing a dark path, as he made a dangerous deal with a devil to solidify his legendary status. Now that the consequences of this pact are threateningly close, he desperately seeks a way out.
What makes the Warlock special? Unlike other spellcasting classes, Warlocks have extremely few spell slots, but are rewarded with some of the best cantrips in the game.
A key feature of the Warlock is how they regain their spell slots – this occurs not only after a long rest but also after every short rest. The Warlock is also among the easiest classes in Baldur’s Gate 3 and is therefore well-suited for beginners.
We show you how to get the most out of this class.
Best Build for Warlock – Subclass: The Fiend
There are three subclasses for the Warlock, including: The Fiend, The Archfey, and The Great Old One. You can choose the subclass as early as level 1. Each Warlock has made a pact with a powerful patron, granting them certain magical powers.
With the subclass The Fiend, you gain, among other things, the feature “Blessing of the Dark Master,” which gives you some temporary hit points from killing enemies and increases your chances of survival.
Additionally, you will later gain access to the powerful AoE spell: Fireball. With this subclass, you also get the opportunity to roll 1d10 on one of your attribute rolls once per short rest, which is particularly useful for conversations.
Attribute Distribution
This is how you can distribute your attribute points at the start (or at Lazarus):
Prioritize Charisma, as it is the main attribute for Warlocks. Constitution and Dexterity are also important to increase your survivability.
You can choose a total of three feats – at levels 4, 8, and 12. We recommend leveling your Charisma as quickly as possible. With the feat Ability Score Improvement, you can raise your Charisma by +2 each time. High Charisma gives you an increased hit probability and higher damage with your most important cantrip: Eldritch Blast.
At level 12, it is advisable to also take the feat Combat Caster. This gives you an advantage on saving throws to maintain your concentration spells. Additionally, you can use the spell Shocking Grasp as a reaction when an enemy moves out of melee range.
Warlock Build – Spells
Level 1
Cantrips: Eldritch Blast and Mage Hand
Spells: Hex, Hellish Rebuke
The cantrip Eldritch Blast is the core of being a Warlock. With this cantrip, you can deal massive damage. As one of the few spells, Eldritch Blast deals Force Damage, bypassing some resistances of enemies.
The cantrip can also be used to destroy objects like doors. Eldritch Blast is your main damage source as a Warlock that improves further with later level-ups. Eventually, you can shoot up to 3 rays per round at the same or different targets.
With Mage Hand, you can conjure a ghostly hand that can interact with objects – which can sometimes be quite practical.
Hex is a concentration spell that additionally increases the damage of your attacks and pairs well with Eldritch Blast to deal even more damage. You can also choose an ability on which the target should have disadvantage. If the target dies before the concentration spell ends, you can cast Hex again on a different target without using a spell slot. Eldritch Blast together with Hex forms your main combination for combat.
With Hellish Rebuke, you can react to the next attack of the enemies and add 2-20 fire damage to the target.
Level 2
Spell: Armor of Agathys
Grizzly Invocations: Painful Ray, Armor of Shadows
Armor of Agathys is a spell that lasts until your next long rest. The spell grants 5 temporary hit points and deals 5 cold damage to enemies who hit you with a melee attack. This not only provides additional protection but also an offensive component that punishes attackers.
Painful Ray increases your damage from Eldritch Blast by the amount of your Charisma modifier. Armor of Shadows allows you to cast Mage Armor at any time without expending spell slots, granting you more armor class. This only works if you are wearing clothing as a Warlock – so no light armor.
Level 3
Spell: Fog Step
Pact Benefit: Pact of the Chain
With Fog Step, you gain increased mobility. With Fog Step, you can teleport (with a bonus action) within a radius of 60 feet, allowing you to position yourself well.
With Pact of the Chain, you can summon a familiar companion to assist you in combat, among other things. The Pact of the Chain offers special abilities for the familiar companions, which can vary depending on the choice of the companion.
Level 4
Cantrip: Friends
Spell: Hold Person
With the cantrip Friends, you gain an advantage in conversations by getting advantage on Charisma-based rolls. But be careful: when the spell ends, the target may realize it has been charmed.
The spell Hold Person works very well in combination with melee fighters in your group. If the spell succeeds, the target (which must be humanoid) cannot move or take any action or reaction. Additionally, all melee attacks hit critically, potentially causing massive damage.
Level 5
Spell: Fireball
Grizzly Invocations: Repelling Ray
Fireball is a powerful AoE spell that can deal significant damage to many enemies simultaneously. This spell is always worth it.
Repelling Ray is a passive feature for your Eldritch Blast that can be switched. With this passive, your Eldritch Blast can push back enemies, which can be quite useful. For example, you can throw enemies into a chasm.
Level 6
Dimension Door can be used in various ways. With this spell, you can teleport yourself and an ally to a location of your choice that is within your line of sight. Your ally can only be medium size.
With Dimension Door, you can reposition tactically or escape dangerous situations. Apart from that, you can also use this spell to overcome obstacles outside of combat and reach hard-to-access places in an elegant way.
Level 9
Spell: Hold Monster
Grizzly Invocation: Book of Ancient Secrets
Hold Monster is basically the same spell as Hold Person, but better. The spell is not limited to humanoids; with Hold Monster, you can immobilize all sorts of creatures, but not undead.
By using Book of Ancient Secrets, you gain the following spells: Silence, Ray of Enfeeblement, and Chromatic Orb. The cool thing is that you can cast all three spells once per long rest – without using a spell slot.
Level 10
Cantrip: Minor Illusion
Spell: Cone of Cold
With this cantrip, you can create an illusion of yourself, which makes nearby enemies curious and distracts them. This cantrip can even be cast while you are silenced. The spell Cone of Cold creates a cone area around the caster, dealing cold damage. The damage ranges from 8 to 64.
Level 11
Spell: Greater Flight
Mystical Arcana: Circle of Death or Create Undead
Mystical Arcana allows you to choose a 6th-level spell that you can cast once per long rest for free – without wasting a spell slot. Circle of Death is a powerful AoE necromancy spell that can deal 8-48 damage. Having area damage spells in your arsenal is generally always a good idea. Alternatively, we recommend Create Undead, which allows you to raise a corpse to fight by your side.
As a spell, you can actually choose freely whatever you like. We recommend the spell Greater Flight, to be even more mobile or to support your group members. Greater Flight lasts for 10 rounds and allows you or an ally to fly up to 60 feet per turn.
Level 12
Grizzly Invocation: Pick your Favorite
Spell: Pick your Favorite
Feat: Combat Caster
Warlock Build – What equipment is worth it in the endgame?
Legendary Staff: Markoheshkir (you can only obtain in Act 3)
Robe of the Weave (Act 3)
Head: Birthright (Act 3)
Hell’s Light Gloves (Act 3 House of Hope)
Quick Spell Gloves (Act 3)
Cloak of the Weave (Act 3)
Ring of Mental Health (Act 2)
Neck: Spellcrux Amulet (Act 2)
Shoes: Dissolving Nightwalker (Act 1)
If you don’t like this specific Warlock build or feel drawn to other spells, you can easily swap out and adjust some spells. This build simply shows one option of how you can play the Warlock.
Through Counterspell, you can attempt to negate a spell with your reaction, preventing it from being cast by the opponent.
Level 7
Spell: Hunger of Hadar or Wall of Fire
Grizzly Invocation: Devil’s Sight
Hunger of Hadar causes AoE damage and additionally blinds those who are within the area of the spell. The area counts as difficult terrain. Hunger of Hadar continuously deals damage (over multiple rounds) as enemies remain in its area of influence. The area counts as difficult terrain, slowing everyone inside.
With Wall of Fire, you can conjure a huge wall of fire that deals damage to enemies as they approach it. Wall of Fire can be creatively used for tactical advantages – for example, to separate enemies. Overall, Hunger of Hadar and Wall of Fire provide opportunities to control the battlefield.
Devil’s Sight is a useful passive feature, allowing you to see normally in the dark. The range is 60 feet.
Level 8
Spell: Dimension Door
Dimension Door can be used in various ways. With this spell, you can teleport yourself and an ally to a location of your choice that is within your line of sight. Your ally can only be medium size.
With Dimension Door, you can reposition tactically or escape dangerous situations. Apart from that, you can also use this spell to overcome obstacles outside of combat and reach hard-to-access places in an elegant way.
Level 9
Spell: Hold Monster
Grizzly Invocation: Book of Ancient Secrets
Hold Monster is basically the same spell as Hold Person, but better. The spell is not limited to humanoids; with Hold Monster, you can immobilize all sorts of creatures, but not undead.
By using Book of Ancient Secrets, you gain the following spells: Silence, Ray of Enfeeblement, and Chromatic Orb. The cool thing is that you can cast all three spells once per long rest – without using a spell slot.
Level 10
Cantrip: Minor Illusion
Spell: Cone of Cold
With this cantrip, you can create an illusion of yourself, which makes nearby enemies curious and distracts them. This cantrip can even be cast while you are silenced. The spell Cone of Cold creates a cone area around the caster, dealing cold damage. The damage ranges from 8 to 64.
Level 11
Spell: Greater Flight
Mystical Arcana: Circle of Death or Create Undead
Mystical Arcana allows you to choose a 6th-level spell that you can cast once per long rest for free – without wasting a spell slot. Circle of Death is a powerful AoE necromancy spell that can deal 8-48 damage. Having area damage spells in your arsenal is generally always a good idea. Alternatively, we recommend Create Undead, which allows you to raise a corpse to fight by your side.
As a spell, you can actually choose freely whatever you like. We recommend the spell Greater Flight, to be even more mobile or to support your group members. Greater Flight lasts for 10 rounds and allows you or an ally to fly up to 60 feet per turn.
Level 12
Grizzly Invocation: Pick your Favorite
Spell: Pick your Favorite
Feat: Combat Caster
Warlock Build – What equipment is worth it in the endgame?
Legendary Staff: Markoheshkir (you can only obtain in Act 3)
Robe of the Weave (Act 3)
Head: Birthright (Act 3)
Hell’s Light Gloves (Act 3 House of Hope)
Quick Spell Gloves (Act 3)
Cloak of the Weave (Act 3)
Ring of Mental Health (Act 2)
Neck: Spellcrux Amulet (Act 2)
Shoes: Dissolving Nightwalker (Act 1)
If you don’t like this specific Warlock build or feel drawn to other spells, you can easily swap out and adjust some spells. This build simply shows one option of how you can play the Warlock.
On April 24, 2024, Genshin Impact Version 4.6 “Two Worlds Aflame, the Crimson Night Fades” will launch with new banners and characters. Here you will find all the important information about the new version summarized.
When will Version 4.6 be released? On April 24 at 00:00, the update to the new version will start and is expected to last five hours.
During this time, you will not be able to play Genshin Impact. However, as compensation, you will receive 300x Primogems.
You can already download the data for the new version in advance.
Here you can see a trailer for the upcoming Version 4.6:
Start video
Genshin Impact Version 4.6: “Two Worlds Aflame, the Crimson Night Fades”
These are the new contents of Version 4.6 in Genshin Impact
Which new character will be in Version 4.6? Arlecchino, aka the “Servant” and Number Four among the eleven Fatui, will appear as a playable character in the new version. She is a 5-star character who fights with a polearm and the Pyro element.
What banners will be in Version 4.6? The first phase will run from the beginning of the update until May 14, 2024, at 17:59 and will include these special banners:
“Shadow Ashes by the Fireplace”: featuring Arlecchino as a 5-star character; Xiangling, Fréminet, and Lynette as 4-star characters
“Magic Between Light and Shadow” featuring Lyney as a 5-star character; Xiangling, Fréminet, and Lynette as 4-star characters
“Divine Work” with “Polearm – Form of the Scarlet Moon” and “Bow – First Great Magic”; several 4-star weapons
Special banner of Phase 1 in Version 4.6
In phase 2, Wanderer (Anemo and Catalyst) and Baizhu (Dendro and Catalyst) will have their reruns.
A small note: Currently, an online event titled “Shadows of the Deep Night” is running featuring Arlecchino, where you can secure Primogems among other rewards.
What events will there be in the first part of Version 4.6? More information is available on these events that will soon start in the new version of Genshin Impact:
“Arataki’s Great Rainbow Tour of Live Rock ‘n’ Roll”: Event period from May 6, 2024, 10:00 to May 27, 2024, 3:59; rewards include 4-star character Gorou, Nightwind Horn, and Primogems
“Application Research for Vibration Crystals”: Event period from April 28, 2024, 10:00 to May 9, 2024, 3:59 with Primogems, Hero’s Wit, and weapon ascension materials as rewards
“Genius Invocation: Action: Forge Realm’s Ember”: Event period during Version 4.6
“Genius Invocation: Escalation Mode – Formation Battle”: Event period from May 4, 2024, 10:00 to May 20, 2024, 3:59
What else is in Version 4.6? Right after the update to the new version, you can play the new legend quest with Arlecchino.
In addition, in Version 4.6, the area of Fontaine will be expanded around the ruins of the kingdom of Remuria, with a new enemy, the “Golem Leader.” Also, Arlecchino will be added as a new boss. Two new artifact sets will be introduced, and Cyno will also receive a new legend quest.
The strategy game Millennia was released on March 26 on Steam and has received a mixed reception from players so far. A team member from publisher Paradox has now responded to the criticism and clarified under what circumstances the game was developed.
Which game is it about? Millennia is a new game published by Paradox, the strategy veterans behind Europa Universalis, Hearts of Iron, or Crusader Kings.
Paradox acts as the publisher while the game is developed by the studio C Prompt Games. Millennia resembles Civilization, but there are no fixed nations. You establish your own nation and build cities.
Bugs and glitches, performance issues, and poor balancing are criticized. Many reviews, however, emphasize that a good game is hidden beneath the problems. Millennia just needs more work to be truly good. On MeinMMO, we summarized the mood of the players.
Start video
Announcement Teaser Trailer to Millennia
Players are frustrated: Believe the studio is too small
What is the problem? Steam user shoobers believes he knows the cause of the current state of Millennia. He addresses the team size of the small developer studio C Prompt Games.
According to shoobers, it consists of only three people. While they are industry veterans responsible for classics like System Shock 2, Age of Empires 2, StarCraft, or Diablo, they are still just three people.
One of them is not even a developer, but “only” an art designer. According to the user, such a team size would not be sufficient to handle all the bugs and issues of the game.
Another Steam user named Skybsky addresses this point and expresses his frustration:
“Only three people, really? That explains a lot; I thought many people were working on the game. Paradox should invest in them and hire more good developers, so the team’s vision is supported. The game is so good in terms of gameplay but has one of the worst balancing/AI/performance and graphics.”
From this statement, it is clear how annoyed some players are. They want to enjoy Millennia, but the game is preventing them from doing so.
However, this assessment is incorrect; many more people are now working on Millennia at C Prompt Games. The developers have now clarified this.
The team speaks out, promises groundbreaking changes
What are the developers saying? The community manager of Paradox, Erik Jakobsson, spoke out on Steam and directly addressed the criticism that the studio is too small.
There haven’t just been three people working on the game for a long time. Initially, it was so, but now the team has grown and consists of exactly 20 people. This includes additional designers and programmers, among others.
Millennia is a new IP, but significantly smaller than other Paradox games. Therefore, the team is smaller and listens very closely to player feedback. The game is to be improved in the future through regular updates.
Why is the new update so important?
They promise probably the most important innovation in the new update: Players will be able to demolish cities of their vassals.
In Millennia, you can gradually expand existing cities over time to include up to 4 villages, making small villages into huge metropolises. However, you need a lot of space on the map for that.
The AI builds cities relatively close to existing settlements, hindering growth.
Because you could only conquer cities and make them vassals but could not demolish them, many players felt hindered when expanding cities.
The ability to demolish conquered cities is therefore seen as a “game changer” and fundamentally changes the game.
In Fortnite and many other games, you first exchange your money for another currency before you can buy something in the shop. Now there is a tool that helps you keep track of your costs.
What kind of tool is it? The Sparkasse has created a new tool that is supposed to help you better understand how much money you spend on items in the shop.
In many games, you first have to exchange your real money for another currency like V-Bucks before you can shop in the store, but often the conversion of the fictional currency into euros is not immediately obvious.
The new tool from Sparkasse is meant to help you with that. Here is the tool:
What can the tool do? The Sparkasse calculator works really simply. You can just enter the amount your skin costs on the calculator’s website in your browser, and you will know how many euros that is. In addition to Fortnite, many other games are also offered.
Here you can find a list of all games:
Fortnite
League of Legends
Roblox
EA FC24
Candy Crush
Clash of Clans
Valorant
Rocket League
Hearthstone
Minecraft
Apex Legends
Genshin Impact
Call of Duty: Warzone
Overwatch 2
Destiny 2
Diablo IV
RAID: Shadow Legends
Battlefield 2042
The Finals
Fall Guys
Forge Of Empires
Hero Wars
Game of Thrones: Winter is Coming
Elvenar
Zoo 2: Animal Park
Farmerama
Hero Zero
Goodgame Empire
Big Farm
Seafight
How are the prices calculated? The Sparkasse in-game calculator only uses the base prices for its calculations. Prices from bundles or other promotions, like “the more you load, the more you get for free” are not taken into account by the tool.
Is the tool available on mobile? Yes, the tool is also available on mobile. There, you can easily use it like Google Lens to hover over the in-game currency and find out how much that is in euros.
If you like watching videos of new skins, you can also install the in-game calculator as a browser extension. With the push of a button, you can see how much the skin actually costs while watching videos, helping you keep track of your expenses.
The Sphinx from Dragon’s Dogma 2 tests you with ten different riddles. We explain where to find the Sphinx, how to solve the riddles, and ultimately how to kill it.
Warning, Spoilers: The Sphinx does not appear right at the beginning of Dragon’s Dogma 2, but only in the middle of the game. You have been warned!
Who is the Sphinx? It has already been seen in the trailers for Dragon’s Dogma 2: the Sphinx. This admittedly quite eerie creature can be encountered in the game.
The Sphinx is actually a mythological creature with the head of a human, the body of a lion, and the wings of an eagle. Similar, but not exactly like that, is the appearance of the Sphinx in the world of Dragon’s Dogma 2.
It lives a reclusive and lonely life in a well-hidden shrine. If you find it, it will pose ten riddles to you, which can earn you valuable rewards. The treasures are located in chests that the Sphinx guards.
In this article, we explain where to find the Sphinx and how to solve its riddles.
Start video
For the launch, Dragon’s Dogma 2 will receive a final trailer
Preparation Tips
What should you consider before the quest? There are a few things that can make solving the riddles with the Sphinx easier:
Rest before solving the riddles in an inn. This way, the game will create a save point that you can load in the worst case. Because: The riddles each allow you only one attempt. If you fail, the reward will be denied to you. If this happens too often, the Sphinx will fly away and the quest cannot be continued.
Take at least one portable Waypoint Crystal with you to the Sphinx. You will get a second one from her during the quest. Place a Waypoint Crystal in front of the Sphinx’s shrine so you can fast travel back there repeatedly.
In line with the previous point: Don’t forget to bring some travel stones. This is the only way you can fast travel.
If you want to save yourself some running later, travel to the Riftstone of the Fellowship near Rest Town before the quest. There, get an official pawn from Capcom named “SphinxParent,” “SphinxFather,” or “SphinxMother.”
If you plan to play all the riddles in one go, switch to the Archer class beforehand. To kill the Sphinx at the end, you can use a specific arrow that ensures the creature dies with just one shot.
Finding the Sphinx – Location 1
Where is the Sphinx located? The Sphinx can be found in two different locations during its quest. After you solve five of the ten riddles, it will change its location. First, you meet it in the Mountain Shrine, later in the Border Shrine.
To reach the Mountain Shrine, start from Rest Town heading northeast to the Old Battlefield. There, you will find a castle that you must pass through. At the top, there is a Cyclops that needs to be defeated. If you use the ladder behind it, you will reach the “Cave at the End of the World.” That’s where you want to go.
To reach your goal, you need to traverse the Cave at the End of the World.
Cross the cave and exit at the other end. Walk past a golem and you will soon reach the Mountain Shrine. There, you will find the Sphinx waiting for you.
Important tip: Set your Waypoint Crystal here. You will likely return here several times.
Solve the First 5 Sphinx Riddles
How do the riddles work? When you enter the shrine, you will quickly face the monstrous Sphinx. Don’t let it intimidate you. If you speak with her, she will give you the first five riddles to choose from.
Riddle of Eyes
How do you solve the riddle? The Sphinx points to a cave near her position and instructs you to fetch the most valuable item from within for her.
When you enter the cave, be sure to look immediately behind you. There is a chest hidden above the door. Just climb over the rocks at the side to reach it and retrieve the Seal Vial from the chest. Bring it back to the Sphinx and receive a Lazarus Stone as a reward.
Right above the entrance, you will find the chest.
Riddle of Madness
How do you solve the riddle? The Sphinx tasks you with bringing her a person you love most. It can be one of your romances, Ulrika or Wilhelmina.
But it can be even easier: Grab your loyal main pawn and throw him over your shoulder. Bring him to the Sphinx and talk to her. You will then receive a Waypoint Crystal.
Simply throw your main pawn over your shoulder and hand him in.
Riddle of Wisdom
How do you solve the riddle? In this task, the Sphinx wants to meet a specific pawn. She leaves you in the dark about who it is.
To solve the riddle, go to the Riftstone of the Fellowship (north of Rest Town) and look for a pawn named “SphinxParent.” Alternatively, “SphinxFather” and “SphinxMother” will also work.
Important: It must be an official pawn from Capcom. Bring him to the Sphinx and you will receive 1,200 Rift Crystals as a reward.
Follow the road northeast from Rest Town to find the Riftstone.
Riddle of Persuasion
How do you solve the riddle? You are to give the Sphinx an item from your inventory. Don’t worry, you will not lose the item. On the contrary: The Sphinx will make a copy of it and return both to you.
Therefore, it is worth giving away a particularly rare item. For example, a Lazarus Stone, Waypoint Crystal, or Travel Stone. The copy of the item is also your reward for solving the riddle.
Rare items like Waypoint Crystals are suitable for copying.
Riddle of Contemplation
How do you solve the riddle? The next riddle could be tricky. The Sphinx wants you to return to where you found the first Seeker Medallion. Upon your return, you will find a Finder Medallion there. Bring it back to the Sphinx. However, you only have seven days to do this.
This riddle is difficult because probably very few will remember where they found the first medallion. There is also no way in the game to look up the locations of finds.
If you know the approximate area, you can at least scour all potential locations and hope that your first find is among them.
As a reward, you will receive three Travel Stones.
Hopefully, you still remember the location of your first find.
Find the Sphinx – Location 2
After the fifth riddle, the Sphinx changes its position. It flies away and can now be found at the Border Shrine. Walk from Rest Town there. It’s best to let yourself fall into the riverbed below by the bridge to the village.
Follow the path of the water, and sooner or later you will reach your destination. Watch out: You will encounter some tough enemies along the way.
However, you can also skip the hike to the shrine and jump onto its back as the Sphinx takes off, clinging on. This way, it will fly you to your destination comfortably. However, by doing this, you leave behind your portable Waypoint Crystal and the reward for the fifth riddle.
West of Rest Town, you will find the Border Shrine.
Tip: Set a Waypoint Crystal here as well.
Solve the Second 5 Sphinx Riddles
Riddle of Reunion
How do you solve the riddle? This isn’t really a riddle. It’s enough that you find the Sphinx again. Talk to her and you will immediately receive 100,000 Gold as a reward. Easy money.
The last four riddles are in random order.
New location, same mysterious creature.
Riddle of Competition
How do you solve the riddle? Here, the Sphinx resorts to unfair tricks. She wants you to defeat an easy enemy. However, at the start of the battle, the Ring of Mockery is equipped on you. This significantly lowers your character stats, leaving you with no chance against the enemy.
What you should do instead: Pick up the enemy and throw him into the abyss. As a reward, you will receive the Ring of Ambition (with this, you gain more EXP for defeating enemies).
Just throw him over your shoulder and down into the depths. (Screenshot via KhrazeGaming)
Riddle of Futility
How do you solve the riddle? This task is also tricky. The Sphinx requires you to bring a vase to Maurits. The problem is: The NPC is located in Bakbattahl, which is quite far away. Additionally, the vase is very fragile. If it breaks, the riddle fails.
You solve the task by not bringing the vase to Maurits, but rather bringing Maurits to the vase. Grab him and travel to your previously placed Waypoint Crystal at the Sphinx. As a reward, you will receive the Ring of Eternal Bond (which deepens the bond between giver and receiver).
You will find Maurits at this location in Bakbattahl. (Screenshot via TagBackTV)
Riddle of Distinction
How do you solve the riddle? The Sphinx shows you an NPC that you need to find in the game world. You either get to see Dante or Vergil (yes, this is a nod to Devil May Cry).
The two look almost identical. The only difference is their hair. While Dante has straight hair, Vergil’s is slightly wavy.
You find both in Rest Town. Just proceed as you did in the previous riddle, pick up the NPC, and bring him to the Sphinx. The reward is the weapon Wonderful Daydream, which can be used by the Illusionist class.
The sought-after character may look like this.
Before you solve the tenth and final riddle, you should switch to the Archer class. You will need a bow to make your life easier.
Riddle of Memory
How do you solve the riddle? The Sphinx wants to know how many of her riddles you have already solved. You should then bring her that many statues (located nearby) and place them in front of the altar. Simply count the open chests behind the Sphinx and include the first five solved riddles in your count.
This way, the riddle is solved and you will receive the Fate Arrow as a thank you.
How does the quest end? After you solve the tenth riddle, talk to the Sphinx again. She will then attempt to flee, leading to a fight against her.
The Sphinx is a strong opponent, with four health bars. The battle against her can therefore be lengthy unless you use the Fate Arrow that you just received.
As an Archer, you can shoot it and kill the Sphinx with a single shot. Once the eerie beast is lying on the ground, you will receive 27,000 EXP, 10,000 Gold, and the Key of Wisdom at the end of the quest.
The last one allows you to open the golden chest and loot the Eternal Lazarus Stone. This will allow you to resurrect multiple NPCs at once. It also helps with combating the Dragon Plague in the game.
Thus, you have completed the quest of the Sphinx and all its riddles. It is worth taking on the tasks, as some very rare items are hidden behind the rewards. The only problem is: The Sphinx is scary and will likely haunt you in your dreams. Good thing she is taken care of. You can find more guides on Dragon’s Dogma 2 on MeinMMO.
This is an AI-powered translation. Some inaccuracies might exist.
In Attack on Titan, the Titans behaved not like humans, but like emotionless beings. However, there were some Abnormals among the normal Titans that behaved differently than ordinary Titans. The mangaka of Attack on Titan revealed the nature of these Titans.
What abnormal Titans are there? By abnormal Titans, we mean the beings that do not belong to the Titan Shifters. They form their own category as they differ from normal Titans in their characteristics.
In OVA 1 and a special chapter of the manga, there appears a Titan that can speak. It is even possible for it to show emotions. Another Titan that could speak was Connie’s mother. She welcomed her son with “Welcome home”.
Rod Reiss transformed into an abnormal Titan that is twice the size of the Colossal Titan. He could only move by crawling on the ground.
In the Titan Forest, Eren and Ymir encountered a Titan that simply observed them. It made no attempts to attack them.
Additionally, there are several Titans that can jump several meters high. Normally, Titans do not have the strength to cover such long distances in one leap.
Other abnormal Titans that occur more frequently are those that run towards a specific group of humans while ignoring other living beings.
Especially the first Titan mentioned seemed almost like a real human. It could be that this represents a more advanced form of Titans that have progressed further in evolution. The mangaka Hajime Isayama, who is now working on another manga, clarified what mystery lies behind the abnormal Titans.
In the 1st season of Attack on Titan, some of the Titans can already be seen:
Start video
The trailer for the first season of Attack on Titan
Abnormal Titan is a defective product in Attack on Titan
What secret lies behind it? According to Isayama, the abnormal Titans are “glitches”. One could imagine it as a defective item that falls off the assembly line in a factory:
At the beginning, I was just starting to develop the idea of the Titans. There are normal Titans and there are abnormal Titans. Normal Titans were for me something like programmed beings, and some of them contained a “glitch”, something like a defective item from a factory. I didn’t think much more about this Titan while writing the story.
The probably strangest behavior was shown by the Titan from the OVA. He knelt down before Titan Hunter Ilse Langner, who was accidentally named after a German journalist. The Titan mistook Ilse for Ymir and seemed to belong to the cult that worshiped Ymir.
The Titan could not only speak individual words like “Lady Ymir”, but also show emotions. He began to cry when Ilse yelled at him. Ilse recorded her observations in a notebook that was found by Hanji Zoe.
But in the end, the nature of the Titans prevailed: Ilse was eaten by the abnormal Titan.
The next patch of World of Warcraft is almost here. Just a few more days until update 10.2.7.
In World of Warcraft, everyone is looking forward to next Wednesday, when the 4th and final season of WoW: Dragonflight begins. All dungeons will return one more time, and players will revisit the old raids, while simultaneously making outdoor content more rewarding.
But the next patch, update 10.2.7, is only a few days away. It starts in early May.
Start video
WoW: The War Within – All the major features of the new expansion
When will the patch be released? Patch 10.2.7 Dark Heart will be released on May 8, 2024, which is in just under 2 weeks. As usual, the patch will be available on the American realms a few hours earlier, on May 7.
What’s included in the patch? The patch brings several new quests that relate to the new elven city Bel’ameth, as well as Xal’atath, who will slowly but surely introduce the events of “The War Within”.
Additionally, Draenei and trolls finally get quest chains to unlock their traditional armors.
On top of that, there are a few minor improvements, such as new hair colors for humans from Kul Tiras, and quest chains from Dragonflight that previously required a certain level of fame are now available immediately.
Xal’atath will soon begin her deeds – first quests available in patch 10.2.7.
When will WoW Remix: Mists of Pandaria be released? Just over a week after the launch of patch 10.2.7, WoW Remix: Mists of Pandaria will also launch – starting on May 16, 2024. This is quite unusual, as it falls on a Thursday instead of the usual Wednesday following maintenance. The launch will happen simultaneously worldwide, so you can dive into the brief Pandaria variant at the same time as the rest of the global WoW player base.
What does this mean for The War Within? Even though the release of the last patch does not give a definitive indication of when the next expansion, The War Within, will arrive, it can be used as a reference point. Assuming Blizzard aims to release a new patch roughly every 8 to 12 weeks, and accounting for a little “buffer,” the pre-patch for The War Within, patch 11.0, should be released by the end of August. This would coincide with the end of WoW Remix: Mists of Pandaria – as the mode is expected to run until mid-August, according to data mining.
Are you looking forward to patch 10.2.7? Or would you rather wait for the release of The War Within?
Due to a legal dispute, Life is Feudal: MMO disappeared from Steam over three years ago. Now, the medieval MMORPG is making a comeback, and there are numerous negative reviews and accusations of rip-offs. We are breaking down the recent events for you.
The reason we put “free” in quotes is because the EA version of Life is Feudal: MMO is only free to play at first glance. In reality, LTG wants to charge you a monthly fee. The developers explain this in their early access FAQ as follows:
During the early access phase, the game will be available through a subscription model: This allows us to continuously add new features and content based on your valuable feedback! Even if we adjust the prices for the full version, we assure you that they will not be higher than the current price. We will inform you in a timely manner about any changes.
How is the community reacting to the subscription model? Life is Feudal: MMO currently sits at just 27 percent positive reviews after its comeback. This translates to “mostly negative” overall. Many buyers of the original version are outraged that they now have to pay a monthly subscription despite having already purchased the game.
Engelskrieger writes, for example: “I bought the game back then for 120 Euros. I certainly won’t be paying monthly just to play it again. Rip-off times three.”
The technical state of the game is also heavily criticized, particularly regarding bugs, server stability, and performance. Moreover, despite the long hiatus, nothing has reportedly improved since the shutdown over three years ago.
The old announcement trailer of Life is Feudal – MMO:
Start video
Life is Feudal: MMO – Announcement Trailer
What kind of game is Life is Feudal: MMO? The hardcore MMORPG throws you into a harsh, medieval world where realism is paramount, and you fight for survival. You can expect a sandbox where you can master trades, wage guild wars, and build entire settlements.
In addition to Life is Feudal: MMO, there are the two offshoots Life is Feudal: Forest Village (via Steam), a city simulation, and Life is Feudal: Your Own (via Steam). In the latter version, you can host your own servers to experience the hardcore sandbox gameplay with friends or strangers. Both games cost around 20 Euros each and generally have balanced reviews.
Why did Life is Feudal: MMO have to be shut down? The reason given by the responsible parties from the former developer Bitbox at the time was a legal dispute with the publisher that was supposed to distribute Life is Feudal: MMO. Since an agreement could not be reached, the studio received no more money, which ultimately led to the shutdown of the MMO version.