

Caro, editor of MeinMMO, has taken on a personal challenge: 6 months after painting a tabletop miniature for Dungeons & Dragons, she faced the same figure once again. The result surprised her.
If you read my article on getting started with the miniature hobby, you could see how I painted my D&D character back in December 2025 and documented it step by step. Here we are now, about half a year later, and I have since dealt with various techniques that I am (more or less) trying to incorporate into my workflow.
Alongside a full-time job, relationships, and other hobbies, I use any time I can find to practice, watch tutorials, and tackle my very light grey, unpainted “Pile of Shame.” Like many others who pursue creative hobbies, I sometimes look at my work and think: … am I making any progress? It looks somehow like the last miniature. And the last one looks like the one before it.

To fight against this inner struggle, I subjected myself to a self-test. I wanted to see exactly, have I improved? And if so, how?
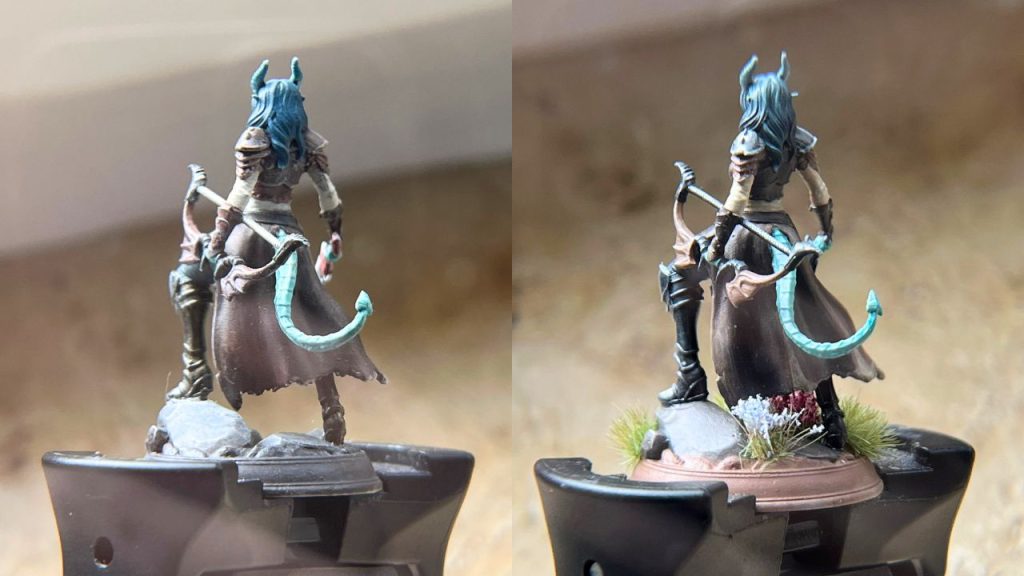
Done. I ordered the same miniature from my article again and painted it once more. Same character, same color scheme, but now with all the knowledge and skills I have acquired since the end of 2025.
Tiefling number 2 is finished … and here is what I can take from it and share with you.
A Tiefling, two miniatures: My result after 6 months
During the second attempt with the same miniature, I went about it exactly as I paint now. However, it wasn’t just the sensitivity and motor skills that differed (even though those two points are still relevant), but especially my equipment, the order of steps, and a better understanding of what makes a miniature look better overall.
In the end, I arrived at the following result, which I must admit I am quite proud of:
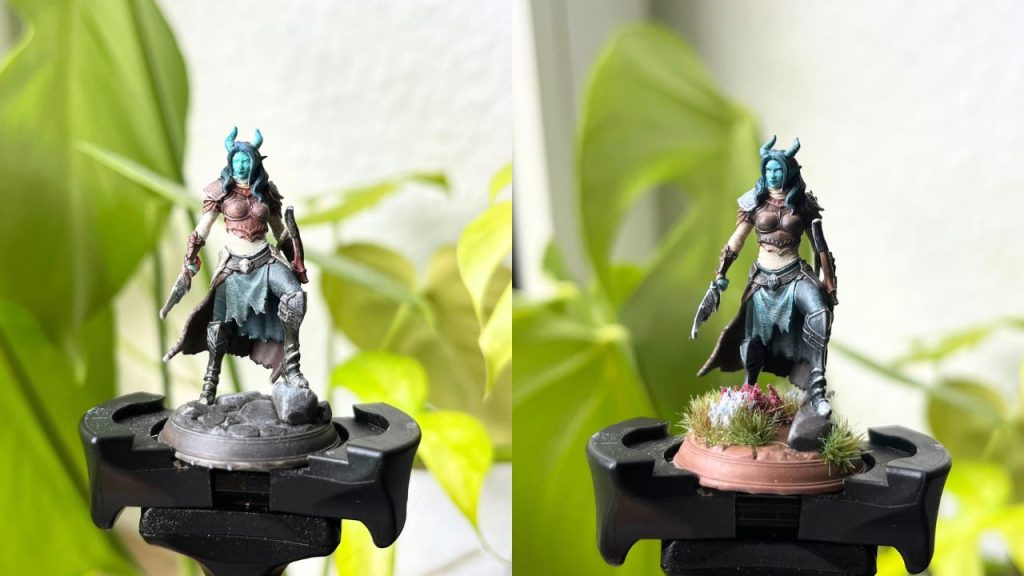
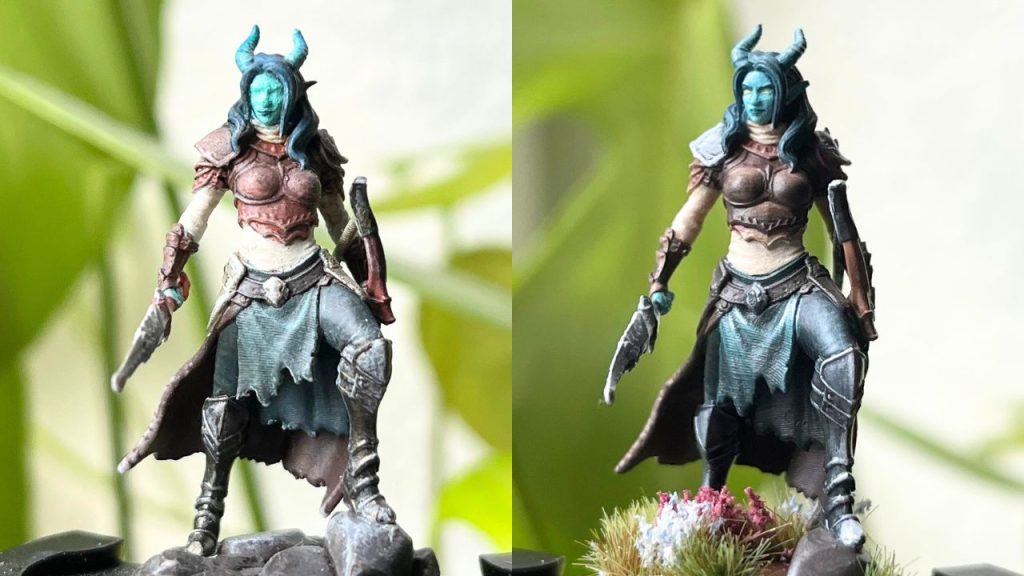
My D&D character looks not only more vibrant, but has more depth, cleaner strokes, and – as a victory over my inner demons – EYES! (Still without pupils, but EYES!)
I was actually surprised to recognize my own progress. It made me reflect on what changes I have made since the first version and how important it is to leave the comfort zone and try something that may seem difficult at first. Who would have thought that my miniatures would teach me an important life lesson.
What I have actually changed
So that you can get more out of this article than just witnessing my newfound self-confidence, I would like to explain what was responsible for the improvement:
- Diluted paints: What is especially noticeable on the face: I worked with too undiluted paint and too many layers. This caused me to lose all detail, making the face from December look more wallpapered than painted. The Wet Palette in particular did a great job, which I would really recommend to any miniature fan, whether bought or homemade.
- EYES: Yes, I faced my final boss and finally managed to give my miniature eyes. To achieve this, I mainly swapped the order. Earlier, I tried to paint the eye color over the skin afterward. But what is much easier is to start with the eye color, and then paint the skin tone over it. This way ugly edges can be smoothed out much more easily.
- Layering: Instead of drybrushing my miniature to death, I started focusing on hand-painting and creating brighter highlights. For this, I used a trick that I also presented in an article: I looked ahead to where more light and where more shadow would fall, and supported that artificially with stronger contrast. I painted light and shadow with heavily diluted paint to create a gradient that still “pops”. You shouldn’t be afraid that something might be too bright or too dark before the miniature is really finished.
- NMM (Non-Metallic-Metal): In my first version, I relied on my metallic paints for the armor parts, for which I still have a weakness because they are simply so shiny. In reality, these colors without the necessary light reflections resulted in silver or gold mush. Non-Metallic-Metal means creating a metallic effect solely through color, which relies mainly on placement, contrast, and a pinch of courage. In the future, I will certainly devote an article to this … when I get better at it.
- Brush hack: While I use various hobby brushes for most of my miniatures, I received a tip from a friend that was a huge benefit. Especially for the little details. It involves nail art brushes that are not only finer but also significantly cheaper than expected.
- Terrain: Since I first tested it, I have completely fallen in love with designing the bases of my miniatures. Especially with the tiny vegetation that can send my miniatures into a flower meadow. For this reason, I wanted to add some flowers and grasses under my Tiefling’s feet, which I think rounded out the miniature even more in my eyes.
I recommend the self-test to anyone who doubts their progress or to those who want to know which new tricks really work and which ones less so. It has helped me enormously and gave me new courage to try even more new techniques – even if they seem intimidating.
I declare here and now: The test will be repeated in the future!
To improve at painting miniatures, practice, practice, and more practice helps, but often the community of the hobby does as well. It is a truly open-minded community that is more than happy to share tips, provide feedback, and also produces remarkable works that are astounding: A miniature of ARC Raiders is so good that I simply had to ask the artist how they came up with it

Your opinion is important to us!
Do you like the article? Then let us know!