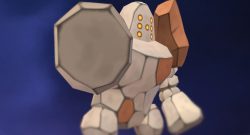
Do you want to challenge Mega Absol in Pokémon GO? We show you the best counters to take on the Pokémon in raids.
What kind of Pokémon is Mega Absol? Absol is a Pokémon that has been around since Generation 3. It is a Dark-type Pokémon and can undergo Mega Evolution.
When does Mega Absol come? On Sunday, March 23, 2025, there will be a raid day featuring Mega Absol. Here you will have the chance to complete many raids against the monster.
We will show you the best counters against Mega Absol and explain which types it has weaknesses against (type effectiveness).
Defeating Mega Absol in Raids – With These Counters
Mega Lucario with Aura Sphere and Power-Up Punch
Mega Scizor with Counter and X-Scissor
Terrakion with Double Kick and Sacred Sword
Lucario with Aura Sphere and Power-Up Punch
Mega Blaziken with Counter and Focus Blast
Shadow Machamp with Counter and Dynamic Punch
Keldeo with Low Kick and Sacred Sword
Mega Rayquaza with Air Slash and Hurricane
Mega Gardevoir with Charm and Dazzling Gleam
Shadow Machoke with Counter and Dynamic Punch
Mega Pinsir with Fury Cutter and X-Scissor
Shadow Hariyama with Aura Sphere and Dynamic Punch
Mega Scizor with Fury Cutter and X-Scissor
Shadow Machamp with Counter and Dynamic Punch
Tapu Koko with Quick Attack and Nature’s Wrath
Mega Beedrill with Bug Bite and X-Scissor
Mega Gallade with Low Kick and Close Combat
Mega Lopunny with Double Kick and Focus Blast
Shadow Pinsir with Fury Cutter and X-Scissor
Shadow Scizor with Fury Cutter and X-Scissor
Weaknesses of Mega Absol: Mega Absol is a Dark-type Pokémon. This makes it vulnerable to attacks from Fighting, Bug, and Fairy types.
So you should primarily rely on attacks from these types when challenging the Pokémon.
Is there a Shiny version of Mega Absol? Yes. If you’re lucky, you might also encounter the Shiny version of Absol. If you trigger the Mega Evolution for the Pokémon, you will receive the Shiny form of Mega Absol.
How many trainers are needed? If you have a high level and have very good counter Pokémon, you can defeat the Pokémon alone. To complete the battle more quickly or if you don’t have perfect counters, you should bring more trainers with you.
If you want to prepare your teams in advance and save time when joining the raid lobby, there is a good way to do so. Check out our tips for organizing raid teams to show up well-prepared for the raid.
This is an AI-powered translation. Some inaccuracies might exist.
Firestone is a rare material that you need for your equipment in Monster Hunter WildsMeinMMO explains where you can find and collect Firestone.
What is Firestone? Firestone is a material in Monster Hunter Wilds that is essential for crafting and upgrading your equipment.
You can obtain Firestone by looting the environment, completing quests, and from certain beasts. MeinMMO explains in this article how to best get your hands on this rare material.
Update from March 20, 2025: We have structurally adapted the post and brought it up to date.
Start video
Monster Hunter Wilds: 5 Tips for a Clean Fight
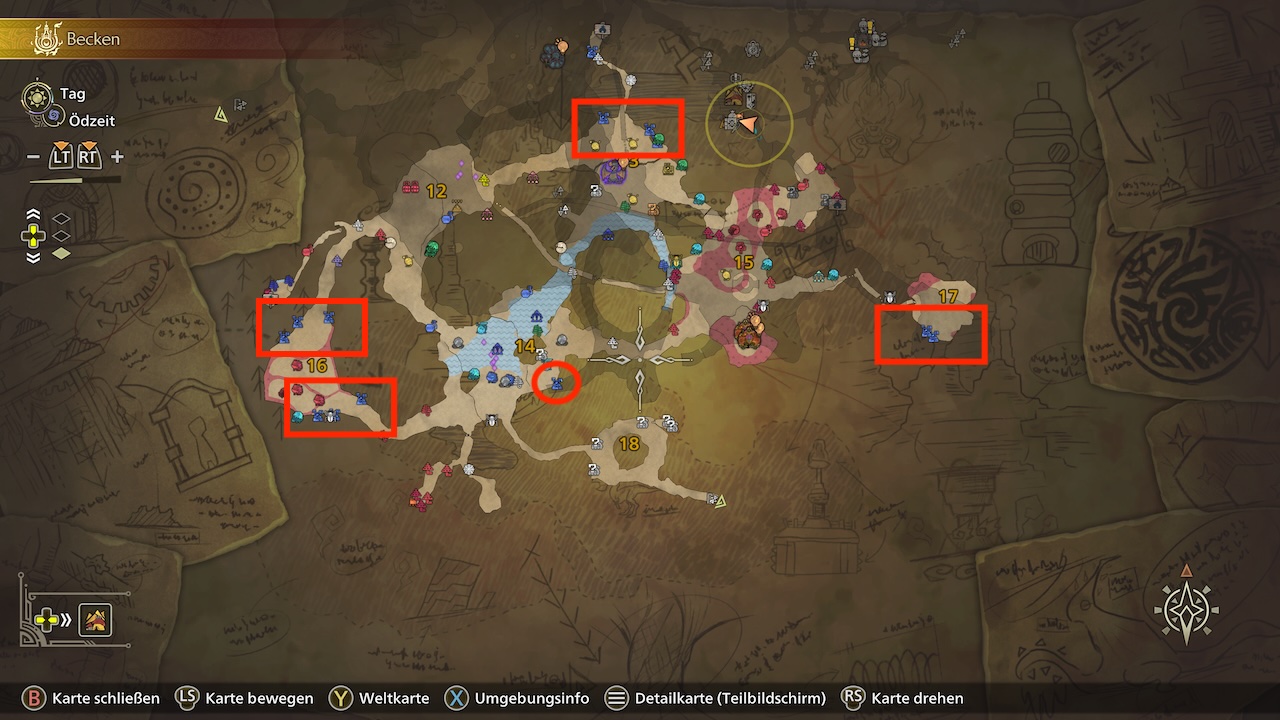
Monster Hunter Wilds: Best Locations for Firestone
These are the best locations: You can only find Firestone in the “Oil Springs Basin.” Below, we will list the best locations, organized by numbers on the map for your reference:
These are the best locations for Firestone
13: Four mining nodes when you walk east.
14: You will find a node west at the edge.
16: Two resource nodes: one west and one east of 16.
17: One resource node is located to the north.
Some also recommend the deposits near the Oil Springs Basin (numbers 4, 6, and 7). However, this area is guarded by the Nu Udra, also known as “The Black Flame.” You can read how to find the Black Flame for a quest on MeinMMO.
How to Mine Firestone: You do not need any tools to mine the ores, as your hunter automatically carries a pickaxe.
You simply approach the resource node and press the button displayed, and you will start mining Firestone with your pickaxe. You can collect up to 3 resources from each mining node. If you are playing in multiplayer, the yield may also be slightly larger.
The resource points will reappear after a while, so be patient if you have searched all points.
Monster Hunter Wilds will soon launch on PC, Xbox, and PS5. Everyone approaches games differently, and we like to play with guides. If you share a similar approach, you can find here a collection of all important guides for Monster Hunter Wilds on MeinMMO: Monster Hunter Wilds: All guides, beginner tips, and information at a glance
This is an AI-powered translation. Some inaccuracies might exist.
In Elden Ring there are over 160 bosses, most of which are purely optional. To help you keep track and always be well prepared, we list here an optimal boss order.
Update from April 6, 2026:The post has been reviewed and is up to date.
We divide our order into level segments and tell you which regions you should visit in these level areas. In doing so, we list the most important bosses and reveal to you the best order to defeat them.
We separate the bosses into enemies that are necessary for progress and optional bosses that you should defeat for quest progress, good loot, or achievements.
[toc]
The perfect counterpart for this article is our regions guide in which we tell you which regions you should visit in what order and what level your character and weapons should have:
In 2 minutes we will tell you everything you need to know about Elden Ring:
Start video
Everything you need to know about Elden Ring – in 2 minutes
Elden Ring: Boss Order forLevel 1 – 20
For the first 20 levels, you should not engage major bosses yet. Instead, you should try to level up yourself and your weapons before attempting to enter Stormveil Castle.
Therefore, we do not recommend any main bosses here, but rather the following small interim steps to start:
Free exploration of Limgrave
Recommended dungeon bosses:
Half-human Ruler (Coastal Cave)
Stonegrave Troll (Tunnel of Limgrave)
Beastman of Farum Azula (Hazel Cave)
Patches (Muddy Flow Catacombs)
Gravekeeper Duelist (Muddy Flow Cave)
Guardian Golem (Highroad Cave)
Recommended open-world bosses:
Tibia Mariner
Even if you see the Tree Sentinel right at the beginning – avoid engaging him before around level 30. The same goes for the dragon Agheel.
Here you can find all of our other tips bundled if you need more help to start:
From level 20, you can slowly start to face the real bosses. If Margit is still too hard for you, it’s worth taking a look at the Peninsula of Tears, all the way in the south of the map. Also, a quick detour to Caelid for the powerful Moonveil katana can help.
By now, you should be strong enough and have understood the game mechanics well enough to assess the bosses in dungeons and the open world on your own. Therefore, from this point on, we only recommend the most important bosses for story progress and loot.
The next region is Liurnia, the Lake Region with the sub-regions of Academy of Raya Lucaria and Caria Manor. Again, we recommend only the most notable bosses, although you can kill any number of other bosses in dungeons and the open world.
Recommended main bosses:
Red Wolf Radagon (Academy of Raya Lucaria)
Rennala, Queen of the Full Moon (Academy of Raya Lucaria)
Other important bosses:
Royal Knight Loretta (Caria Manor)
Tree Sentinel (In the open world of Limgrave)
Tree Avatar (Lower Erd Tree)
Elden Ring: Boss Order forLevel 60 – 70
Now it’s time to go to Caelid and the underground of the Lands Between with Ainsel and Siofra.
Recommended main bosses:
Starscourge Radahn (Caelid – Redmane Castle)
Other important bosses:
Ancestor Spirit (Siofra)
Commander O’Neil (Open World of Caelid)
Nox Swordstress and Nox Monk (Caelid – Sellia, City of Sorcery)
Putrid Tree Spirit (Caelid – Catacombs of the War Victims)
Elden Ring: Boss Order forLevel 70 – 100
Between levels 70 and 100, the game is most open. Here, the Altus Plateau, the Eternal Cities of Nokron and Nokstella, the Rotting Lake, the Depths of the Deep Roots, Gelmir, and Mt. Gelmir are recommended.
Recommended main bosses:
Magma Wyrm Makar (Liurnia – Cliffside Ruins)
Paragon of the Gods (Gelmir – Mt. Gelmir)
Rykard, Lord of Blasphemy (Gelmir – Mt. Gelmir)
Other important bosses:
Imitator’s Tear (Nokron, the Eternal City)
Royal Ancestor Spirit (Nokron, the Eternal City)
Astel, Naturalborn of the Abyss (Great Crossroad, beyond the Rotting Lake)
Ancient Dragon Lansseax (Open World in Altus Plateau)
Godefroy, the Grafted (Altus Plateau – Seal Cage of the Golden Tree)
Elemer of the Boughs (Altus Plateau – Shadow Castle)
Fia’s Champions (Depths of the Deep Roots)
Lich Dragon Fortissax (Depths of the Deep Roots)
Elden Ring: Boss Order forLevel 100 – 120
From level 100, the transition to endgame begins slowly. You will enter the capital Leyndell and its Underground Reserve of Shame. Then to the Mountaintops of the Giants and the Consecrated Snowfield.
Recommended main bosses:
Dragon Tree Sentinel (Altus Plateau, before the side entrance to the capital)
Godfrey, First Elden Lord (Leyndell, Royal Capital)
Morgott, King of Omens (Leyndell, Royal Capital)
Fire Giant (Mountaintops of the Giants)
Other important bosses:
Mohg, the Omen (Underground Reserve of Shame)
Elden Ring: Boss Order fromLevel 120
From level 120, you are fully in the endgame. Now you will face the last bosses of the game as well as other optional main bosses in the locations Mohgwyn Palace, Miquella’s Haligtree, Elphael, the Fallen Farum Azula, and the Ashen Capital.
Recommended main bosses:
Duo of the Gods (Fallen Farum Azula)
Beast Clergyman / Maliketh, the Black Blade (Fallen Farum Azula)
Gideon Ofnir, the All-Knowing (Leyndell, Ashen Capital)
Godfrey, First Elden Lord / Hoarah Loux, the Warrior (Leyndell, Ashen Capital)
Radagon of the Golden Order / Elden Beast (Leyndell, Ashen Capital)
Other important bosses:
Mohg, Lord of Blood (Mohgwyn Palace)
Dragonlord Placidusax (Fallen Farum Azula)
Loretta, Knight of the Haligtree (Miquella’s Haligtree)
Malenia, Blade of Miquella / Malenia, Goddess of Rot (Elphael, Root of the Haligtree)
Did this boss order help you? Which enemy did you feel the most under-leveled against? Which bosses were you too strong for? Let us know in the comments.
If you want to play the best class, you should choose the Vagabond. Due to its even attribute distribution, it has the best prerequisites to build any type of build. We will now explain why our points were allocated as follows.
Strength: 50
The soft cap is 40. Therefore, we agreed on 50, as we need to endure more in the Blood Build due to the risky attacks.
Mind: 15
Mind is only important for this build in order to cast our wonders and war ashes.
Endurance: 25
The soft cap for equipment load is 25. We don’t want to go into battle naked, and with this amount, we can wear armor with good balance while still wielding weapons.
Strength: 70
With 70 points, you are above the second soft cap (55 points) and can deal a bit more damage. Important for wielding weapons that have a high strength scaling.
Dexterity: 15(20 points from the “Millicent’s Prosthesis” talisman)
Dexterity is set at 15 points to wield the Gargoyle Double Blade.
Wisdom: 9
Not relevant for the build.
Faith: 25
With 25 points in Faith, you can use two important summons that buff you: Flame, Give Me Strength! and Golden Oath. Both are worth it for our build to deal even more damage.
Arcane: 20
Arcane is at 20 points to reach the first soft cap and trigger bleed faster.
If you also want to play PvP in the long term, try to keep your character below level 150. In the community, the meta-level has settled around 125 – 150.
Because you will only encounter players with a similar level to yours in PvP, you will have a hard time finding opponents at a higher level. Since you need to reallocate all “purchased” levels when you respec, you cannot reduce this investment again – the only solution is to create a whole new character.
This Equipment Makes the Bleed Build Really Powerful
Which equipment does the build use? To make the build even stronger, you need to wear the following weapons, talismans, and armor:
Right-hand weapon 1: Gargoyle Double Blade +25
Affinity: Blood
War Ash: Rock Blade
Left-hand weapon 1: Gargoyle Double Blade +25
Affinity: Blood
War Ash: Rock Blade
Left-hand weapon 2: Finger Seal (for summons)
Head armor: White Mask
Chest armor: Black Bird Feather
Talisman 1: Claw Talisman
Talisman 2: Rotting Winged Sword Insignia
Talisman 3: Blood’s Favor
Talisman 4: Millicent’s Prosthesis
We will now go into detail about our choice of weapons and equipment and explain why we chose them.
Overview of Weapons
Which weapons do I need? In a Bleed Build, one would expect either daggers, curved swords, or katanas, but double blades are unusual. This is understandable, but we utilize them for this build for a good reason: because of the jump attack.
When wielding two double blades in hand, you can land up to 6 hits with the light jump attack – if you have practiced the attack. For a Bleed Build, this is optimal because your status effect, in this case “bleed,” is activated faster the more hits you land.
You can find the Gargoyle Double Blades at the Gargoyle boss in the Siofra Aqueduct
To maximize our damage, we chose the Gargoyle Double Blades. They have the highest damage when equipped with a bloody affinity and additionally adorned with the war ash: Rock Blade.
The war ash is essential because it increases your damage by 15% and damages your opponent’s posture by 10%. It’s important that both of your weapons have the same war ashes and affinities.
Locations of Weapons and War Ashes:
Gargoyle Double Blade
Location: In the Siofra Aqueduct. Defeat the two gargoyles to receive the weapon after the battle
War Ash: Rock Blade
Location: At a scarab in Caelid, west of the grace “Impassable Great Bridge”
Overview of Talismans
Which talismans do I need? This Bleed Build has a special tactic for how to attack. To benefit from this, we have selected the following talismans:
These are the talismans you need for the Bleed Build
Claw Talisman
Effect: Increases the damage of your jump attacks by 15%.
Location: You can find it in Stormveil Castle on the rooftops. Use the grace “Wall Tower” and jump north-west to the far-off roof. Try to find your way up until you find a ladder. You will find the talisman on a corpse at the highest point of the tower.
Rotting Winged Sword Insignia
Effect: Significantly increases the strength of your attack series. Has three tiers, which increase your attacks’ damage by 6%, 8%, and 13% depending on intensity.
Location: You receive it after helping Millicent in her battle against her sisters.
Blood’s Favor
Effect: Increases your damage by 20% for 20 seconds if someone nearby has suffered blood loss.
Location: You can find it in the underground reservoir of shame beneath Leyndell. Defeat the enemy “Esgar, Priest of Blood” to obtain it.
Millicent’s Prosthesis
Effect: Increases your Dexterity by 5 points. Increases the strength of your attack series. Has three tiers, which increase your attacks’ damage by 4%, 6%, and 11% depending on intensity.
Location: Defeat Millicent during her quest after receiving the Golden Prosthesis.
Why these talismans? This Bleed Build is all about fast attacks and bleeding. Since we attack while jumping, the Claw Talisman is perfectly suited. With the Sword Insignia and the Prosthesis, we increase our damage through the attack series generated by our six hits from the jump attack.
Blood’s Favor is there to give us a significant damage buff when our opponent starts to bleed. These are many buffs from our talismans alone, but we can go even further with our armor.
Overview of Armors
Which armors do I need? To further increase our damage, there are two armor pieces that fit perfectly:
White Mask Black Bird Feather
White Mask
Effect: Increases your damage by 10% for 20 seconds if someone nearby has suffered blood loss.
Location: Defeat one of the field surgeons who haunt you as intruders near the Mohgwyn Palace.
Black Bird Feather
Effect: Increases the damage of your jump attacks by 10%.
Location: Located southeast of Mt. Gelmir in the cave of the sage behind an illusory wall.
Why these armors? Both items fit perfectly into the synergies of the talismans and the gameplay style of jump attacks, ensuring that your damage is further increased.
Important Items for Optimizing the Bleed Build
What else can I use? To further increase damage, it’s advisable to consume various buffs and items to become even stronger. The following are recommended:
Summon: Golden Oath
Summon: Flame, Give Me Strength!
Flask of Wondrous Physick
Strength-knot Crystal Tear
Blood-boiled Aroma
Now we will briefly explain how to play the build.
What do I need to do? Before each fight, buff yourself first with your two summons. After buffing, drink a Flask of Heavens Tear and use your left double blade in both hands.
Now buff this weapon with your Rock Blade talent. Then take both weapons in each hand again and buff your right double blade with Rock Blade. Finally, you can consume your items like Blood-boiled Aroma, Cooked Crab, or Flask of Wondrous Physick.
Enter the fight and always try to perform a light jump attack when attacking.
Once you reach the first blood loss, your damage numbers will soar towards 10,000 points – and beyond. It’s just a matter of time until the boss or enemy is processed into a red puddle. However, be mindful of your stamina during attacks, otherwise, you may not be able to evade in an emergency.
What do I do against bosses that are immune to bleeding? The only weakness of the build is the fact that you cannot generate bleed against opponents that do not have flesh. For this reason, you should swap out your “Blood’s Favor” talisman and replace it with the “Ritual Shield Talisman”. This way, you at least deal more damage without the bleeding effect.
That was all the important information about the build. Do you also enjoy playing with bleed or do you prefer other affinities like poison? Let us know in the comments how you found this build. You can find all our guides here: Elden Ring: All Guides, Beginner Tips, and Builds in Overview
If you want to play the best class, you should choose the Vagabond. Due to its even attribute distribution, it has the best prerequisites to build any type of build. We will now explain why our points were allocated as follows.
Strength: 50
The soft cap is 40. Therefore, we agreed on 50, as we need to endure more in the Blood Build due to the risky attacks.
Mind: 15
Mind is only important for this build in order to cast our wonders and war ashes.
Endurance: 25
The soft cap for equipment load is 25. We don’t want to go into battle naked, and with this amount, we can wear armor with good balance while still wielding weapons.
Strength: 70
With 70 points, you are above the second soft cap (55 points) and can deal a bit more damage. Important for wielding weapons that have a high strength scaling.
Dexterity: 15(20 points from the “Millicent’s Prosthesis” talisman)
Dexterity is set at 15 points to wield the Gargoyle Double Blade.
Wisdom: 9
Not relevant for the build.
Faith: 25
With 25 points in Faith, you can use two important summons that buff you: Flame, Give Me Strength! and Golden Oath. Both are worth it for our build to deal even more damage.
Arcane: 20
Arcane is at 20 points to reach the first soft cap and trigger bleed faster.
If you also want to play PvP in the long term, try to keep your character below level 150. In the community, the meta-level has settled around 125 – 150.
Because you will only encounter players with a similar level to yours in PvP, you will have a hard time finding opponents at a higher level. Since you need to reallocate all “purchased” levels when you respec, you cannot reduce this investment again – the only solution is to create a whole new character.
This Equipment Makes the Bleed Build Really Powerful
Which equipment does the build use? To make the build even stronger, you need to wear the following weapons, talismans, and armor:
Right-hand weapon 1: Gargoyle Double Blade +25
Affinity: Blood
War Ash: Rock Blade
Left-hand weapon 1: Gargoyle Double Blade +25
Affinity: Blood
War Ash: Rock Blade
Left-hand weapon 2: Finger Seal (for summons)
Head armor: White Mask
Chest armor: Black Bird Feather
Talisman 1: Claw Talisman
Talisman 2: Rotting Winged Sword Insignia
Talisman 3: Blood’s Favor
Talisman 4: Millicent’s Prosthesis
We will now go into detail about our choice of weapons and equipment and explain why we chose them.
Overview of Weapons
Which weapons do I need? In a Bleed Build, one would expect either daggers, curved swords, or katanas, but double blades are unusual. This is understandable, but we utilize them for this build for a good reason: because of the jump attack.
When wielding two double blades in hand, you can land up to 6 hits with the light jump attack – if you have practiced the attack. For a Bleed Build, this is optimal because your status effect, in this case “bleed,” is activated faster the more hits you land.
You can find the Gargoyle Double Blades at the Gargoyle boss in the Siofra Aqueduct
To maximize our damage, we chose the Gargoyle Double Blades. They have the highest damage when equipped with a bloody affinity and additionally adorned with the war ash: Rock Blade.
The war ash is essential because it increases your damage by 15% and damages your opponent’s posture by 10%. It’s important that both of your weapons have the same war ashes and affinities.
Locations of Weapons and War Ashes:
Gargoyle Double Blade
Location: In the Siofra Aqueduct. Defeat the two gargoyles to receive the weapon after the battle
War Ash: Rock Blade
Location: At a scarab in Caelid, west of the grace “Impassable Great Bridge”
Overview of Talismans
Which talismans do I need? This Bleed Build has a special tactic for how to attack. To benefit from this, we have selected the following talismans:
These are the talismans you need for the Bleed Build
Claw Talisman
Effect: Increases the damage of your jump attacks by 15%.
Location: You can find it in Stormveil Castle on the rooftops. Use the grace “Wall Tower” and jump north-west to the far-off roof. Try to find your way up until you find a ladder. You will find the talisman on a corpse at the highest point of the tower.
Rotting Winged Sword Insignia
Effect: Significantly increases the strength of your attack series. Has three tiers, which increase your attacks’ damage by 6%, 8%, and 13% depending on intensity.
Location: You receive it after helping Millicent in her battle against her sisters.
Blood’s Favor
Effect: Increases your damage by 20% for 20 seconds if someone nearby has suffered blood loss.
Location: You can find it in the underground reservoir of shame beneath Leyndell. Defeat the enemy “Esgar, Priest of Blood” to obtain it.
Millicent’s Prosthesis
Effect: Increases your Dexterity by 5 points. Increases the strength of your attack series. Has three tiers, which increase your attacks’ damage by 4%, 6%, and 11% depending on intensity.
Location: Defeat Millicent during her quest after receiving the Golden Prosthesis.
Why these talismans? This Bleed Build is all about fast attacks and bleeding. Since we attack while jumping, the Claw Talisman is perfectly suited. With the Sword Insignia and the Prosthesis, we increase our damage through the attack series generated by our six hits from the jump attack.
Blood’s Favor is there to give us a significant damage buff when our opponent starts to bleed. These are many buffs from our talismans alone, but we can go even further with our armor.
Overview of Armors
Which armors do I need? To further increase our damage, there are two armor pieces that fit perfectly:
White Mask Black Bird Feather
White Mask
Effect: Increases your damage by 10% for 20 seconds if someone nearby has suffered blood loss.
Location: Defeat one of the field surgeons who haunt you as intruders near the Mohgwyn Palace.
Black Bird Feather
Effect: Increases the damage of your jump attacks by 10%.
Location: Located southeast of Mt. Gelmir in the cave of the sage behind an illusory wall.
Why these armors? Both items fit perfectly into the synergies of the talismans and the gameplay style of jump attacks, ensuring that your damage is further increased.
Important Items for Optimizing the Bleed Build
What else can I use? To further increase damage, it’s advisable to consume various buffs and items to become even stronger. The following are recommended:
Summon: Golden Oath
Summon: Flame, Give Me Strength!
Flask of Wondrous Physick
Strength-knot Crystal Tear
Blood-boiled Aroma
Now we will briefly explain how to play the build.
How to Play the Bleed Build Correctly
What do I need to do? Before each fight, buff yourself first with your two summons. After buffing, drink a Flask of Heavens Tear and use your left double blade in both hands.
Now buff this weapon with your Rock Blade talent. Then take both weapons in each hand again and buff your right double blade with Rock Blade. Finally, you can consume your items like Blood-boiled Aroma, Cooked Crab, or Flask of Wondrous Physick.
Enter the fight and always try to perform a light jump attack when attacking.
Once you reach the first blood loss, your damage numbers will soar towards 10,000 points – and beyond. It’s just a matter of time until the boss or enemy is processed into a red puddle. However, be mindful of your stamina during attacks, otherwise, you may not be able to evade in an emergency.
What do I do against bosses that are immune to bleeding? The only weakness of the build is the fact that you cannot generate bleed against opponents that do not have flesh. For this reason, you should swap out your “Blood’s Favor” talisman and replace it with the “Ritual Shield Talisman”. This way, you at least deal more damage without the bleeding effect.
That was all the important information about the build. Do you also enjoy playing with bleed or do you prefer other affinities like poison? Let us know in the comments how you found this build. You can find all our guides here: Elden Ring: All Guides, Beginner Tips, and Builds in Overview
Bleed Builds have always been considered powerful options for taking down bosses in Elden Ring in seconds. They cut through health bars and deal massive damage. You can find out what the currently best Bleed Build looks like and which items and attributes you need here.
Update from January 27, 2026: We have reviewed the Bleed Build and made slight structural adjustments.
For a Bleed Build to be truly effective, various factors come into play: Do you have enough buffs? Which weapons are you using? Does the gear synergize with the build you’ve created? Many questions that can be overwhelming at first, but we’ve sat down and figured out what makes the best Bleed Build truly powerful.
In our research, we came across a build so powerful that you can easily obliterate bosses in the new DLC for Elden Ring. What you need for it will be explained here in detail. If you want to jump to the individual parts of our guide, you can use our directory for that.
[toc]
Attributes You Need for the Bleed Build in Elden Ring
Why is this late-game build so strong? This build focuses primarily on strength because we’re using a weapon combination that perfectly harmonizes with the bleed status effect. It involves the weapon class of double blades.
Points are also allocated to Faith and Arcane to activate bleed faster and buff our hero with summons. This creates a deadly combination, but that’s not all.
What is bleed damage and why is it so good?
Weapons like Bloody Streams cause passive blood loss with each attack. If you hit an opponent often enough within a certain timeframe, the opponent will immediately suffer massive bleed damage. You can recognize successful bleed damage not only by the opponent suddenly losing a large portion of their health but also by a big splatter of blood.
How many hits you need and how long that timeframe is depends on the specific opponent’s resistances. Most enemies in the game, even the largest and hardest bosses, can suffer bleed damage.
Items from the late game also come into play, driving the damage to the max. The build uses the strongest double blades, as well as talismans and armor that buff you with every instance of bleed damage.
This build thus relies on a storm of incredibly fast attacks and a constant back and forth between the powerful bleed damage and the resulting DPS boosts.
How do I level up best for this build?As with our overall best build, we recommend the necessary attribute points to get the most out of your build. Here, too, we pay attention to the “soft caps” to avoid leveling any stat beyond its value.
Note that this is a Level 150 build. You can reallocate your attributes with respec if you want to try the build.
Attributes for a hero at level 150 (Vagabond)
Claw Talisman
Effect: Increases the damage of your jump attacks by 15%.
Location: You can find it in Stormveil Castle on the rooftops. Use the grace “Wall Tower” and jump north-west to the far-off roof. Try to find your way up until you find a ladder. You will find the talisman on a corpse at the highest point of the tower.
Rotting Winged Sword Insignia
Effect: Significantly increases the strength of your attack series. Has three tiers, which increase your attacks’ damage by 6%, 8%, and 13% depending on intensity.
Location: You receive it after helping Millicent in her battle against her sisters.
Blood’s Favor
Effect: Increases your damage by 20% for 20 seconds if someone nearby has suffered blood loss.
Location: You can find it in the underground reservoir of shame beneath Leyndell. Defeat the enemy “Esgar, Priest of Blood” to obtain it.
Millicent’s Prosthesis
Effect: Increases your Dexterity by 5 points. Increases the strength of your attack series. Has three tiers, which increase your attacks’ damage by 4%, 6%, and 11% depending on intensity.
Location: Defeat Millicent during her quest after receiving the Golden Prosthesis.
Why these talismans? This Bleed Build is all about fast attacks and bleeding. Since we attack while jumping, the Claw Talisman is perfectly suited. With the Sword Insignia and the Prosthesis, we increase our damage through the attack series generated by our six hits from the jump attack.
Blood’s Favor is there to give us a significant damage buff when our opponent starts to bleed. These are many buffs from our talismans alone, but we can go even further with our armor.
Overview of Armors
Which armors do I need? To further increase our damage, there are two armor pieces that fit perfectly:
White Mask Black Bird Feather
White Mask
Effect: Increases your damage by 10% for 20 seconds if someone nearby has suffered blood loss.
Location: Defeat one of the field surgeons who haunt you as intruders near the Mohgwyn Palace.
Black Bird Feather
Effect: Increases the damage of your jump attacks by 10%.
Location: Located southeast of Mt. Gelmir in the cave of the sage behind an illusory wall.
Why these armors? Both items fit perfectly into the synergies of the talismans and the gameplay style of jump attacks, ensuring that your damage is further increased.
Important Items for Optimizing the Bleed Build
What else can I use? To further increase damage, it’s advisable to consume various buffs and items to become even stronger. The following are recommended:
Summon: Golden Oath
Summon: Flame, Give Me Strength!
Flask of Wondrous Physick
Strength-knot Crystal Tear
Blood-boiled Aroma
Now we will briefly explain how to play the build.
How to Play the Bleed Build Correctly
What do I need to do? Before each fight, buff yourself first with your two summons. After buffing, drink a Flask of Heavens Tear and use your left double blade in both hands.
Now buff this weapon with your Rock Blade talent. Then take both weapons in each hand again and buff your right double blade with Rock Blade. Finally, you can consume your items like Blood-boiled Aroma, Cooked Crab, or Flask of Wondrous Physick.
Enter the fight and always try to perform a light jump attack when attacking.
Once you reach the first blood loss, your damage numbers will soar towards 10,000 points – and beyond. It’s just a matter of time until the boss or enemy is processed into a red puddle. However, be mindful of your stamina during attacks, otherwise, you may not be able to evade in an emergency.
What do I do against bosses that are immune to bleeding? The only weakness of the build is the fact that you cannot generate bleed against opponents that do not have flesh. For this reason, you should swap out your “Blood’s Favor” talisman and replace it with the “Ritual Shield Talisman”. This way, you at least deal more damage without the bleeding effect.
That was all the important information about the build. Do you also enjoy playing with bleed or do you prefer other affinities like poison? Let us know in the comments how you found this build. You can find all our guides here: Elden Ring: All Guides, Beginner Tips, and Builds in Overview
If you want to play the best class, you should choose the Vagabond. Due to its even attribute distribution, it has the best prerequisites to build any type of build. We will now explain why our points were allocated as follows.
Strength: 50
The soft cap is 40. Therefore, we agreed on 50, as we need to endure more in the Blood Build due to the risky attacks.
Mind: 15
Mind is only important for this build in order to cast our wonders and war ashes.
Endurance: 25
The soft cap for equipment load is 25. We don’t want to go into battle naked, and with this amount, we can wear armor with good balance while still wielding weapons.
Strength: 70
With 70 points, you are above the second soft cap (55 points) and can deal a bit more damage. Important for wielding weapons that have a high strength scaling.
Dexterity: 15(20 points from the “Millicent’s Prosthesis” talisman)
Dexterity is set at 15 points to wield the Gargoyle Double Blade.
Wisdom: 9
Not relevant for the build.
Faith: 25
With 25 points in Faith, you can use two important summons that buff you: Flame, Give Me Strength! and Golden Oath. Both are worth it for our build to deal even more damage.
Arcane: 20
Arcane is at 20 points to reach the first soft cap and trigger bleed faster.
If you also want to play PvP in the long term, try to keep your character below level 150. In the community, the meta-level has settled around 125 – 150.
Because you will only encounter players with a similar level to yours in PvP, you will have a hard time finding opponents at a higher level. Since you need to reallocate all “purchased” levels when you respec, you cannot reduce this investment again – the only solution is to create a whole new character.
This Equipment Makes the Bleed Build Really Powerful
Which equipment does the build use? To make the build even stronger, you need to wear the following weapons, talismans, and armor:
Right-hand weapon 1: Gargoyle Double Blade +25
Affinity: Blood
War Ash: Rock Blade
Left-hand weapon 1: Gargoyle Double Blade +25
Affinity: Blood
War Ash: Rock Blade
Left-hand weapon 2: Finger Seal (for summons)
Head armor: White Mask
Chest armor: Black Bird Feather
Talisman 1: Claw Talisman
Talisman 2: Rotting Winged Sword Insignia
Talisman 3: Blood’s Favor
Talisman 4: Millicent’s Prosthesis
We will now go into detail about our choice of weapons and equipment and explain why we chose them.
Overview of Weapons
Which weapons do I need? In a Bleed Build, one would expect either daggers, curved swords, or katanas, but double blades are unusual. This is understandable, but we utilize them for this build for a good reason: because of the jump attack.
When wielding two double blades in hand, you can land up to 6 hits with the light jump attack – if you have practiced the attack. For a Bleed Build, this is optimal because your status effect, in this case “bleed,” is activated faster the more hits you land.
You can find the Gargoyle Double Blades at the Gargoyle boss in the Siofra Aqueduct
To maximize our damage, we chose the Gargoyle Double Blades. They have the highest damage when equipped with a bloody affinity and additionally adorned with the war ash: Rock Blade.
The war ash is essential because it increases your damage by 15% and damages your opponent’s posture by 10%. It’s important that both of your weapons have the same war ashes and affinities.
Locations of Weapons and War Ashes:
Gargoyle Double Blade
Location: In the Siofra Aqueduct. Defeat the two gargoyles to receive the weapon after the battle
War Ash: Rock Blade
Location: At a scarab in Caelid, west of the grace “Impassable Great Bridge”
Overview of Talismans
Which talismans do I need? This Bleed Build has a special tactic for how to attack. To benefit from this, we have selected the following talismans:
These are the talismans you need for the Bleed Build
Claw Talisman
Effect: Increases the damage of your jump attacks by 15%.
Location: You can find it in Stormveil Castle on the rooftops. Use the grace “Wall Tower” and jump north-west to the far-off roof. Try to find your way up until you find a ladder. You will find the talisman on a corpse at the highest point of the tower.
Rotting Winged Sword Insignia
Effect: Significantly increases the strength of your attack series. Has three tiers, which increase your attacks’ damage by 6%, 8%, and 13% depending on intensity.
Location: You receive it after helping Millicent in her battle against her sisters.
Blood’s Favor
Effect: Increases your damage by 20% for 20 seconds if someone nearby has suffered blood loss.
Location: You can find it in the underground reservoir of shame beneath Leyndell. Defeat the enemy “Esgar, Priest of Blood” to obtain it.
Millicent’s Prosthesis
Effect: Increases your Dexterity by 5 points. Increases the strength of your attack series. Has three tiers, which increase your attacks’ damage by 4%, 6%, and 11% depending on intensity.
Location: Defeat Millicent during her quest after receiving the Golden Prosthesis.
Why these talismans? This Bleed Build is all about fast attacks and bleeding. Since we attack while jumping, the Claw Talisman is perfectly suited. With the Sword Insignia and the Prosthesis, we increase our damage through the attack series generated by our six hits from the jump attack.
Blood’s Favor is there to give us a significant damage buff when our opponent starts to bleed. These are many buffs from our talismans alone, but we can go even further with our armor.
Overview of Armors
Which armors do I need? To further increase our damage, there are two armor pieces that fit perfectly:
White Mask Black Bird Feather
White Mask
Effect: Increases your damage by 10% for 20 seconds if someone nearby has suffered blood loss.
Location: Defeat one of the field surgeons who haunt you as intruders near the Mohgwyn Palace.
Black Bird Feather
Effect: Increases the damage of your jump attacks by 10%.
Location: Located southeast of Mt. Gelmir in the cave of the sage behind an illusory wall.
Why these armors? Both items fit perfectly into the synergies of the talismans and the gameplay style of jump attacks, ensuring that your damage is further increased.
Important Items for Optimizing the Bleed Build
What else can I use? To further increase damage, it’s advisable to consume various buffs and items to become even stronger. The following are recommended:
Summon: Golden Oath
Summon: Flame, Give Me Strength!
Flask of Wondrous Physick
Strength-knot Crystal Tear
Blood-boiled Aroma
Now we will briefly explain how to play the build.
How to Play the Bleed Build Correctly
What do I need to do? Before each fight, buff yourself first with your two summons. After buffing, drink a Flask of Heavens Tear and use your left double blade in both hands.
Now buff this weapon with your Rock Blade talent. Then take both weapons in each hand again and buff your right double blade with Rock Blade. Finally, you can consume your items like Blood-boiled Aroma, Cooked Crab, or Flask of Wondrous Physick.
Enter the fight and always try to perform a light jump attack when attacking.
Once you reach the first blood loss, your damage numbers will soar towards 10,000 points – and beyond. It’s just a matter of time until the boss or enemy is processed into a red puddle. However, be mindful of your stamina during attacks, otherwise, you may not be able to evade in an emergency.
What do I do against bosses that are immune to bleeding? The only weakness of the build is the fact that you cannot generate bleed against opponents that do not have flesh. For this reason, you should swap out your “Blood’s Favor” talisman and replace it with the “Ritual Shield Talisman”. This way, you at least deal more damage without the bleeding effect.
That was all the important information about the build. Do you also enjoy playing with bleed or do you prefer other affinities like poison? Let us know in the comments how you found this build. You can find all our guides here: Elden Ring: All Guides, Beginner Tips, and Builds in Overview
This is an AI-powered translation. Some inaccuracies might exist.
With codes for Creative mode in Fortnite, you can participate in cool “Hide and Seek” games. Here we show you some of the best hide-and-seek maps for Fortnite. You can also find out how to use the codes here.
Update, March 20: The article has been reviewed and is up to date.
What kind of games are these? Fortnite offers players the opportunity to design their own worlds in Creative mode. These can be race tracks, mini-games, obstacle courses, horror games, or even hide-and-seek games. You have the option to enter the code of a map in Fortnite and then have fun in the map. With our directory, you can also quickly jump to the individual maps:
[toc]
Creative Mode Maps in Fortnite – Where to Enter Map Code?
With the twelve-digit codes, you can participate in various maps without having to pay anything. First, find out how this works.
How do you enter a code for Creative mode in Fortnite?
Go to the Fortnite menu
In the mode selection, select the magnifying glass on the left side
Now enter the creator or map code you are looking for
11 Fortnite “Hide and Seek” Maps with Codes
Now you know how to enter the codes for Creative mode. All that’s left are ideas. Here we present a selection of the best “Hide and Seek” maps that Fortnite has to offer. The ranking is based on player feedback and the author’s personal preferences.
What are “Hide and Seek” maps? These Fortnite maps are all about hide-and-seek. These islands are built so that you can hide well in them.
Usually, there are 1-2 seekers who have to search for the remaining players. Ideally, these players have hidden very well, so they cannot be found. Whoever is found last wins.
Fortnite Hide and Seek “Ruined Remains” – Code 5636-1824-2208
This map has a lot to offer. You embark on a time travel journey and get catapulted into a post-apocalyptic map where you have to hide.
One seeker then goes searching with a grappler to help. With it, he can hit other players and recruit them for his team. Whoever is found last wins.
Recommended editorial content
At this point you will find external content from YouTube that complements the article.
I consent to external content being displayed to me. Personal data can be transmitted to third party platforms.
Read more about our privacy policy.
Fortnite Hide and Seek Bloody Mines – Code 9300-7920-6878
In the bloody mines, you must hide from the murderer. Someone plays the murderer, one is a detective, and the other players must hide. The goal is to eliminate the murderer before he finds you.
This map is especially suitable if you want to play in a larger group. For horror fans, there are definitely cool things to discover here.
Recommended editorial content
At this point you will find external content from YouTube that complements the article.
I consent to external content being displayed to me. Personal data can be transmitted to third party platforms.
Read more about our privacy policy.
Fortnite Hide and Seek Area 51 – Code 7980-2048-0494
Have you always wanted to see what’s in Area 51? In this map, you can go on an adventure and search for aliens. The “Hide and Seek” map was created by player I2ELLIK.
The map consists of a huge building adorned with UFOs, battle equipment, and creepy devices. Find a good hiding spot among them!
Recommended editorial content
At this point you will find external content from YouTube that complements the article.
I consent to external content being displayed to me. Personal data can be transmitted to third party platforms.
Read more about our privacy policy.
Fortnite Hide and Seek Laser Tag – Code 0159-7611-5733
Do you want a hide-and-seek game with more action? This map, created by player Puzzler, is perfect for that. You find yourself in an arcade that is dark and illuminated only by neon lights.
You can use the map to play hide-and-seek or combine it with a laser tag game. Sneak around and find your opponents to eliminate them first!
Recommended editorial content
At this point you will find external content from YouTube that complements the article.
I consent to external content being displayed to me. Personal data can be transmitted to third party platforms.
Read more about our privacy policy.
Fortnite Hide and Seek Luigis Mansion – Code 6810-5920-6085
Dive into this map into the world of Luigi’s Mansion (an action-adventure video game from Nintendo) – perfect for players who remember the game and want to indulge in nostalgia.
The content creator doodleclubhaus created this map where you will find many secret rooms and hiding spots. The “seeker” starts with a flashlight that he can use for searching.
Recommended editorial content
At this point you will find external content from YouTube that complements the article.
I consent to external content being displayed to me. Personal data can be transmitted to third party platforms.
Read more about our privacy policy.
Fortnite Hide and Seek Moon Infection – Code 6502-2054-2717
A “Hide and Seek” map located on the moon. 3 players become “seekers” and are thus infected. They must search for and eliminate the remaining players hiding in the space station.
Fortnite Hide and Seek Water Park – Code 0139-3586-5803
In this map, you can not only hide but also play Prop Hunt – transforming into objects. This makes the hide-and-seek game even more challenging for the seekers and more exciting for the hiders.
This “Hide and Seek” map was created by eatyoushay and is meant to represent a water park. You can play with friends and recreate a fun day at the pool.
Recommended editorial content
At this point you will find external content from YouTube that complements the article.
I consent to external content being displayed to me. Personal data can be transmitted to third party platforms.
Read more about our privacy policy.
Have you always wanted to visit the Simpsons while playing Fortnite? This “Hide and Seek” map allows you to immerse yourself in the world of the yellow characters and play extensive hide-and-seek with your friends.
The map recreates the location “Krusty Burger” from the show The Simpsons. The map was created by Marablind and can be played by up to 16 players together. There are hunters who are equipped with weapons and seekers who can transform into objects and blend into the surroundings.
Do you know of any other cool “Hide and Seek” maps for Fortnite that we should include in this list? If so, let us know in the comments. And also tell us which map you liked best from here.
This is an AI-powered translation. Some inaccuracies might exist.
In Elden Ring you can collect not only ordinary talismans but also legendary ones. These rarities are well hidden, so we will show you all the locations of the legendary talismans so you can secure the trophy.
Update, February 18, 2026: The overview has been checked and is up to date.
What do I need the legendary talismans for? Some of these talismans are among the best of their kind. If you want to optimize your holy or mage builds, one of the listed talismans might be important for you.
In addition, you need all eight copies to get the trophy or achievement “Legendary Talismans”. With our directory, you can quickly jump to the talismans you still need for your collection:
[toc]
How to get all legendary talismans
Which legendary talismans exist? There are a total of eight legendary talismans that you can collect on your journeys. They are as follows:
Radagon’s Icon
Radagon’s Scar Seal
Godfrey’s Icon
Moon of Nokstella
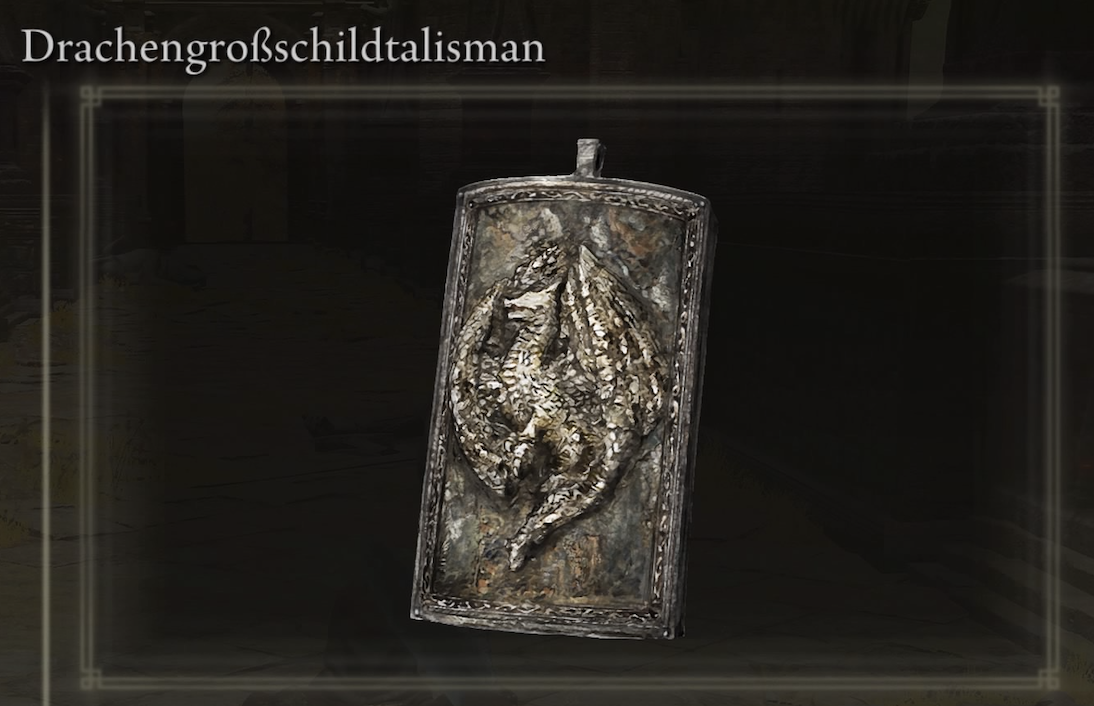
Dragoncrest Greatshield Talisman
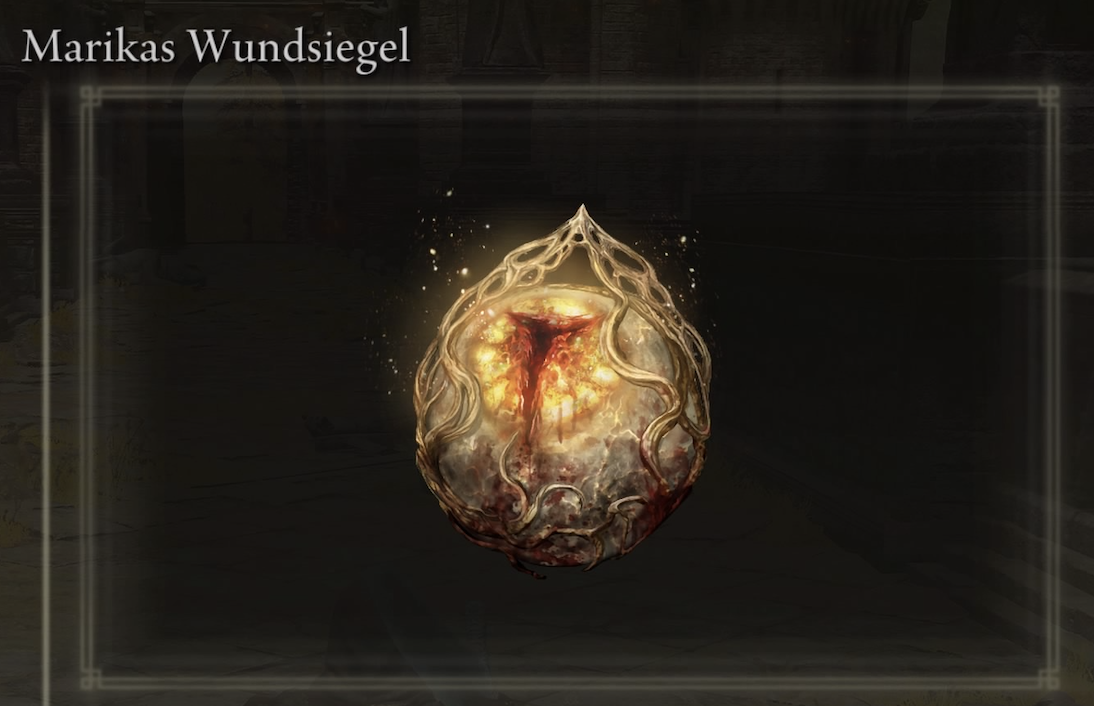
Marika’s Scar Seal
Talisman of the Old Lord
Earth Tree’s Favor +2
We will show you in detail how to obtain the talismans and describe the way step by step so you don’t miss any of the pieces.
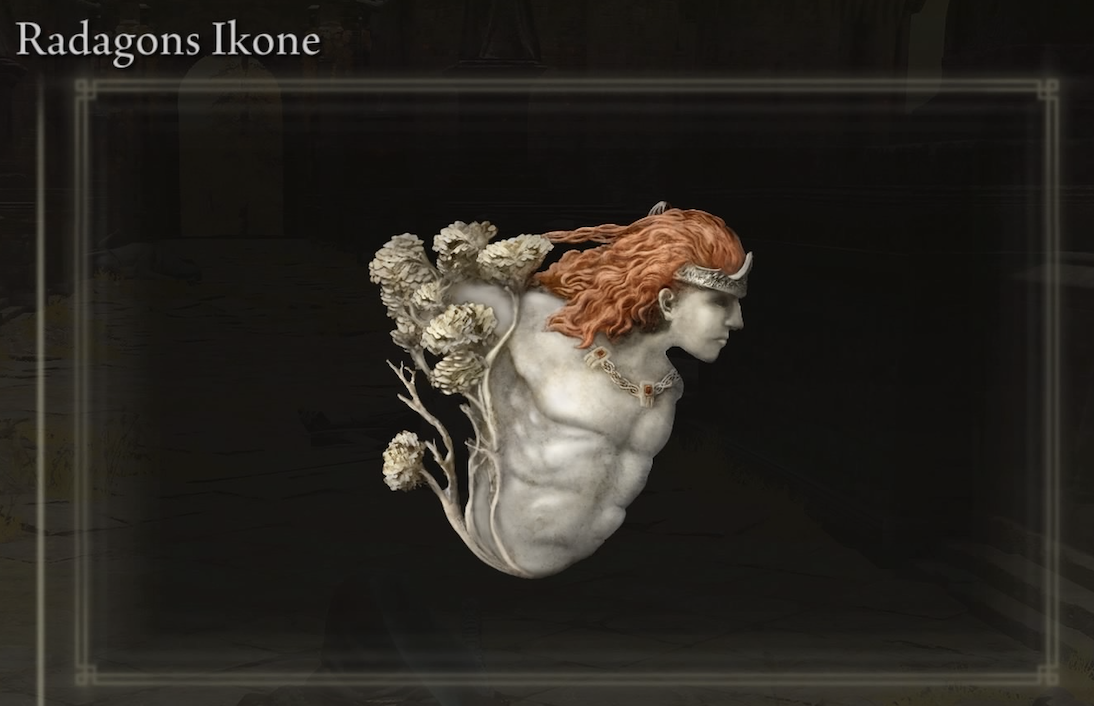
Radagon’s Icon
The medallion featuring Radagon’s likeness
What can the talisman do? This talisman shortens your spell casting time. This means you can cast your spells faster and are not forced to stay long in the preparation animation.
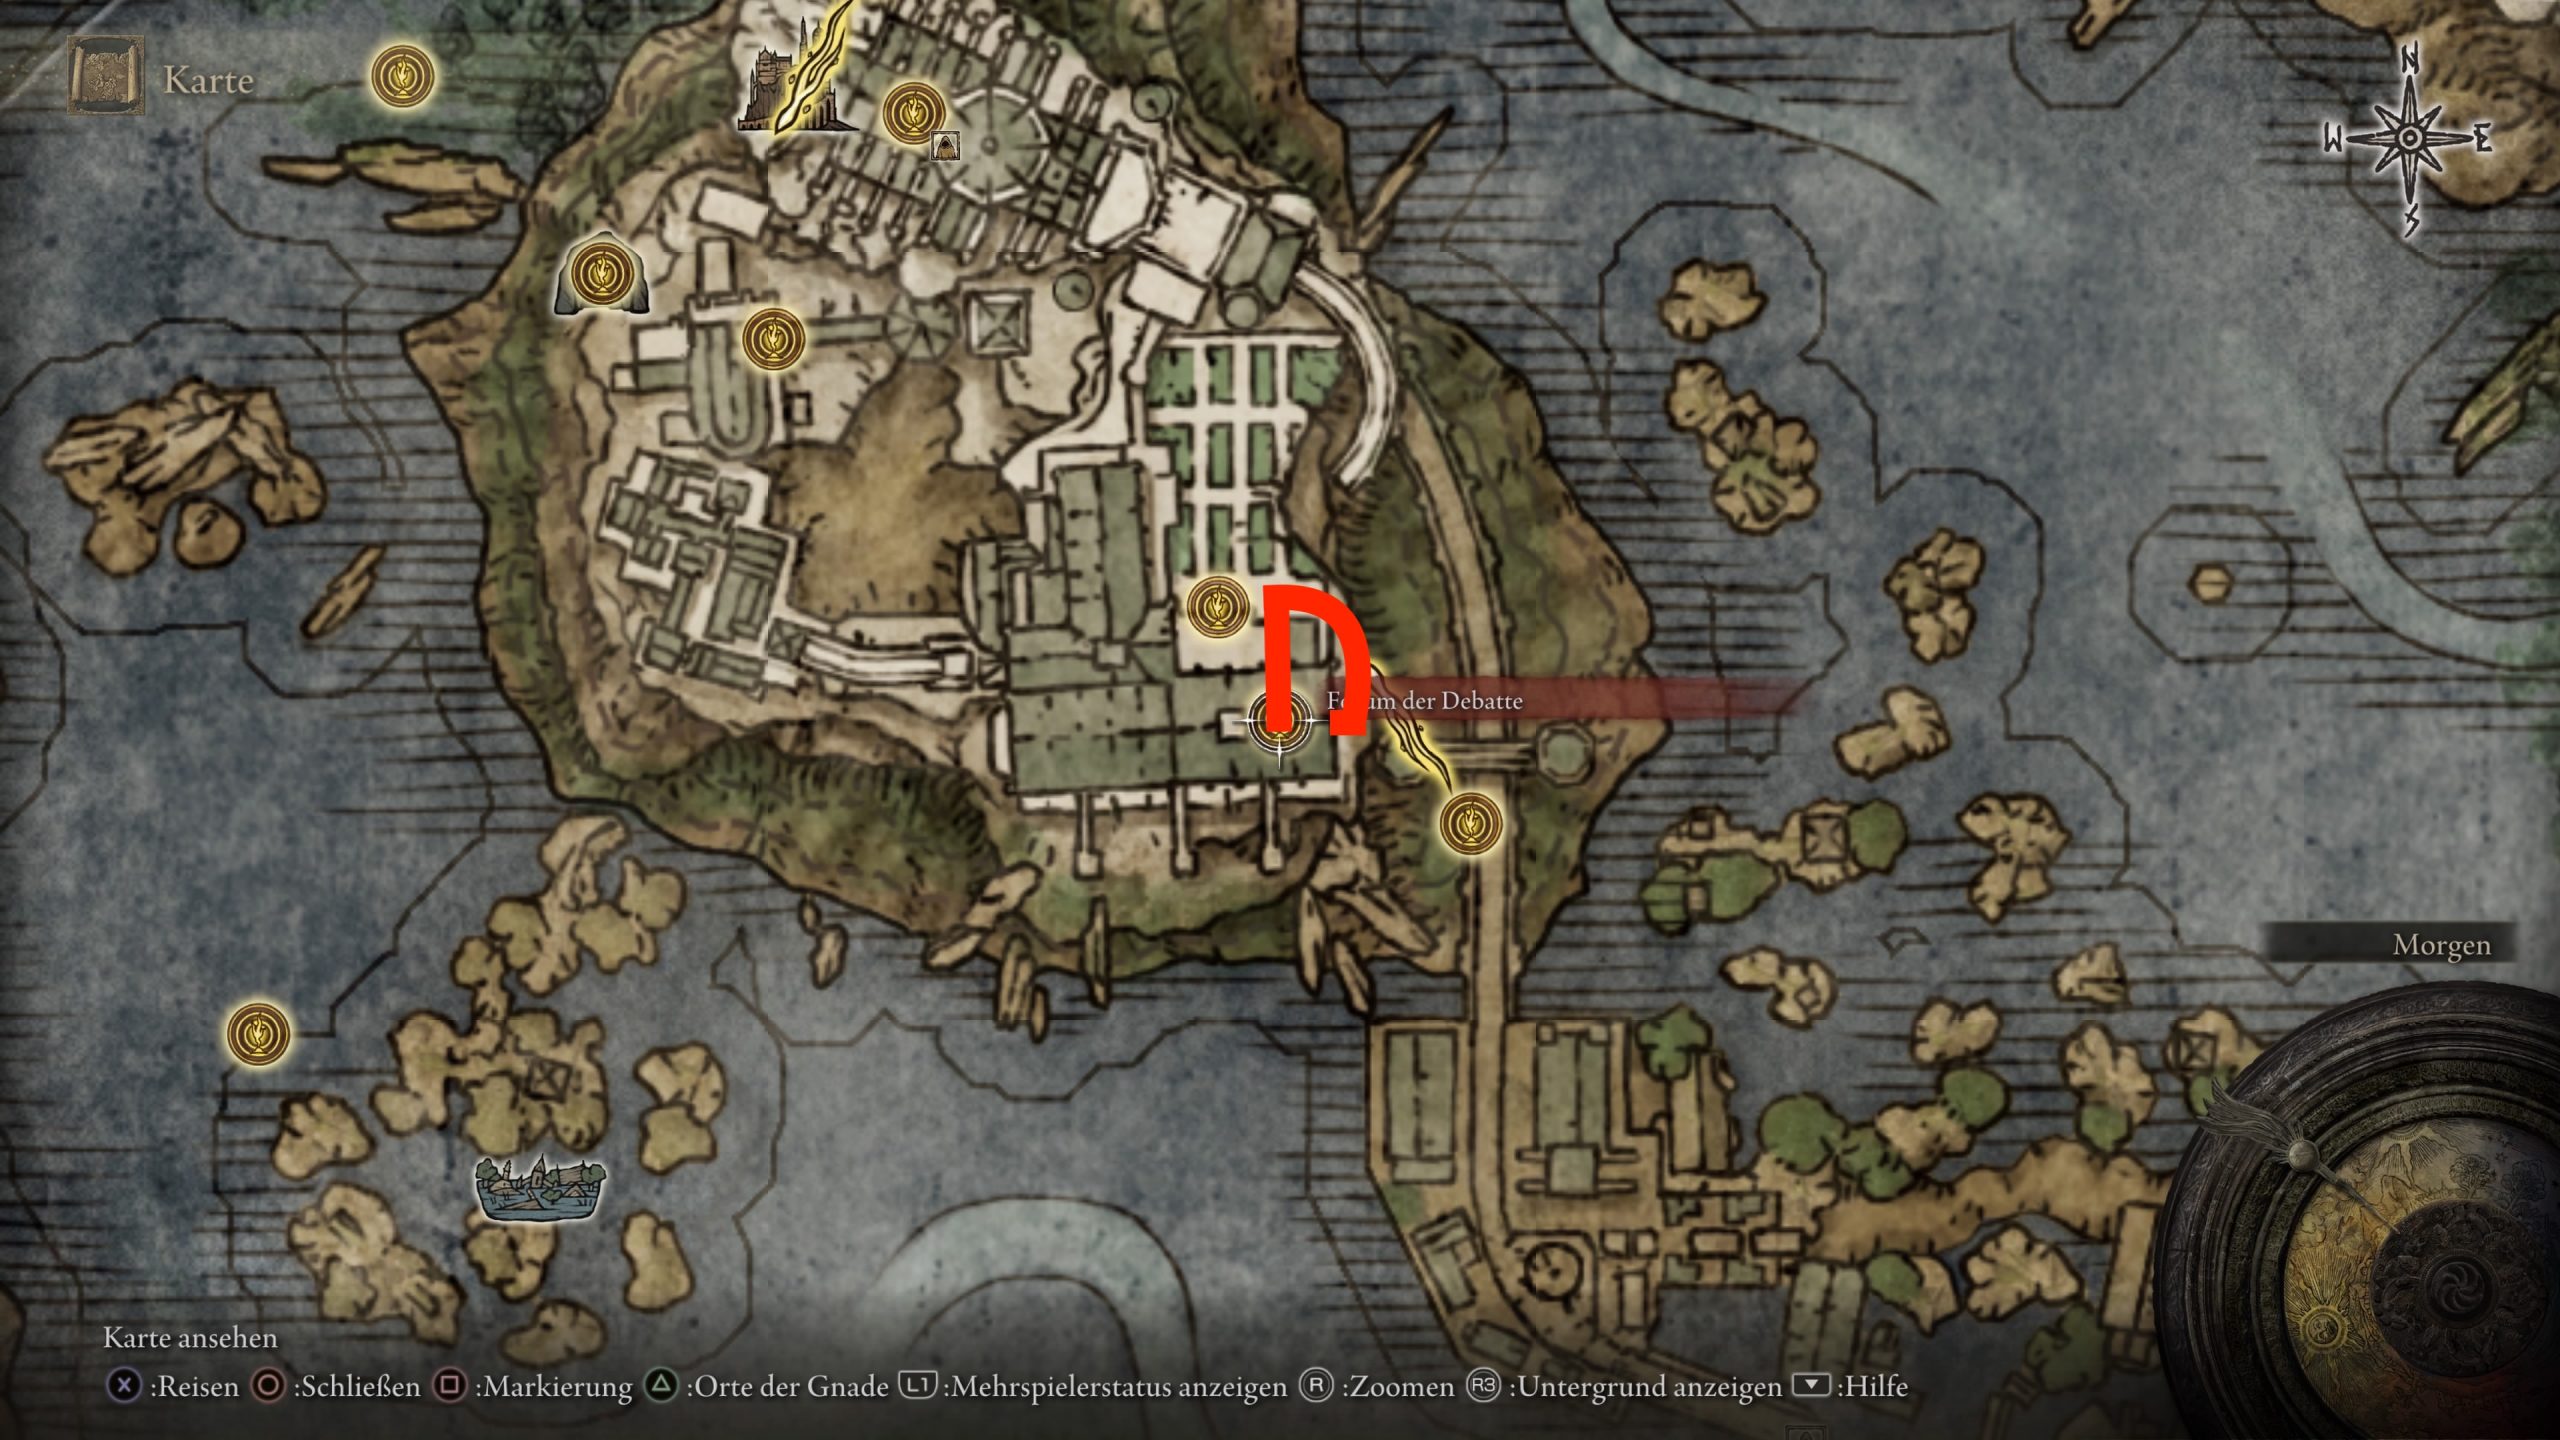
Where can I find this talisman? You need to go to the Site of Grace “Debate Forum”, which is located in the Raya Lucaria Academy. Once there, head directly outside to the academy’s courtyard. Once you pass the iron gate, orient your compass southeast.
If you follow the path, you just need to jump over the broken window and run to the chest
From there, jump over the stone railing and move directly to the ladder ahead. Follow the path until you reach the broken window. Jump over it and keep to the right. You should encounter a chest containing the talisman.
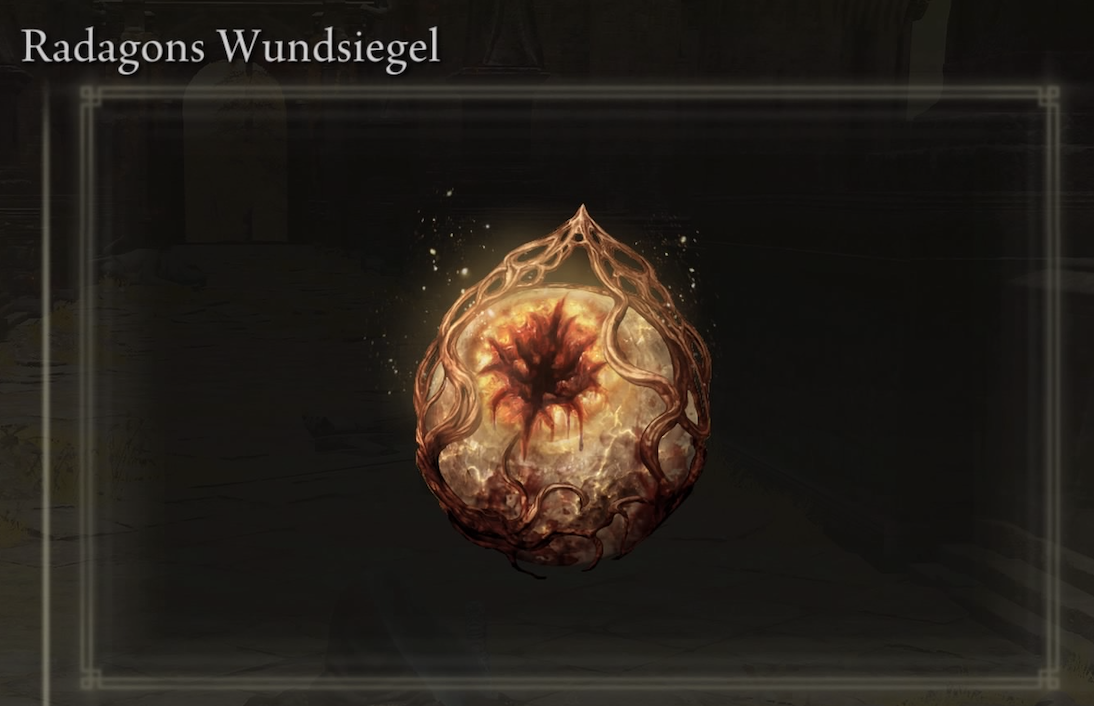
Radagon’s Scar Seal
A popular amulet
What can the talisman do? This talisman significantly increases your attributes such as Strength, Endurance, and Dexterity, but you will take more damage. The attributes receive a bonus of five points.
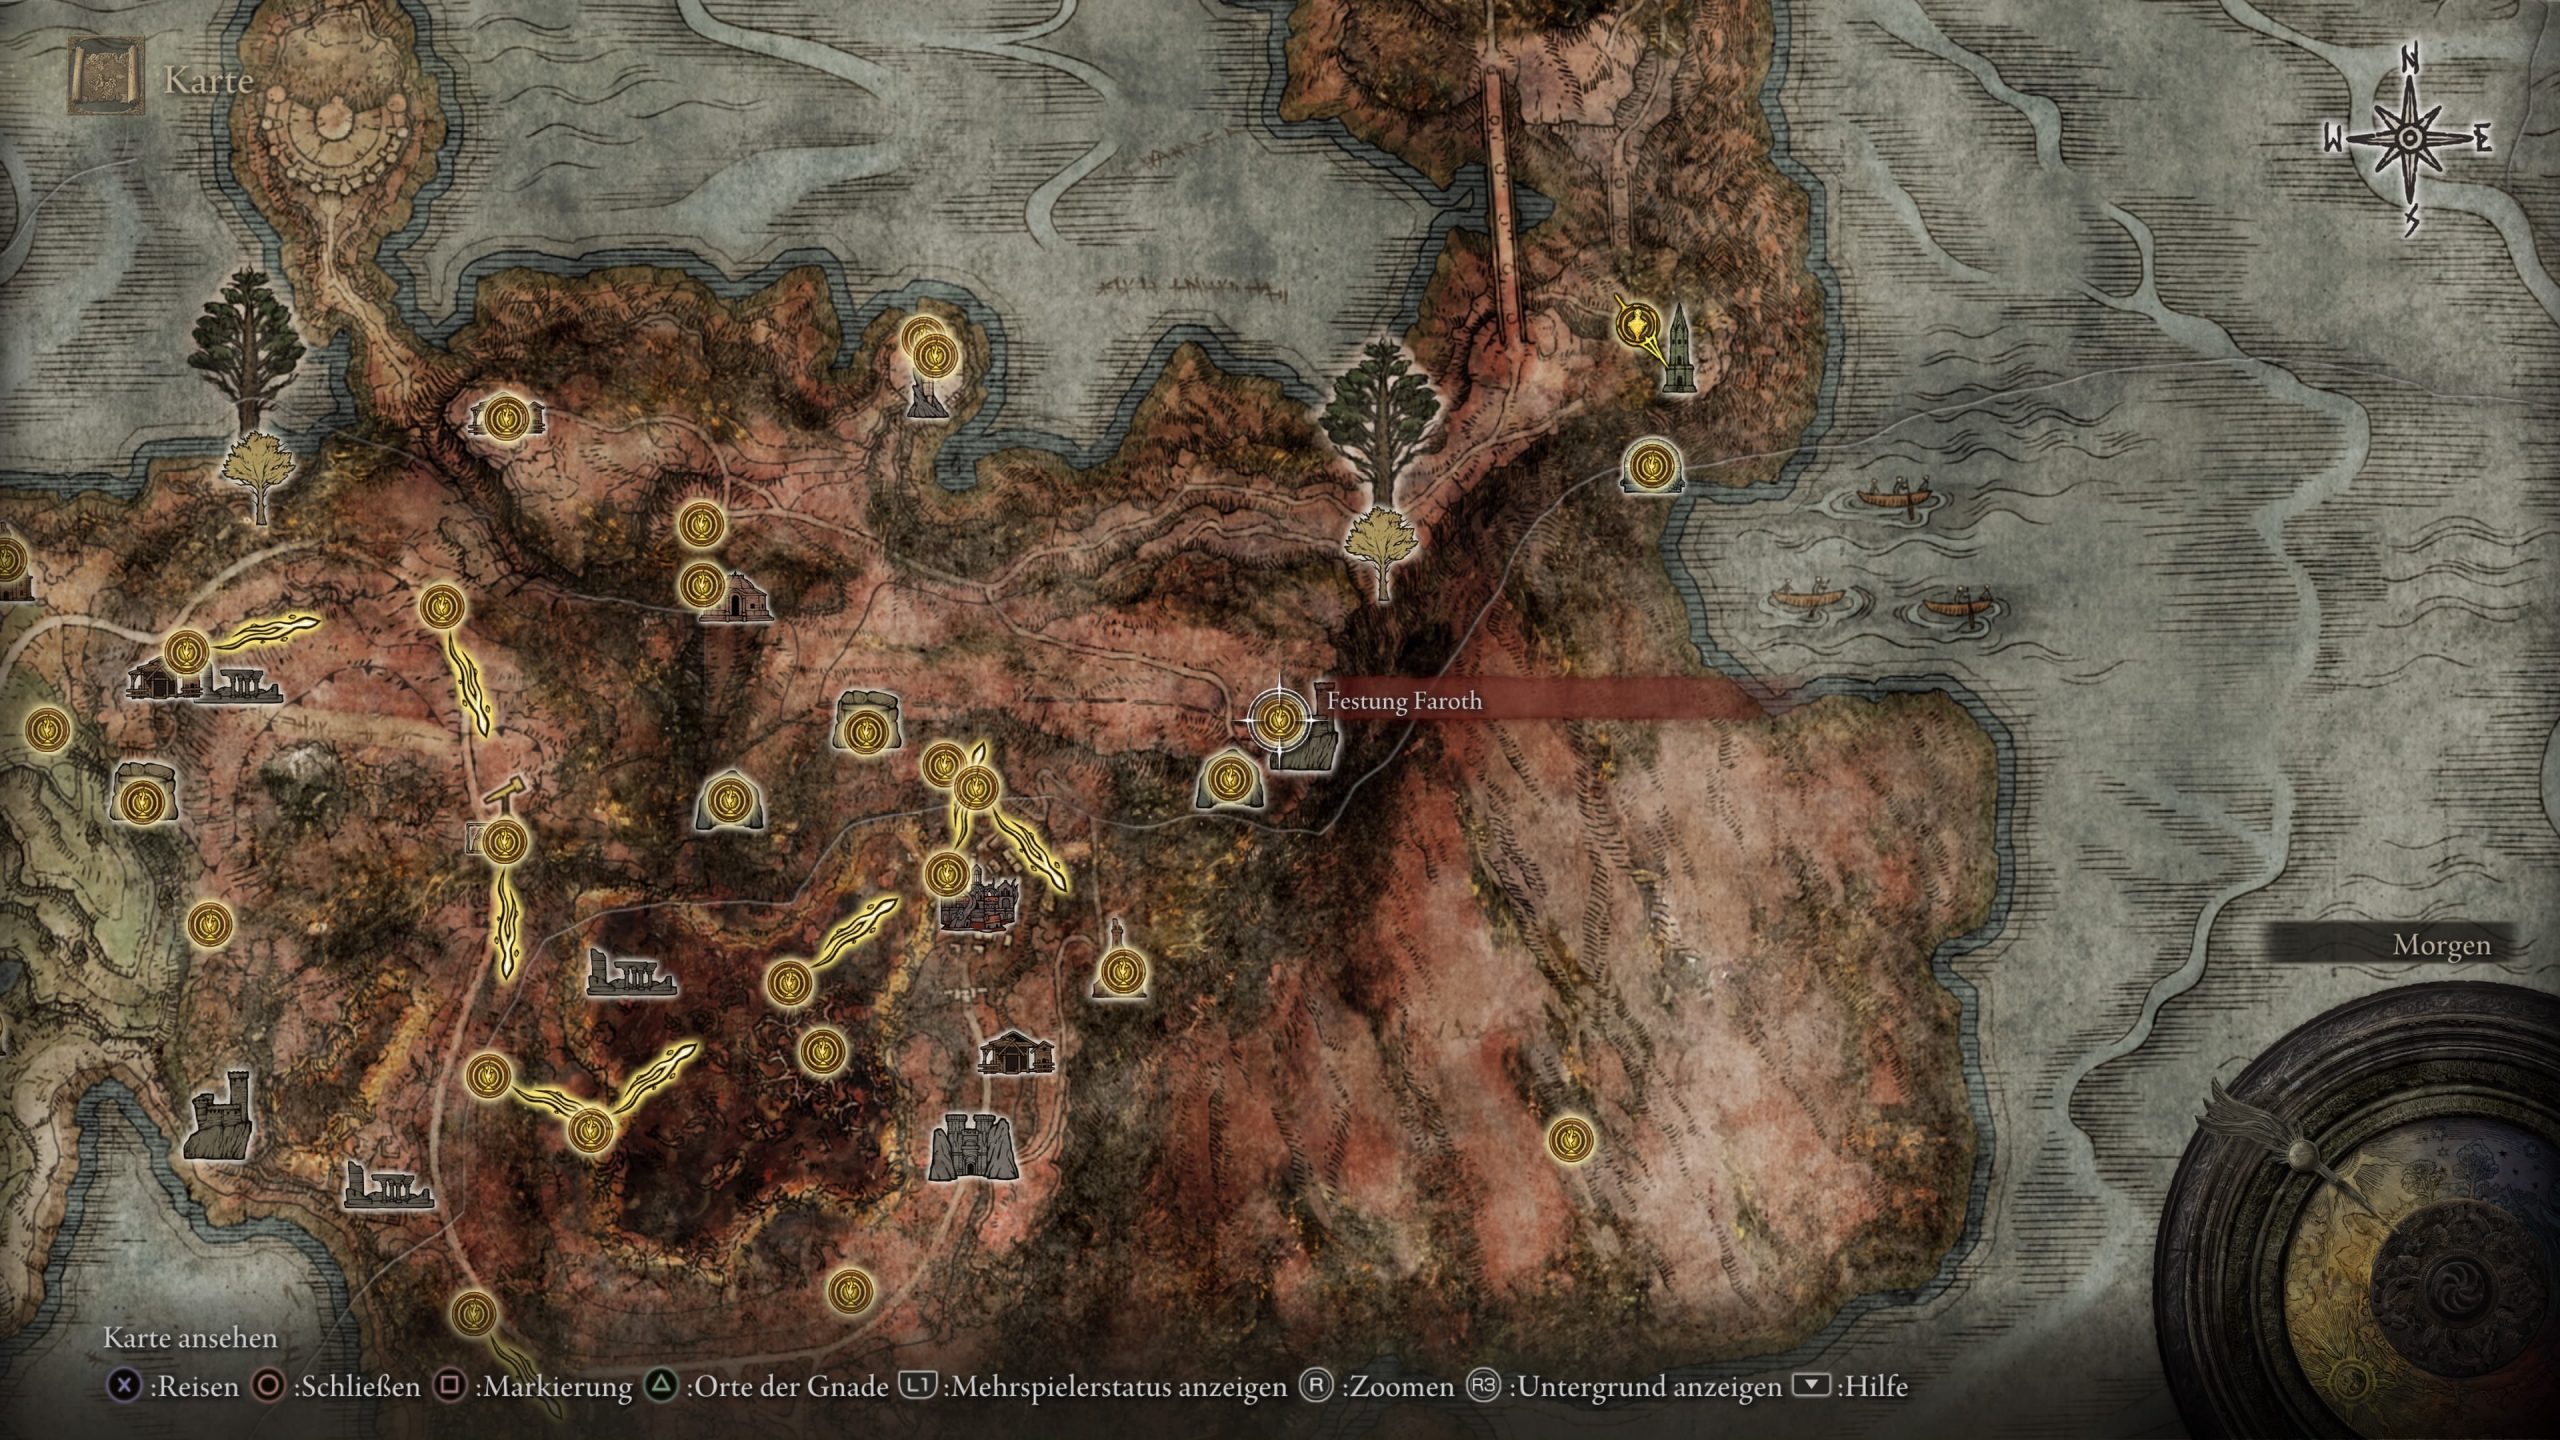
Where can I find this talisman? The talisman is located in the Faroth Fortress in Caelid. Travel to the eponymous Site of Grace and storm the fortress. The talisman is hidden in the wooden scaffolding on a corpse.
The cursor shows you the fortress and the Site of Grace
You need to take the ladder that is in the fortress to reach the fortress and then make your way through the bats. The amulet is guarded by two rats.
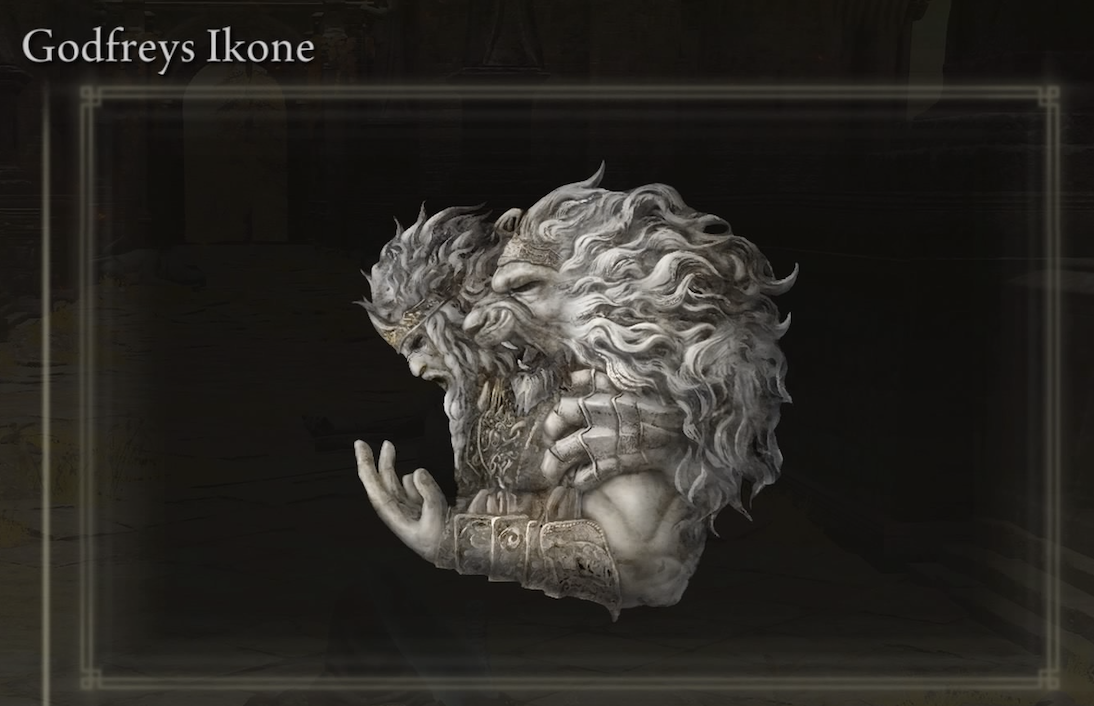
Godfrey’s Icon
Good for sorcerers and holy characters
What can the talisman do? This talisman enhances charged spells and skills. This applies to all spells and skills that can be charged during their animation.
Where can I find this talisman? To obtain this talisman, you need to travel from the Site of Grace “Atlus Plateau” to the Golden Tree’s Seal Prison.
Follow the path to the Seal Prison
We have marked on the map where you need to travel with your horse. Defeat the prisoner there and receive this talisman as a reward.
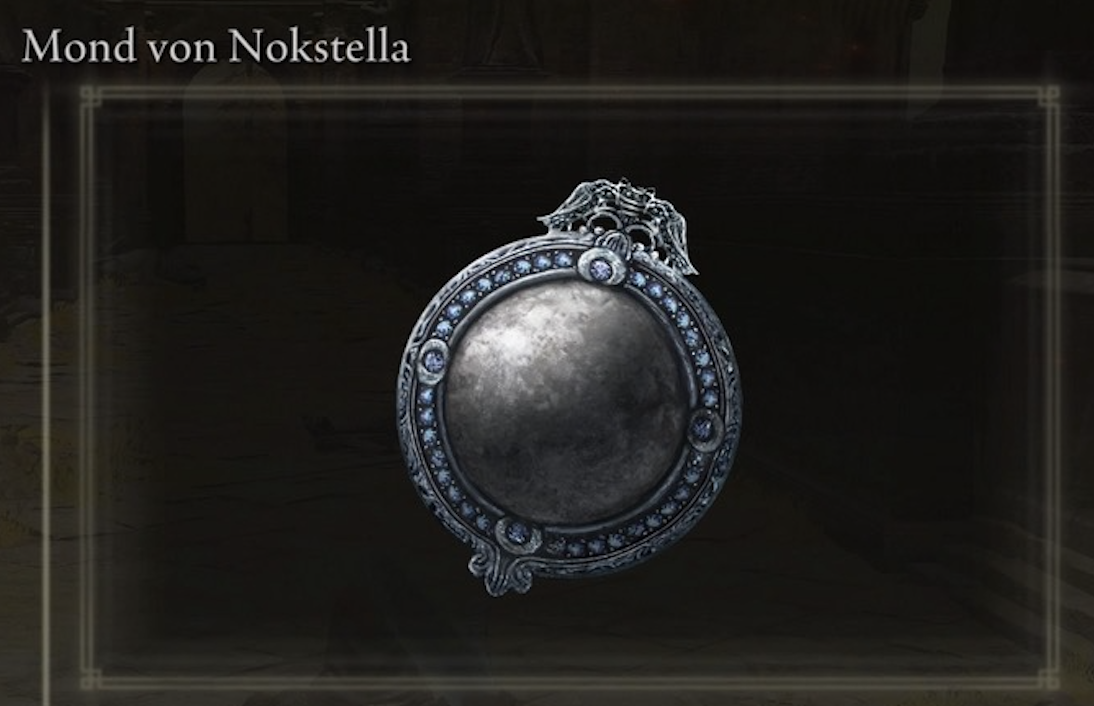
Moon of Nokstella
Useful if you are a sorcerer
What can the talisman do? This amulet increases your number of memory slots by two.
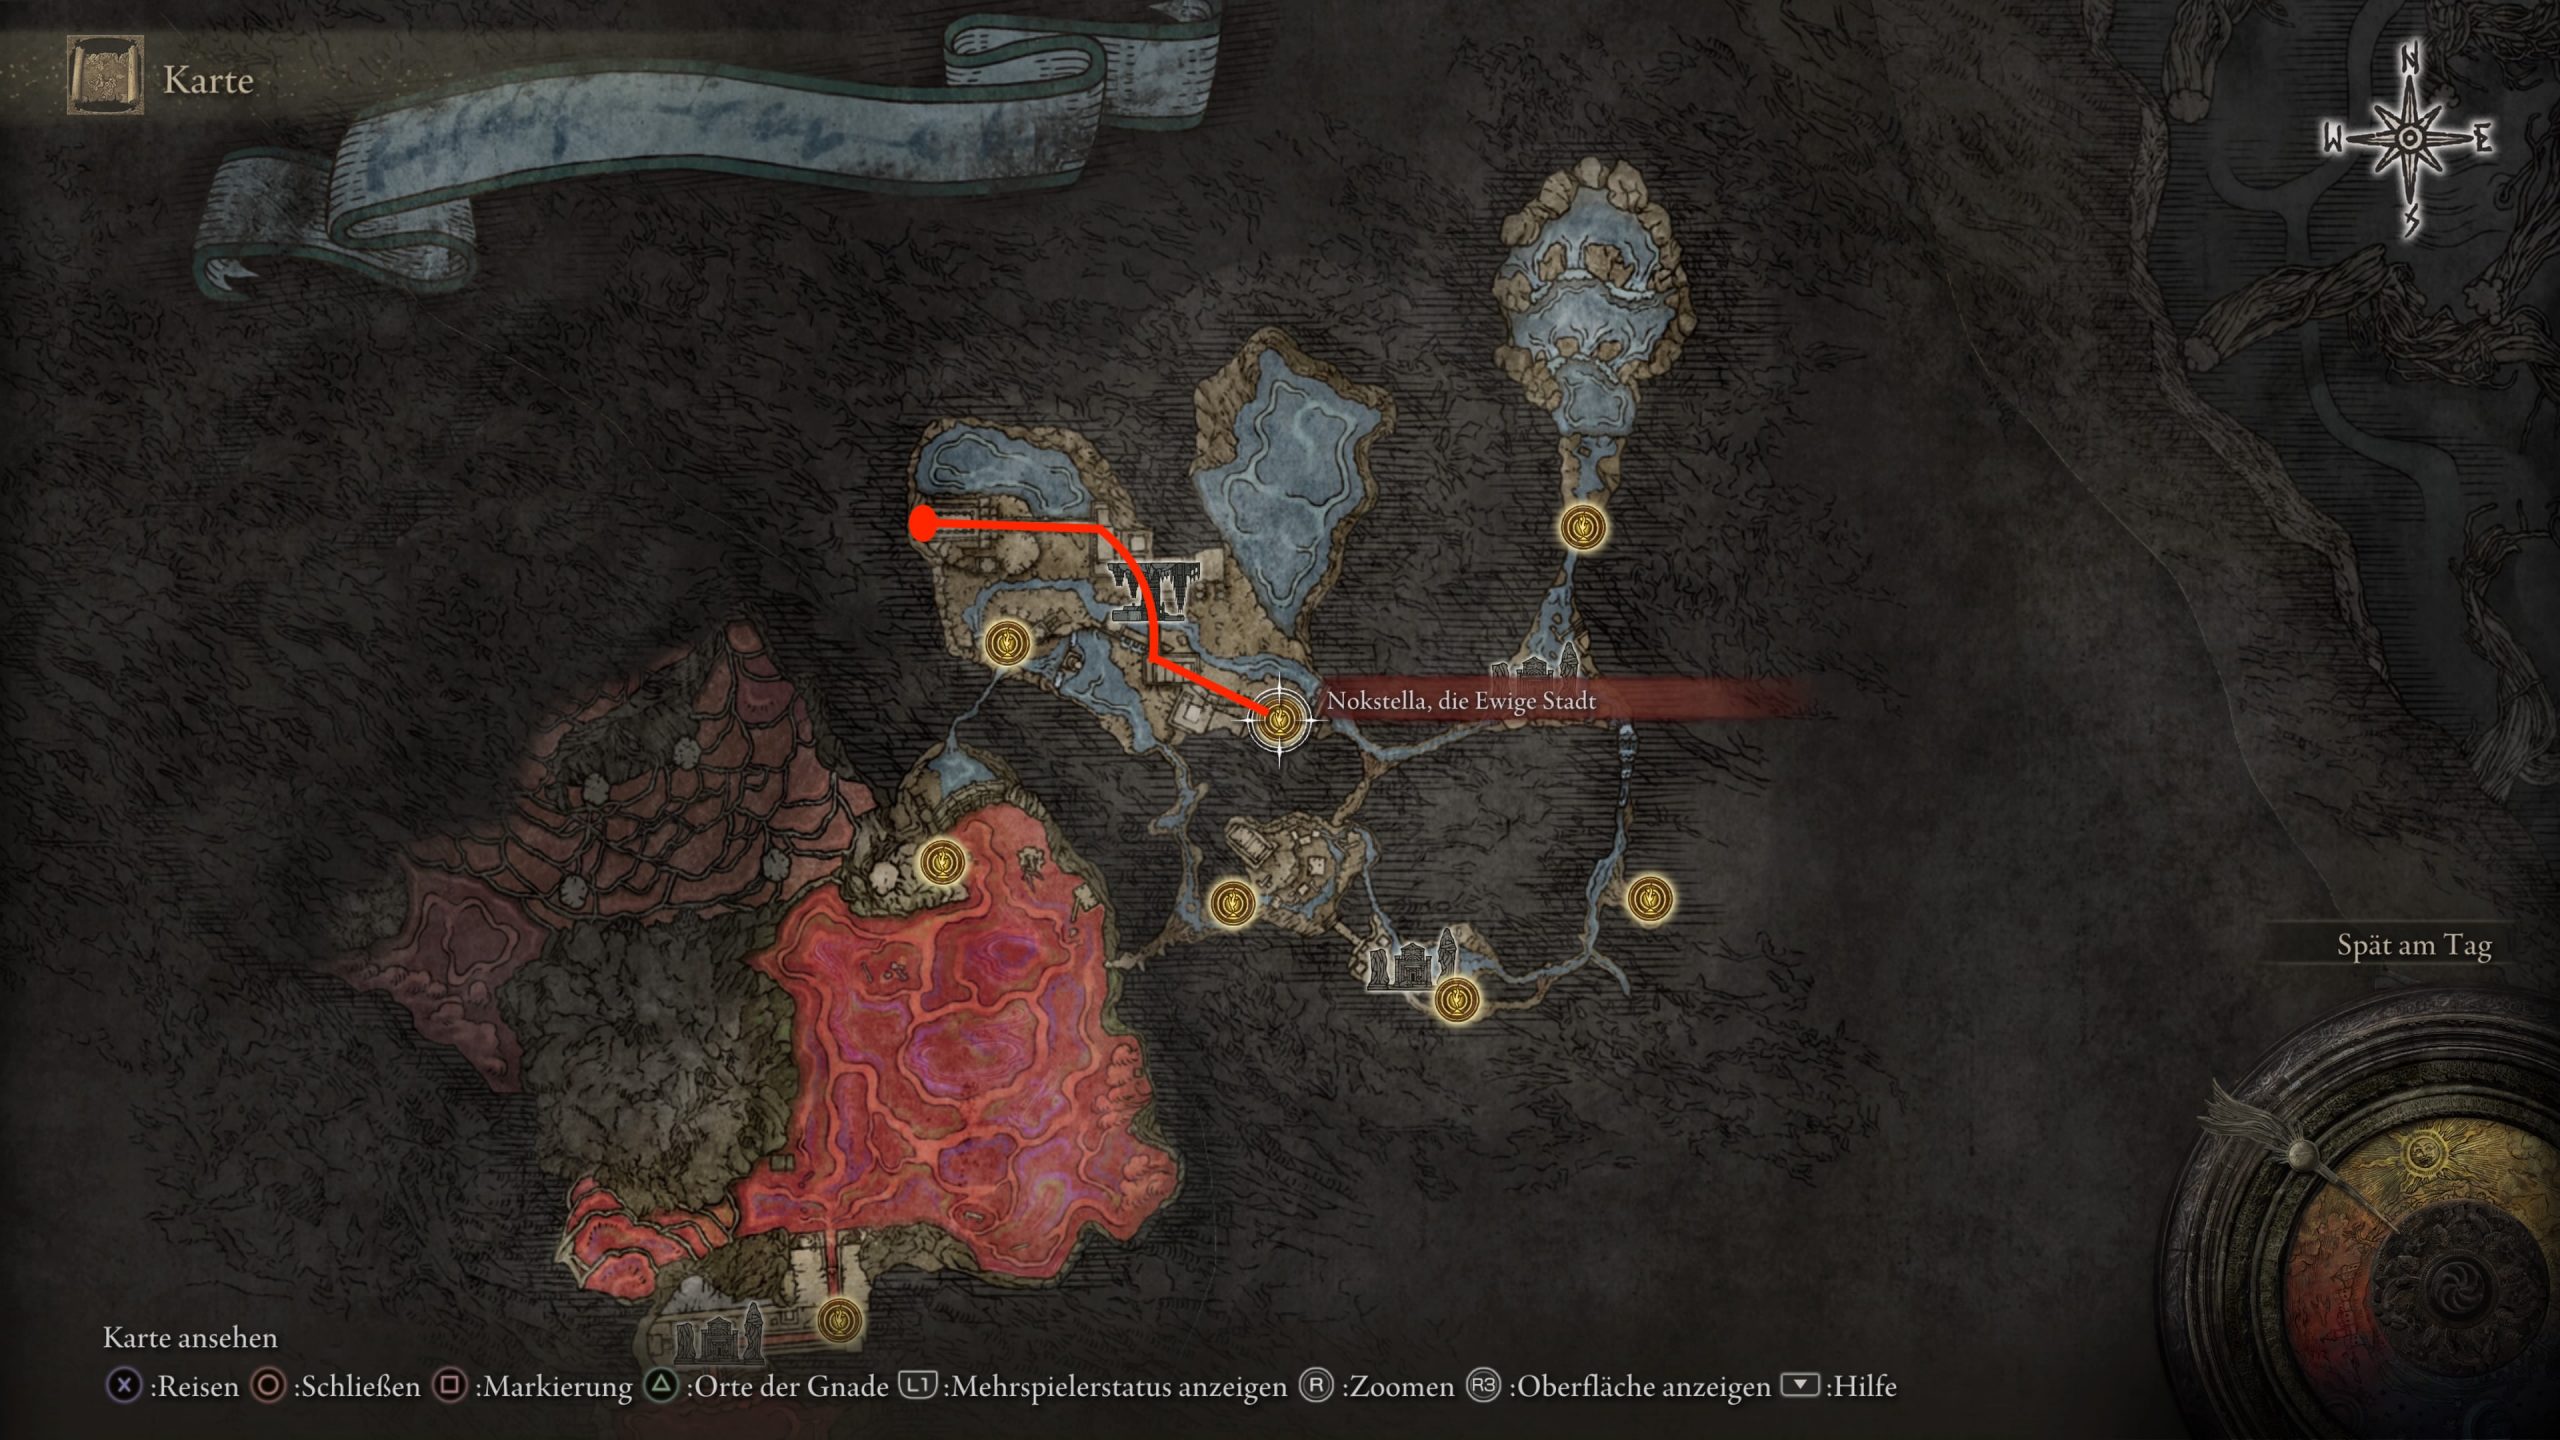
Where can I find this talisman? The Moon of Nokstella can be found in a chest in the grand cathedral of Nokstella. To gain access to this area of the map, you need to complete part of Ranni’s quest.
Follow the stairs that lead you ever higher
Then go to the Site of Grace “Nokstella, the Eternal City” and follow the path we marked on the map. The last church contains the chest with the talisman.
Dragoncrest Greatshield Talisman
Good talisman to provide you with increased resistance
What can the talisman do? It significantly increases your resistance to physical damage. This allows you to withstand more hits.
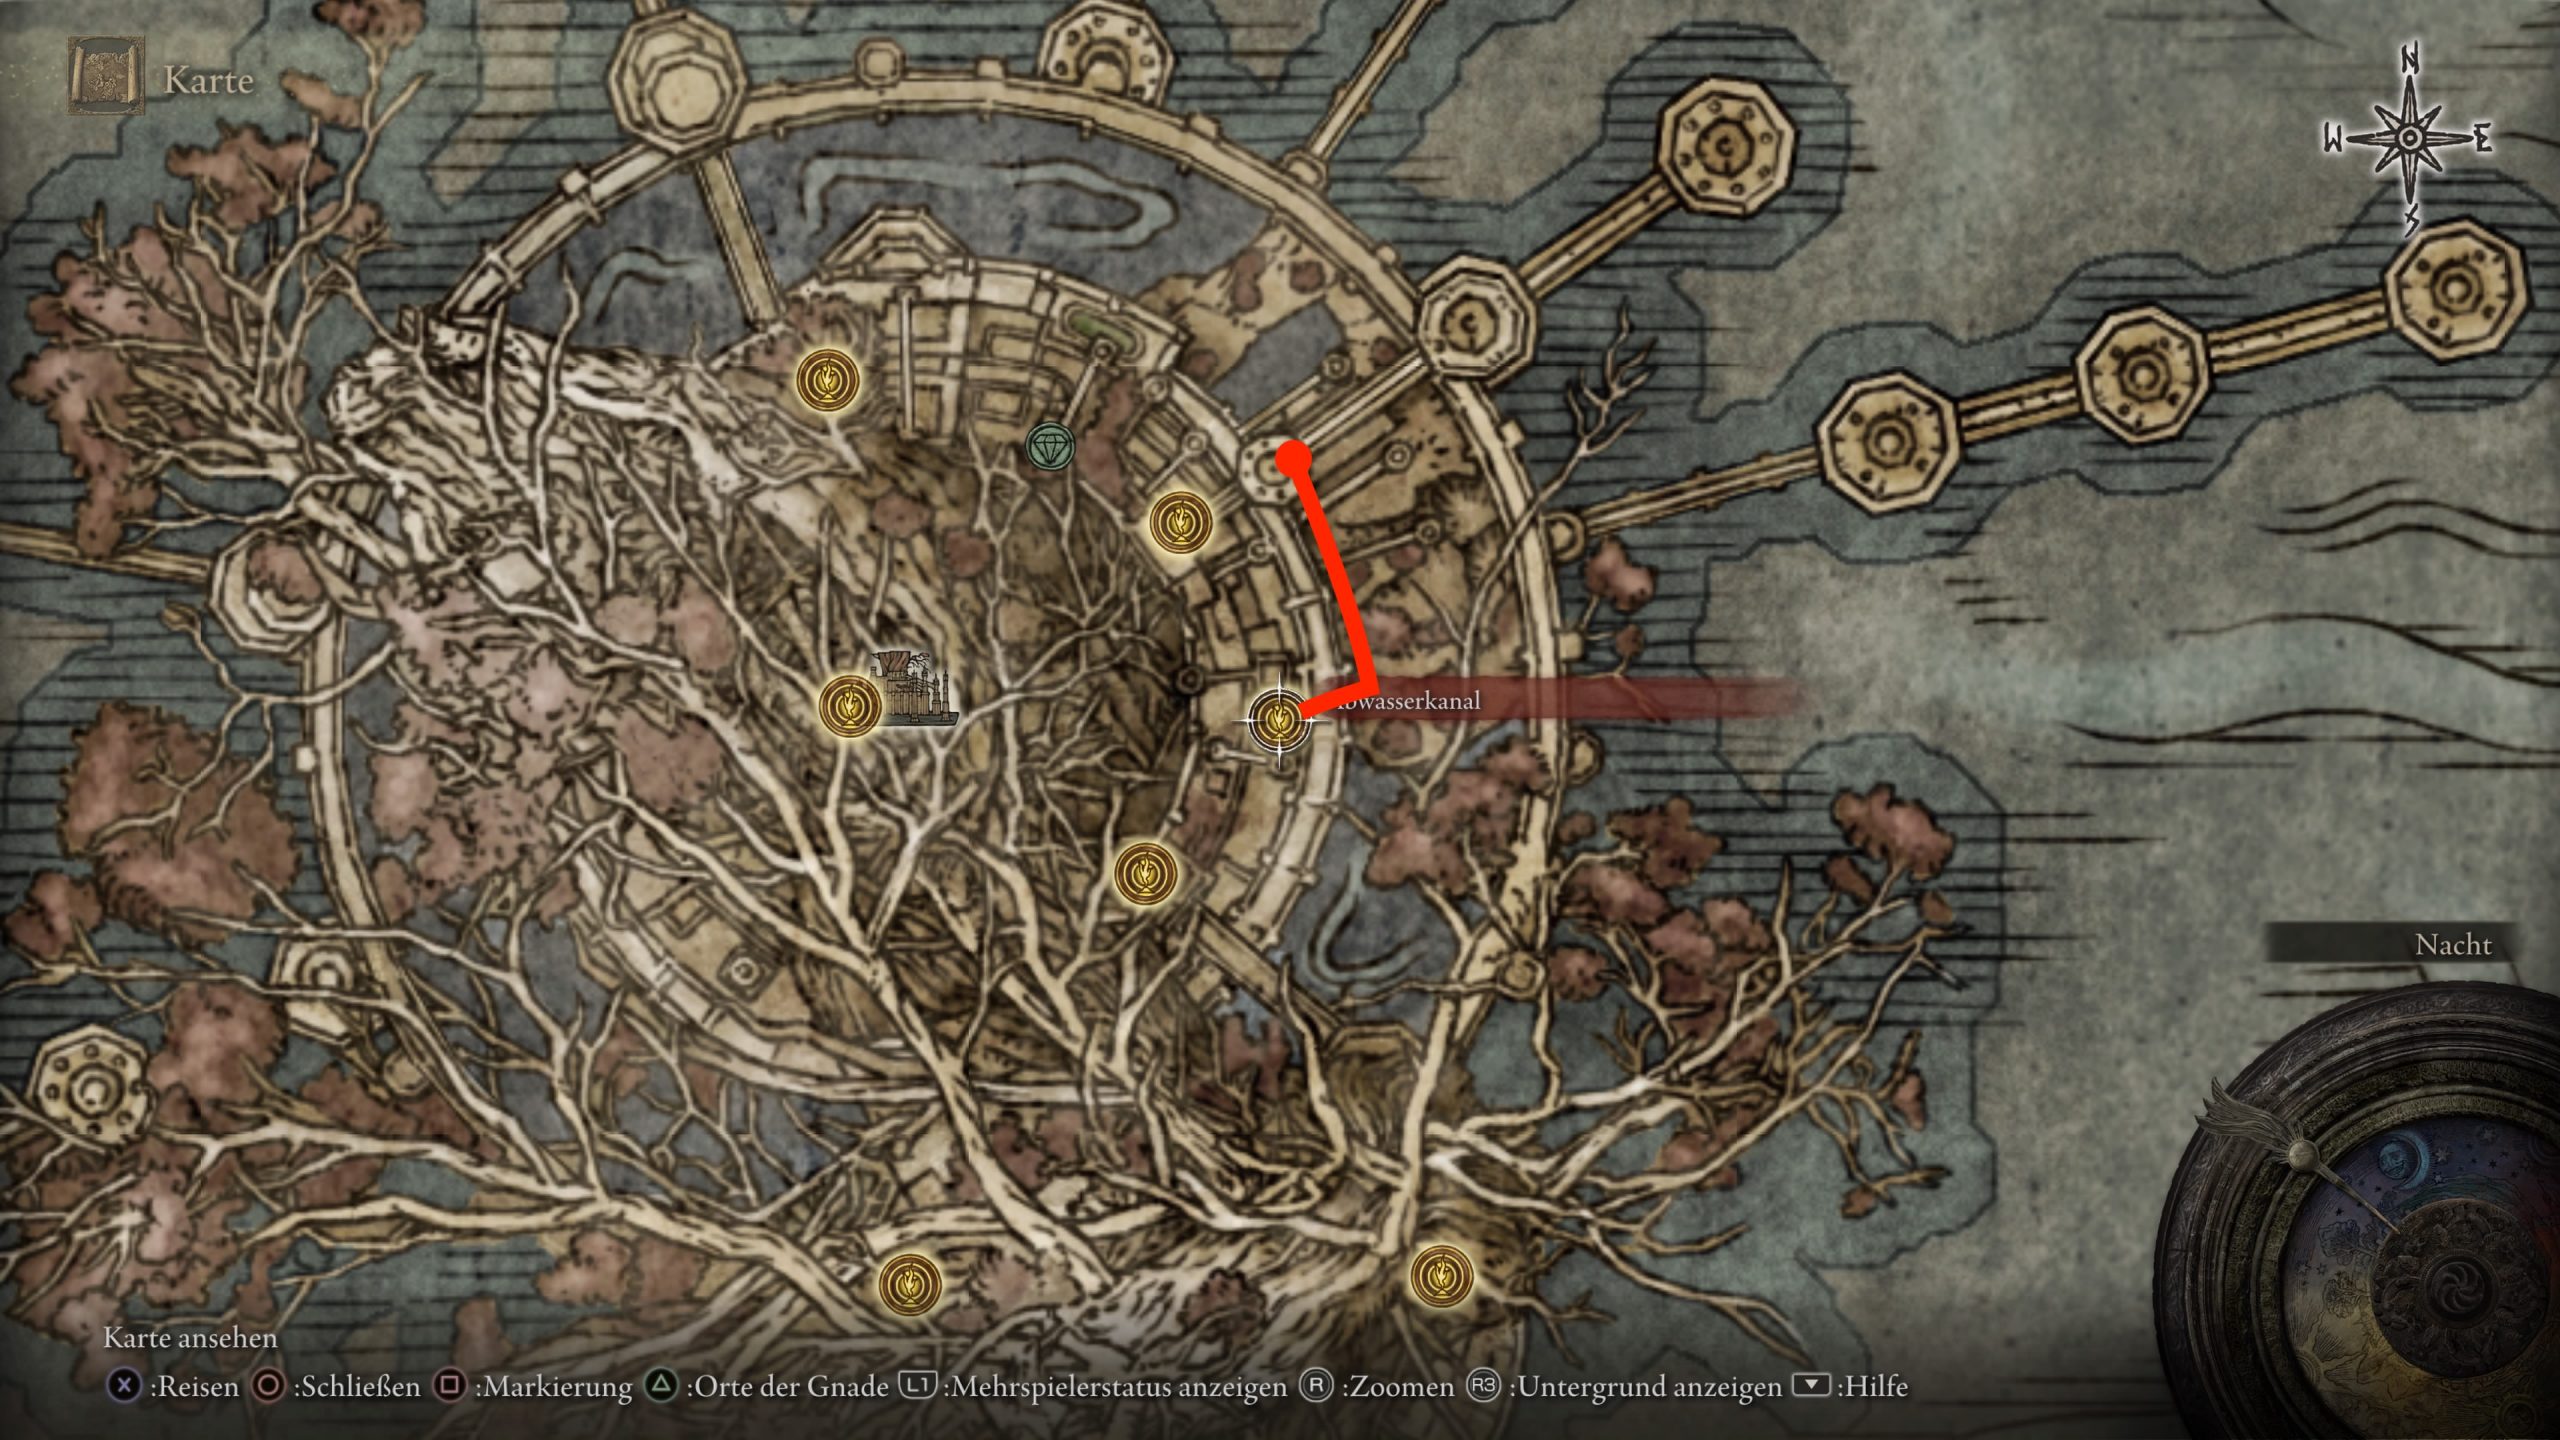
Where can I find this talisman? This talisman is located in the hidden area of the Haligtree. Go to the Site of Grace “Sewage Canal”. Once there, balance over the large roots of the tree until you reach the roof of a cathedral.
Follow the roots and reach the roof of the church
Choose a hole in the broken roof and let yourself fall onto the wooden beams. From there, head west to find a chest among the infected insect creatures. Inside is the talisman.
Marika’s Scar Seal
A good talisman to give you the necessary boost
What can the talisman do? This talisman significantly increases your attributes of Mind, Intelligence, Faith, and Arcane, but also your damage taken. The attributes receive a bonus of five points.
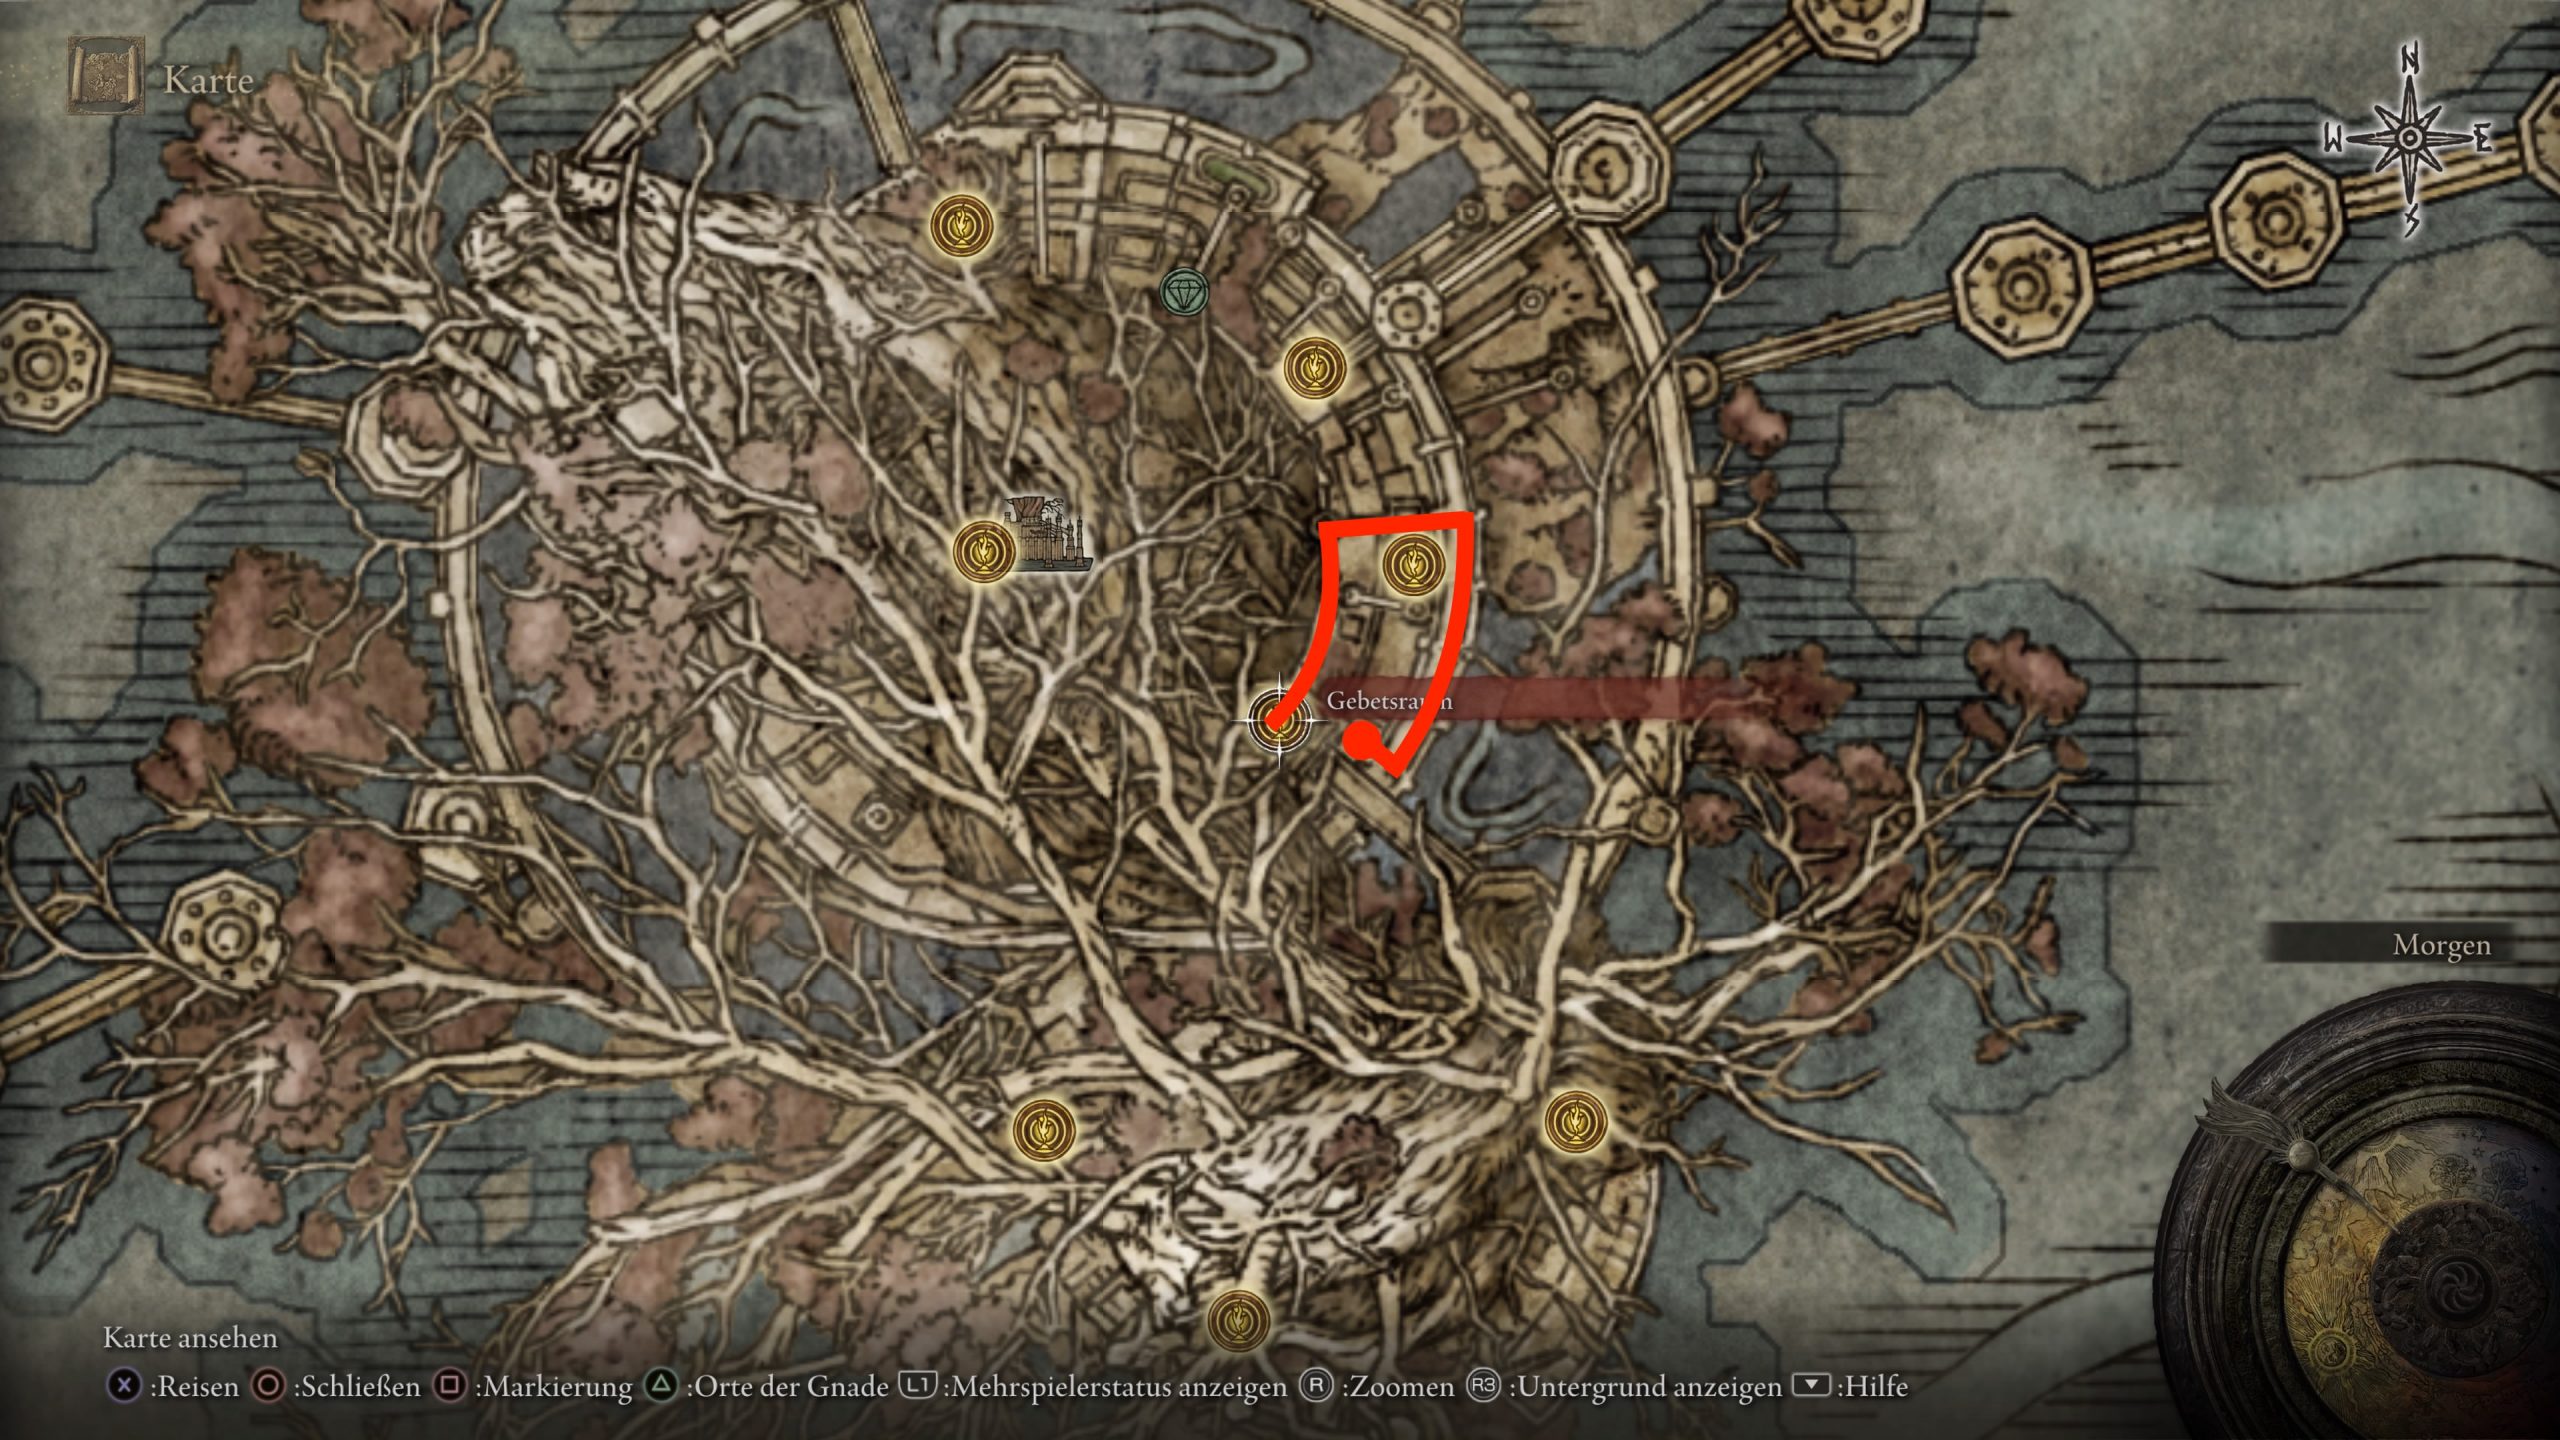
Where can I find this talisman? You can find the talisman at the Haligtree, the optional area in the north of the Lands Between. Head to the Site of Grace “Prayer Room”. From there, take the next door outside and follow the round city wall until the railing ends and you stand before a stone bowl.
There, use the transition and let yourself fall onto the lower edge of the tower. Go around the tower. You should look towards the sea. Make the jump to the next city wall, ignore the foul offspring of the Erdtree, and run south.
Ignore the offspring, as they can be very annoying
When you reach the end of the wall, jump west onto the roof of a small building. Jump down further until you reach a fog door that you can open with a stone sword key. Before you is the amulet.
Beware: A stronger enemy spawns at the door, which can make your life difficult. Be prepared.
Talisman of the Old Lord
Very useful for buffing spells and incantations
What can the talisman do? It extends the duration of spell effects.
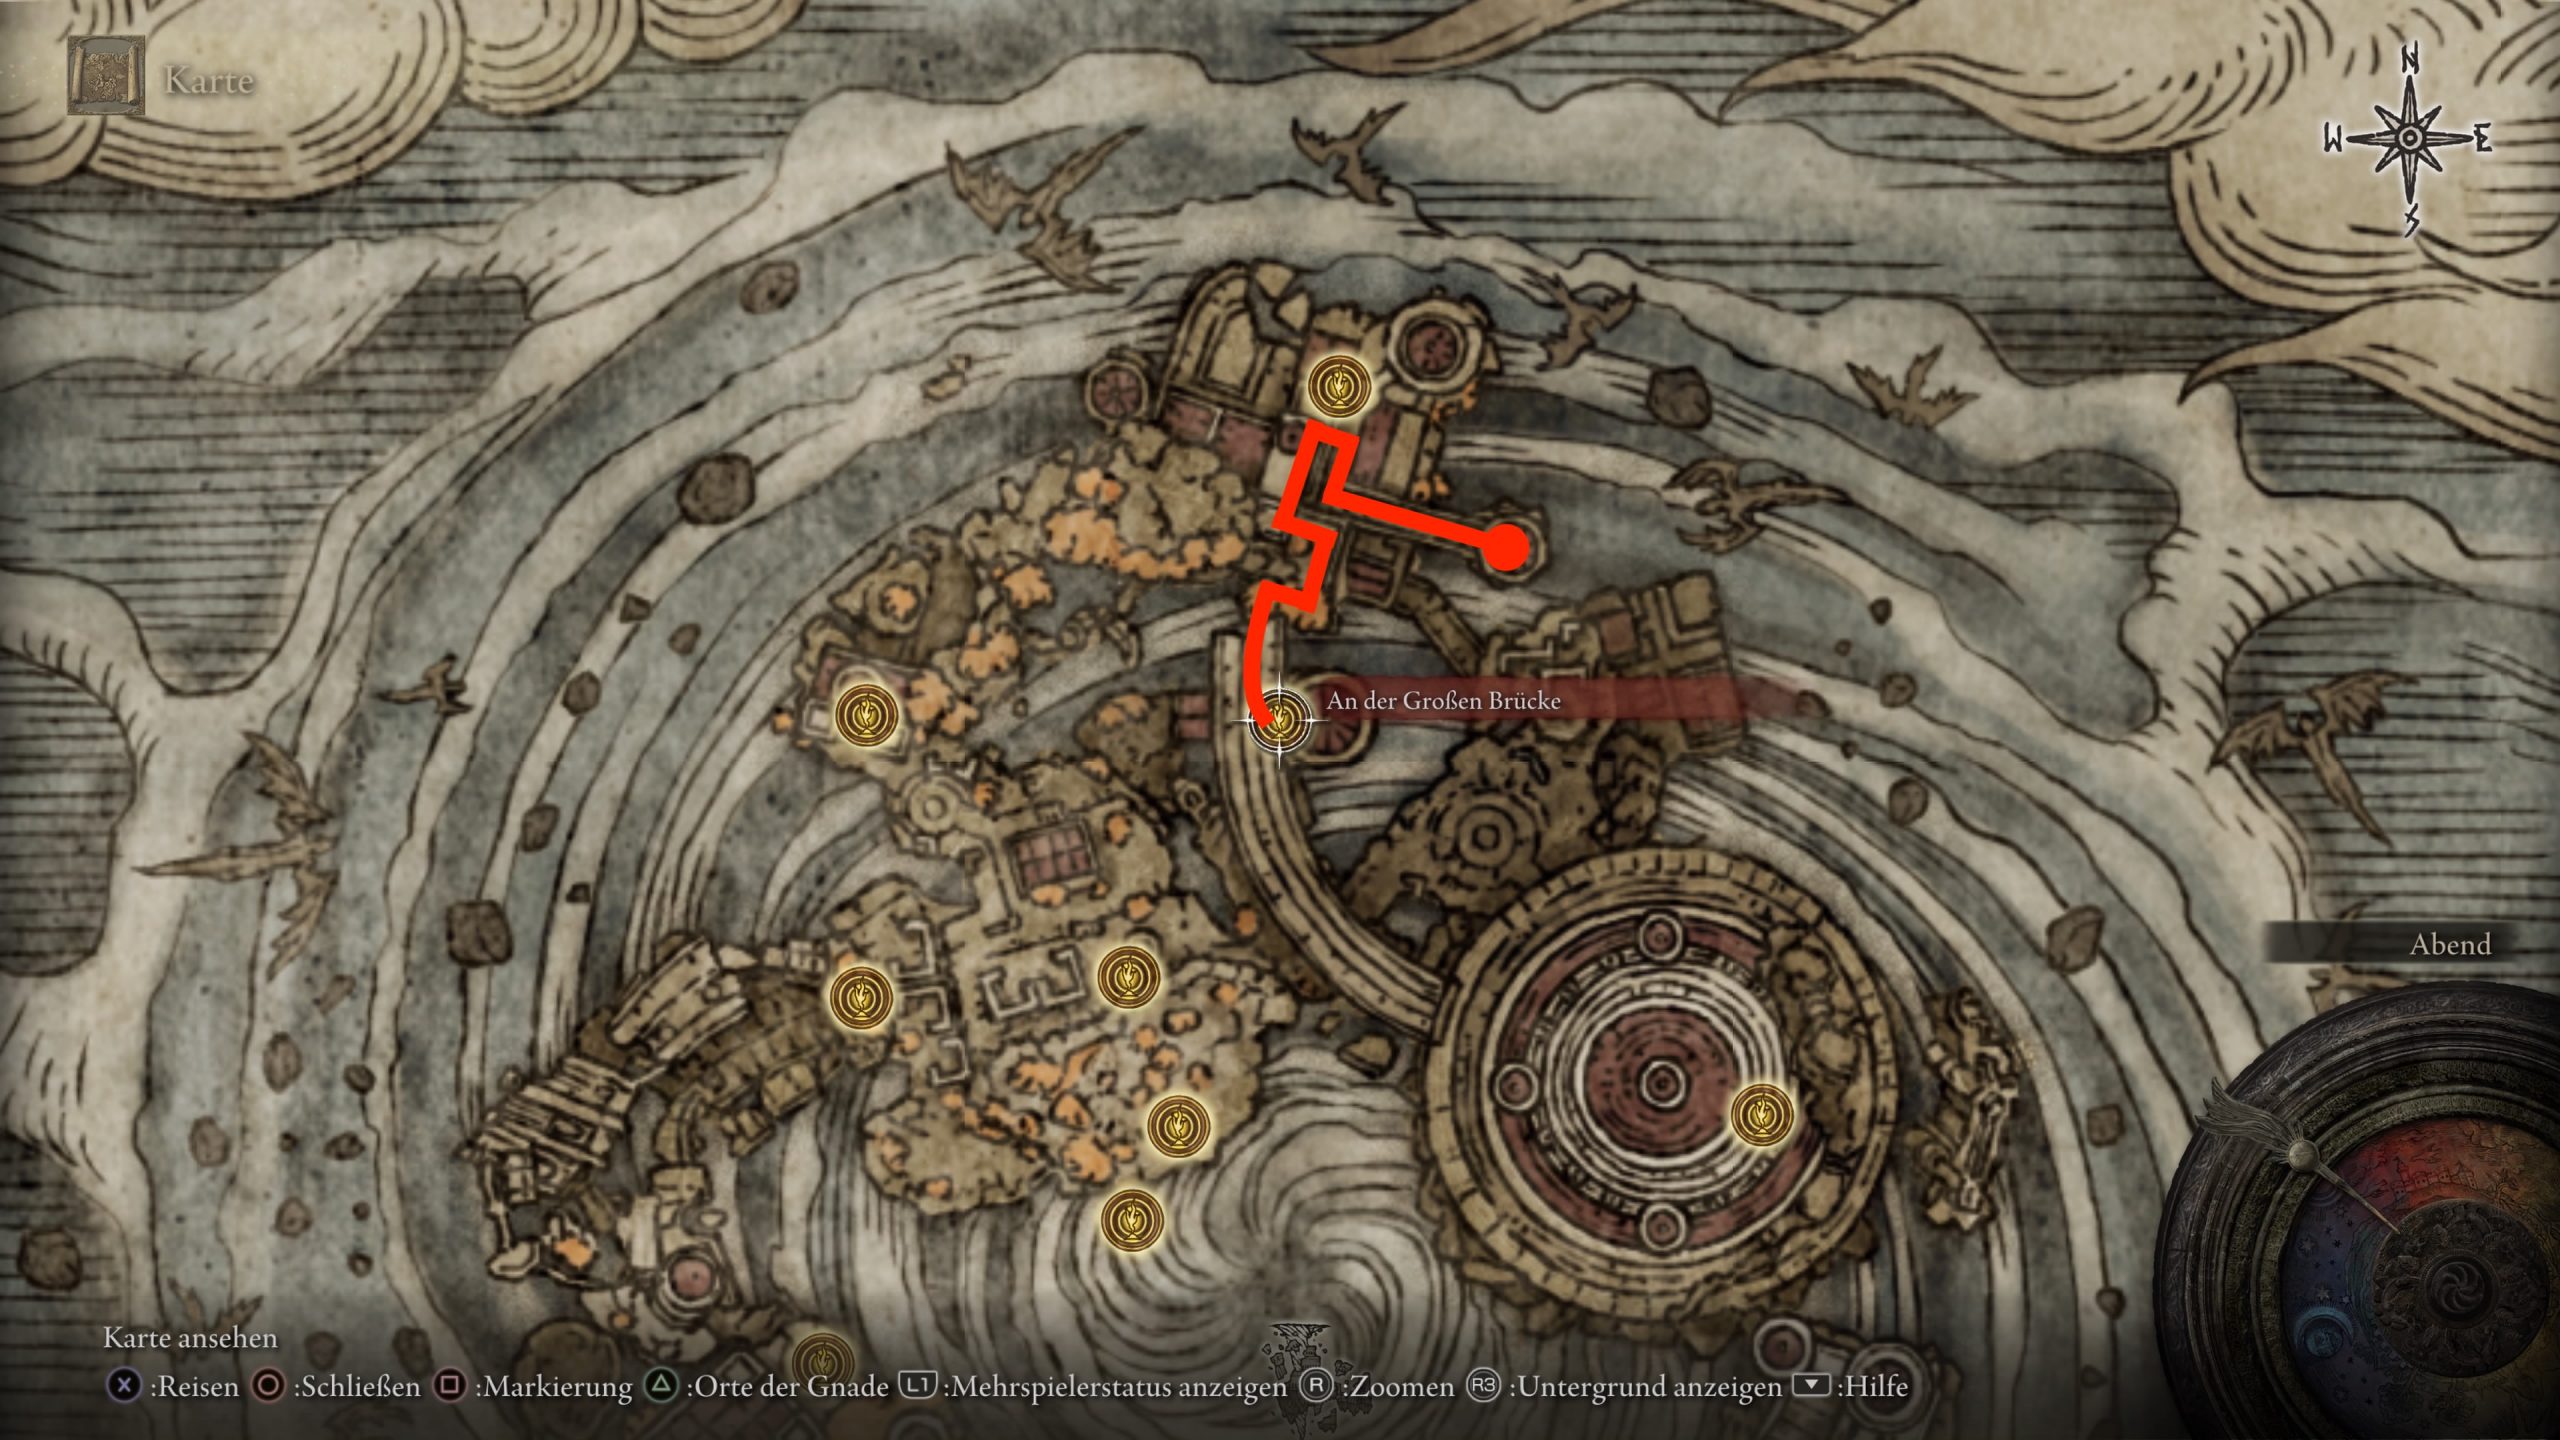
Where can I find this talisman? The talisman is located in the ruined city “Farum Azula”. Start at the Site of Grace “At the Great Bridge”. From there, go up the stairs to the ascent. However, head north in the opposite direction of the boss fight with Malekith.
Watch out for the wolfmen who deal immense damage
Then follow the path further through an open corridor, down the stairs, and back outside. Once there, turn south and take the ladder downwards. Then enter the tower in front of you and grab the talisman.
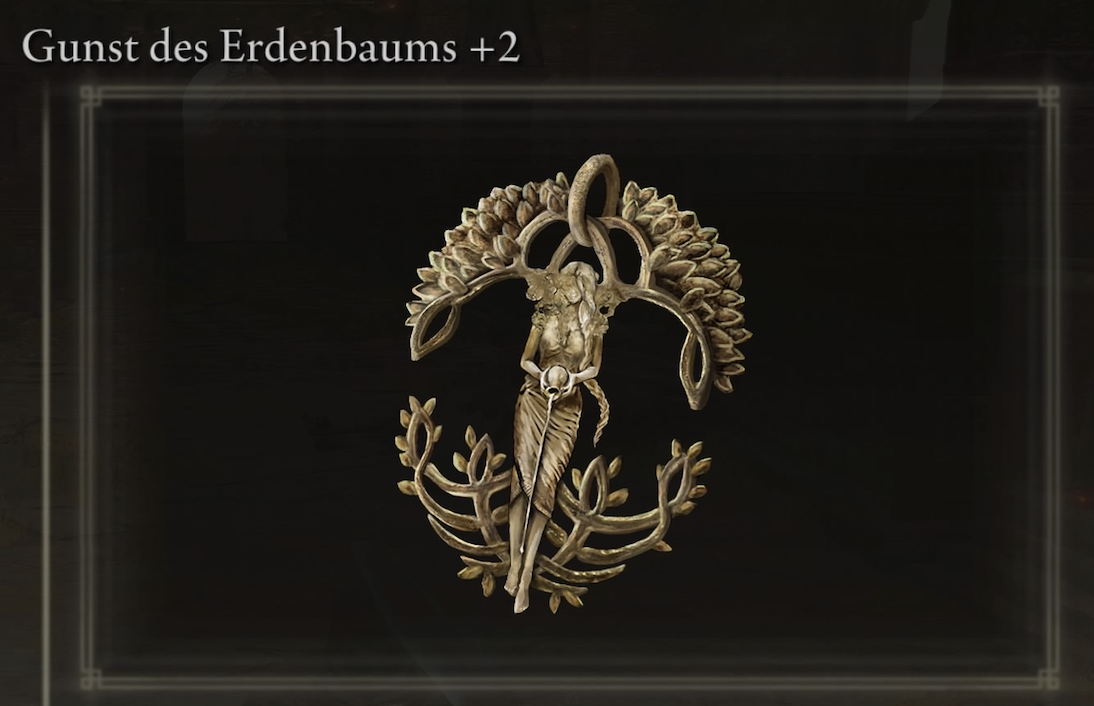
Earth Tree’s Favor +2
A talisman that fits into any build
What can the talisman do? It significantly increases your maximum HP, stamina, and equipment load.
Where can I find this talisman? You only receive this talisman after defeating Maliketh, the Black Blade. Afterwards, Leyndell, the Royal Capital will be engulfed in ash and drastically change. You need to go to the Site of Grace “Forbidden Lands” and then follow the path back to the capital.
Once you reach the location where the monsters were, take the staircase down that heads north. The once vast lake is now full of ash and giant Elden worms. Run past them until you reach a tree trunk. On this, you will find the talisman.
For simplification, we have embedded a YouTube video to show you the exact location:
Recommended editorial content
At this point you will find external content from YouTube that complements the article.
I consent to external content being displayed to me. Personal data can be transmitted to third party platforms.
Read more about our privacy policy.
Once you have collected all the talismans, you will receive the trophy “Legendary Talismans”. However, it may happen that this achievement does not pop up.
In this case, you can go to a safe location, drop all legendary talismans, and then collect them one by one. Sometimes Elden Ring does not register the collected items, so they must be picked up again.
What do you think of the talismans? Do you find them all strong or can you only use a few? Let us know your thoughts in the comments!
This is an AI-powered translation. Some inaccuracies might exist.
Since its release, Elden Ring has changed significantly with new patches. The meta has shifted. Old builds that were strong at launch are now considered weak. Therefore, we show you the overall best buildand how to play it.
Update from January 27, 2026: We have reviewed the article and made some minor structural adjustments.
In Elden Ring, there are many builds, but none is as versatile as a Str/Faith build. The build we will present not only uses the strongest weapons from our tier list and the strongest summons in the game. It also offers the most adaptable and versatile gameplay in Elden Ring.
With this build, you can easily master any situation in the game. All without constant respecing. It is a build that relies on the attributes Strength and Faith, the so-called Str/Faith build.
We will explain to you why this build is so good, in what versatile forms you can play it, and how to play it correctly. Because the build excels even when you primarily bash enemies with your blunt weapons.
[toc]
Start video
Elden Ring Tarnished Edition Reveal Trailer
How to level up properly for this build
Why is this build so strong? The Str/Faith build equally focuses on Strength and Faith. This covers several of the best categories in the game:
Weapons that require Faith generally also scale with Strength – Such a build harmonizes perfectly
Faith additionally possesses the best buff summons and debuffs in the game – This allows you to strengthen not only your surroundings and yourself but also weaken your enemies
The strongest weapons in the meta, such as the Blasphemous Blade, Maliketh’s Black Blade, or the Vicar’s Longhorn can be easily swapped out to prepare for each boss
The recommended equipment is lightweight, has the minimum requirement for balance, and ensures that you don’t falter after every hit
The build allows you to use and swap many weapons
Several great weapons can be combined for more flexibility and DPS
The best weapons for the build utilize Darksmithing Stones, which makes weapon upgrades significantly cheaper, faster, and easier.
How do I level up best for this build? Although Strength and Faith are your most important attributes in a Str/Faith build, you should not underestimate the importance of the attributes Vigor, Mind, and Endurance.
These are the attributes, and this is what they do:
Vigor (Vitality): Vitality influences your health points and affects fire resistance and poison immunity.
Mind (Focus): Mind influences FP (Mana) and focus-related resistance. Important for magic and sorcery builds.
Endurance: Increases your character’s stamina and physical defense. Particularly important for melee fighters, as stamina enables dodging and blocking.
Strength: Required to wield heavy weapons. It also increases the attack power of weapons that scale with Strength.
Dexterity: Required to wield advanced weapons. It also increases the attack power of weapons that scale with Dexterity. Shortens casting time for spells, mitigates fall damage, and makes it harder to fall off a horse.
Intelligence (Intellect): Increases the spell power of Intelligence-scaling spells and improves magic resistance. Also increases how often you can use spells.
Faith: Required to perform summons. Also strengthens summons that scale with Faith.
Arcane (Arcane Energy): Affects death resistance and certain spells and summons.
Depending on which weapon you wish to use, you should level the attributes according to this priority list. Also, keep in mind that the choice of helmet and talismans can also influence these attributes. We also pay attention to the “soft caps” (you can read more about that on Reddit), meaning the values beyond which investments are hardly worth it:
Attributes for a hero at level 150 (Wanderer)
If you want to play the best class, you should choose the Wanderer. With its even attribute distribution, it has the best prerequisites to build any build from it. We now explain why our points are distributed as follows.
Strength: 45
The soft cap is 40. Therefore, we agreed on 45 to endure a little more.
Focus: 23
Focus is important for this build for three reasons: War ashes, summons, and spirit ashes.
With 23 points, you have enough FP to summon the most expensive spirit ash (Tiche of the Black Blade). Furthermore, you have more resources to not constantly need to refill with a flask of crimson tears.
Endurance: 25
The soft cap for equipment loads is 25. We do not want to go naked into battle, and with this amount, it is possible to equip armor with good balance while still wielding weapons.
Strength: 65
With 65 points, you are above the second soft cap (55 points) and can deal a bit more damage. Important for wielding weapons that have high Strength scaling.
Dexterity: 22
Dexterity stands at 22 points to be able to use the God’s Eater Greatsword and the God’s Scalphunter. Two strong weapons for Str/Faith builds.
Intelligence: 9
Not relevant for this build.
Faith: 33
With 33 points in Faith, you can use one of the strongest buffs in the game – Shabiri’s Wail. In addition to buffs, this amount of Faith also allows you to use strong summons such as Oh, Flame!, Lightning Strike of the Ancient Dragons, and Lightning Spear of the Ancient Dragons.
Arcane: 7
Not relevant for this build.
If you want to play PvP in the long run, you should try to keep your character below level 150. In the community, the meta level has settled between 125 and 150.
Because you will only find players in PvP who have a similar level to yours, you will find it hard to locate opponents at a too high of a level. Since you must redistribute all “purchased” levels when respecing, you cannot reduce this investment again – the only salvation here is a brand-new character.
How to find the right weapon for this build
Which weapons does this build use? The question of weapons in this build is perhaps the most exciting. Because you have many different options, all of which are similarly powerful and serve different niches. You have the following options:
A weapon with Str/Faith scaling and a shield for blocking or parrying.
A weapon with Str/Faith scaling and a seal in the off-hand.
Two weapons with Str/Faith scaling of the same category, one in each hand (the so-called “Power Stance”).
Depending on preference, the following weapons are the best:
The Blasphemous Blade
Location: Trade the Blasphemous Echo (Rykard) at the Finger Reader in the Grace Table.
Maliketh’s Black Blade
Location: Trade the Echo of the Black Blade (Maliketh) at the Finger Reader in the Grace Table.
Vicar’s Longhorn
Location: Can be farmed from the Vicar in Leyndell or the Haligbaum.
Ordovis’ Greatsword
Location: Defeat the boss in the dungeon “Tomb of the Hero of Auriza” northwest of Leyndell.
Siluria’s Root
Location: Defeat the boss in “The Depths of the Rooted Depths” near the tree trunk.
Gods-Eater Greatsword
Location: Open the chest in “Holy Tower of Caelid” after the boss.
Magmalindwurm Scaleward
Location: Defeat “Magmalindworm Makar” in “Ruins-Infested Abyss” northwest of the Great Lift of Dectus.
Finger Seal for Buffs
Location: Can be acquired from the Twin Maiden Husks at the Grace Table for 800 runes.
If you are missing one of these special weapons, you can also use standard weapons like the Magma Blade or the God’s Scalphunter. This way, you can also use completely different weapon types than those listed here and, if possible, even outfit them with war ashes.
Strong weapons for a strong heroThe magma swords are perfect for dual-wielding
The perhaps most interesting decision is the one regarding the off-hand:
With a shield for protection, you can play more cautiously, but you exchange offensive stamina for defensive actions.
With a parry option, you can brutally punish many opponents, but parrying requires a lot of skill from you and is risky.
With Power Stance, you deal the highest DPS but are also the most vulnerable. Here you must be able to dodge very well.
If you are looking for a good shield for defense, the Beast Triangular Shield is an excellent choice. For parrying, there is no better option than the small buckler. A brief overview of the best shields can be found here:
A seal must not be missing from the build: If you only want to buff and use your summons for support, the Finger Seal will suffice. However, if you also want to deal damage with your summons, the Seal of the Raging Flame is perfect for Str/Faith builds.
What are the best summons? What would a Str/Faith build be without summons? The wonders actually play a somewhat subordinate role here and are meant to buff you and your teammates. The summons you should definitely use include the following:
Golden OathShabiri’s Wail
Golden Oath
Effect: Increases your damage by 15%. Increases your defense by 10%
Location: In a hut at the site of grace “Hut with Corpse Stench” on Mt. Gelmir.
Shabiri’s Wail
Effect: Increases your damage by 25%. Increases the damage taken by 30%.
Location: On the second floor of the tower “Tower of the Raging Flame” in a chest, south of the lift of Dectus.
If Shabiri’s Wail is too damaging for you, you can also use Flame, Give Me Strength! or Protection of the Black Flame instead.
There are also offensive summons, but these are somewhat limited and not the focus of the build. However, you can still equip the following:
Oh, Flame!
Lightning Spear of the Ancient Dragons
Lightning Strike of the Ancient Dragons
Stone of Gurranq
Insect Threads
Raging Explosion
Which weapon type is the best? This actually depends on the boss and the enemies you want damage from. Many weapons with Faith have strong effects that benefit you in combat.
Maliketh’s Black Blade or the Black Knife can weaken bosses with their unique talents, drain health over time, and temporarily minimize their health bar.
The Blasphemous Blade is an all-rounder. It handles every enemy, deals massive damage even at a distance, and heals you after each hit with its unique talent.
The Vicar’s Longhorn looks the silliest of all weapons but can especially annihilate huge enemies like dragons or monsters with small bursts in seconds. Practical if you want to attack from a distance.
However, if you prefer fast attacks, the Magma Blade or the Gods Scalphunter would be a better choice. They can deal massive damage in quick succession and also consume little stamina.
How to find the right equipment for the build
What armor should I take? Generally, for every build, pay attention to your balance and the overall weight of your armor.
It is important that you reach at least 51 balance with your armor. If you do not achieve this, you will be knocked back by almost every attack from your opponent and cannot withstand anything.
The weight of your armor also plays a role in dodging and stamina consumption. The heavier your equipment, the heavier the load you carry. So, always try to achieve a medium load and not fall below the balance value of 51. You can thus wear any armor as long as you follow our recommendations.
Which talismans should I take? The choice of talismans can be easily narrowed down. We recommend the following:
Increases your damage at full HP gaugeSignificantly increases your damage from talents
Ritual Sword Talisman
Effect: Increases your attack power at maximum HP.
Location: Located in a chest after defeating the boss in the ruins of Lux (Altus Plateau).
Shard of Alexander
Effect: Significantly enhances the attack power of talents.
Location: Complete Alexander’s quest.
As a second and third talisman, you can use different talismans depending on which weapon you wield and how you fight. The following are appropriate:
Green Turtle Talisman
Dragon Greatshield Talisman
Fiery Scorpion Talisman
Lightning Scorpion Talisman
Holy Scorpion Talisman
Axe Talisman
Claw Talisman
Herb’s Canvas Talisman
All weapons typically use their unique talents, and with these examples, you can increase their damage to the maximum.
What does your build look like for the start of Shadow of the Erdtree? Do you also use Str/Faith or do you prefer Dex/Int? Feel free to exchange ideas with other users in the comments! If you are looking for more tips, information, and recommendations on Elden Ring from the MeinMMO editorial team, we have an overview here that we update continuously: Elden Ring: All our guides, beginner tips and builds in overview
This is an AI-powered translation. Some inaccuracies might exist.
The new Event Quests in Monster Hunter Wilds are here and offer you a simple way to quickly get valuable Glow Orbs that you can use to customize your weapons and armor.
Which quests are involved? Since March 19, 2025, at 01:00 until March 26, 2025, at 00:59, you have the opportunity to participate in 3 new Event Quests that deliver special rewards. With 2 of them, you can now easily and quickly obtain powerful Glow Orbs with which you can customize the abilities of your weapons and armor.
Normally, Glow Orbs are available as loot for high-ranking two-monster hunts that generally take longer. Both Event Quests have a difficulty level of 5-★ and can be completed relatively easily, allowing you to specifically approach your desired build through these quests. One of the quests is even suitable for players who are not that far advanced in the story yet.
Start video
Monster Hunter Wilds: Did you really start the quest?
What do you need to do to obtain the Glow Orbs? To receive the Glow Orbs, you must complete one of the two quests:
Sand-Crusted Soul: You only need Hunter Rank 9 or higher and can obtain Glow Orbs to customize your armor abilities. To do this, you must hunt or capture a regular Doshaguma.
Ballet in the Rain: You need Hunter Rank 21 or higher, as you need to catch or slay a hardened Lala Barina for this. In exchange, you will then receive Glow Orbs that allow you to customize the abilities of your weapons.
The quest “Sand-Crusted Soul” is particularly suitable for hunters who have just started the game, allowing them to experiment with different abilities for their armor early on.
To start the quests, you need to go to Alma and select “Event Quests” under item 6 in the quest overview. You will find the item directly under the investigations.
Is the third quest worth it? In the third Event Quest “Hidden Fire in the Sand,” you can obtain special materials that you need, among other things, for the exclusive “Expedition Headgear α” inspired by the Expedition emblem. Whether the Leaf-Look earring is worth it for you, you will have to decide for yourself. It definitely won’t hurt, and this quest can also be completed relatively quickly.
If you don’t have time to farm within the quest period, you probably don’t need to be too sad. In the past, Event Quests have often returned, so the opportunity will certainly arise again.
The latest generation of RTX graphics cards are among the best GPUs on the market right now. NVIDIA has even lowered its prices in Germany, but there’s a catch.
How cheap are the graphics cards now? Only the Founders Edition of the new RTX-50 series has benefited from the price reduction. Here are the prices you can expect per model:
RTX 5090: From €2,329 to €2,229 – (€100 less)
RTX 5080: From €1,169 to €1,119 – (€50 less)
RTX 5070: From €649 to €619 – (€30 less)
This is a good sign, especially considering the current market and those looking to upgrade their systems. According to pcgamesn, the price drop has something to do with the dollar’s exchange rate, which has reached a new low since March 5. Although the news of lower prices is a reason to celebrate, hardly anyone will benefit from it.
Start video
In Germany, there are over 400 USB sticks protruding from walls – What is the ‘Dead Drops’ project?
Cheaper, but only a few can benefit
What’s the catch? Despite the price drop from NVIDIA, there aren’t automatically new units available from the manufacturer. The price has been adjusted, but the stock remains the same – there are none to buy.
As for the Founders Edition, the officially cheaper GPUs of the 50-series are sold out everywhere, except for scalpers who are selling their goods at exorbitant prices. Additionally, these prices apply only to the Founders Edition. Partnerships with Zotac, Asus, or MSI are excluded – they have their own, usually pricier prices.
However, it is still a positive step from NVIDIA in the right direction. Graphics cards are among the most expensive components in a system, and ultimately it looked like prices would only increase.
Unfortunately, we cannot answer what the true reason for the price reduction is, but if you’re looking for a graphics card that offers performance and can even compete with the RTX-50 series, you might want to look at the competition. AMD has introduced its new 90 series, and it sounds promising for an upgrade: AMD RX 9070 XT: Price, release, and tests – everything you need to know before buying
This is an AI-powered translation. Some inaccuracies might exist.
Generation Z is looking for jobs, but receives rejection after rejection – and not only in professional life, but also in dating.
The title image is a symbolic image
Why is Generation Z so lonely? The term “loneliness” describes the feeling that people experience when they perceive a discrepancy in their lives between the social relationships they desire and the relationships they actually have.
According to the online magazine Business Insider, the dating platform “Hinge” surveyed 15,000 people about their dating views last year and found that 90% of Generation Z would love to find love. The survey also revealed that 44% of the surveyed Gen Z representatives have little to no dating experience.
There is thus a significant discrepancy of 46% within Generation Z between people who are looking for a relationship and those who actually have dating experience – despite the fact that apps like Hinge and Tinder theoretically allow for meeting a large number of different people.
Start video
Students spy on passersby with hidden cameras and AI, find name and address in seconds
Gen Z is not only facing rejection on Tinder
What is behind the constant rejection? The colleagues at Business Insider have outlined various fates of Generation Z that show the experiences this generation has in the job search.
A 24-year-old with a degree in finance applied for around 600 positions before finding a job. A 23-year-old wrote about 300 applications and is still looking.
On Reddit, affected individuals report similar experiences. One user received only one job offer in 9 months and 300 applications, another achieved the same result in 6 months and 1,200 applications. A third user is currently at 800 applications.
What do those affected say about the rejections? A reported problem is the lack of feedback from companies. Applicants sometimes never receive an official rejection, and if they do, a reason is rarely given for why it was not enough. This leaves those affected uncertain.
With the lance, you can deal high damage in Monster Hunter Wilds and use the shield for protection. To facilitate a quicker battle in the endgame, we show you the best build with weapons, armor, and decorations that you need.
How is the build structured? We first provide a brief overview of the essential items like weapons and armor for the best lance build. We will then explain in detail the most important information about crafting your equipment, as well as selecting the right decorations for your armor. Lastly, we will reveal the strength of the build.
This build will be continuously updated and may be completely changed depending on updates to match the current meta. So feel free to check back after every update and see what’s changed.
With our directory, you can also quickly jump to each point of the build:
[toc]
Lance Build: Everything about Weapons, Armor & Decorations
Start video
Monster Hunter Wilds: This is how the lance plays in the latest installment of the series
What is the best build for the lance? The lance has two options regarding its builds:
High affinity and paralysis
High affinity and explosion
The shield allows for a more passive playstyle, and when playing in a group, you can even take on the role of the tank. Therefore, we recommend the build with paralysis, so you can incapacitate your targets for longer periods. The focus is thus on critical damage and paralyzing the enemy.
Weapon
Skyscraper (Artian Weapon) or alternatively Purifying W. Gareth
Armor
Gore Helm B Blangonga Armor B W.-Arkveld Armguards B Arkveld Waist B Gore Leggings B
Charm
Chaser Charm
How to build the best Artian weapon for the lance
What do I need to craft the Skyscraper? For Skyscraper, you should choose three affinity infusions when crafting with your materials. The element should be paralysis to incapacitate the monster while building the status.
If you don’t have good parts yet or luck is unfavorable with the enhancement bonuses for the Skyscraper, you can also opt for the Purifying W. Gareth, which you can build from the components of the Arkveld.
As a secondary weapon, all weapons are worthwhile except for dual blades or the bow. Dealing weapon damage primarily with raw damage aligns nicely, like the hammer or the sword & shield. They also provide a refreshing gameplay experience.
Which enhancement bonus should I focus on? When enhancing your Artian weapon, the following bonuses are especially important:
Affinity
Attack
Sharpness
Which decorations are important? You can be more flexible with decorations and choose from the following options:
Guardian/Wall-Jwl 3
Bare/Wall-Jwl 3
Critical Jwl III 3
Lance Build: Armor and Decorations
Which armors are important? For our armor selection, we focus on the following equipment and effects:
Armors
Gore Helm B
Blangonga Armor B
W.-Arkveld Armguards B
Arkveld Waist B
Gore Leggings B
This is what the armor for the lance build looks like
Set Bonuses
Gore Magalas Tyranny
Black Darkness I: Causes frenzy in battle against large monsters
Which decorations should I use? For the armor, you should primarily choose decorations that increase your attack and affinity, and you also need an effect through frenzy that enhances your infection recovery rate while simultaneously increasing your critical damage. Finally, reducing damage is beneficial when you block attacks from your monster. You should equip the following:
Head
Challenger-Jwl 3
Figure-Jwl 1
Chest
Fury-Jwl 2
Arms
Reason-Jwl 1
Reason-Jwl 1
Figure-Jwl 1
Waist
Figure-Jwl 1
Figure-Jwl 1
Legs
Chain-Jwl 3
Figure-Jwl 1
Protection-Jwl 1
How does the strength of the build unfold?
This build primarily focuses on maximizing agitator to increase damage (+20) and affinity (+15 %). When attacking weak points, the weakness advantage activates, further strengthening your attacks.
To increase affinity, healing from frenzy is essential, as the set bonus from the Gore set can give you up to 15% affinity.
As the tank of the group, you need to take a lot of hits, and the Protection-Jwl 1 helps reduce monster attacks. With the Figure-Jwl 1, your constitution is also raised to maximum level, which reduces overall stamina consumption by 50%.
All in all, with this build, you are a walking tank that never runs out of stamina and can also work excellently as part of a team.
In many games, there is a debate about whether Europe or North America is the stronger region. In the case of Counter-Strike, shroud has a clear answer.
Who is it about? The Twitch streamer Michael “shroud” Grzesiek is a former CS:GO and Valorant pro, known for being very skilled in various shooters.
On Twitch, shroud has 11.1 million followers and averaged 11,300 concurrent viewers over the past 6 months (via Sullygnome).
In Counter-Strike, shroud celebrated several regional successes in North America with his team Cloud9.
Shroud’s greatest triumph is winning the ESL Pro League Season 4 Finals in CS:GO. The success earned Cloud9 a prize money of $200,000. Now the streamer reflects on Cloud9’s achievements and concludes that Europe is much better in Counter-Strike than North America.
Start video
Counter-Strike 2: Valve once again impresses with the launch trailer
From Top Team in America to Mediocre in Europe
What exactly does shroud say? The streamer explained on Twitch that while Cloud9 was one of the top teams in North America, it only performed decently in Europe: “We were kind of the best NA team, so we won all the NA stuff. And then we went to Europe and were okay.”
He then added that being decent in Europe is quite an achievement because the region is so strong: “Being okay in Europe was respectable because Europe is insane [good] in Counter-Strike.”
What lies behind shroud’s statements? Shroud played CS:GO professionally for Cloud9 until 2017 and was indeed relatively successful – at least in North America.
Cloud9 was considered one of the best teams in the region and won various smaller tournaments and qualifiers for international competitions.
Cloud9 also often finished in one of the top positions in the regional Pro League seasons.
However, internationally, European teams like Astralis, NaVi, or Fnatic mostly held the upper hand.
Over the years, the team of Cloud9 changed more and more. Shroud took a spot on the bench and shortly thereafter ended his career as an active player. In 2020, Cloud9 then signed European players and participated in Pro League Season 13 for the first time in Europe. However, the new lineup did not get beyond the 17th place.
In Monster Hunter Wilds, the popular Death Stench armor from the predecessors is also back. To unlock it, you first need to obtain a Sinister Cloth. We will show you where to get it and how to use it.
What kind of material is this? Sinister Cloth is a high-rank material that allows you to craft the equally high-rank Death Stench armor for yourself and your Palico. However, to unlock the armor, you must first find the item.
Where you can get it and what you can craft from it is explained here.
[toc]
Start video
Monster Hunter Wilds: Do you simply disable your helmet for the perfect look?
How to obtain the material “Sinister Cloth”
Unlike most materials in Monster Hunter Wilds, you cannot obtain the Sinister Cloth from a monster or find it in the environment. Instead, you have two options to get the coveted item.
1. Through trade
The simplest method to obtain the material is through a trade. This is easiest when you speak with Nata at any camp.
There, you can exchange the item through the following traders:
Kilama (Kunafa/Wind Plains) –> In exchange for the item “Large Wind Aloe,” which you can find in the Wind Plains
Brillitzer (Wudwud Hideout/Crimson Forest) –> In exchange for “Ancient Wyvern Coins,” which you can find from endemic life or in the sand
At a camp, you can conduct trades with other areas through Nata
Alternatively, you can also speak with the respective NPCs in the corresponding areas. However, the method through Nata is more effective.
What can I do if the traders do not have the cloth? The traders do not always have the Sinister Cloth in stock, so you need to be a bit patient.
You can reset the traders’ offers by using the “Rest” function in your tent or at a campfire. This costs you 300 Guild Points each time.
2. Through material procurement
With a very low chance, but without having to do anything, NPC Murtabak from Kunafa can randomly procure the item for you.
To do this, once you have unlocked material procurement, set the order settings to “Prioritize Rare Materials” to slightly increase the chance. You can then regularly collect the materials he procures at Nata.
With a bit of luck, a Sinister Cloth is among them.
Using Sinister Cloth: Crafting the Death Stench Armors
Once you have snagged a Sinister Cloth, you automatically unlock the corresponding armors: 2 variants of the Death Stench Set α and the F Death Stench Set α for your Palico:
Death Stench Set α – Variant 1Death Stench Set α – Variant 2F Death Stench Set α
For each armor piece, you need 1 Sinister Cloth and 2 additional materials each. So, a bit of patience is required if you want to craft everything.
With the hammer, you can rain down raw damage in Monster Hunter Wilds on your opponents with some of the strongest attacks. For a quicker battle in the endgame, we show you the best build with weapons, armor, and decorations that you’ll need.
How is the build structured? We first provide a brief overview of the essential items such as weapons and armor for the best hammer build. Next, we explain in detail the important information about crafting your equipment, as well as choosing the right decorations for your armor. Lastly, we reveal the strength of the build.
This build will be continuously updated and completely altered depending on updates to match the current meta. So feel free to check back after each update and see what has changed.
With our directory, you can also quickly jump to the individual points of the build:
[toc]
Hammer Build: Everything about Weapons, Armor & Decorations
Start video
Monster Hunter Wilds: The Hammer’s Capabilities
What is the best build for the hammer? Since the hammer has a short range and a slow attack speed, we present a build that increases your affinity to 100%. This ensures that your hits deal brutal damage.
To give it an additional bonus, we focus on the element of explosion, allowing you to deal area damage when the monster’s status threshold is reached.
Weapon
Motor Wankel (Artian weapon) or alternatively Graviton Hammer
Armor
Gore Helm B Arkveld Armor B W.-Fulgur Arm Guard A W.-Fulgur Hip Ring B Gore Leg Protectors B
talisman
Hunt Talisman
How to Craft the Best Artian Weapon for the Hammer
What do I need to build Motor Wankel? For Motor Wankel, you should ensure to choose three affinity infusions when crafting your materials. The element should be explosion to have an additional source of damage.
If you don’t have good parts or luck with the enhancement bonuses for the Motor Wankel, you can also rely on the Graviton Hammer, which you can build from the individual parts of Gravios.
For a secondary weapon, either the Rathalos Fire Sword (great sword) or Rathling Phoenix (light bowgun) are worthwhile. Both weapons have the ability “Critical Boost St. 3,” which supports your affinity. Furthermore, the Fire Sword can help you sever body parts, while the bowgun allows you to adopt a ranged play style.
Which enhancement bonuses should I focus on? When enhancing your Artian weapon, the following bonuses are especially important:
Attack
Sharpness
Element
Affinity
Make sure you can secure at least one sharpness enhancement so your weapon gains white sharpness.
What decorations are important? You can be more flexible with decorations and choose from the following options:
Charging/Crafting-Jwl 3
Critical Jwl III 3
Critical Element Jwl II 2
Hammer Build: Armors and Decorations
Which armors are important? For our armor choice, we focus on the following equipment and effects:
Armors
Gore Helm B
Arkveld Armor B
W.-Fulgur Arm Guard A
W.-Fulgur Hip Ring B
Gore Leg Protectors B
This is what the armor for the hammer build looks like
Set Bonuses
Gore Magalas Tyranny
Black Darkness I: Unleashes frenzy in battles against large monsters
Fulgur-Anjanath’s Will
Uplift I: Grants a second stamina bar.
What decorations should I use? When it comes to armor, it is primarily about selecting decorations that increase your attack and affinity, in addition to needing an effect from frenzy that boosts your infection recovery rate while also increasing your critical damage. You should equip the following:
Head
Challenger-Jwl 3
Growth-Jwl 1
Chest
Challenger-Jwl 3
Powerful Jwl 2
Arms
Figure-Jwl 1
Waist
Powerful Jwl 2
Counter-Jwl 2
Legs
Soften-Jwl 3
Sensible Jwl 1
Sensible Jwl 1
How Does the Strength of the Build Unfold?
Since the hammer has a slow moveset, damage must be maximized as much as possible, which is why this build is based on affinity. With the W.-Fulgur Arm Guard and 2x Powerful Jwl 2, you receive 30% affinity when your stamina bar is full for a certain time. With the additional bar you gain from Fulgur-Anjanath’s Will, the effect is almost always active.
When the monster is then enraged (15% affinity), you repeatedly attack the weak points of monsters (10% affinity) and cure the frenzy from the Gore set (15% affinity), you are at 70% affinity. If you then add the 20% affinity from your Artian weapon, you achieve 90% affinity.
If you also give your weapon 2x an enhancement bonus in the form of affinity, you reach 100% affinity.
This is a massive damage boost, and that’s not even counting the Counter-Jwl 2 for more attack after being knocked back and the explosion status effect. As you can see, despite lacking range and slow attacks, the hammer can hit like an unstoppable wrecking ball with the right build.
With the sword & shield, you can hold on to wounds in Monster Hunter Wilds, break them, and even block attacks. For a faster fight in the endgame, we show you the best build with weapons, armor, and decorations that you need.
How is the build constructed? For the best sword & shield build, we first provide a brief overview of the essential items such as weapons and armor. Then we will explain in detail the most important information about crafting your equipment, as well as choosing the right decorations for your armor. Lastly, we reveal the strength of the build.
This build will be continuously updated and completely modified based on updates to match the current meta. So feel free to stop by after each update and see what has changed.
With our directory, you can quickly jump to the individual points of the build:
[toc]
Sword & Shield Build: All about Weapons, Armor & Decorations
Start video
Monster Hunter Wilds: This is how it plays with Sword & Shield
What is the best build for sword & shield? In the best build for sword & shield, the focus is primarily on quick attacks. With the high speed, you can make fast and numerous attacks.
This build relies on the frenzy feature. With the right decorations, you can extract a lot of affinity to overwhelm your hunted monsters with critical damage.
Weapon
Verdoloto (Artian Weapon)
Armor
Gore Helm B Arkveld Armor B W.-Arkveld Armguard B Arkveld Hippo B Gore Leggings B
talisman
Chain Talisman
How to build the best Artian weapon for sword & shield
What do I need to build Verdoloto? For Verdoloto, you should choose three affinity infusions when crafting your materials. You can choose the element freely, but we recommend either paralysis or sleep, as these provide the best advantages in battle.
If you do not yet have good parts or luck with the enhancement bonuses for Verdoloto, you can switch to the following alternatives, depending on your preferred element:
Fire: Rays Crown
Water: Sandsea Katduva
Thunder: Fulgur Sword Guardiana
Ice: Cliffs Mateptro
Dragon: Hunter Ankh
As a secondary weapon, the dual blades “Hunger Claws” from Gore Magala are worthwhile due to the fast playstyle, as they significantly increase your elemental damage when the “Critical Element” perk is active.
Which enhancement bonus should I focus on? When enhancing your Artian weapon, the following bonuses are particularly important in priority:
Element
Affinity
Attack
Sharpness
Which decorations are important? With the decorations, you can be more flexible and choose the following options:
Guardian/Craft Jwl 3
Critical Jwl III 3
One Element/Critical Element Jwl 3 (depending on the element of the Artian weapon)
Sword & Shield Build: Armors and Decorations
Which armors are important? For our choice of armor, we rely on the following equipment and effects:
Armors
Gore Helm B
Arkveld Armor B
W.-Arkveld Armguard B
Arkveld Hippo B
Gore Leggings B
This is what the armor for the sword and shield build looks like
Set Bonuses
Gore Magala’s Tyranny
Black Darkness I: Triggers frenzy in battle against large monsters
Arkveld’s Hunger
Quick Recovery I: Restores some health as long as you continuously attack monsters. Recovery depends on the weapon
Which decorations should I use? With the armor, it is mainly about selecting decorations that increase your attack and elemental damage. Additionally, due to frenzy, you need an effect that increases your recovery rate from infection and at the same time your critical damage. The following should be equipped:
Head
Chain Jwl 3
Buffer Jwl 1
Chest
Chain Jwl 3
Phoenix Jwl 2
Arms
Figure Jwl 1
Figure Jwl 1
Figure Jwl 1
Waist
Figure Jwl 1
Figure Jwl 1
Legs
Chain Jwl 3
Reason Jwl 1
Reason Jwl 1
How does the strength of the build unfold?
The sword & shield does not deal much damage per hit, but due to the speed of the weapon, you can land many hits in a short time to maximize your attack and elemental damage. With the Arkveld set bonus, you benefit, as continuous attacks regenerate your health bar.
With the set bonus from the Gore armor, you will additionally be infected with frenzy. When healed, you gain a significant boost in your affinity to deal critical damage more often. If you maintain your attacks and continue to apply pressure on the monster, you increase your affinity and can heal yourself at the same time. This is an aggressive gameplay style that is definitely worth it if you master it.
A passive play style is also possible thanks to the shield, and through the grip mechanic of the weapon, you can latch onto weak points and destroy them in seconds to inflict immediate critical damage.
You can play Palworld on Steam, on Xbox, in Game Pass, and starting today on PS5. But what about multiplayer? MeinMMO explains what you need to know about multiplayer, servers, and crossplay.
Do you want to play Palworld in multiplayer but don’t know what to consider? MeinMMO explains what you should know before jumping into a match with friends. We will explain how to create a match, with which platforms crossplay works, and which progress you can carry over.
With the big Sakurajima update for Palworld, a lot of content has been added to Palworld, which we also want to address.
Will Palworld work the same on PS5? MeinMMO assumes that all information contained in this article also applies to the PS5 version.
The article was first published on January 22, 2024. We updated the article on March 19, 2025, and added new information about crossplay, which has been expanded with update 0.500. We also adjusted the structure and moved crossplay to the top.
Last updates: 03/19/2025, 03/05/2025, 02/14/25, 03/19/24, 01/29/24, 01/22/24, 09/25/24
Palworld: Crossplay with PC, PS5, Xbox, and Game Pass
Is there crossplay? On March 19, 2025, the Update 0.50 for Palworld was released. Now crossplay is supposed to be available for all platforms.
Yes, there is crossplay, but there are a few restrictions you need to consider (as of March 5, 2025):
PC and Xbox: Players on Xbox Series X|S can play together with players who started their game on PC via Game Pass.
Steam and Xbox: Xbox and the Steam version of Palworld can now play together since the update.
PS5 and PC: Crossplay between the PS5 and PC versions of Palworld should also be possible since update 0.50. More info on the PS5 version of Palworld can be found on MeinMMO.
PS5 and Xbox: Crossplay between PS5 and Xbox Series X|S is now possible in Palworld.
Steam and Game Pass: Crossplay between the Steam version and players with Game Pass is currently possible.
Developer Pocket Pair announced on the occasion of the 1st anniversary of Palworld that they plan to work on a crossplay feature across all devices for the release. Now they have fulfilled their promise.
Does Palworld offer multiplayer? Yes, you can play Palworld both in single-player and multiplayer. You can also play offline alone. The best tips for Palworld can be found on MeinMMO.
What multiplayer options are there? At the current time (as of March 5, 2025), you can play Palworld in the following ways:
In coop with up to 4 players.
On a server with up to 32 players. Here you can choose between different regions, such as EU, NA, or China.
With the arena, Palworld also now offers PvP content, functioning as 4v4 matches where each player can bring three Pals per player.
What you should consider in multiplayer:
All progress is saved by the host. If the host deletes the game, your character is gone.
Your character is saved in the host’s game. If you rejoin a match, all progress of your character (level, inventory, technology, Paldex) is retained.
You cannot carry a character from single-player to multiplayer. This is expected to come later as an update.
Steam achievements work for the host, for the teammates only the achievements for the bosses at the moment.
Server settings can be changed by the host as often as desired before each start. Therefore, you can also make your game easier or harder later.
In the future, it should also be possible to transfer captured Pals between servers.
If you have problems and difficulties with multiplayer in Palworld, please check the following guide directly on MeinMMO:
What kind of PvP does Palworld offer? With the Sakurajima update, Palworld has received a PvP arena. This serves as a fun additional mode without leaderboards.
The arena offers 4v4 matches, where each player can bring three Pals per player. Additionally, players can bring their best and favorite weapons. All items consumed in the arena (ammunition, consumables) will be fully refunded upon leaving the match.
Start video
Palworld: Feybreak – Trailer presents free update with loads of new content
Palworld: Server or Coop Game?
Choose Server: The official servers are hosted by Palworld, and the performance is handled by the provider. However, you cannot freely choose with which players you play there. Depending on the selected region, the ping of your connection can be very high. All admin commands for your server in Palworld can be found in the following article.
Hosting Server: With the Steam version, you can also host private servers. Currently, you have two options:
Either you host the game on your own gaming PC. However, the server will shut down every time you turn off your PC.
Or you can choose a dedicated hosting provider, where you rent a place for yourself. Prices vary between 10 and 15 euros.
Since the Sakurajima update, there are finally dedicated servers for Xbox and Game Pass users.
Palworld Server Minimum Requirements for 1-8 Players
CPU
Processor with 4 cores
Memory
16 GB + 1 GB for each additional player
Network
UDP Port 8211
Storage
30 GB, SSD preferred; slow storage may corrupt save data
Operating System
Windows 64bit or Linux 64bit (e.g., Ubuntu)
Dedicated Server vs Community Server:
Dedicated Server: You host the client independently from the game. Players connect to it via an IP address and port. You can create the game privately or publicly.
Community Server: Similar to a dedicated server, but the game is listed in the official server lists of Palworld. This allows it to be displayed in the game’s client section in the general server list that players can join.
Hosting Coop Game: You host coop games privately on your computer, but it requires fast hardware. You can invite players to your private match. Up to 4 players are possible simultaneously.
Server or Coop: If you prefer a stable connection and want to play with friends or people you know, then you should create a coop match. However, keep in mind that progress is only saved by the host.
Hosting Multiplayer Game – Requirements and Settings
You need to consider: If you want to host a multiplayer game, the creator (host) must bear the entire performance of the game. If you do not have enough processing power, you can also reduce certain settings of the server, such as how many Pals spawn when and how often, or how many resources can be lying around. The system requirements of Palworld in detail can be found explained in detail on MeinMMO.
Create a New Multiplayer Game:
Select “Start Game” from the main menu.
In the next menu, select a world or press “create new world.”
Enter a world name and confirm it.
In the next menu, slide the slider for “Multiplayer” from “Off” to “On.” Now multiplayer is activated.
In the next step, you can choose a preset difficulty level or customize your settings.
Now click on confirm and confirm the following prompt as well.
In the next step, create your character.
Once you are in the game, press Escape, and then you will see the main menu. Here you will see the invitation code in the upper right corner.
Your friends press “Join Multiplayer Game (Invitation Code)” in the main menu and can enter your code there.
If everything works out, your teammates will then enter the character creation.
Tip: You can convert a single-player game into a coop game at any time. To do this, go to the server settings and activate multiplayer. However, this only works from the main menu. It is not possible from an active game.
All Guides for Palworld: Are you looking for more tips, tricks, and help for Palworld? Then check out MeinMMO.
The SciFi MMORPG Entropia Universe is known for high real cash transactions. Normally, however, these refer to properties, buildings, weapons, or other in-game investments … and not to the account service from support.
What does the MMORPG want money for? Apparently for the provision of billing information for an account that is more than a year old. Specifically, it is about a case involving the player petscopkid, who reached out to Entropia Universe support because he needs his payment history for tax purposes, dating back to May 2023.
The problem: It seems that only details from the past twelve months can be viewed through one’s own profile. After a brief back-and-forth with support (screenshot of the conversation via Reddit), petscopkid received the information that they have to charge fees for the provision of payment details that go back more than a year.
The cost for this fun is said to be 500 PED per started hour of work, which would translate to 50 US dollars per hour. In other words: The support of Entropia Universe wants to be paid extra by the players for processing a standard support request regarding the provision of basic information about their account.
A look at the world of Entropia Universe:
Start video
Visual Style Showcase (Pre-Alpha) for Entropia Universe
“I am shocked”
How does the community react to this? Since Entropia Universe enjoys a certain reputation, many commenters are not surprised by petscopkid’s experience report. However, this support policy is sharply criticized nonetheless.
_generic writes on Reddit: “The company that defrauds players out of hundreds, maybe thousands of dollars is also robbing them of support? I AM SHOCKED!”
Cold_Associate2213 cannot believe it (via Reddit): “Why is this [game] even still around? Why are people still giving them money? Their product has been and will always be garbage.”
CantAffordzUsername has a clear opinion on Reddit: “Oh my God, what a scam. Just abandon this crap and let it die.”
However, in the comments, there is also some player who looks (somewhat) positively at Entropia Universe. Kamioni writes on Reddit, for example:
It is an old game and back then, before the era of NFTs and similar monetization scams, this was a huge and unique incentive for an MMO. Personally, I invested over 1,000 dollars in the game more than a decade ago because I thought I could earn it back.
The surprising thing is that my investments actually paid off after all these years, because I had originally invested in properties in the game and got back at least three times my initial deposit.
However, when I tried to withdraw the money, there was a catch. Somehow it takes almost half a year for them to transfer the money through some dubious banking service. While it is not exactly a “scam,” the company is certainly shady and inexplicably holds your money for an unreasonably long time.
What do I need to know about Entropia Universe? The SciFi MMORPG by MindArk was originally called Project Entropia and aimed to provide a virtual experience more than 20 years ago, which today would be marketed with the metaverse and implemented with blockchain technology.
One of the more well-known stories: British actor Jon Jacobs treated himself to a virtual vacation resort in Entropia Universe for the equivalent of 100,000 US dollars. Through the sale of mining and hunting rights as well as the rental of hotel suites, he is said to have made over a million US dollars.
Apart from trading, hunting, and mining, the game also offers MMO activities such as quests or PvP battles in space. And in the past year, the developers had a remarkable idea to lead their game into a golden age: Company implements AI presidents to manage their SF MMORPG.
This is an AI-powered translation. Some inaccuracies might exist.
The Avengers are a heroic group in the films of Marvel that has saved the world multiple times. However, not all members and individuals behind the Avengers have always been on the good side. Due to their own failures, they were replaced, by one of the nastiest villains.
Which villain is it about? During the big comic event Secret Invasion, the Skrulls, who can disguise themselves as other people, infiltrated humanity. In the finale of the event, it is not an Avenger or a known hero who defeats the queen of the Skrulls, but Norman Osborn, who is known to many as the Green Goblin.
Due to the failure of technology from Stark Industries and the Avengers, the group was disbanded, and S.H.I.E.L.D. was also replaced. H.A.M.M.E.R. took over the tasks of S.H.I.E.L.D. The company is led by Norman Osborn, who takes over the Avengers Initiative.
Instead of the known heroes, Osborn replaces them with villains who disguise themselves. The new Dark Avengers are not just new heroes; they have their own motivations.
Image rights for Spider-Man (2002) are held by Sony Pictures Entertainment
Start video
Deutscher Trailer zu „Marvel’s The Avengers“
Known villains disguised as heroes
Which members do the Dark Avengers have? Maria Hill, who led S.H.I.E.L.D. before the takeover, was replaced by Osborn with Victoria Hand. Since Osborn wanted a loyal team, he assembled the new Avengers with villains and anti-heroes.
Bullseye disguised himself as Hawkeye
Moonstone became the new Ms. Marvel
Venom disguised himself as Spider-Man
Daken, the son of Wolverine, disguised himself as his father
The Kree Noh-Varr became Captain Marvel
There was also the god Ares and the insane Sentry
As the leader of the Avengers, Osborn became the Iron Patriot, a mix of Iron Man and Captain America. However, Osborn did not just want to form a new group of heroes; he also used them for himself and his partners. During the first mission, the Dark Avengers helped the villain Dr. Doom.
Due to intrigues and hidden motives of the members and allies, there were often disagreements, which is why some members disappeared. When Noh-Varr found out who was behind all his colleagues, he left the new Avengers.
The greatest weapon for Osborn was Sentry. He is actually Robert Reynolds, who is not fundamentally evil but is plagued by The Void. The entity is bound to Reynolds. His normal self and The Void are in an internal struggle, which constantly plagues Reynolds. This is particularly dangerous because he has the power to destroy the whole world and the universe.
Osborn takes advantage of this to control Sentry for his purposes, because with his abilities, Osborn can defeat any enemy.
The Dark Avengers did not last long. Besides the problems with Sentry and his unstable mentality, Osborn had to deal with his own demons. Under stress, he succumbed to his own madness. After a conflict with his former partner Dr. Doom, Loki seized the opportunity to manipulate Osborn.
Under Loki’s influence, Osborn believed that Asgard was a threat to his own power. With a trick, Osborn, together with Loki, made sure that the Dark Avengers, H.A.M.M.E.R, the Thunderbolts, and other allies attacked Asgard.
He unleashed the power of Sentry as The Void to defeat Thor and Ares, who had betrayed Osborn. During the battle, Ares was killed by Sentry.
In the background, Steve Rogers planned to finally take down Norman Osborn. Together with Nick Fury, Maria Hill, and the Young Avengers, they defeated Osborn during the battle in Asgard. However, Osborn unleashed Sentry as The Void, and the heroes could only defeat him with the help of Loki. Thor killed Sentry out of mercy and hurled him into the sun. H.A.M.M.E.R was overthrown, Osborn and most members of the Dark Avengers were arrested.
Has Osborn given up? As is typical for villains, Osborn did not give up. He later re-established the Dark Avengers with new members:
Ai Apaec becomes Spider-Man
Trickshot becomes Hawkeye
Toxic Doxie becomes Scarlet Witch
Superia becomes Ms. Marvel
Gorgon becomes Wolverine
In addition, Skaar, the son of Hulk, was also a member of the team. However, this attempt by Osborn ultimately failed as the various members and partners regularly caused conflicts and betrayals with their evil nature.
How can I read the story of the Dark Avengers? If you want to read the backstory, you should first read the event Secret Invasion from 2008. After that, the comic series Dark Avengers was published between 2009 and 2010. The series has 16 volumes, and the finale is the battle in Asgard. Even heroes can turn into nasty villains: 7 ruthless things demonstrate the dark side of Tony Stark in the Marvel universe
This is an AI-powered translation. Some inaccuracies might exist.
While Larian Studios achieved a huge success with Baldur’s Gate 3the studio wants to move away from the world of Dungeons & Dragons with its future projects and instead focus on original ideas. Now, Hasbro has to find out what the possible future of Baldur’s Gate could look like.
What is the future of Baldur’s Gate? The rights to the brand and games related to D&D have been owned by the American company Hasbro since April 2022.In a conversation with IGN at the Game Developers Conference 2025, Hasbro’s senior vice president for digital games revealed that they are thinking about the future of Baldur’s Gate and are developing plans that they could discuss in “short order.” He is holding back in this context:
It is a rather unenviable position. I mean, we are not in a hurry. Or? (…) We have many plans, many different ways to achieve that. We are starting to think about it. And I think that we will be talking about some other things soon, as I said, not to give away too much.
What he reveals, however, is that after the transition from Larian Studios, there are many people who are very interested in Baldur’s Gate. The community reacts to this statement.
Here you can see the trailer for Baldur’s Gate 3:
Start video
Baldur’s Gate 3 is coming to PS5 – Trailer prepares for console release
“A lot of people are interested” – But not Larian
What is the reaction of the community? In the comments of the article by IGN, the community’s reaction to a Baldur’s Gate franchise without Larian Studios becomes clear:
“Inspired by the success of Baldur’s Gate 3, Hasbro hints at plans to exploit the now profitable IP in the future,” is the most popular comment. The response of another user reads:
Their problem is that there is only one Larian. The bar is set so high that a fourth game would most likely disappoint. I would bet that they would milk the franchise with a movie and a TV series, and then risk a fourth game.
A comment from the user “Striferias” sums up the overall sentiment best: “A studio would have to be crazy to try to emulate Larian’s Baldur’s Gate 3.”
What is Swen Vincke’s view on the future of single-player games? Larian president Vincke has publicly expressed critical views several times about the current state of game development. He has now also recently commented on the status of single-player games, which are often declared dead. However, Vincke has a different, more nuanced opinion: Single-player games are dead – the head of Baldur’s Gate 3 believes that is complete nonsense
This is an AI-powered translation. Some inaccuracies might exist.
A popular strategy game on Steam is getting a DLC with two new factions, and one of them you know from a legendary game series.
Which game is being talked about? We are referring to Age of Empires 4: The latest installment in the legendary strategy game series and one of the currently most played RTS games on Steam (via steamdb.info). In a new trailer, the developers briefly showcase all the new content of the DLC “Knights of Cross and Rose”.
You can watch the trailer for the DLC here:
Start video
Age of Empires 4: Trailer shows the Templars from the new DLC in action
Age of Empires now lets you play the arch enemies of the Assassins
What’s included in the DLC? The centerpiece consists of the two new playable factions: the Knights Templar and House Lancaster. And yes, the Knights Templar are exactly the order that fans of Assassin’s Creed have been battling against for ages – at least in the older parts of the series.
These factions are referred to as “variant civilizations”. This means they share some aspects with already existing civilizations in the game – the Knights Templar share elements with the French, while House Lancaster shares with the British. Nevertheless, both factions are said to offer their own gameplay mechanics and a variety of special units.
The Knights Templar utilize a mix of European military traditions and are thus well-rounded. In contrast, Lancaster builds a flourishing economy that can be invested in technological advantages.
Also included in the DLC are:
4 historical battles that you can complete for medals
An optional Conqueror Mode that makes the historical battles even more challenging
10 new maps for skirmishes against AI and multiplayer mode
When is the DLC coming out? Age of Empires 4: Knights of Cross and Rose will be released on April 8, 2025, for PC on Steam, in the Microsoft Store, and for Xbox One and Xbox Series X|S.
Xbox Game Pass owners can play Age of Empires 4 at no additional cost. On Steam, the base game currently costs only €15.99 – but only for a limited time. So if you don’t own Age of Empires 4 yet or want to persuade friends, now would be a good opportunity.