A trainer of Pokémon GO encountered one of the rarest monsters in the game. For a rather trivial reason, he was unable to catch it.
If you want to catch monsters in Pokémon GO, there can be several reasons why you don’t get it. For example, you might run out of balls, or the Pokémon might flee. This is especially frustrating when it’s a rare monster.
A trainer on Reddit reports that he found one of the rarest monsters in the game. And he was unable to add it to his collection for a very frustrating reason.
Start video
Pokémon GO starts new season Pleasant Days – Trailer for the season
No Battery, No Catch
Which monster is it? As the trainer shows in his post on Reddit, he encountered one of the rare Galar birds: Galar Zapdos. And as if that weren’t enough, his encounter was even with the shiny variant of the bird.
While the regular forms of the 3 Galar birds are very difficult to catch, you have a 100% chance of obtaining the Pokémon with the shiny variants, as long as you don’t run out of balls. The shiny birds cannot flee.
Why did the trainer miss the monster? The reason the trainer did not catch the Zapdos despite the guaranteed catch chance is as trivial as it is frustrating: The battery of his phone ran out during the catching process. As a result, the trainer missed the shimmering, legendary Pokémon.
What does the community say about it? Some of the comments under the post on Reddit give the trainer hints to consider in the future if he finds himself in this situation again:
“You should invest in a power bank,” advises ActiveSame7304 to the trainer. “I don’t want to lie, but you should focus on catching rather than taking a screenshot when your battery is almost empty,” says SynyardNL. “Yes, use your daily adventure incense when you only have 5 percent battery left. Great idea,” says DoctorOZempic. “That’s why kids (or adults) should always carry a power bank with them,” Loserdummy also remarks.
You have just started with Dune: Awakening? MeinMMO tells you which classes, talents, and equipment pieces will make you overwhelmingly powerful as you leave the starting area of the survival MMO.
What kind of build is this? Our build recommendation for the best possible start in Dune: Awakening focuses on a mix of 3 classes that can be unlocked very early in the game and grant you access to talents that significantly improve your damage and mobility.
We also reveal which items you should acquire from the starting area to smoothly navigate through all battles. In the later regions, you can refine our starter build further with armor upgrades and the talents of the other two classes.
[toc]
The release trailer for Dune Awakening:
Start video
Dune: Awakening presents new action-packed trailer for the release of the game
Choosing the Starter Class
In the first region of Dune: Awakening, the “Southern Haggwa Basin”, you can find the trainers for two classes: Trooper and Planetologist. So if you want to leave the starting area with as many unlocked talent trees as possible, you should choose one of the other 3 classes Mentat, Swordmaster or Bene Gesserit during character creation.
Our recommendation: the Bene Gesserit. They have strong passive improvements that noticeably enhance your survivability and healing abilities, and provide you with the Bindu Sprint which offers a frequently usable … you guessed it … sprint.
The combination of Bindu Sprint from the Bene Gesserit and Shigadraht Claw from the Trooper provides you with maximum mobility. You can also use the grappling hook in combat to stagger enemies or escape from dangerous situations.
If you need to prepare for battles in the near future, swap the Bindu Sprint for the Force of the Bene Gesserit or Grenade or Target Seeker from the Trooper. The Anti-Gravity Field from the Trooper or the Suspensor Field from the Planetologist can help situationally if you want to dive down or catapult into the air.
Important Passive Attributes and Techniques
Since you initially only meet the basic trainers, you can invest only one point in the talents of all unlocked classes. However, you will earn enough competence points through the fairly quick level-ups. Use this to unlock as many passive skills in the trees of Bene Gesserit, Trooper, and Planetologist as possible that support your playstyle.
The following 3 passive techniques are recommended for the early game:
Trauma Recovery (Bene Gesserit)
Combat Hardened (Trooper)
Manipulated Instability (Bene Gesserit) or Mass Center (Trooper)
The best passive attributes for survival, mobility, and combat (improvements to certain weapon types of course only if you also use that type of weapon):
Ranged Damage (Trooper)
Suspensor Efficiency (Trooper)
Disruptor Damage (Trooper)
Scattergun Damage (Trooper)
Damage from Heavy Weapons (Trooper)
Recovery (Bene Gesserit)
Sun Tolerance (Bene Gesserit)
Toxin Tolerance (Bene Gesserit)
Self-Healing (Bene Gesserit)
Vitality (Bene Gesserit)
Blade Damage (Bene Gesserit)
Dagger Damage (Bene Gesserit)
Great passive attributes that increase your comfort:
Field Maintenance (Trooper)
Weaponsmith (Trooper)
Cutteray Mining (Planetologist)
Collection (Planetologist)
Diverting (Planetologist)
Deep Analysis (Planetologist)
Densification (Planetologist)
Climber (Planetologist)
Vehicle Repair (Planetologist)
Vehicle Dismantling (Planetologist)
Efficient Driver (Planetologist)
Important: When the talent trees of the other classes are added later or when you want to enhance certain talents with two or more competence points after visiting advanced teachers, you can respec for free, once every 48 hours.
High mobility is invaluable in Dune: Awakening.
The Best Equipment from the Starting Area
Forget the regular equipment and weapons that you can create through normal exploration. The best items are obtained through unique blueprints that you find in the world. The good news: In the first section of Dune: Awakening alone, 17 unique schematics are hidden that are comparatively easy to craft.
Why comparatively? Because you need not only copper bars and other standard resources for crafting these unique items but also copper dust infused with spice. Unfortunately, this dust cannot simply be crafted but is found in the high-security containers of local storehouses and fortresses.
If you don’t want to farm these locations constantly, you need to focus on a few unique blueprints. Below we recommend what we consider to be the best parts from the starting zone:
Aren’s Vengeance: A powerful rifle that will serve you well for a long time. You can find the blueprint in the container at the “Defective Stone Station”, in the central mountain formation of the starting area.
Kaleff’s Drinker: This blade is significantly stronger than your starting dagger with 10.9 damage and has a special feature: hits siphon blood from the victim, which immediately lands in your blood pouch. You can find the blueprint in the large chest in the wreck of the Alcyon.
Wings of the Emperor Type 1: This unique suspensor belt can be activated by a double jump, allowing you to hover upwards. Moreover, the state of hovering lasts significantly longer than with regular belts. You can find the item in the final area of the Imperial Test Station 2.
Also, quickly acquire a Holtzman Shield, which you can activate or deactivate with H. The shield protects you from ranged attacks and quick knife strikes. Note, however, that it is not active while you are shooting at enemies. Also, make sure the shield is deactivated on open sand, as it quickly attracts worms.
If you want to prepare for an excursion, you need to find the balance between
taking as little as possible to have plenty of room for loot and to minimize the risk of losing valuable equipment to a sandworm or sandstorm
carrying everything necessary to be prepared for any situation.
From our perspective, important tools and items you should always have with you are:
A few Solari (to pay for fast travel to a city or trading post if needed)
Healing Kit
Close and ranged weapon
Ammunition for ranged weapon
Recovered metal and plant fibers to create ammunition or healing kits when needed
Survey Probe Launcher plus survey probe when venturing into a new region
At least one blood pouch plus blood extractor – the pouch should always be full at the end of each trip so the blood purifier at the base has something to do
Literjon (preferably the Hajra Literjon Type 1 from the merchant at Griffin’s Reach trading post), pack several if you want to farm water efficiently
Vehicle repair tool (so you can take your sandbike everywhere)
Cutteray
Respawn beacon (if you want to venture into dangerous terrain)
Collector (best tool for filling a Literjon with water in no time)
Energy Cell that provides you with … well … energy
Fuel Cell (if you plan a longer trip with the bike)
Before starting your trip, also make sure that your bike and equipment have sufficient durability. With a welding torch and copper welding wire, you’ll bring your vehicle up to speed before departure. A repair station at the base will fix your equipment (but only if you know the recipe for the item).
In Path of Exile 2 there is a good feature that has changed the genre for many. Now it is ironically blocking the season start of Path of Exile (1).
What feature is it? Path of Exile 2 differs in many ways from the first part. But above all, the improved controls have captured the players’ attention.
In a new post on Reddit, veteran Pipnotiq recommends to all new players who started with part 2 to also check out the new season “Secrets of the Atlas” of Path of Exile 1, which starts on Friday, June 13 at 10:00 PM. However, player reactions clearly show: A feature is sorely missed.
Here you can see the trailer for the new season:
Start video
Path of Exile shows new Mercenary Season “Secrets of the Atlas” in the trailer
“I need WASD”
What do the players say about the new season? Players are generally inclined towards Path of Exile (1), but the transition from WASD to click-to-move is a dealbreaker for many. It allows movements and attacks in different directions. Additionally, there is also the dodge roll, which does not exist in part 1 and is replaced by mobility skills like Blink.
Zarroc1733: “The only thing stopping me from playing poe1 is that I can only use WASD movements.”
jarg3n: “I need WASD. I don’t know if I can move with the mouse again.”
pokerbro33: “This. As much as I dislike the current state of PoE2, it has completely ruined other aRPGs for me – I can’t play without WASD movement anymore.”
Famous-Bread2521: “I can’t go back to WASD. It’s just too good.”
However, there is also criticism of the players’ attitude. User Boohg writes on Reddit:
Judging by the comments here, one might think that the average age of PoE2 players is 50 years, lol
That most players on Reddit reject Path of Exile (1) just because there is no WASD control is a clear message to the developers of Grinding Gear Games. If they were to add alternative controls in the future, they would probably attract many players.
A study has analyzed how many people in a country hold a university degree. Germany is only in the midfield here, the leader is a European country.
Where does the ranking come from?The study by CBRE Research (PDF) is a comprehensive analysis of the supply, costs, and quality of the workforce. Education plays an important role in the data. CBRE is an internationally active real estate company that occasionally publishes education and labor market studies.
Especially in the area of education, Germany is surpassed by many other countries. Education is a forward-looking metric and a key component for the prospects of a technical workforce market.
Start video
Students spy on passersby with hidden cameras and AI, find name and address in seconds
Ireland and Switzerland are leading, Germany only in 20th place for education
Who are the leaders of the study? At the forefront of education are the countries Ireland, Switzerland, and Singapore. In all three countries, more than 45% of adults (ages 25-64) hold a university degree.
In Ireland, education is highly valued: over 70% of a cohort enroll in higher education. This is one of the highest rates in Europe. Accordingly, almost half of the population between 25 and 64 years old reports having at least one university degree (via daad.de). This is also reflected in the study by CBRE Research.
Where does Germany stand? Germany ranks 20th and thus in the midfield of the study: 32.9% of adults have a university degree, which in raw numbers is 17.7 million people.
Who occupies the last places? China and India. However, there is a special situation here: due to the large population, there are high absolute numbers that far exceed all other countries, but the percentages of university graduates are only low.
Education is seen as an important factor for long-term economic growth
Why is education so important? Education is one of the most important factors for the long-term economic growth of a country. Well-educated people are more productive, can better utilize new technologies, and are more likely to develop innovations that drive economic growth. Moreover, people with higher education are less frequently unemployed and earn on average more than those without a university degree.
Education alone does not guarantee growth, as other areas also play an important role in the development of a society. However, without education, sustainable growth is hardly possible (via boeckler.de). Therefore, experts generally consider it unsustainable to just pump millions into education while neglecting other areas.
World of Warcraft is full of invisible rabbits. But is that true? And if so: Why are these rabbits everywhere?
There are many myths and mysteries surrounding World of Warcraft. One of them is that the loot is determined when entering a dungeon. A second myth is the existence of numerous invisible rabbits in the game. But what is the truth? Is it just a figment of the players’ imagination? Or is Azeroth actually inhabited by countless invisible rabbits?
Start video
Older lady lives our dream and plays WoW until 5 a.m.
Is there any truth to the myth? Yes, there is. Because “invisible rabbits” are something that World of Warcraft has indeed been implementing since its very early days and are still in use today. The game world is full of small rabbits that, under normal conditions, cannot be seen by the players – because they are transparent and cannot be targeted.
Why are there rabbits? The answer is quite banal yet logical. Because the world of World of Warcraft is meant to feel alive. This means that not only player characters interact with the world, but also NPCs. On large battlefields, you can see mages hurling fireballs down a path, and elsewhere you see archers practicing their aim and shooting arrows.
All these effects only work if the animations have a “target” – that is, a point at which they are directed. These points are always creatures in the game. But if something should not hit an obvious creature at all, then Blizzard needs invisible rabbits. These then serve as proxies for the target.
How can you see the invisible rabbits? Occasionally, you can see these invisible rabbits, even though that is not intended by Blizzard. For example, in the WoW subreddit, there are sometimes posts where the rabbits have lost their invisibility:
Recommended editorial content
At this point you will find external content from Reddit that complements the article.
I consent to external content being displayed to me. Personal data can be transmitted to third party platforms.
Read more about our privacy policy.
Those who look closely can sometimes recognize the rabbits even in invisible mode. Because although they are “invisible”, their model reacts to light and particle effects. Thus, one can occasionally see the outline of a rabbit when a bright spell effect is triggered by an NPC somewhere.
Do the rabbits cause problems too? Yes, they do. Because the invisible rabbits can also lead to server issues. Especially during “The Burning Crusade”, this occurred more frequently. There, the rabbits were used in Nagrand so that the Legion’s cannons would fire at a target in the sky. For each shot, an invisible rabbit was generated – which did not despawn anymore. Those playing in the area had to deal with stutters and lags that could even affect the entire server.
Because even if the rabbits are invisible, several thousand could accumulate, all of which are calculated as entities and burden Blizzard’s servers and players’ hardware.
However, the system of invisible rabbits is not the only complex system in World of Warcraft. By now, the talents and abilities of the characters are also so confusing that sometimes one has to read a tooltip over 50 lines to truly understand all the intricacies of a skill.
This is an AI-powered translation. Some inaccuracies might exist.
Toyotaro succeeded the manga of Dragon Ball Super. However, he will soon present another project at a fair – which has nothing to do with the adventures of the Saiyans.
What exactly the story is about will only be revealed when Toyotaro talks about his manga.
When will he present it? The mangaka wants to introduce his new work at this year’s Japan Expo, which takes place from July 3 to 6, 2025, in Paris. Together with Kazuhiko Torishima, an editor of Dragon Ball and Dr. Slump, he will host a panel.
Start video
Dragon Ball Super: The Trailer for the Anime
Toyotaro starts new project, which fans do not like
What are fans worried about? It is already difficult enough to keep a manga alive. The schedules of major mangaka can be very tight. For example, Eiichiro Oda, the author of One Piece, barely ate and slept.
On Kazenshuu, some users like WittyUsername are concerned in the comments that it might all be over for Dragon Ball now. Although some are happy for him that he can finally do his own project, others like Vegeta th3 4th say that such a workload could land him in the hospital.
Are the worries justified? Until the reveal of the manga, we can only speculate on how it will continue with Dragon Ball Super. However, it is already clear that Toyotaro will continue the manga of Dragon Ball Super – at least that has been communicated so far.
Therefore, it could be that the new manga project is only a one-shot. Afterwards, he would return to Dragon Ball Super.
The new survival game Dune: Awakening is already receiving positive feedback on Steam during its pre-release phase. Among the tens of thousands of players, however, there are apparently some who find the optional PvP zones insufficient. They are now annoying their victims even in the open world using underhanded methods.
PvP is a big part of the game, but the developers say: You don’t have to be afraid of other players. However, a user on Reddit sees this quite differently and recounts an unpleasant encounter with a griefer.
This is what the griefer does: Dune: Awakening provides you with several features you need to survive in the desert, including a building tool and vehicles. Vehicles, in particular, are essential to avoid dehydration on long journeys or getting caught in nasty sandworm traps.
In the post, the Reddit user explains that he only parked his chopper briefly to scout an area from a high point. When he returned to his vehicle, a griefer had surrounded his bike with walls, making it inaccessible for him:
You ruined my night and made me cry. All I wanted was a night with friends and some escapism, but I guess the people in Dune are just as awful as in real life.
The post has garnered hundreds of comments within a few hours, with other players supporting the user, offering tips on what he can do – but also explaining that such things happen frequently.
Start video
Das neue Survival-MMO Dune: Awakening im Launch-Trailer
The building tool as a tool for nasty trolls
In a further thread, a user shows a picture of a player who apparently built his base intentionally in a thoroughfare. His house is positioned in such a way that no one can pass by. Destroying it is also not an option.
Another user has a nasty neighbor who always parks his vehicles right in front of the garage ramp. Users recommend reporting such behavior, as it counts as griefing and is something the developers want to punish.
Alternatively, one could return to their vehicle with several deaths using the chopper and then use the storage tool in the future to pack vehicles. This would keep them safe from trolls.
Overall, the mood against such players is, however, extremely negative. Such behavior is usually only known from Rust or Ark and has no place in Dune. The game itself still holds strong ratings on Steam with 89%.
With Chrono Odyssey, Aion 2, and ArcheAge Chronicles, there are a whole range of big MMORPGs from Asia that will fully focus on PvE content in the future. A developer now explains why this is the case.
Which developer is it and what does he say? Sangtae Yoon is the Executive Producer of Chrono Odyssey, the certainly biggest new MMORPG that is set to be released in the current gaming year 2025 here in the West.
In an interview with the MMORPG-specialized YouTuber Kanon, the lead developer talked about the strong PvE focus of Chrono Odyssey and why the developers decided to offer PvP only as an optional activity in special regions (via YouTube).
The simple explanation from Sangtae Yoon: The internal numbers of the team show that only about 5 to 10 percent of all players would prefer PvP content. The absolute majority enjoys playing PvE. This also explains why upcoming MMORPGs like Aion 2 and ArcheAge Chronicles want to move away from the roots of their predecessors and also focus much more on PvE.
The new trailer for Chrono Odyssey from the Summer Game Fest:
Start video
Chrono Odyssey: Trailer from Summer Game Fest 2025 shows action-packed battles and a dark world
No Pay2Win! Honestly! I swear!
What else does the developer say? When Kanon has an Asian MMORPG developer in front of him, the Pay2Win question inevitably comes up: How fair will the payment model be? The bold promise from Sangtae Yoon: Chrono Odyssey will not have any Pay2Win elements. However, since Tarisland, it has been known that such promises actually mean nothing.
Otherwise, the interview was mainly about the content that all interested parties can expect in Chrono Odyssey. The chief developer emphasized once again that they want to focus on content for solo players and small groups of 5 to 10 players. Players will have the choice of whether they want to craft or earn the best possible equipment.
Additionally, Sangtae Yoon explained that there will be no daily quests, so players will not feel obligated to log in every day. You can expect an open world without loading screens, where thousands of other adventurers are expected to roam.
In Railborn, a new survival game on Steam, you fight for survival on a hostile planet. Your best protection against the elements is a train, which you can expand alone – or with friends – from a small cart to a huge base.
What kind of game is it? Railborn is a survival game and the second title from developer Washbear Studio on Steam. The title will first launch in Early Access – the developers have not yet revealed when exactly.
You can watch a trailer for the game here:
Start video
Railborn: Reveal trailer for the new survival game on Steam
Surviving on a deadly planet
What is the game about? In Railborn, you find yourself on an alien planet, 350 light-years away from Earth. At first glance, it may resemble Earth in terms of flora, but alien creatures inhabit it.
However, you don’t need to worry about the planet’s inhabitants. The trailer shows no battles against aliens. Instead, the greatest danger is likely to come from the planet itself:
Outside the safety of your train lies a hostile, doomed world where every step is a struggle against suffocation, starvation, and the planet itself.
Your best protection against the elements is your train. With the resources you find on the planet, you will continually expand it – car by car. You start with a simple cart, but over time, you can build multi-story behemoths.
Your objectives are:
collect rare plants, and restore the dying biomes of the planet in your train
discover abandoned outposts and alien monoliths to decipher the planet’s history
transport your train with everything you’ve salvaged onto the “ultimate track” into outer space
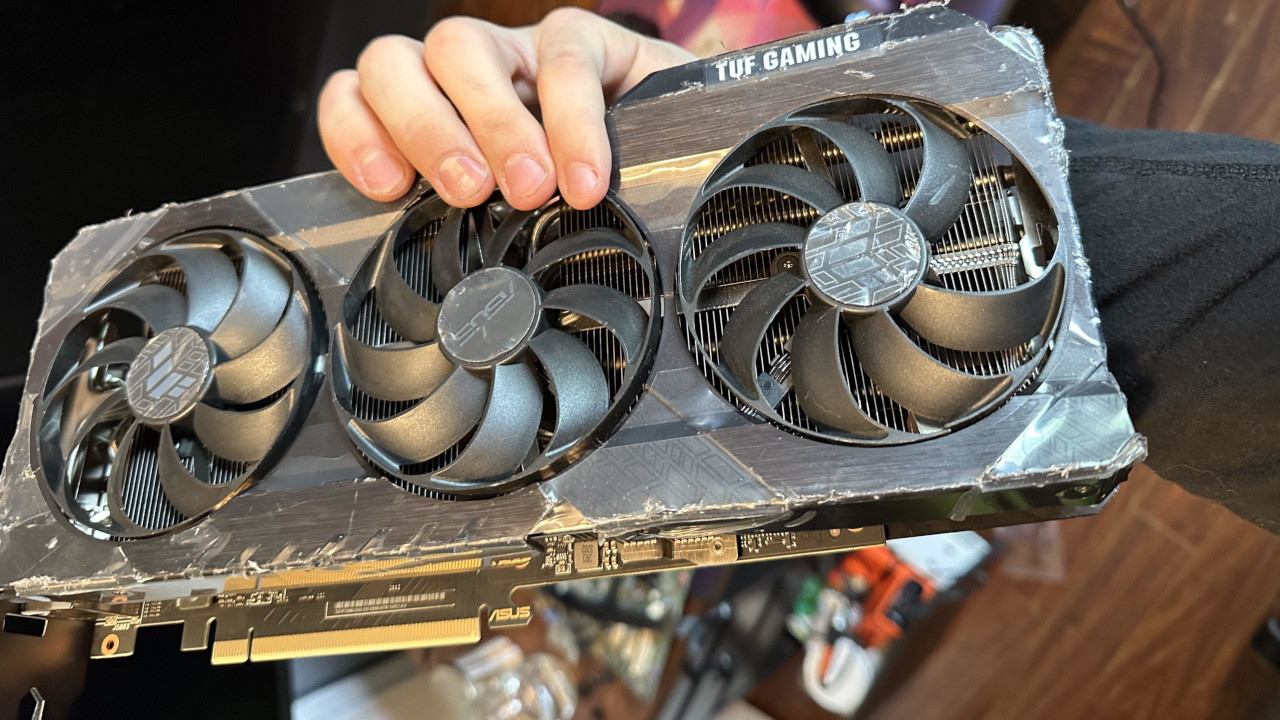
A player reports that he obtained his Nvidia RTX 3090 for under 10 euros. His former employer did not realize at the time what the graphics card was really worth.
A user reports that he has had an Nvidia RTX 3090 in his computer for 2 years. The RTX 3090 was considered the fastest graphics card back then and is still regarded as a very good high-end model if you can still find it used. The MSRP of the graphics card was adjusted after some price changes to 1,999 euros.
However, the user explained that he only paid 10 euros for his RTX 3090 because his employer did not know what the graphics card was actually worth at the time.
Start video
Wir packen die Switch 2 aus: Das ist im Karton
Player salvages usable RTX 3090 from 1.5 tons of graphics cards that actually works
The player reports: The user stated on Reddit that he would be working in the “tech recycling” sector. At his employer’s place was a huge box with 1,500 kg of old RTX 3000 series graphics cards that were to be dismantled.
The user learned about this from a colleague and decided to acquire some models. The trick in the operation to pay only a few euros: The managers in the company did not know the true value of the cards and sold them to him for just scrap value:
Since it is electronic waste and my managers are not very technically inclined, they sold us the parts for the raw material value, which was only 10 dollars.
I bought an RTX 3080 TI that looked in perfect condition, but it couldn’t connect, so I tried it with this slightly battered RTX 3090 – aside from a broken fan and a slightly bent cover, it started immediately and has been my main GPU for 2 years now.
My colleague also got a 3070 TI, but it had a line on the display. In the end, he returned it via RMA and got a fully functional 3070 TI for $30.
Unfortunately, according to the user, the upper management caught on at some point and ended the resale of the graphics cards from recycling. He himself stated that he made some good finds during that time:
Unfortunately, upper management found out and no longer sold us cheap parts, but I got some good deals while I was there.
Since his employer found out that you can take very good hardware for little money, the user claims that working there is no longer worth it.
What else did he receive at a low price?
Sennheiser HD 598s for 10 US dollars
Meta Quest 2 for 10 US dollars
Samsung 980 Pro 2 TB for 20 US dollars
Nintendo Switch for 10 US dollars
ASUS TUF laptop with RTX 3050 Ti for about 200 US dollars
Xbox Series X controller,
Samsung curved monitor (3440×1440) with 100 Hz for 50 US dollars.
In another post on Reddit, he added that there was of course a certain risk involved with each of the offers. Because you couldn’t test the items at work:
We couldn’t test them at work, so we always took a risk. But most of the time, it worked out.
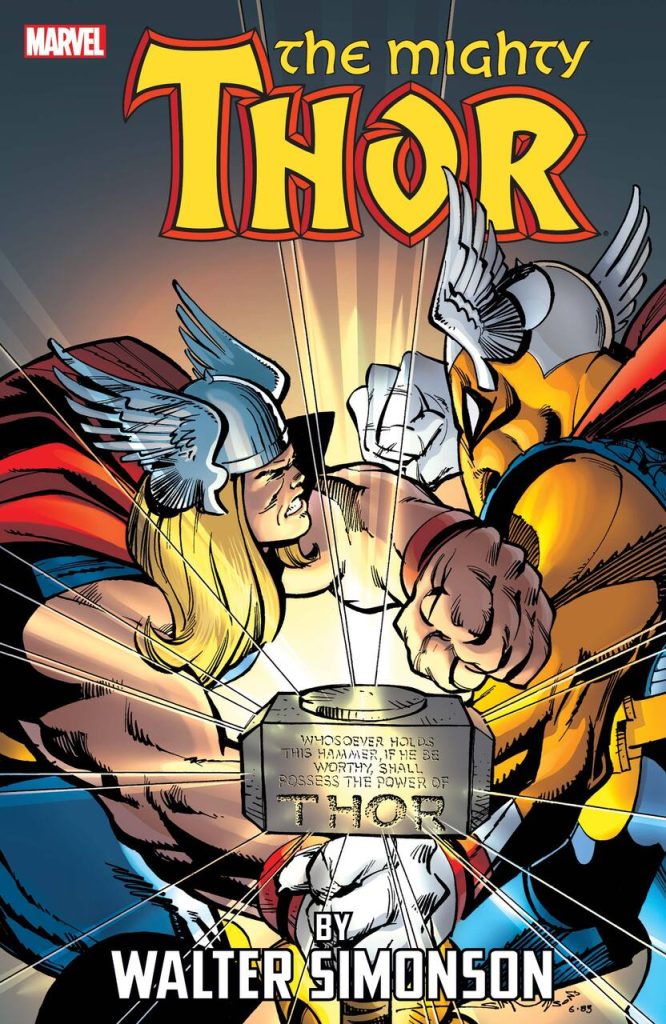
When thinking of Mjolnir, the hammer in the Marvel Universe, most fans of the movies probably first think of Thor. However, another powerful being can wield the hammer but received a different weapon to keep Mjolnir with Thor.
Which character is it? Since the beginning of the Avengers in the MCU, Thor, played by Chris Hemsworth, has been one of the superheroes. His iconic weapon is the hammer Mjolnir, which can only be wielded if one is worthy. This also applies to other members of the Avengers.
After Mjolnir was destroyed by Hela, Thor set out to forge a new weapon for the battle against Thanos. On the star Nidavellir, the weapon Stormbreaker was forged for Thor.
In the comics, someone completely different is the user of the weapon: Beta Ray Bill received the weapon as a gift from Odin after proving himself worthy and defeating Thor in battle. In the MCU, except for a small detail, there has been no appearance of the character, who could even wield Mjolnir.
Start video
Thor: Ragnarok – Trailer for the third Marvel movie of the God of Thunder
A champion who wants to protect his people
Who is Beta Ray Bill? Beta Ray Bill made his first appearance in 1983 in Thor comic #337. He hails from the planet Korbin, which was attacked by the powerful demon Surtur to create a weapon that could trigger Ragnarok.
To prevent this, Bill was chosen to become the protector of the planet. Through a severe surgical procedure, Bill was transformed into a cyborg, enhanced with the DNA of Tuog, an alien species. He was to be assisted by the AI Skuttlebutt, which also functions as a ship.
The process disfigured Bill’s face. Shortly after his operation, Surtur attacked Korbin. Some inhabitants of the planet fled and put themselves in stasis. Bill, despite being quite powerful, could barely survive the demon’s attack.
In flight and searching for a new home, they landed in the Milky Way. This was noticed by S.H.I.E.L.D., and Thor was sent into space. Bill and Thor began a fight in which Bill managed to grab Mjolnir and proved himself worthy.
Shortly thereafter, both were transported to Asgard by Odin.
A powerful weapon as a gift for the fight against Thor
What happened to Mjolnir and Beta Ray Bill after the fight against Thor? After the battle, Bill claimed that he justly deserved the hammer because he earned Mjolnir in the fight. Odin then declared that the two should fight for the hammer.
In Skartheim, Bill could once again defeat Thor. However, Bill didn’t want to kill Thor. Bill returned Mjolnir to Thor, but as a reward, Odin ordered that a new weapon be forged for Bill from Uru, the same metal as Mjolnir. Stormbreaker was created for Bill in the comics by Eitri and other dwarves.
Beta Ray Bill in battle against Thor on the cover of The Mighty Thor Vol. 1 by Walt Simonson (Source: marvel.com)
There, Stormbreaker looks much more like a hammer but also resembles Mjolnir in its properties. When using Stormbreaker, Bill also wears the same outfit as the comic character Thor:
One must also be worthy for Stormbreaker
Bill can always summon Stormbreaker
Through Stormbreaker, Bill can transform into a human form
Stormbreaker can create portals, generate energy, and manipulate the weather (via Marvel Database)
What has Bill done with Stormbreaker? After his debut, Bill continues to fulfill his duty to protect his people. In doing so, he also often fights alongside Asgard and joined the Thor Corps, a group of heroes with abilities from Asgard. Bill became a recurring character with his own comic series.
Where is Beta Ray Bill in the Marvel Cinematic Universe? So far, Beta Ray Bill has not had a specific appearance in the MCU, but it is known that he exists in the film universe. In Thor: Ragnarok, a statue of the hero can be seen on the planet Sakaar. Therefore, it can be assumed that he must have been a champion of the arena and captured by the Grandmaster.
On Steam, the Steam Next Fest is currently underway, offering a range of fresh demos. In one of them, you will make decisions as an employee about who gets to safety and who meets their end as a zombie.
What kind of game is this? The Steam Next Fest is currently taking place on Steam. During this event, the demo for Quarantine Zone: The Last Check was also presented. As a member of the military, it is your task to observe people in a zombie apocalypse and check if they may already be infected.
Quarantine Zone: The Last Check takes the gameplay concept of “Papers, please” and implements it in 3D in a new setting. Additionally, elements like gunplay and a tower defense mode come into play, where you must defend the outpost against waves of enemies.
People line up every day to seek safety with you. However, your task is to ensure that no infected person gets to the people until they are finally safe.
Here you can watch the trailer for Quarantine Zone: The Last Check:
Start video
Der Trailer von Quarantine Zone: The Last Check zeigt euch, wie ihr in der Zombieapokalypse über Leben und Tod entscheidet
As an Officer through the Apocalypse
What makes the game special? The main objective in the game is to thoroughly examine the newcomers. You have many different tools at your disposal. Among them is a body scanner, which allows you to look under people’s clothes to examine them for scratches and bite marks.
With the stethoscope, you can listen to people’s lungs and discern if they simply have a cold or if they have zombie breath. If the people who introduce themselves to you are already infected, you must have them eliminated.
However, if you are unsure, you have a group quarantine zone where you can accommodate all people for a duration of two days.
But be careful: If one of the people is actually an infected individual and transforms into a zombie overnight, they will also eat the other survivors who are in the quarantine cell with them.
When do you win? Every few days, the survivors are picked up by the army and relocated to another camp where they will be safe. For each correct decision, you also earn money. With the revenue, you can unlock new upgrades for the base, such as new living quarters or better watchtowers.
This way, players are rewarded for their good performance but also face penalties for wrong decisions. The demo is currently still available for free on Steam, while the full game is not set to release until September 2025.
Quarantine Zone: The Last Check implements the classic “Papers, please” mechanics with a new twist and manages to create its own interesting game concept. It remains exciting to see what mechanics will be added after the demo and how far the base building will go. A streamer has already failed at the tutorial of another game with similar mechanics: Twitch: Papaplatte fails for an hour and a half at the tutorial of a game and would do it all over again
This is an AI-powered translation. Some inaccuracies might exist.
Baldur’s Gate 3 is already almost 2 years old, yet players and data miners are still discovering more partially lost content that surprises the community. One player collected all this content into a long list that shows how much a certain druid has evolved since the initial idea.
What does the player report? In a long and detailed Reddit post, a fan of the druid Halsin from Baldur’s Gate 3 summarizes all the changes, cut content, and early versions of the character.
This list makes it clear how much the game has changed since the initial idea phase and how the druid has changed during development.
Here you can see more about secrets in Baldur’s Gate 3, but those of the players:
Start video
Baldur’s Gate 3 is 1 year old and to celebrate the creators share your dirty secrets
An old man with bear friends and great responsibility
How could Halsin have been? The player mentions several changes among others:
Halsin was initially an old man, which is remembered by the item “Halsin’s Pipe”, which is still in the game. When fans began to idolize the “new”, younger Halsin, the writers were initially confused because they were unaware of the change and did not quite understand why players would be so taken with an old man.
Halsin was not originally planned to be the only archdruid of the grove. Instead, there was a second one named Denor, who worshiped Eldath. A conflict-driven story developed between the two, which was eventually cut down and resulted in one druid – Halsin and his circle of Silvanus druids.
A cut companion named Helia would not only have been a friend of Halsin but would have also been captured by goblins along with him.
Judging by the cut lines, Halsin had two bear companions, one male and one female. It would have been possible for both Halsin and one of the bears to die in the goblin camp, resulting in the other bear losing its companion as well as its friend.
Speaking of bears: The sex scene with Halsin in bear form was initially meant to be an off-screen scene that was more of a joke. Ultimately, however, it was included in the main romance.
How could Halsin have played an even larger role? Especially in the second act of the game, much of Halsin’s story has changed. He would not only have been kidnapped up to the towers of the rising moon, but also could have had more influence on the salvation of the shadow cursed lands:
Thaniel became a friend of Halsin later as a form of motivation. Because previously, the druid was more focused on saving the land rather than a child.
Instead of getting the information from the sleeping Art Cullagh, Halsin had his own mission to learn more about the curse. He needed a bone from each of the Thorm siblings (whom you can defeat or talk to) from which Isobel would create a remedy for a ritual that we know in the game as the fight for the portal.
As for the fight for the portal: Here, there would have also been the opportunity to bypass Halsin’s request and destabilize the portal, which would have caused him to angrily leave the group.
These were just a few points mentioned by the player in his Reddit post and likely not the only ones, as he himself clarifies: ‘This list is not exhaustive. There are probably more things we will never learn about.’ However, for those who want to learn more about cut or lost content from Baldur’s Gate 3 beyond Halsin, you can read more about it here on MeinMMO: Player shows the huge iceberg of content that never made it into Baldur’s Gate 3
This is an AI-powered translation. Some inaccuracies might exist.
However, the reactions from employees and users were so devastating that he had to retract his statements and apologize. This is reported by the English-language magazine Fortune.
Start video
“We have created a monster” – A Spanish model earns up to 10,000 euros a month, yet she is not real
CEO announces ‘AI-first’ company, walks back one week later, shocked by reactions
What was that email about? On April 28, 2025, Luis von Ahn posted on LinkedIn an email he had just sent to all employees of his company. In it, he outlined his vision for Duolingo to become an ‘AI-first’ company.
This included that contractors would leave the company if AI could perform their work, and that a team could only hire a new person if it was not able to automate its work with AI.
What were the reactions? The comments were almost all negative and devastating for the CEO of Duolingo. Many were appalled by the CEO’s email and stated that they no longer wanted to support such a company. One person said: “I cannot support a company that replaces people with AI.”
How did the company react? A week later, the CEO retracted his statements and made it clear that he does not see “AI as a replacement for our employees’ work”, but rather as a “tool to accelerate our work with the same or better quality”.
In an interview with the Financial Times (Paywall), he stated that he never expected such a harsh reaction from users. He was even quite shocked: “I did not expect such headwinds”
He says he should have articulated his goals regarding AI more clearly, but he also believes that the negative reaction is due to the general fear that AI will replace workers. “Every tech company is doing similar things, but we were open about it,” he said.
These were all the Echoes that you can actively complete for all classes. There are many skins that you can unlock in Elden Ring: Nightreign, and alongside the Echo skins, classics from Dark Souls have also made it into the game. To find out what they look like and how to get them, read here: Elden Ring Nightreign: All Skins and how to unlock them
Third Echo (after Chapter 6):
Start an expedition to begin Chapter 7
Back in the Round Table Hold, collect the “Key of the Virtuous Thief” from the table in the room before the chambers
Open the chest in the cellar of the Round Table Hold and collect the item “Torn Paper Fragment”
Talk to the recluse
Talk to the Iron Attendant
Start an expedition with the shifted world “Noklateo”
Find the Imitator Tear in Noklateo, it is marked with a golden shimmer in the city and guarded by an Imitator Troll
Defeat the Night Aspect (final boss)
Remembrance of the Guardian
How do I unlock the Echoes of the Guardian? Equip him and play a round.
First Echo (after Chapter 3):
Talk to the Iron Attendant
Defeat the Guardian Golem (will be marked on the map during an expedition)
Talk again to the Iron Attendant and hand him the Stone Pillar to receive the book “Annals of Cursed Weapons”.
Second Echo (after Chapter 4):
Talk to the Spirit Merchant in the dressing room and collect the item “Uncanny Talisman”
Go to the main hall of the Round Table Hold and become unconscious
Talk to the Iron Attendant when you wake up
Go back to the Spirit Merchant and select the option “Put Out”
Collect the item “Merchant’s Ledger”
Third Echo (after Chapter 6):
Talk to the Iron Attendant
Go on an expedition and look for the marked Cursed Merchant
Purchase the book from him for 10,000 runes
Return to the Iron Attendant and give him the Third Volume
Fourth Echo (after Chapter 8):
Interact with the paper fragment in the main hall on the huge table
Go to the room where the Vessel Bazaar is located and interact with a book on the right wall in a cabinet
Go outside to the graves of the Round Table Hold and talk to the recluse
You can now keep or destroy her Witch Brooch.
Regardless of your choice, the effect of the relic remains the same
Remembrance of the Iron Eye
How do I unlock the Echoes of the Iron Eye? Equip him and play a round.
First Echo (after Chapter 2):
Talk to the Priestess
Start an expedition and defeat the traitor “Night Hunter”
You will then receive the “Letter of the Traitor”
Talk again to the Priestess
Second Echo (after Chapter 5):
Talk to the Priestess in the cellar near the graves
Execute the Assassin
Defeat the Night Lord “Fulghor, Hero of Nightglow” and collect the “Blade of Order”
Execute the Assassin again, this time with the Blade of Order
Defeat Heolstor the Night Lord
At the end, touch the corpse and select “Hold Dagger”
Remembrance of the Countess
How do I unlock the Echoes of the Countess? Equip her and play a round.
First Echo (after Chapter 2):
Talk to the Robber
Talk to the Wylder
Talk to the Robber again
Now search in an expedition for the “Weapon Repair Materials”
The location is marked on your map
Once you have found the materials, you must defeat enemies and then collect the Gold Dew
Hand over the Gold Dew to the Wylder and receive the “Faded Iron Coins”
Talk to the Robber
Talk to the Ghost
Talk to the Iron Attendant
Second Echo (after Chapter 4):
Find the Wylder and collect the flatbread
Talk to the Iron Attendant
Third Echo (after Chapter 5):
Talk to the Robber
Talk to the Ghost on the beach
Defeat the Ghost and receive the “Crown Pendant”
Search for the message in Limveldt
The message will be marked for you on the map
Defeat some enemies and collect “Rooster’s Words”
Talk to the Robber and collect the “Double-Sided Coin”
Fourth Echo (after Chapter 6):
Bless your Iron Coin at the huge table of the Round Table Hold
Give the Iron Attendant your Blessed Iron Coin
Talk to Wylder
Talk to the Iron Attendant
Remembrance of the Robber
How do I unlock the Echoes of the Robber? Equip him and play a round.
First Echo (after Chapter 1):
Talk to the Iron Attendant
Touch the Monument
Talk to the Iron Attendant
Touch the Monument again to enter the arena
Defeat the Single Hit Gladiator
Second Echo (after Chapter 3):
Talk to the Iron Attendant
Touch the Monument
Defeat the Blinding Elder Lion
Talk to the Iron Attendant again
Third Echo (after Chapter 6):
Talk to the Attendant
Touch the Monument
Talk to the Attendant
Travel to the beach
Defeat the White Horn
Talk to the Attendant
Touch the Monument
Talk to the Attendant
Pay respects to the grave next to the Monument
Remembrance of the Ghost
How do I unlock the Echoes of the Ghost? Equip her and play a round.
First Echo:
Talk to the Countess
Talk to the Guardian
Defeat the Tricephalos or the Dark Rift Knight
At the end of your expedition, collect the “Blade of Night Aspect”
Hand the blade to the Guardian
Second Echo (after Chapter 4):
Talk to the Countess
Talk to the recluse
Have a seat on the bench
Eliminate the corruption by defeating all enemies in the room
Interact with the doll
Third Echo (after Chapter 6):
Talk to the Countess
Have a seat on the bench
Defeat the Corruption
Talk to the recluse
Remembrance of the Recluse
How do I unlock the Echoes of the Recluse? Equip her and play a round.
First Echo (after Chapter 1):
Talk to the Iron Attendant
Start an expedition and defeat the Night-Entangled Goldnilpferd
The boss’s location will be marked on the map
Collect the Night Fragment after the battle
Talk to the Iron Attendant and give him the Night Fragment
Second Echo (after Chapter 3):
Interact with the note at the large round table of the Round Table Hold
Talk to the Iron Attendant and get the Night Fragment back
Now go to the sleeping quarters and interact with the contaminated bed
Collect the remnants of the night
Talk to the Iron Attendant
Third Echo (after Chapter 5):
Expose the fraud at the training ground
Talk to the fraudster
Go to the cellar
Recalibrate the magical roots of the Iron Attendant
Talk to the Iron Attendant
Defeat three Night Lords and then challenge Heolstor
After the fight against Heolstor, go to the sleeping quarters
Go to the beds and place your hand on the infant
Talk again to the fraudster in the sleeping quarters after reliving the ending
Remembrance of the Executor
How do I unlock the Echoes of the Executor? Equip him and play a round.
First Echo (after Chapter 1):
Talk to the Guardian
Talk to the Priestess
Start an expedition and collect the Blessed Flower
The flower will be marked for you on the map
Defeat the boss “Tracker Bloodhound Knight” and collect the flower
Talk to the Priestess
Talk to the Iron Attendant
Interact with your canvas
Second Echo (after Chapter 5):
Talk to the Priestess
Start an expedition with the Shifted Earth “Mountain Peak”
Search on the mountain for the Golden Sprout
The Golden Sprout will be marked on the map
Defeat the Avatar of the Earth Tree and collect the Golden Sprout
Give the Golden Sprout to the Priestess
Now defeat the Executor’s Call
Interact in the hut with the Forge Knight
Talk to the Priestess
Remembrance of the Scholar
First Echo:
Unlock the Scholar
Complete expeditions and collect memory fragments
Interact with the codex on the table and start the Echo
Start an expedition
Search for an underground chamber that is marked on the map (during an expedition)
Collect the item “Vassal’s Journal”
Talk to the Gravedigger
Talk to Iron Attendant
Interact with the Vassal’s Journal at the chapel table
Talk to the Gravedigger
Second Echo:
Complete expeditions and collect memory fragments
Talk to the Vessel Bazaar
Defeat the Apostle of the God Skull
Interact with the crystallized knight
Third Echo:
Talk to the Gravedigger
Inspect the mirror in the Round Table
Inspect the chapel
Defeat the Dreglord in Limveld
Talk to the Gravedigger
Remembrance of the Gravedigger
First Echo:
Unlock the Gravedigger
Complete an expedition or defeat a Night Lord to collect memory fragments
Talk to Iron Attendant
Defeat the Iron Attendant
Defeat the Night Wanderers
Apologize to the Iron Attendant
Absorb the power of the night
Talk to the Scholar
Second Echo:
Complete an expedition or defeat a Night Lord to collect memory fragments
Talk to the Priestess
Pray in the chapel
Talk to the Iron Attendant
Start an expedition with the Balancers
Find the Scholar
Take the “Scholar’s Primal Core” to you
Third Echo:
Start an expedition with the Night Aspect
Take the “Dismembered Finger” to you
Drop the finger
Interact with the corpse
These were all the Echoes that you can actively complete for all classes. There are many skins that you can unlock in Elden Ring: Nightreign, and alongside the Echo skins, classics from Dark Souls have also made it into the game. To find out what they look like and how to get them, read here: Elden Ring Nightreign: All Skins and how to unlock them
First Echo (after Chapter 2):
Talk to the Iron Attendant
Start an expedition and collect the “Slate Whetstone”
Talk to the Iron Attendant and hand in the Whetstone
Collect the earrings from the rewards
Go to the sleeping quarters and hold the earrings up to the light
Find the Countess and give her the earrings
Second Echo (after Chapter 5):
Read three short passages near the Vessel Bazaar:
The first passage is located to the right of the encyclopedia for important information on the book tower
The second passage is in the same room on the right wall on a shelf
The third passage is on a book tower behind the recluse’s chair
Interact with the three graves in the cellar of the Round Table Hold
Go to the beach and talk to the Countess
Third Echo (after Chapter 6):
Start an expedition to begin Chapter 7
Back in the Round Table Hold, collect the “Key of the Virtuous Thief” from the table in the room before the chambers
Open the chest in the cellar of the Round Table Hold and collect the item “Torn Paper Fragment”
Talk to the recluse
Talk to the Iron Attendant
Start an expedition with the shifted world “Noklateo”
Find the Imitator Tear in Noklateo, it is marked with a golden shimmer in the city and guarded by an Imitator Troll
Defeat the Night Aspect (final boss)
Remembrance of the Guardian
How do I unlock the Echoes of the Guardian? Equip him and play a round.
First Echo (after Chapter 3):
Talk to the Iron Attendant
Defeat the Guardian Golem (will be marked on the map during an expedition)
Talk again to the Iron Attendant and hand him the Stone Pillar to receive the book “Annals of Cursed Weapons”.
Second Echo (after Chapter 4):
Talk to the Spirit Merchant in the dressing room and collect the item “Uncanny Talisman”
Go to the main hall of the Round Table Hold and become unconscious
Talk to the Iron Attendant when you wake up
Go back to the Spirit Merchant and select the option “Put Out”
Collect the item “Merchant’s Ledger”
Third Echo (after Chapter 6):
Talk to the Iron Attendant
Go on an expedition and look for the marked Cursed Merchant
Purchase the book from him for 10,000 runes
Return to the Iron Attendant and give him the Third Volume
Fourth Echo (after Chapter 8):
Interact with the paper fragment in the main hall on the huge table
Go to the room where the Vessel Bazaar is located and interact with a book on the right wall in a cabinet
Go outside to the graves of the Round Table Hold and talk to the recluse
You can now keep or destroy her Witch Brooch.
Regardless of your choice, the effect of the relic remains the same
Remembrance of the Iron Eye
How do I unlock the Echoes of the Iron Eye? Equip him and play a round.
First Echo (after Chapter 2):
Talk to the Priestess
Start an expedition and defeat the traitor “Night Hunter”
You will then receive the “Letter of the Traitor”
Talk again to the Priestess
Second Echo (after Chapter 5):
Talk to the Priestess in the cellar near the graves
Execute the Assassin
Defeat the Night Lord “Fulghor, Hero of Nightglow” and collect the “Blade of Order”
Execute the Assassin again, this time with the Blade of Order
Defeat Heolstor the Night Lord
At the end, touch the corpse and select “Hold Dagger”
Remembrance of the Countess
How do I unlock the Echoes of the Countess? Equip her and play a round.
First Echo (after Chapter 2):
Talk to the Robber
Talk to the Wylder
Talk to the Robber again
Now search in an expedition for the “Weapon Repair Materials”
The location is marked on your map
Once you have found the materials, you must defeat enemies and then collect the Gold Dew
Hand over the Gold Dew to the Wylder and receive the “Faded Iron Coins”
Talk to the Robber
Talk to the Ghost
Talk to the Iron Attendant
Second Echo (after Chapter 4):
Find the Wylder and collect the flatbread
Talk to the Iron Attendant
Third Echo (after Chapter 5):
Talk to the Robber
Talk to the Ghost on the beach
Defeat the Ghost and receive the “Crown Pendant”
Search for the message in Limveldt
The message will be marked for you on the map
Defeat some enemies and collect “Rooster’s Words”
Talk to the Robber and collect the “Double-Sided Coin”
Fourth Echo (after Chapter 6):
Bless your Iron Coin at the huge table of the Round Table Hold
Give the Iron Attendant your Blessed Iron Coin
Talk to Wylder
Talk to the Iron Attendant
Remembrance of the Robber
How do I unlock the Echoes of the Robber? Equip him and play a round.
First Echo (after Chapter 1):
Talk to the Iron Attendant
Touch the Monument
Talk to the Iron Attendant
Touch the Monument again to enter the arena
Defeat the Single Hit Gladiator
Second Echo (after Chapter 3):
Talk to the Iron Attendant
Touch the Monument
Defeat the Blinding Elder Lion
Talk to the Iron Attendant again
Third Echo (after Chapter 6):
Talk to the Attendant
Touch the Monument
Talk to the Attendant
Travel to the beach
Defeat the White Horn
Talk to the Attendant
Touch the Monument
Talk to the Attendant
Pay respects to the grave next to the Monument
Remembrance of the Ghost
How do I unlock the Echoes of the Ghost? Equip her and play a round.
First Echo:
Talk to the Countess
Talk to the Guardian
Defeat the Tricephalos or the Dark Rift Knight
At the end of your expedition, collect the “Blade of Night Aspect”
Hand the blade to the Guardian
Second Echo (after Chapter 4):
Talk to the Countess
Talk to the recluse
Have a seat on the bench
Eliminate the corruption by defeating all enemies in the room
Interact with the doll
Third Echo (after Chapter 6):
Talk to the Countess
Have a seat on the bench
Defeat the Corruption
Talk to the recluse
Remembrance of the Recluse
How do I unlock the Echoes of the Recluse? Equip her and play a round.
First Echo (after Chapter 1):
Talk to the Iron Attendant
Start an expedition and defeat the Night-Entangled Goldnilpferd
The boss’s location will be marked on the map
Collect the Night Fragment after the battle
Talk to the Iron Attendant and give him the Night Fragment
Second Echo (after Chapter 3):
Interact with the note at the large round table of the Round Table Hold
Talk to the Iron Attendant and get the Night Fragment back
Now go to the sleeping quarters and interact with the contaminated bed
Collect the remnants of the night
Talk to the Iron Attendant
Third Echo (after Chapter 5):
Expose the fraud at the training ground
Talk to the fraudster
Go to the cellar
Recalibrate the magical roots of the Iron Attendant
Talk to the Iron Attendant
Defeat three Night Lords and then challenge Heolstor
After the fight against Heolstor, go to the sleeping quarters
Go to the beds and place your hand on the infant
Talk again to the fraudster in the sleeping quarters after reliving the ending
Remembrance of the Executor
How do I unlock the Echoes of the Executor? Equip him and play a round.
First Echo (after Chapter 1):
Talk to the Guardian
Talk to the Priestess
Start an expedition and collect the Blessed Flower
The flower will be marked for you on the map
Defeat the boss “Tracker Bloodhound Knight” and collect the flower
Talk to the Priestess
Talk to the Iron Attendant
Interact with your canvas
Second Echo (after Chapter 5):
Talk to the Priestess
Start an expedition with the Shifted Earth “Mountain Peak”
Search on the mountain for the Golden Sprout
The Golden Sprout will be marked on the map
Defeat the Avatar of the Earth Tree and collect the Golden Sprout
Give the Golden Sprout to the Priestess
Now defeat the Executor’s Call
Interact in the hut with the Forge Knight
Talk to the Priestess
Remembrance of the Scholar
First Echo:
Unlock the Scholar
Complete expeditions and collect memory fragments
Interact with the codex on the table and start the Echo
Start an expedition
Search for an underground chamber that is marked on the map (during an expedition)
Collect the item “Vassal’s Journal”
Talk to the Gravedigger
Talk to Iron Attendant
Interact with the Vassal’s Journal at the chapel table
Talk to the Gravedigger
Second Echo:
Complete expeditions and collect memory fragments
Talk to the Vessel Bazaar
Defeat the Apostle of the God Skull
Interact with the crystallized knight
Third Echo:
Talk to the Gravedigger
Inspect the mirror in the Round Table
Inspect the chapel
Defeat the Dreglord in Limveld
Talk to the Gravedigger
Remembrance of the Gravedigger
First Echo:
Unlock the Gravedigger
Complete an expedition or defeat a Night Lord to collect memory fragments
Talk to Iron Attendant
Defeat the Iron Attendant
Defeat the Night Wanderers
Apologize to the Iron Attendant
Absorb the power of the night
Talk to the Scholar
Second Echo:
Complete an expedition or defeat a Night Lord to collect memory fragments
Talk to the Priestess
Pray in the chapel
Talk to the Iron Attendant
Start an expedition with the Balancers
Find the Scholar
Take the “Scholar’s Primal Core” to you
Third Echo:
Start an expedition with the Night Aspect
Take the “Dismembered Finger” to you
Drop the finger
Interact with the corpse
These were all the Echoes that you can actively complete for all classes. There are many skins that you can unlock in Elden Ring: Nightreign, and alongside the Echo skins, classics from Dark Souls have also made it into the game. To find out what they look like and how to get them, read here: Elden Ring Nightreign: All Skins and how to unlock them
Third Echo (after Chapter 6):
Talk to the Iron Attendant
Go on an expedition and look for the marked Cursed Merchant
Purchase the book from him for 10,000 runes
Return to the Iron Attendant and give him the Third Volume
Fourth Echo (after Chapter 8):
Interact with the paper fragment in the main hall on the huge table
Go to the room where the Vessel Bazaar is located and interact with a book on the right wall in a cabinet
Go outside to the graves of the Round Table Hold and talk to the recluse
You can now keep or destroy her Witch Brooch.
Regardless of your choice, the effect of the relic remains the same
Remembrance of the Iron Eye
How do I unlock the Echoes of the Iron Eye? Equip him and play a round.
First Echo (after Chapter 2):
Talk to the Priestess
Start an expedition and defeat the traitor “Night Hunter”
You will then receive the “Letter of the Traitor”
Talk again to the Priestess
Second Echo (after Chapter 5):
Talk to the Priestess in the cellar near the graves
Execute the Assassin
Defeat the Night Lord “Fulghor, Hero of Nightglow” and collect the “Blade of Order”
Execute the Assassin again, this time with the Blade of Order
Defeat Heolstor the Night Lord
At the end, touch the corpse and select “Hold Dagger”
Remembrance of the Countess
How do I unlock the Echoes of the Countess? Equip her and play a round.
First Echo (after Chapter 2):
Talk to the Robber
Talk to the Wylder
Talk to the Robber again
Now search in an expedition for the “Weapon Repair Materials”
The location is marked on your map
Once you have found the materials, you must defeat enemies and then collect the Gold Dew
Hand over the Gold Dew to the Wylder and receive the “Faded Iron Coins”
Talk to the Robber
Talk to the Ghost
Talk to the Iron Attendant
Second Echo (after Chapter 4):
Find the Wylder and collect the flatbread
Talk to the Iron Attendant
Third Echo (after Chapter 5):
Talk to the Robber
Talk to the Ghost on the beach
Defeat the Ghost and receive the “Crown Pendant”
Search for the message in Limveldt
The message will be marked for you on the map
Defeat some enemies and collect “Rooster’s Words”
Talk to the Robber and collect the “Double-Sided Coin”
Fourth Echo (after Chapter 6):
Bless your Iron Coin at the huge table of the Round Table Hold
Give the Iron Attendant your Blessed Iron Coin
Talk to Wylder
Talk to the Iron Attendant
Remembrance of the Robber
How do I unlock the Echoes of the Robber? Equip him and play a round.
First Echo (after Chapter 1):
Talk to the Iron Attendant
Touch the Monument
Talk to the Iron Attendant
Touch the Monument again to enter the arena
Defeat the Single Hit Gladiator
Second Echo (after Chapter 3):
Talk to the Iron Attendant
Touch the Monument
Defeat the Blinding Elder Lion
Talk to the Iron Attendant again
Third Echo (after Chapter 6):
Talk to the Attendant
Touch the Monument
Talk to the Attendant
Travel to the beach
Defeat the White Horn
Talk to the Attendant
Touch the Monument
Talk to the Attendant
Pay respects to the grave next to the Monument
Remembrance of the Ghost
How do I unlock the Echoes of the Ghost? Equip her and play a round.
First Echo:
Talk to the Countess
Talk to the Guardian
Defeat the Tricephalos or the Dark Rift Knight
At the end of your expedition, collect the “Blade of Night Aspect”
Hand the blade to the Guardian
Second Echo (after Chapter 4):
Talk to the Countess
Talk to the recluse
Have a seat on the bench
Eliminate the corruption by defeating all enemies in the room
Interact with the doll
Third Echo (after Chapter 6):
Talk to the Countess
Have a seat on the bench
Defeat the Corruption
Talk to the recluse
Remembrance of the Recluse
How do I unlock the Echoes of the Recluse? Equip her and play a round.
First Echo (after Chapter 1):
Talk to the Iron Attendant
Start an expedition and defeat the Night-Entangled Goldnilpferd
The boss’s location will be marked on the map
Collect the Night Fragment after the battle
Talk to the Iron Attendant and give him the Night Fragment
Second Echo (after Chapter 3):
Interact with the note at the large round table of the Round Table Hold
Talk to the Iron Attendant and get the Night Fragment back
Now go to the sleeping quarters and interact with the contaminated bed
Collect the remnants of the night
Talk to the Iron Attendant
Third Echo (after Chapter 5):
Expose the fraud at the training ground
Talk to the fraudster
Go to the cellar
Recalibrate the magical roots of the Iron Attendant
Talk to the Iron Attendant
Defeat three Night Lords and then challenge Heolstor
After the fight against Heolstor, go to the sleeping quarters
Go to the beds and place your hand on the infant
Talk again to the fraudster in the sleeping quarters after reliving the ending
Remembrance of the Executor
How do I unlock the Echoes of the Executor? Equip him and play a round.
First Echo (after Chapter 1):
Talk to the Guardian
Talk to the Priestess
Start an expedition and collect the Blessed Flower
The flower will be marked for you on the map
Defeat the boss “Tracker Bloodhound Knight” and collect the flower
Talk to the Priestess
Talk to the Iron Attendant
Interact with your canvas
Second Echo (after Chapter 5):
Talk to the Priestess
Start an expedition with the Shifted Earth “Mountain Peak”
Search on the mountain for the Golden Sprout
The Golden Sprout will be marked on the map
Defeat the Avatar of the Earth Tree and collect the Golden Sprout
Give the Golden Sprout to the Priestess
Now defeat the Executor’s Call
Interact in the hut with the Forge Knight
Talk to the Priestess
Remembrance of the Scholar
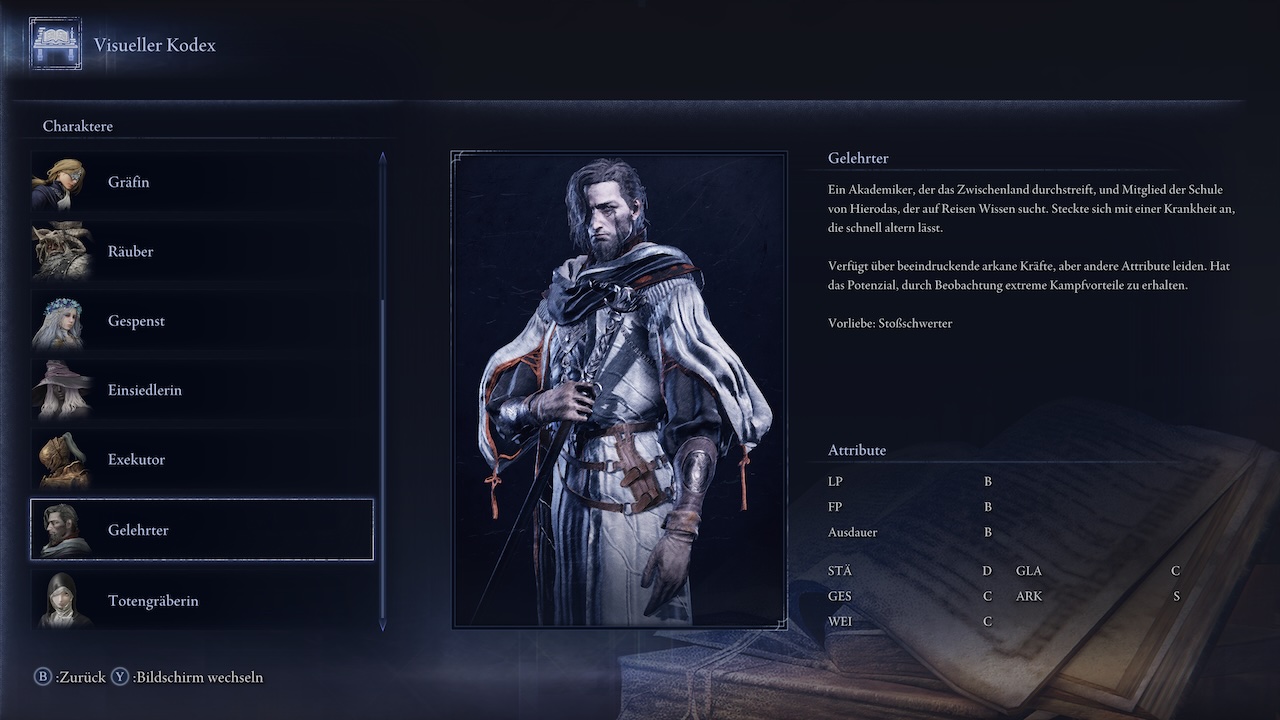
First Echo:
Unlock the Scholar
Complete expeditions and collect memory fragments
Interact with the codex on the table and start the Echo
Start an expedition
Search for an underground chamber that is marked on the map (during an expedition)
Collect the item “Vassal’s Journal”
Talk to the Gravedigger
Talk to Iron Attendant
Interact with the Vassal’s Journal at the chapel table
Talk to the Gravedigger
Second Echo:
Complete expeditions and collect memory fragments
Talk to the Vessel Bazaar
Defeat the Apostle of the God Skull
Interact with the crystallized knight
Third Echo:
Talk to the Gravedigger
Inspect the mirror in the Round Table
Inspect the chapel
Defeat the Dreglord in Limveld
Talk to the Gravedigger
Remembrance of the Gravedigger
First Echo:
Unlock the Gravedigger
Complete an expedition or defeat a Night Lord to collect memory fragments
Talk to Iron Attendant
Defeat the Iron Attendant
Defeat the Night Wanderers
Apologize to the Iron Attendant
Absorb the power of the night
Talk to the Scholar
Second Echo:
Complete an expedition or defeat a Night Lord to collect memory fragments
Talk to the Priestess
Pray in the chapel
Talk to the Iron Attendant
Start an expedition with the Balancers
Find the Scholar
Take the “Scholar’s Primal Core” to you
Third Echo:
Start an expedition with the Night Aspect
Take the “Dismembered Finger” to you
Drop the finger
Interact with the corpse
These were all the Echoes that you can actively complete for all classes. There are many skins that you can unlock in Elden Ring: Nightreign, and alongside the Echo skins, classics from Dark Souls have also made it into the game. To find out what they look like and how to get them, read here: Elden Ring Nightreign: All Skins and how to unlock them
First Echo (after Chapter 2):
Talk to the Iron Attendant
Start an expedition and collect the “Slate Whetstone”
Talk to the Iron Attendant and hand in the Whetstone
Collect the earrings from the rewards
Go to the sleeping quarters and hold the earrings up to the light
Find the Countess and give her the earrings
Second Echo (after Chapter 5):
Read three short passages near the Vessel Bazaar:
The first passage is located to the right of the encyclopedia for important information on the book tower
The second passage is in the same room on the right wall on a shelf
The third passage is on a book tower behind the recluse’s chair
Interact with the three graves in the cellar of the Round Table Hold
Go to the beach and talk to the Countess
Third Echo (after Chapter 6):
Start an expedition to begin Chapter 7
Back in the Round Table Hold, collect the “Key of the Virtuous Thief” from the table in the room before the chambers
Open the chest in the cellar of the Round Table Hold and collect the item “Torn Paper Fragment”
Talk to the recluse
Talk to the Iron Attendant
Start an expedition with the shifted world “Noklateo”
Find the Imitator Tear in Noklateo, it is marked with a golden shimmer in the city and guarded by an Imitator Troll
Defeat the Night Aspect (final boss)
Remembrance of the Guardian
How do I unlock the Echoes of the Guardian? Equip him and play a round.
First Echo (after Chapter 3):
Talk to the Iron Attendant
Defeat the Guardian Golem (will be marked on the map during an expedition)
Talk again to the Iron Attendant and hand him the Stone Pillar to receive the book “Annals of Cursed Weapons”.
Second Echo (after Chapter 4):
Talk to the Spirit Merchant in the dressing room and collect the item “Uncanny Talisman”
Go to the main hall of the Round Table Hold and become unconscious
Talk to the Iron Attendant when you wake up
Go back to the Spirit Merchant and select the option “Put Out”
Collect the item “Merchant’s Ledger”
Third Echo (after Chapter 6):
Talk to the Iron Attendant
Go on an expedition and look for the marked Cursed Merchant
Purchase the book from him for 10,000 runes
Return to the Iron Attendant and give him the Third Volume
Fourth Echo (after Chapter 8):
Interact with the paper fragment in the main hall on the huge table
Go to the room where the Vessel Bazaar is located and interact with a book on the right wall in a cabinet
Go outside to the graves of the Round Table Hold and talk to the recluse
You can now keep or destroy her Witch Brooch.
Regardless of your choice, the effect of the relic remains the same
Remembrance of the Iron Eye
How do I unlock the Echoes of the Iron Eye? Equip him and play a round.
First Echo (after Chapter 2):
Talk to the Priestess
Start an expedition and defeat the traitor “Night Hunter”
You will then receive the “Letter of the Traitor”
Talk again to the Priestess
Second Echo (after Chapter 5):
Talk to the Priestess in the cellar near the graves
Execute the Assassin
Defeat the Night Lord “Fulghor, Hero of Nightglow” and collect the “Blade of Order”
Execute the Assassin again, this time with the Blade of Order
Defeat Heolstor the Night Lord
At the end, touch the corpse and select “Hold Dagger”
Remembrance of the Countess
How do I unlock the Echoes of the Countess? Equip her and play a round.
First Echo (after Chapter 2):
Talk to the Robber
Talk to the Wylder
Talk to the Robber again
Now search in an expedition for the “Weapon Repair Materials”
The location is marked on your map
Once you have found the materials, you must defeat enemies and then collect the Gold Dew
Hand over the Gold Dew to the Wylder and receive the “Faded Iron Coins”
Talk to the Robber
Talk to the Ghost
Talk to the Iron Attendant
Second Echo (after Chapter 4):
Find the Wylder and collect the flatbread
Talk to the Iron Attendant
Third Echo (after Chapter 5):
Talk to the Robber
Talk to the Ghost on the beach
Defeat the Ghost and receive the “Crown Pendant”
Search for the message in Limveldt
The message will be marked for you on the map
Defeat some enemies and collect “Rooster’s Words”
Talk to the Robber and collect the “Double-Sided Coin”
Fourth Echo (after Chapter 6):
Bless your Iron Coin at the huge table of the Round Table Hold
Give the Iron Attendant your Blessed Iron Coin
Talk to Wylder
Talk to the Iron Attendant
Remembrance of the Robber
How do I unlock the Echoes of the Robber? Equip him and play a round.
First Echo (after Chapter 1):
Talk to the Iron Attendant
Touch the Monument
Talk to the Iron Attendant
Touch the Monument again to enter the arena
Defeat the Single Hit Gladiator
Second Echo (after Chapter 3):
Talk to the Iron Attendant
Touch the Monument
Defeat the Blinding Elder Lion
Talk to the Iron Attendant again
Third Echo (after Chapter 6):
Talk to the Attendant
Touch the Monument
Talk to the Attendant
Travel to the beach
Defeat the White Horn
Talk to the Attendant
Touch the Monument
Talk to the Attendant
Pay respects to the grave next to the Monument
Remembrance of the Ghost
How do I unlock the Echoes of the Ghost? Equip her and play a round.
First Echo:
Talk to the Countess
Talk to the Guardian
Defeat the Tricephalos or the Dark Rift Knight
At the end of your expedition, collect the “Blade of Night Aspect”
Hand the blade to the Guardian
Second Echo (after Chapter 4):
Talk to the Countess
Talk to the recluse
Have a seat on the bench
Eliminate the corruption by defeating all enemies in the room
Interact with the doll
Third Echo (after Chapter 6):
Talk to the Countess
Have a seat on the bench
Defeat the Corruption
Talk to the recluse
Remembrance of the Recluse
How do I unlock the Echoes of the Recluse? Equip her and play a round.
First Echo (after Chapter 1):
Talk to the Iron Attendant
Start an expedition and defeat the Night-Entangled Goldnilpferd
The boss’s location will be marked on the map
Collect the Night Fragment after the battle
Talk to the Iron Attendant and give him the Night Fragment
Second Echo (after Chapter 3):
Interact with the note at the large round table of the Round Table Hold
Talk to the Iron Attendant and get the Night Fragment back
Now go to the sleeping quarters and interact with the contaminated bed
Collect the remnants of the night
Talk to the Iron Attendant
Third Echo (after Chapter 5):
Expose the fraud at the training ground
Talk to the fraudster
Go to the cellar
Recalibrate the magical roots of the Iron Attendant
Talk to the Iron Attendant
Defeat three Night Lords and then challenge Heolstor
After the fight against Heolstor, go to the sleeping quarters
Go to the beds and place your hand on the infant
Talk again to the fraudster in the sleeping quarters after reliving the ending
Remembrance of the Executor
How do I unlock the Echoes of the Executor? Equip him and play a round.
First Echo (after Chapter 1):
Talk to the Guardian
Talk to the Priestess
Start an expedition and collect the Blessed Flower
The flower will be marked for you on the map
Defeat the boss “Tracker Bloodhound Knight” and collect the flower
Talk to the Priestess
Talk to the Iron Attendant
Interact with your canvas
Second Echo (after Chapter 5):
Talk to the Priestess
Start an expedition with the Shifted Earth “Mountain Peak”
Search on the mountain for the Golden Sprout
The Golden Sprout will be marked on the map
Defeat the Avatar of the Earth Tree and collect the Golden Sprout
Give the Golden Sprout to the Priestess
Now defeat the Executor’s Call
Interact in the hut with the Forge Knight
Talk to the Priestess
Remembrance of the Scholar
First Echo:
Unlock the Scholar
Complete expeditions and collect memory fragments
Interact with the codex on the table and start the Echo
Start an expedition
Search for an underground chamber that is marked on the map (during an expedition)
Collect the item “Vassal’s Journal”
Talk to the Gravedigger
Talk to Iron Attendant
Interact with the Vassal’s Journal at the chapel table
Talk to the Gravedigger
Second Echo:
Complete expeditions and collect memory fragments
Talk to the Vessel Bazaar
Defeat the Apostle of the God Skull
Interact with the crystallized knight
Third Echo:
Talk to the Gravedigger
Inspect the mirror in the Round Table
Inspect the chapel
Defeat the Dreglord in Limveld
Talk to the Gravedigger
Remembrance of the Gravedigger
First Echo:
Unlock the Gravedigger
Complete an expedition or defeat a Night Lord to collect memory fragments
Talk to Iron Attendant
Defeat the Iron Attendant
Defeat the Night Wanderers
Apologize to the Iron Attendant
Absorb the power of the night
Talk to the Scholar
Second Echo:
Complete an expedition or defeat a Night Lord to collect memory fragments
Talk to the Priestess
Pray in the chapel
Talk to the Iron Attendant
Start an expedition with the Balancers
Find the Scholar
Take the “Scholar’s Primal Core” to you
Third Echo:
Start an expedition with the Night Aspect
Take the “Dismembered Finger” to you
Drop the finger
Interact with the corpse
These were all the Echoes that you can actively complete for all classes. There are many skins that you can unlock in Elden Ring: Nightreign, and alongside the Echo skins, classics from Dark Souls have also made it into the game. To find out what they look like and how to get them, read here: Elden Ring Nightreign: All Skins and how to unlock them
First Echo (after Chapter 2):
Talk to the Iron Attendant
Start an expedition and collect the “Slate Whetstone”
Talk to the Iron Attendant and hand in the Whetstone
Collect the earrings from the rewards
Go to the sleeping quarters and hold the earrings up to the light
Find the Countess and give her the earrings
Second Echo (after Chapter 5):
Read three short passages near the Vessel Bazaar:
The first passage is located to the right of the encyclopedia for important information on the book tower
The second passage is in the same room on the right wall on a shelf
The third passage is on a book tower behind the recluse’s chair
Interact with the three graves in the cellar of the Round Table Hold
Go to the beach and talk to the Countess
Third Echo (after Chapter 6):
Start an expedition to begin Chapter 7
Back in the Round Table Hold, collect the “Key of the Virtuous Thief” from the table in the room before the chambers
Open the chest in the cellar of the Round Table Hold and collect the item “Torn Paper Fragment”
Talk to the recluse
Talk to the Iron Attendant
Start an expedition with the shifted world “Noklateo”
Find the Imitator Tear in Noklateo, it is marked with a golden shimmer in the city and guarded by an Imitator Troll
Defeat the Night Aspect (final boss)
Remembrance of the Guardian
How do I unlock the Echoes of the Guardian? Equip him and play a round.
First Echo (after Chapter 3):
Talk to the Iron Attendant
Defeat the Guardian Golem (will be marked on the map during an expedition)
Talk again to the Iron Attendant and hand him the Stone Pillar to receive the book “Annals of Cursed Weapons”.
Second Echo (after Chapter 4):
Talk to the Spirit Merchant in the dressing room and collect the item “Uncanny Talisman”
Go to the main hall of the Round Table Hold and become unconscious
Talk to the Iron Attendant when you wake up
Go back to the Spirit Merchant and select the option “Put Out”
Collect the item “Merchant’s Ledger”
Third Echo (after Chapter 6):
Talk to the Iron Attendant
Go on an expedition and look for the marked Cursed Merchant
Purchase the book from him for 10,000 runes
Return to the Iron Attendant and give him the Third Volume
Fourth Echo (after Chapter 8):
Interact with the paper fragment in the main hall on the huge table
Go to the room where the Vessel Bazaar is located and interact with a book on the right wall in a cabinet
Go outside to the graves of the Round Table Hold and talk to the recluse
You can now keep or destroy her Witch Brooch.
Regardless of your choice, the effect of the relic remains the same
Remembrance of the Iron Eye
How do I unlock the Echoes of the Iron Eye? Equip him and play a round.
First Echo (after Chapter 2):
Talk to the Priestess
Start an expedition and defeat the traitor “Night Hunter”
You will then receive the “Letter of the Traitor”
Talk again to the Priestess
Second Echo (after Chapter 5):
Talk to the Priestess in the cellar near the graves
Execute the Assassin
Defeat the Night Lord “Fulghor, Hero of Nightglow” and collect the “Blade of Order”
Execute the Assassin again, this time with the Blade of Order
Defeat Heolstor the Night Lord
At the end, touch the corpse and select “Hold Dagger”
Remembrance of the Countess
How do I unlock the Echoes of the Countess? Equip her and play a round.
First Echo (after Chapter 2):
Talk to the Robber
Talk to the Wylder
Talk to the Robber again
Now search in an expedition for the “Weapon Repair Materials”
The location is marked on your map
Once you have found the materials, you must defeat enemies and then collect the Gold Dew
Hand over the Gold Dew to the Wylder and receive the “Faded Iron Coins”
Talk to the Robber
Talk to the Ghost
Talk to the Iron Attendant
Second Echo (after Chapter 4):
Find the Wylder and collect the flatbread
Talk to the Iron Attendant
Third Echo (after Chapter 5):
Talk to the Robber
Talk to the Ghost on the beach
Defeat the Ghost and receive the “Crown Pendant”
Search for the message in Limveldt
The message will be marked for you on the map
Defeat some enemies and collect “Rooster’s Words”
Talk to the Robber and collect the “Double-Sided Coin”
Fourth Echo (after Chapter 6):
Bless your Iron Coin at the huge table of the Round Table Hold
Give the Iron Attendant your Blessed Iron Coin
Talk to Wylder
Talk to the Iron Attendant
Remembrance of the Robber
How do I unlock the Echoes of the Robber? Equip him and play a round.
First Echo (after Chapter 1):
Talk to the Iron Attendant
Touch the Monument
Talk to the Iron Attendant
Touch the Monument again to enter the arena
Defeat the Single Hit Gladiator
Second Echo (after Chapter 3):
Talk to the Iron Attendant
Touch the Monument
Defeat the Blinding Elder Lion
Talk to the Iron Attendant again
Third Echo (after Chapter 6):
Talk to the Attendant
Touch the Monument
Talk to the Attendant
Travel to the beach
Defeat the White Horn
Talk to the Attendant
Touch the Monument
Talk to the Attendant
Pay respects to the grave next to the Monument
Remembrance of the Ghost
How do I unlock the Echoes of the Ghost? Equip her and play a round.
First Echo:
Talk to the Countess
Talk to the Guardian
Defeat the Tricephalos or the Dark Rift Knight
At the end of your expedition, collect the “Blade of Night Aspect”
Hand the blade to the Guardian
Second Echo (after Chapter 4):
Talk to the Countess
Talk to the recluse
Have a seat on the bench
Eliminate the corruption by defeating all enemies in the room
Interact with the doll
Third Echo (after Chapter 6):
Talk to the Countess
Have a seat on the bench
Defeat the Corruption
Talk to the recluse
Remembrance of the Recluse
How do I unlock the Echoes of the Recluse? Equip her and play a round.
First Echo (after Chapter 1):
Talk to the Iron Attendant
Start an expedition and defeat the Night-Entangled Goldnilpferd
The boss’s location will be marked on the map
Collect the Night Fragment after the battle
Talk to the Iron Attendant and give him the Night Fragment
Second Echo (after Chapter 3):
Interact with the note at the large round table of the Round Table Hold
Talk to the Iron Attendant and get the Night Fragment back
Now go to the sleeping quarters and interact with the contaminated bed
Collect the remnants of the night
Talk to the Iron Attendant
Third Echo (after Chapter 5):
Expose the fraud at the training ground
Talk to the fraudster
Go to the cellar
Recalibrate the magical roots of the Iron Attendant
Talk to the Iron Attendant
Defeat three Night Lords and then challenge Heolstor
After the fight against Heolstor, go to the sleeping quarters
Go to the beds and place your hand on the infant
Talk again to the fraudster in the sleeping quarters after reliving the ending
Remembrance of the Executor
How do I unlock the Echoes of the Executor? Equip him and play a round.
First Echo (after Chapter 1):
Talk to the Guardian
Talk to the Priestess
Start an expedition and collect the Blessed Flower
The flower will be marked for you on the map
Defeat the boss “Tracker Bloodhound Knight” and collect the flower
Talk to the Priestess
Talk to the Iron Attendant
Interact with your canvas
Second Echo (after Chapter 5):
Talk to the Priestess
Start an expedition with the Shifted Earth “Mountain Peak”
Search on the mountain for the Golden Sprout
The Golden Sprout will be marked on the map
Defeat the Avatar of the Earth Tree and collect the Golden Sprout
Give the Golden Sprout to the Priestess
Now defeat the Executor’s Call
Interact in the hut with the Forge Knight
Talk to the Priestess
Remembrance of the Scholar
First Echo:
Unlock the Scholar
Complete expeditions and collect memory fragments
Interact with the codex on the table and start the Echo
Start an expedition
Search for an underground chamber that is marked on the map (during an expedition)
Collect the item “Vassal’s Journal”
Talk to the Gravedigger
Talk to Iron Attendant
Interact with the Vassal’s Journal at the chapel table
Talk to the Gravedigger
Second Echo:
Complete expeditions and collect memory fragments
Talk to the Vessel Bazaar
Defeat the Apostle of the God Skull
Interact with the crystallized knight
Third Echo:
Talk to the Gravedigger
Inspect the mirror in the Round Table
Inspect the chapel
Defeat the Dreglord in Limveld
Talk to the Gravedigger
Remembrance of the Gravedigger
First Echo:
Unlock the Gravedigger
Complete an expedition or defeat a Night Lord to collect memory fragments
Talk to Iron Attendant
Defeat the Iron Attendant
Defeat the Night Wanderers
Apologize to the Iron Attendant
Absorb the power of the night
Talk to the Scholar
Second Echo:
Complete an expedition or defeat a Night Lord to collect memory fragments
Talk to the Priestess
Pray in the chapel
Talk to the Iron Attendant
Start an expedition with the Balancers
Find the Scholar
Take the “Scholar’s Primal Core” to you
Third Echo:
Start an expedition with the Night Aspect
Take the “Dismembered Finger” to you
Drop the finger
Interact with the corpse
These were all the Echoes that you can actively complete for all classes. There are many skins that you can unlock in Elden Ring: Nightreign, and alongside the Echo skins, classics from Dark Souls have also made it into the game. To find out what they look like and how to get them, read here: Elden Ring Nightreign: All Skins and how to unlock them
Third Echo (after Chapter 6):
Start an expedition to begin Chapter 7
Back in the Round Table Hold, collect the “Key of the Virtuous Thief” from the table in the room before the chambers
Open the chest in the cellar of the Round Table Hold and collect the item “Torn Paper Fragment”
Talk to the recluse
Talk to the Iron Attendant
Start an expedition with the shifted world “Noklateo”
Find the Imitator Tear in Noklateo, it is marked with a golden shimmer in the city and guarded by an Imitator Troll
Defeat the Night Aspect (final boss)
Remembrance of the Guardian
How do I unlock the Echoes of the Guardian? Equip him and play a round.
First Echo (after Chapter 3):
Talk to the Iron Attendant
Defeat the Guardian Golem (will be marked on the map during an expedition)
Talk again to the Iron Attendant and hand him the Stone Pillar to receive the book “Annals of Cursed Weapons”.
Second Echo (after Chapter 4):
Talk to the Spirit Merchant in the dressing room and collect the item “Uncanny Talisman”
Go to the main hall of the Round Table Hold and become unconscious
Talk to the Iron Attendant when you wake up
Go back to the Spirit Merchant and select the option “Put Out”
Collect the item “Merchant’s Ledger”
Third Echo (after Chapter 6):
Talk to the Iron Attendant
Go on an expedition and look for the marked Cursed Merchant
Purchase the book from him for 10,000 runes
Return to the Iron Attendant and give him the Third Volume
Fourth Echo (after Chapter 8):
Interact with the paper fragment in the main hall on the huge table
Go to the room where the Vessel Bazaar is located and interact with a book on the right wall in a cabinet
Go outside to the graves of the Round Table Hold and talk to the recluse
You can now keep or destroy her Witch Brooch.
Regardless of your choice, the effect of the relic remains the same
Remembrance of the Iron Eye
How do I unlock the Echoes of the Iron Eye? Equip him and play a round.
First Echo (after Chapter 2):
Talk to the Priestess
Start an expedition and defeat the traitor “Night Hunter”
You will then receive the “Letter of the Traitor”
Talk again to the Priestess
Second Echo (after Chapter 5):
Talk to the Priestess in the cellar near the graves
Execute the Assassin
Defeat the Night Lord “Fulghor, Hero of Nightglow” and collect the “Blade of Order”
Execute the Assassin again, this time with the Blade of Order
Defeat Heolstor the Night Lord
At the end, touch the corpse and select “Hold Dagger”
Remembrance of the Countess
How do I unlock the Echoes of the Countess? Equip her and play a round.
First Echo (after Chapter 2):
Talk to the Robber
Talk to the Wylder
Talk to the Robber again
Now search in an expedition for the “Weapon Repair Materials”
The location is marked on your map
Once you have found the materials, you must defeat enemies and then collect the Gold Dew
Hand over the Gold Dew to the Wylder and receive the “Faded Iron Coins”
Talk to the Robber
Talk to the Ghost
Talk to the Iron Attendant
Second Echo (after Chapter 4):
Find the Wylder and collect the flatbread
Talk to the Iron Attendant
Third Echo (after Chapter 5):
Talk to the Robber
Talk to the Ghost on the beach
Defeat the Ghost and receive the “Crown Pendant”
Search for the message in Limveldt
The message will be marked for you on the map
Defeat some enemies and collect “Rooster’s Words”
Talk to the Robber and collect the “Double-Sided Coin”
Fourth Echo (after Chapter 6):
Bless your Iron Coin at the huge table of the Round Table Hold
Give the Iron Attendant your Blessed Iron Coin
Talk to Wylder
Talk to the Iron Attendant
Remembrance of the Robber
How do I unlock the Echoes of the Robber? Equip him and play a round.
First Echo (after Chapter 1):
Talk to the Iron Attendant
Touch the Monument
Talk to the Iron Attendant
Touch the Monument again to enter the arena
Defeat the Single Hit Gladiator
Second Echo (after Chapter 3):
Talk to the Iron Attendant
Touch the Monument
Defeat the Blinding Elder Lion
Talk to the Iron Attendant again
Third Echo (after Chapter 6):
Talk to the Attendant
Touch the Monument
Talk to the Attendant
Travel to the beach
Defeat the White Horn
Talk to the Attendant
Touch the Monument
Talk to the Attendant
Pay respects to the grave next to the Monument
Remembrance of the Ghost
How do I unlock the Echoes of the Ghost? Equip her and play a round.
First Echo:
Talk to the Countess
Talk to the Guardian
Defeat the Tricephalos or the Dark Rift Knight
At the end of your expedition, collect the “Blade of Night Aspect”
Hand the blade to the Guardian
Second Echo (after Chapter 4):
Talk to the Countess
Talk to the recluse
Have a seat on the bench
Eliminate the corruption by defeating all enemies in the room
Interact with the doll
Third Echo (after Chapter 6):
Talk to the Countess
Have a seat on the bench
Defeat the Corruption
Talk to the recluse
Remembrance of the Recluse
How do I unlock the Echoes of the Recluse? Equip her and play a round.
First Echo (after Chapter 1):
Talk to the Iron Attendant
Start an expedition and defeat the Night-Entangled Goldnilpferd
The boss’s location will be marked on the map
Collect the Night Fragment after the battle
Talk to the Iron Attendant and give him the Night Fragment
Second Echo (after Chapter 3):
Interact with the note at the large round table of the Round Table Hold
Talk to the Iron Attendant and get the Night Fragment back
Now go to the sleeping quarters and interact with the contaminated bed
Collect the remnants of the night
Talk to the Iron Attendant
Third Echo (after Chapter 5):
Expose the fraud at the training ground
Talk to the fraudster
Go to the cellar
Recalibrate the magical roots of the Iron Attendant
Talk to the Iron Attendant
Defeat three Night Lords and then challenge Heolstor
After the fight against Heolstor, go to the sleeping quarters
Go to the beds and place your hand on the infant
Talk again to the fraudster in the sleeping quarters after reliving the ending
Remembrance of the Executor
How do I unlock the Echoes of the Executor? Equip him and play a round.
First Echo (after Chapter 1):
Talk to the Guardian
Talk to the Priestess
Start an expedition and collect the Blessed Flower
The flower will be marked for you on the map
Defeat the boss “Tracker Bloodhound Knight” and collect the flower
Talk to the Priestess
Talk to the Iron Attendant
Interact with your canvas
Second Echo (after Chapter 5):
Talk to the Priestess
Start an expedition with the Shifted Earth “Mountain Peak”
Search on the mountain for the Golden Sprout
The Golden Sprout will be marked on the map
Defeat the Avatar of the Earth Tree and collect the Golden Sprout
Give the Golden Sprout to the Priestess
Now defeat the Executor’s Call
Interact in the hut with the Forge Knight
Talk to the Priestess
Remembrance of the Scholar
First Echo:
Unlock the Scholar
Complete expeditions and collect memory fragments
Interact with the codex on the table and start the Echo
Start an expedition
Search for an underground chamber that is marked on the map (during an expedition)
Collect the item “Vassal’s Journal”
Talk to the Gravedigger
Talk to Iron Attendant
Interact with the Vassal’s Journal at the chapel table
Talk to the Gravedigger
Second Echo:
Complete expeditions and collect memory fragments
Talk to the Vessel Bazaar
Defeat the Apostle of the God Skull
Interact with the crystallized knight
Third Echo:
Talk to the Gravedigger
Inspect the mirror in the Round Table
Inspect the chapel
Defeat the Dreglord in Limveld
Talk to the Gravedigger
Remembrance of the Gravedigger
First Echo:
Unlock the Gravedigger
Complete an expedition or defeat a Night Lord to collect memory fragments
Talk to Iron Attendant
Defeat the Iron Attendant
Defeat the Night Wanderers
Apologize to the Iron Attendant
Absorb the power of the night
Talk to the Scholar
Second Echo:
Complete an expedition or defeat a Night Lord to collect memory fragments
Talk to the Priestess
Pray in the chapel
Talk to the Iron Attendant
Start an expedition with the Balancers
Find the Scholar
Take the “Scholar’s Primal Core” to you
Third Echo:
Start an expedition with the Night Aspect
Take the “Dismembered Finger” to you
Drop the finger
Interact with the corpse
These were all the Echoes that you can actively complete for all classes. There are many skins that you can unlock in Elden Ring: Nightreign, and alongside the Echo skins, classics from Dark Souls have also made it into the game. To find out what they look like and how to get them, read here: Elden Ring Nightreign: All Skins and how to unlock them
First Echo (after Chapter 2):
Talk to the Iron Attendant
Start an expedition and collect the “Slate Whetstone”
Talk to the Iron Attendant and hand in the Whetstone
Collect the earrings from the rewards
Go to the sleeping quarters and hold the earrings up to the light
Find the Countess and give her the earrings
Second Echo (after Chapter 5):
Read three short passages near the Vessel Bazaar:
The first passage is located to the right of the encyclopedia for important information on the book tower
The second passage is in the same room on the right wall on a shelf
The third passage is on a book tower behind the recluse’s chair
Interact with the three graves in the cellar of the Round Table Hold
Go to the beach and talk to the Countess
Third Echo (after Chapter 6):
Start an expedition to begin Chapter 7
Back in the Round Table Hold, collect the “Key of the Virtuous Thief” from the table in the room before the chambers
Open the chest in the cellar of the Round Table Hold and collect the item “Torn Paper Fragment”
Talk to the recluse
Talk to the Iron Attendant
Start an expedition with the shifted world “Noklateo”
Find the Imitator Tear in Noklateo, it is marked with a golden shimmer in the city and guarded by an Imitator Troll
Defeat the Night Aspect (final boss)
Remembrance of the Guardian
How do I unlock the Echoes of the Guardian? Equip him and play a round.
First Echo (after Chapter 3):
Talk to the Iron Attendant
Defeat the Guardian Golem (will be marked on the map during an expedition)
Talk again to the Iron Attendant and hand him the Stone Pillar to receive the book “Annals of Cursed Weapons”.
Second Echo (after Chapter 4):
Talk to the Spirit Merchant in the dressing room and collect the item “Uncanny Talisman”
Go to the main hall of the Round Table Hold and become unconscious
Talk to the Iron Attendant when you wake up
Go back to the Spirit Merchant and select the option “Put Out”
Collect the item “Merchant’s Ledger”
Third Echo (after Chapter 6):
Talk to the Iron Attendant
Go on an expedition and look for the marked Cursed Merchant
Purchase the book from him for 10,000 runes
Return to the Iron Attendant and give him the Third Volume
Fourth Echo (after Chapter 8):
Interact with the paper fragment in the main hall on the huge table
Go to the room where the Vessel Bazaar is located and interact with a book on the right wall in a cabinet
Go outside to the graves of the Round Table Hold and talk to the recluse
You can now keep or destroy her Witch Brooch.
Regardless of your choice, the effect of the relic remains the same
Remembrance of the Iron Eye
How do I unlock the Echoes of the Iron Eye? Equip him and play a round.
First Echo (after Chapter 2):
Talk to the Priestess
Start an expedition and defeat the traitor “Night Hunter”
You will then receive the “Letter of the Traitor”
Talk again to the Priestess
Second Echo (after Chapter 5):
Talk to the Priestess in the cellar near the graves
Execute the Assassin
Defeat the Night Lord “Fulghor, Hero of Nightglow” and collect the “Blade of Order”
Execute the Assassin again, this time with the Blade of Order
Defeat Heolstor the Night Lord
At the end, touch the corpse and select “Hold Dagger”
Remembrance of the Countess
How do I unlock the Echoes of the Countess? Equip her and play a round.
First Echo (after Chapter 2):
Talk to the Robber
Talk to the Wylder
Talk to the Robber again
Now search in an expedition for the “Weapon Repair Materials”
The location is marked on your map
Once you have found the materials, you must defeat enemies and then collect the Gold Dew
Hand over the Gold Dew to the Wylder and receive the “Faded Iron Coins”
Talk to the Robber
Talk to the Ghost
Talk to the Iron Attendant
Second Echo (after Chapter 4):
Find the Wylder and collect the flatbread
Talk to the Iron Attendant
Third Echo (after Chapter 5):
Talk to the Robber
Talk to the Ghost on the beach
Defeat the Ghost and receive the “Crown Pendant”
Search for the message in Limveldt
The message will be marked for you on the map
Defeat some enemies and collect “Rooster’s Words”
Talk to the Robber and collect the “Double-Sided Coin”
Fourth Echo (after Chapter 6):
Bless your Iron Coin at the huge table of the Round Table Hold
Give the Iron Attendant your Blessed Iron Coin
Talk to Wylder
Talk to the Iron Attendant
Remembrance of the Robber
How do I unlock the Echoes of the Robber? Equip him and play a round.
First Echo (after Chapter 1):
Talk to the Iron Attendant
Touch the Monument
Talk to the Iron Attendant
Touch the Monument again to enter the arena
Defeat the Single Hit Gladiator
Second Echo (after Chapter 3):
Talk to the Iron Attendant
Touch the Monument
Defeat the Blinding Elder Lion
Talk to the Iron Attendant again
Third Echo (after Chapter 6):
Talk to the Attendant
Touch the Monument
Talk to the Attendant
Travel to the beach
Defeat the White Horn
Talk to the Attendant
Touch the Monument
Talk to the Attendant
Pay respects to the grave next to the Monument
Remembrance of the Ghost
How do I unlock the Echoes of the Ghost? Equip her and play a round.
First Echo:
Talk to the Countess
Talk to the Guardian
Defeat the Tricephalos or the Dark Rift Knight
At the end of your expedition, collect the “Blade of Night Aspect”
Hand the blade to the Guardian
Second Echo (after Chapter 4):
Talk to the Countess
Talk to the recluse
Have a seat on the bench
Eliminate the corruption by defeating all enemies in the room
Interact with the doll
Third Echo (after Chapter 6):
Talk to the Countess
Have a seat on the bench
Defeat the Corruption
Talk to the recluse
Remembrance of the Recluse
How do I unlock the Echoes of the Recluse? Equip her and play a round.
First Echo (after Chapter 1):
Talk to the Iron Attendant
Start an expedition and defeat the Night-Entangled Goldnilpferd
The boss’s location will be marked on the map
Collect the Night Fragment after the battle
Talk to the Iron Attendant and give him the Night Fragment
Second Echo (after Chapter 3):
Interact with the note at the large round table of the Round Table Hold
Talk to the Iron Attendant and get the Night Fragment back
Now go to the sleeping quarters and interact with the contaminated bed
Collect the remnants of the night
Talk to the Iron Attendant
Third Echo (after Chapter 5):
Expose the fraud at the training ground
Talk to the fraudster
Go to the cellar
Recalibrate the magical roots of the Iron Attendant
Talk to the Iron Attendant
Defeat three Night Lords and then challenge Heolstor
After the fight against Heolstor, go to the sleeping quarters
Go to the beds and place your hand on the infant
Talk again to the fraudster in the sleeping quarters after reliving the ending
Remembrance of the Executor
How do I unlock the Echoes of the Executor? Equip him and play a round.
First Echo (after Chapter 1):
Talk to the Guardian
Talk to the Priestess
Start an expedition and collect the Blessed Flower
The flower will be marked for you on the map
Defeat the boss “Tracker Bloodhound Knight” and collect the flower
Talk to the Priestess
Talk to the Iron Attendant
Interact with your canvas
Second Echo (after Chapter 5):
Talk to the Priestess
Start an expedition with the Shifted Earth “Mountain Peak”
Search on the mountain for the Golden Sprout
The Golden Sprout will be marked on the map
Defeat the Avatar of the Earth Tree and collect the Golden Sprout
Give the Golden Sprout to the Priestess
Now defeat the Executor’s Call
Interact in the hut with the Forge Knight
Talk to the Priestess
Remembrance of the Scholar
First Echo:
Unlock the Scholar
Complete expeditions and collect memory fragments
Interact with the codex on the table and start the Echo
Start an expedition
Search for an underground chamber that is marked on the map (during an expedition)
Collect the item “Vassal’s Journal”
Talk to the Gravedigger
Talk to Iron Attendant
Interact with the Vassal’s Journal at the chapel table
Talk to the Gravedigger
Second Echo:
Complete expeditions and collect memory fragments
Talk to the Vessel Bazaar
Defeat the Apostle of the God Skull
Interact with the crystallized knight
Third Echo:
Talk to the Gravedigger
Inspect the mirror in the Round Table
Inspect the chapel
Defeat the Dreglord in Limveld
Talk to the Gravedigger
Remembrance of the Gravedigger
First Echo:
Unlock the Gravedigger
Complete an expedition or defeat a Night Lord to collect memory fragments
Talk to Iron Attendant
Defeat the Iron Attendant
Defeat the Night Wanderers
Apologize to the Iron Attendant
Absorb the power of the night
Talk to the Scholar
Second Echo:
Complete an expedition or defeat a Night Lord to collect memory fragments
Talk to the Priestess
Pray in the chapel
Talk to the Iron Attendant
Start an expedition with the Balancers
Find the Scholar
Take the “Scholar’s Primal Core” to you
Third Echo:
Start an expedition with the Night Aspect
Take the “Dismembered Finger” to you
Drop the finger
Interact with the corpse
These were all the Echoes that you can actively complete for all classes. There are many skins that you can unlock in Elden Ring: Nightreign, and alongside the Echo skins, classics from Dark Souls have also made it into the game. To find out what they look like and how to get them, read here: Elden Ring Nightreign: All Skins and how to unlock them
Third Echo (after Chapter 6):
Talk to the Iron Attendant
Go on an expedition and look for the marked Cursed Merchant
Purchase the book from him for 10,000 runes
Return to the Iron Attendant and give him the Third Volume
Fourth Echo (after Chapter 8):
Interact with the paper fragment in the main hall on the huge table
Go to the room where the Vessel Bazaar is located and interact with a book on the right wall in a cabinet
Go outside to the graves of the Round Table Hold and talk to the recluse
You can now keep or destroy her Witch Brooch.
Regardless of your choice, the effect of the relic remains the same
Remembrance of the Iron Eye
How do I unlock the Echoes of the Iron Eye? Equip him and play a round.
First Echo (after Chapter 2):
Talk to the Priestess
Start an expedition and defeat the traitor “Night Hunter”
You will then receive the “Letter of the Traitor”
Talk again to the Priestess
Second Echo (after Chapter 5):
Talk to the Priestess in the cellar near the graves
Execute the Assassin
Defeat the Night Lord “Fulghor, Hero of Nightglow” and collect the “Blade of Order”
Execute the Assassin again, this time with the Blade of Order
Defeat Heolstor the Night Lord
At the end, touch the corpse and select “Hold Dagger”
Remembrance of the Countess
How do I unlock the Echoes of the Countess? Equip her and play a round.
First Echo (after Chapter 2):
Talk to the Robber
Talk to the Wylder
Talk to the Robber again
Now search in an expedition for the “Weapon Repair Materials”
The location is marked on your map
Once you have found the materials, you must defeat enemies and then collect the Gold Dew
Hand over the Gold Dew to the Wylder and receive the “Faded Iron Coins”
Talk to the Robber
Talk to the Ghost
Talk to the Iron Attendant
Second Echo (after Chapter 4):
Find the Wylder and collect the flatbread
Talk to the Iron Attendant
Third Echo (after Chapter 5):
Talk to the Robber
Talk to the Ghost on the beach
Defeat the Ghost and receive the “Crown Pendant”
Search for the message in Limveldt
The message will be marked for you on the map
Defeat some enemies and collect “Rooster’s Words”
Talk to the Robber and collect the “Double-Sided Coin”
Fourth Echo (after Chapter 6):
Bless your Iron Coin at the huge table of the Round Table Hold
Give the Iron Attendant your Blessed Iron Coin
Talk to Wylder
Talk to the Iron Attendant
Remembrance of the Robber
How do I unlock the Echoes of the Robber? Equip him and play a round.
First Echo (after Chapter 1):
Talk to the Iron Attendant
Touch the Monument
Talk to the Iron Attendant
Touch the Monument again to enter the arena
Defeat the Single Hit Gladiator
Second Echo (after Chapter 3):
Talk to the Iron Attendant
Touch the Monument
Defeat the Blinding Elder Lion
Talk to the Iron Attendant again
Third Echo (after Chapter 6):
Talk to the Attendant
Touch the Monument
Talk to the Attendant
Travel to the beach
Defeat the White Horn
Talk to the Attendant
Touch the Monument
Talk to the Attendant
Pay respects to the grave next to the Monument
Remembrance of the Ghost
How do I unlock the Echoes of the Ghost? Equip her and play a round.
First Echo:
Talk to the Countess
Talk to the Guardian
Defeat the Tricephalos or the Dark Rift Knight
At the end of your expedition, collect the “Blade of Night Aspect”
Hand the blade to the Guardian
Second Echo (after Chapter 4):
Talk to the Countess
Talk to the recluse
Have a seat on the bench
Eliminate the corruption by defeating all enemies in the room
Interact with the doll
Third Echo (after Chapter 6):
Talk to the Countess
Have a seat on the bench
Defeat the Corruption
Talk to the recluse
Remembrance of the Recluse
How do I unlock the Echoes of the Recluse? Equip her and play a round.
First Echo (after Chapter 1):
Talk to the Iron Attendant
Start an expedition and defeat the Night-Entangled Goldnilpferd
The boss’s location will be marked on the map
Collect the Night Fragment after the battle
Talk to the Iron Attendant and give him the Night Fragment
Second Echo (after Chapter 3):
Interact with the note at the large round table of the Round Table Hold
Talk to the Iron Attendant and get the Night Fragment back
Now go to the sleeping quarters and interact with the contaminated bed
Collect the remnants of the night
Talk to the Iron Attendant
Third Echo (after Chapter 5):
Expose the fraud at the training ground
Talk to the fraudster
Go to the cellar
Recalibrate the magical roots of the Iron Attendant
Talk to the Iron Attendant
Defeat three Night Lords and then challenge Heolstor
After the fight against Heolstor, go to the sleeping quarters
Go to the beds and place your hand on the infant
Talk again to the fraudster in the sleeping quarters after reliving the ending
Remembrance of the Executor
How do I unlock the Echoes of the Executor? Equip him and play a round.
First Echo (after Chapter 1):
Talk to the Guardian
Talk to the Priestess
Start an expedition and collect the Blessed Flower
The flower will be marked for you on the map
Defeat the boss “Tracker Bloodhound Knight” and collect the flower
Talk to the Priestess
Talk to the Iron Attendant
Interact with your canvas
Second Echo (after Chapter 5):
Talk to the Priestess
Start an expedition with the Shifted Earth “Mountain Peak”
Search on the mountain for the Golden Sprout
The Golden Sprout will be marked on the map
Defeat the Avatar of the Earth Tree and collect the Golden Sprout
Give the Golden Sprout to the Priestess
Now defeat the Executor’s Call
Interact in the hut with the Forge Knight
Talk to the Priestess
Remembrance of the Scholar
First Echo:
Unlock the Scholar
Complete expeditions and collect memory fragments
Interact with the codex on the table and start the Echo
Start an expedition
Search for an underground chamber that is marked on the map (during an expedition)
Collect the item “Vassal’s Journal”
Talk to the Gravedigger
Talk to Iron Attendant
Interact with the Vassal’s Journal at the chapel table
Talk to the Gravedigger
Second Echo:
Complete expeditions and collect memory fragments
Talk to the Vessel Bazaar
Defeat the Apostle of the God Skull
Interact with the crystallized knight
Third Echo:
Talk to the Gravedigger
Inspect the mirror in the Round Table
Inspect the chapel
Defeat the Dreglord in Limveld
Talk to the Gravedigger
Remembrance of the Gravedigger
First Echo:
Unlock the Gravedigger
Complete an expedition or defeat a Night Lord to collect memory fragments
Talk to Iron Attendant
Defeat the Iron Attendant
Defeat the Night Wanderers
Apologize to the Iron Attendant
Absorb the power of the night
Talk to the Scholar
Second Echo:
Complete an expedition or defeat a Night Lord to collect memory fragments
Talk to the Priestess
Pray in the chapel
Talk to the Iron Attendant
Start an expedition with the Balancers
Find the Scholar
Take the “Scholar’s Primal Core” to you
Third Echo:
Start an expedition with the Night Aspect
Take the “Dismembered Finger” to you
Drop the finger
Interact with the corpse
These were all the Echoes that you can actively complete for all classes. There are many skins that you can unlock in Elden Ring: Nightreign, and alongside the Echo skins, classics from Dark Souls have also made it into the game. To find out what they look like and how to get them, read here: Elden Ring Nightreign: All Skins and how to unlock them
Third Echo (after Chapter 6):
Start an expedition to begin Chapter 7
Back in the Round Table Hold, collect the “Key of the Virtuous Thief” from the table in the room before the chambers
Open the chest in the cellar of the Round Table Hold and collect the item “Torn Paper Fragment”
Talk to the recluse
Talk to the Iron Attendant
Start an expedition with the shifted world “Noklateo”
Find the Imitator Tear in Noklateo, it is marked with a golden shimmer in the city and guarded by an Imitator Troll
Defeat the Night Aspect (final boss)
Remembrance of the Guardian
How do I unlock the Echoes of the Guardian? Equip him and play a round.
First Echo (after Chapter 3):
Talk to the Iron Attendant
Defeat the Guardian Golem (will be marked on the map during an expedition)
Talk again to the Iron Attendant and hand him the Stone Pillar to receive the book “Annals of Cursed Weapons”.
Second Echo (after Chapter 4):
Talk to the Spirit Merchant in the dressing room and collect the item “Uncanny Talisman”
Go to the main hall of the Round Table Hold and become unconscious
Talk to the Iron Attendant when you wake up
Go back to the Spirit Merchant and select the option “Put Out”
Collect the item “Merchant’s Ledger”
Third Echo (after Chapter 6):
Talk to the Iron Attendant
Go on an expedition and look for the marked Cursed Merchant
Purchase the book from him for 10,000 runes
Return to the Iron Attendant and give him the Third Volume
Fourth Echo (after Chapter 8):
Interact with the paper fragment in the main hall on the huge table
Go to the room where the Vessel Bazaar is located and interact with a book on the right wall in a cabinet
Go outside to the graves of the Round Table Hold and talk to the recluse
You can now keep or destroy her Witch Brooch.
Regardless of your choice, the effect of the relic remains the same
Remembrance of the Iron Eye
How do I unlock the Echoes of the Iron Eye? Equip him and play a round.
First Echo (after Chapter 2):
Talk to the Priestess
Start an expedition and defeat the traitor “Night Hunter”
You will then receive the “Letter of the Traitor”
Talk again to the Priestess
Second Echo (after Chapter 5):
Talk to the Priestess in the cellar near the graves
Execute the Assassin
Defeat the Night Lord “Fulghor, Hero of Nightglow” and collect the “Blade of Order”
Execute the Assassin again, this time with the Blade of Order
Defeat Heolstor the Night Lord
At the end, touch the corpse and select “Hold Dagger”
Remembrance of the Countess
How do I unlock the Echoes of the Countess? Equip her and play a round.
First Echo (after Chapter 2):
Talk to the Robber
Talk to the Wylder
Talk to the Robber again
Now search in an expedition for the “Weapon Repair Materials”
The location is marked on your map
Once you have found the materials, you must defeat enemies and then collect the Gold Dew
Hand over the Gold Dew to the Wylder and receive the “Faded Iron Coins”
Talk to the Robber
Talk to the Ghost
Talk to the Iron Attendant
Second Echo (after Chapter 4):
Find the Wylder and collect the flatbread
Talk to the Iron Attendant
Third Echo (after Chapter 5):
Talk to the Robber
Talk to the Ghost on the beach
Defeat the Ghost and receive the “Crown Pendant”
Search for the message in Limveldt
The message will be marked for you on the map
Defeat some enemies and collect “Rooster’s Words”
Talk to the Robber and collect the “Double-Sided Coin”
Fourth Echo (after Chapter 6):
Bless your Iron Coin at the huge table of the Round Table Hold
Give the Iron Attendant your Blessed Iron Coin
Talk to Wylder
Talk to the Iron Attendant
Remembrance of the Robber
How do I unlock the Echoes of the Robber? Equip him and play a round.
First Echo (after Chapter 1):
Talk to the Iron Attendant
Touch the Monument
Talk to the Iron Attendant
Touch the Monument again to enter the arena
Defeat the Single Hit Gladiator
Second Echo (after Chapter 3):
Talk to the Iron Attendant
Touch the Monument
Defeat the Blinding Elder Lion
Talk to the Iron Attendant again
Third Echo (after Chapter 6):
Talk to the Attendant
Touch the Monument
Talk to the Attendant
Travel to the beach
Defeat the White Horn
Talk to the Attendant
Touch the Monument
Talk to the Attendant
Pay respects to the grave next to the Monument
Remembrance of the Ghost
How do I unlock the Echoes of the Ghost? Equip her and play a round.
First Echo:
Talk to the Countess
Talk to the Guardian
Defeat the Tricephalos or the Dark Rift Knight
At the end of your expedition, collect the “Blade of Night Aspect”
Hand the blade to the Guardian
Second Echo (after Chapter 4):
Talk to the Countess
Talk to the recluse
Have a seat on the bench
Eliminate the corruption by defeating all enemies in the room
Interact with the doll
Third Echo (after Chapter 6):
Talk to the Countess
Have a seat on the bench
Defeat the Corruption
Talk to the recluse
Remembrance of the Recluse
How do I unlock the Echoes of the Recluse? Equip her and play a round.
First Echo (after Chapter 1):
Talk to the Iron Attendant
Start an expedition and defeat the Night-Entangled Goldnilpferd
The boss’s location will be marked on the map
Collect the Night Fragment after the battle
Talk to the Iron Attendant and give him the Night Fragment
Second Echo (after Chapter 3):
Interact with the note at the large round table of the Round Table Hold
Talk to the Iron Attendant and get the Night Fragment back
Now go to the sleeping quarters and interact with the contaminated bed
Collect the remnants of the night
Talk to the Iron Attendant
Third Echo (after Chapter 5):
Expose the fraud at the training ground
Talk to the fraudster
Go to the cellar
Recalibrate the magical roots of the Iron Attendant
Talk to the Iron Attendant
Defeat three Night Lords and then challenge Heolstor
After the fight against Heolstor, go to the sleeping quarters
Go to the beds and place your hand on the infant
Talk again to the fraudster in the sleeping quarters after reliving the ending
Remembrance of the Executor
How do I unlock the Echoes of the Executor? Equip him and play a round.
First Echo (after Chapter 1):
Talk to the Guardian
Talk to the Priestess
Start an expedition and collect the Blessed Flower
The flower will be marked for you on the map
Defeat the boss “Tracker Bloodhound Knight” and collect the flower
Talk to the Priestess
Talk to the Iron Attendant
Interact with your canvas
Second Echo (after Chapter 5):
Talk to the Priestess
Start an expedition with the Shifted Earth “Mountain Peak”
Search on the mountain for the Golden Sprout
The Golden Sprout will be marked on the map
Defeat the Avatar of the Earth Tree and collect the Golden Sprout
Give the Golden Sprout to the Priestess
Now defeat the Executor’s Call
Interact in the hut with the Forge Knight
Talk to the Priestess
Remembrance of the Scholar
First Echo:
Unlock the Scholar
Complete expeditions and collect memory fragments
Interact with the codex on the table and start the Echo
Start an expedition
Search for an underground chamber that is marked on the map (during an expedition)
Collect the item “Vassal’s Journal”
Talk to the Gravedigger
Talk to Iron Attendant
Interact with the Vassal’s Journal at the chapel table
Talk to the Gravedigger
Second Echo:
Complete expeditions and collect memory fragments
Talk to the Vessel Bazaar
Defeat the Apostle of the God Skull
Interact with the crystallized knight
Third Echo:
Talk to the Gravedigger
Inspect the mirror in the Round Table
Inspect the chapel
Defeat the Dreglord in Limveld
Talk to the Gravedigger
Remembrance of the Gravedigger
First Echo:
Unlock the Gravedigger
Complete an expedition or defeat a Night Lord to collect memory fragments
Talk to Iron Attendant
Defeat the Iron Attendant
Defeat the Night Wanderers
Apologize to the Iron Attendant
Absorb the power of the night
Talk to the Scholar
Second Echo:
Complete an expedition or defeat a Night Lord to collect memory fragments
Talk to the Priestess
Pray in the chapel
Talk to the Iron Attendant
Start an expedition with the Balancers
Find the Scholar
Take the “Scholar’s Primal Core” to you
Third Echo:
Start an expedition with the Night Aspect
Take the “Dismembered Finger” to you
Drop the finger
Interact with the corpse
These were all the Echoes that you can actively complete for all classes. There are many skins that you can unlock in Elden Ring: Nightreign, and alongside the Echo skins, classics from Dark Souls have also made it into the game. To find out what they look like and how to get them, read here: Elden Ring Nightreign: All Skins and how to unlock them
First Echo (after Chapter 2):
Talk to the Iron Attendant
Start an expedition and collect the “Slate Whetstone”
Talk to the Iron Attendant and hand in the Whetstone
Collect the earrings from the rewards
Go to the sleeping quarters and hold the earrings up to the light
Find the Countess and give her the earrings
Second Echo (after Chapter 5):
Read three short passages near the Vessel Bazaar:
The first passage is located to the right of the encyclopedia for important information on the book tower
The second passage is in the same room on the right wall on a shelf
The third passage is on a book tower behind the recluse’s chair
Interact with the three graves in the cellar of the Round Table Hold
Go to the beach and talk to the Countess
Third Echo (after Chapter 6):
Start an expedition to begin Chapter 7
Back in the Round Table Hold, collect the “Key of the Virtuous Thief” from the table in the room before the chambers
Open the chest in the cellar of the Round Table Hold and collect the item “Torn Paper Fragment”
Talk to the recluse
Talk to the Iron Attendant
Start an expedition with the shifted world “Noklateo”
Find the Imitator Tear in Noklateo, it is marked with a golden shimmer in the city and guarded by an Imitator Troll
Defeat the Night Aspect (final boss)
Remembrance of the Guardian
How do I unlock the Echoes of the Guardian? Equip him and play a round.
First Echo (after Chapter 3):
Talk to the Iron Attendant
Defeat the Guardian Golem (will be marked on the map during an expedition)
Talk again to the Iron Attendant and hand him the Stone Pillar to receive the book “Annals of Cursed Weapons”.
Second Echo (after Chapter 4):
Talk to the Spirit Merchant in the dressing room and collect the item “Uncanny Talisman”
Go to the main hall of the Round Table Hold and become unconscious
Talk to the Iron Attendant when you wake up
Go back to the Spirit Merchant and select the option “Put Out”
Collect the item “Merchant’s Ledger”
Third Echo (after Chapter 6):
Talk to the Iron Attendant
Go on an expedition and look for the marked Cursed Merchant
Purchase the book from him for 10,000 runes
Return to the Iron Attendant and give him the Third Volume
Fourth Echo (after Chapter 8):
Interact with the paper fragment in the main hall on the huge table
Go to the room where the Vessel Bazaar is located and interact with a book on the right wall in a cabinet
Go outside to the graves of the Round Table Hold and talk to the recluse
You can now keep or destroy her Witch Brooch.
Regardless of your choice, the effect of the relic remains the same
Remembrance of the Iron Eye
How do I unlock the Echoes of the Iron Eye? Equip him and play a round.
First Echo (after Chapter 2):
Talk to the Priestess
Start an expedition and defeat the traitor “Night Hunter”
You will then receive the “Letter of the Traitor”
Talk again to the Priestess
Second Echo (after Chapter 5):
Talk to the Priestess in the cellar near the graves
Execute the Assassin
Defeat the Night Lord “Fulghor, Hero of Nightglow” and collect the “Blade of Order”
Execute the Assassin again, this time with the Blade of Order
Defeat Heolstor the Night Lord
At the end, touch the corpse and select “Hold Dagger”
Remembrance of the Countess
How do I unlock the Echoes of the Countess? Equip her and play a round.
First Echo (after Chapter 2):
Talk to the Robber
Talk to the Wylder
Talk to the Robber again
Now search in an expedition for the “Weapon Repair Materials”
The location is marked on your map
Once you have found the materials, you must defeat enemies and then collect the Gold Dew
Hand over the Gold Dew to the Wylder and receive the “Faded Iron Coins”
Talk to the Robber
Talk to the Ghost
Talk to the Iron Attendant
Second Echo (after Chapter 4):
Find the Wylder and collect the flatbread
Talk to the Iron Attendant
Third Echo (after Chapter 5):
Talk to the Robber
Talk to the Ghost on the beach
Defeat the Ghost and receive the “Crown Pendant”
Search for the message in Limveldt
The message will be marked for you on the map
Defeat some enemies and collect “Rooster’s Words”
Talk to the Robber and collect the “Double-Sided Coin”
Fourth Echo (after Chapter 6):
Bless your Iron Coin at the huge table of the Round Table Hold
Give the Iron Attendant your Blessed Iron Coin
Talk to Wylder
Talk to the Iron Attendant
Remembrance of the Robber
How do I unlock the Echoes of the Robber? Equip him and play a round.
First Echo (after Chapter 1):
Talk to the Iron Attendant
Touch the Monument
Talk to the Iron Attendant
Touch the Monument again to enter the arena
Defeat the Single Hit Gladiator
Second Echo (after Chapter 3):
Talk to the Iron Attendant
Touch the Monument
Defeat the Blinding Elder Lion
Talk to the Iron Attendant again
Third Echo (after Chapter 6):
Talk to the Attendant
Touch the Monument
Talk to the Attendant
Travel to the beach
Defeat the White Horn
Talk to the Attendant
Touch the Monument
Talk to the Attendant
Pay respects to the grave next to the Monument
Remembrance of the Ghost
How do I unlock the Echoes of the Ghost? Equip her and play a round.
First Echo:
Talk to the Countess
Talk to the Guardian
Defeat the Tricephalos or the Dark Rift Knight
At the end of your expedition, collect the “Blade of Night Aspect”
Hand the blade to the Guardian
Second Echo (after Chapter 4):
Talk to the Countess
Talk to the recluse
Have a seat on the bench
Eliminate the corruption by defeating all enemies in the room
Interact with the doll
Third Echo (after Chapter 6):
Talk to the Countess
Have a seat on the bench
Defeat the Corruption
Talk to the recluse
Remembrance of the Recluse
How do I unlock the Echoes of the Recluse? Equip her and play a round.
First Echo (after Chapter 1):
Talk to the Iron Attendant
Start an expedition and defeat the Night-Entangled Goldnilpferd
The boss’s location will be marked on the map
Collect the Night Fragment after the battle
Talk to the Iron Attendant and give him the Night Fragment
Second Echo (after Chapter 3):
Interact with the note at the large round table of the Round Table Hold
Talk to the Iron Attendant and get the Night Fragment back
Now go to the sleeping quarters and interact with the contaminated bed
Collect the remnants of the night
Talk to the Iron Attendant
Third Echo (after Chapter 5):
Expose the fraud at the training ground
Talk to the fraudster
Go to the cellar
Recalibrate the magical roots of the Iron Attendant
Talk to the Iron Attendant
Defeat three Night Lords and then challenge Heolstor
After the fight against Heolstor, go to the sleeping quarters
Go to the beds and place your hand on the infant
Talk again to the fraudster in the sleeping quarters after reliving the ending
Remembrance of the Executor
How do I unlock the Echoes of the Executor? Equip him and play a round.
First Echo (after Chapter 1):
Talk to the Guardian
Talk to the Priestess
Start an expedition and collect the Blessed Flower
The flower will be marked for you on the map
Defeat the boss “Tracker Bloodhound Knight” and collect the flower
Talk to the Priestess
Talk to the Iron Attendant
Interact with your canvas
Second Echo (after Chapter 5):
Talk to the Priestess
Start an expedition with the Shifted Earth “Mountain Peak”
Search on the mountain for the Golden Sprout
The Golden Sprout will be marked on the map
Defeat the Avatar of the Earth Tree and collect the Golden Sprout
Give the Golden Sprout to the Priestess
Now defeat the Executor’s Call
Interact in the hut with the Forge Knight
Talk to the Priestess
Remembrance of the Scholar
First Echo:
Unlock the Scholar
Complete expeditions and collect memory fragments
Interact with the codex on the table and start the Echo
Start an expedition
Search for an underground chamber that is marked on the map (during an expedition)
Collect the item “Vassal’s Journal”
Talk to the Gravedigger
Talk to Iron Attendant
Interact with the Vassal’s Journal at the chapel table
Talk to the Gravedigger
Second Echo:
Complete expeditions and collect memory fragments
Talk to the Vessel Bazaar
Defeat the Apostle of the God Skull
Interact with the crystallized knight
Third Echo:
Talk to the Gravedigger
Inspect the mirror in the Round Table
Inspect the chapel
Defeat the Dreglord in Limveld
Talk to the Gravedigger
Remembrance of the Gravedigger
First Echo:
Unlock the Gravedigger
Complete an expedition or defeat a Night Lord to collect memory fragments
Talk to Iron Attendant
Defeat the Iron Attendant
Defeat the Night Wanderers
Apologize to the Iron Attendant
Absorb the power of the night
Talk to the Scholar
Second Echo:
Complete an expedition or defeat a Night Lord to collect memory fragments
Talk to the Priestess
Pray in the chapel
Talk to the Iron Attendant
Start an expedition with the Balancers
Find the Scholar
Take the “Scholar’s Primal Core” to you
Third Echo:
Start an expedition with the Night Aspect
Take the “Dismembered Finger” to you
Drop the finger
Interact with the corpse
These were all the Echoes that you can actively complete for all classes. There are many skins that you can unlock in Elden Ring: Nightreign, and alongside the Echo skins, classics from Dark Souls have also made it into the game. To find out what they look like and how to get them, read here: Elden Ring Nightreign: All Skins and how to unlock them
Third Echo (after Chapter 6):
Start an expedition to begin Chapter 7
Back in the Round Table Hold, collect the “Key of the Virtuous Thief” from the table in the room before the chambers
Open the chest in the cellar of the Round Table Hold and collect the item “Torn Paper Fragment”
Talk to the recluse
Talk to the Iron Attendant
Start an expedition with the shifted world “Noklateo”
Find the Imitator Tear in Noklateo, it is marked with a golden shimmer in the city and guarded by an Imitator Troll
Defeat the Night Aspect (final boss)
Remembrance of the Guardian
How do I unlock the Echoes of the Guardian? Equip him and play a round.
First Echo (after Chapter 3):
Talk to the Iron Attendant
Defeat the Guardian Golem (will be marked on the map during an expedition)
Talk again to the Iron Attendant and hand him the Stone Pillar to receive the book “Annals of Cursed Weapons”.
Second Echo (after Chapter 4):
Talk to the Spirit Merchant in the dressing room and collect the item “Uncanny Talisman”
Go to the main hall of the Round Table Hold and become unconscious
Talk to the Iron Attendant when you wake up
Go back to the Spirit Merchant and select the option “Put Out”
Collect the item “Merchant’s Ledger”
Third Echo (after Chapter 6):
Talk to the Iron Attendant
Go on an expedition and look for the marked Cursed Merchant
Purchase the book from him for 10,000 runes
Return to the Iron Attendant and give him the Third Volume
Fourth Echo (after Chapter 8):
Interact with the paper fragment in the main hall on the huge table
Go to the room where the Vessel Bazaar is located and interact with a book on the right wall in a cabinet
Go outside to the graves of the Round Table Hold and talk to the recluse
You can now keep or destroy her Witch Brooch.
Regardless of your choice, the effect of the relic remains the same
Remembrance of the Iron Eye
How do I unlock the Echoes of the Iron Eye? Equip him and play a round.
First Echo (after Chapter 2):
Talk to the Priestess
Start an expedition and defeat the traitor “Night Hunter”
You will then receive the “Letter of the Traitor”
Talk again to the Priestess
Second Echo (after Chapter 5):
Talk to the Priestess in the cellar near the graves
Execute the Assassin
Defeat the Night Lord “Fulghor, Hero of Nightglow” and collect the “Blade of Order”
Execute the Assassin again, this time with the Blade of Order
Defeat Heolstor the Night Lord
At the end, touch the corpse and select “Hold Dagger”
Remembrance of the Countess
How do I unlock the Echoes of the Countess? Equip her and play a round.
First Echo (after Chapter 2):
Talk to the Robber
Talk to the Wylder
Talk to the Robber again
Now search in an expedition for the “Weapon Repair Materials”
The location is marked on your map
Once you have found the materials, you must defeat enemies and then collect the Gold Dew
Hand over the Gold Dew to the Wylder and receive the “Faded Iron Coins”
Talk to the Robber
Talk to the Ghost
Talk to the Iron Attendant
Second Echo (after Chapter 4):
Find the Wylder and collect the flatbread
Talk to the Iron Attendant
Third Echo (after Chapter 5):
Talk to the Robber
Talk to the Ghost on the beach
Defeat the Ghost and receive the “Crown Pendant”
Search for the message in Limveldt
The message will be marked for you on the map
Defeat some enemies and collect “Rooster’s Words”
Talk to the Robber and collect the “Double-Sided Coin”
Fourth Echo (after Chapter 6):
Bless your Iron Coin at the huge table of the Round Table Hold
Give the Iron Attendant your Blessed Iron Coin
Talk to Wylder
Talk to the Iron Attendant
Remembrance of the Robber
How do I unlock the Echoes of the Robber? Equip him and play a round.
First Echo (after Chapter 1):
Talk to the Iron Attendant
Touch the Monument
Talk to the Iron Attendant
Touch the Monument again to enter the arena
Defeat the Single Hit Gladiator
Second Echo (after Chapter 3):
Talk to the Iron Attendant
Touch the Monument
Defeat the Blinding Elder Lion
Talk to the Iron Attendant again
Third Echo (after Chapter 6):
Talk to the Attendant
Touch the Monument
Talk to the Attendant
Travel to the beach
Defeat the White Horn
Talk to the Attendant
Touch the Monument
Talk to the Attendant
Pay respects to the grave next to the Monument
Remembrance of the Ghost
How do I unlock the Echoes of the Ghost? Equip her and play a round.
First Echo:
Talk to the Countess
Talk to the Guardian
Defeat the Tricephalos or the Dark Rift Knight
At the end of your expedition, collect the “Blade of Night Aspect”
Hand the blade to the Guardian
Second Echo (after Chapter 4):
Talk to the Countess
Talk to the recluse
Have a seat on the bench
Eliminate the corruption by defeating all enemies in the room
Interact with the doll
Third Echo (after Chapter 6):
Talk to the Countess
Have a seat on the bench
Defeat the Corruption
Talk to the recluse
Remembrance of the Recluse
How do I unlock the Echoes of the Recluse? Equip her and play a round.
First Echo (after Chapter 1):
Talk to the Iron Attendant
Start an expedition and defeat the Night-Entangled Goldnilpferd
The boss’s location will be marked on the map
Collect the Night Fragment after the battle
Talk to the Iron Attendant and give him the Night Fragment
Second Echo (after Chapter 3):
Interact with the note at the large round table of the Round Table Hold
Talk to the Iron Attendant and get the Night Fragment back
Now go to the sleeping quarters and interact with the contaminated bed
Collect the remnants of the night
Talk to the Iron Attendant
Third Echo (after Chapter 5):
Expose the fraud at the training ground
Talk to the fraudster
Go to the cellar
Recalibrate the magical roots of the Iron Attendant
Talk to the Iron Attendant
Defeat three Night Lords and then challenge Heolstor
After the fight against Heolstor, go to the sleeping quarters
Go to the beds and place your hand on the infant
Talk again to the fraudster in the sleeping quarters after reliving the ending
Remembrance of the Executor
How do I unlock the Echoes of the Executor? Equip him and play a round.
First Echo (after Chapter 1):
Talk to the Guardian
Talk to the Priestess
Start an expedition and collect the Blessed Flower
The flower will be marked for you on the map
Defeat the boss “Tracker Bloodhound Knight” and collect the flower
Talk to the Priestess
Talk to the Iron Attendant
Interact with your canvas
Second Echo (after Chapter 5):
Talk to the Priestess
Start an expedition with the Shifted Earth “Mountain Peak”
Search on the mountain for the Golden Sprout
The Golden Sprout will be marked on the map
Defeat the Avatar of the Earth Tree and collect the Golden Sprout
Give the Golden Sprout to the Priestess
Now defeat the Executor’s Call
Interact in the hut with the Forge Knight
Talk to the Priestess
Remembrance of the Scholar
First Echo:
Unlock the Scholar
Complete expeditions and collect memory fragments
Interact with the codex on the table and start the Echo
Start an expedition
Search for an underground chamber that is marked on the map (during an expedition)
Collect the item “Vassal’s Journal”
Talk to the Gravedigger
Talk to Iron Attendant
Interact with the Vassal’s Journal at the chapel table
Talk to the Gravedigger
Second Echo:
Complete expeditions and collect memory fragments
Talk to the Vessel Bazaar
Defeat the Apostle of the God Skull
Interact with the crystallized knight
Third Echo:
Talk to the Gravedigger
Inspect the mirror in the Round Table
Inspect the chapel
Defeat the Dreglord in Limveld
Talk to the Gravedigger
Remembrance of the Gravedigger
First Echo:
Unlock the Gravedigger
Complete an expedition or defeat a Night Lord to collect memory fragments
Talk to Iron Attendant
Defeat the Iron Attendant
Defeat the Night Wanderers
Apologize to the Iron Attendant
Absorb the power of the night
Talk to the Scholar
Second Echo:
Complete an expedition or defeat a Night Lord to collect memory fragments
Talk to the Priestess
Pray in the chapel
Talk to the Iron Attendant
Start an expedition with the Balancers
Find the Scholar
Take the “Scholar’s Primal Core” to you
Third Echo:
Start an expedition with the Night Aspect
Take the “Dismembered Finger” to you
Drop the finger
Interact with the corpse
These were all the Echoes that you can actively complete for all classes. There are many skins that you can unlock in Elden Ring: Nightreign, and alongside the Echo skins, classics from Dark Souls have also made it into the game. To find out what they look like and how to get them, read here: Elden Ring Nightreign: All Skins and how to unlock them
First Echo (after Chapter 2):
Talk to the Iron Attendant
Start an expedition and collect the “Slate Whetstone”
Talk to the Iron Attendant and hand in the Whetstone
Collect the earrings from the rewards
Go to the sleeping quarters and hold the earrings up to the light
Find the Countess and give her the earrings
Second Echo (after Chapter 5):
Read three short passages near the Vessel Bazaar:
The first passage is located to the right of the encyclopedia for important information on the book tower
The second passage is in the same room on the right wall on a shelf
The third passage is on a book tower behind the recluse’s chair
Interact with the three graves in the cellar of the Round Table Hold
Go to the beach and talk to the Countess
Third Echo (after Chapter 6):
Start an expedition to begin Chapter 7
Back in the Round Table Hold, collect the “Key of the Virtuous Thief” from the table in the room before the chambers
Open the chest in the cellar of the Round Table Hold and collect the item “Torn Paper Fragment”
Talk to the recluse
Talk to the Iron Attendant
Start an expedition with the shifted world “Noklateo”
Find the Imitator Tear in Noklateo, it is marked with a golden shimmer in the city and guarded by an Imitator Troll
Defeat the Night Aspect (final boss)
Remembrance of the Guardian
How do I unlock the Echoes of the Guardian? Equip him and play a round.
First Echo (after Chapter 3):
Talk to the Iron Attendant
Defeat the Guardian Golem (will be marked on the map during an expedition)
Talk again to the Iron Attendant and hand him the Stone Pillar to receive the book “Annals of Cursed Weapons”.
Second Echo (after Chapter 4):
Talk to the Spirit Merchant in the dressing room and collect the item “Uncanny Talisman”
Go to the main hall of the Round Table Hold and become unconscious
Talk to the Iron Attendant when you wake up
Go back to the Spirit Merchant and select the option “Put Out”
Collect the item “Merchant’s Ledger”
Third Echo (after Chapter 6):
Talk to the Iron Attendant
Go on an expedition and look for the marked Cursed Merchant
Purchase the book from him for 10,000 runes
Return to the Iron Attendant and give him the Third Volume
Fourth Echo (after Chapter 8):
Interact with the paper fragment in the main hall on the huge table
Go to the room where the Vessel Bazaar is located and interact with a book on the right wall in a cabinet
Go outside to the graves of the Round Table Hold and talk to the recluse
You can now keep or destroy her Witch Brooch.
Regardless of your choice, the effect of the relic remains the same
Remembrance of the Iron Eye
How do I unlock the Echoes of the Iron Eye? Equip him and play a round.
First Echo (after Chapter 2):
Talk to the Priestess
Start an expedition and defeat the traitor “Night Hunter”
You will then receive the “Letter of the Traitor”
Talk again to the Priestess
Second Echo (after Chapter 5):
Talk to the Priestess in the cellar near the graves
Execute the Assassin
Defeat the Night Lord “Fulghor, Hero of Nightglow” and collect the “Blade of Order”
Execute the Assassin again, this time with the Blade of Order
Defeat Heolstor the Night Lord
At the end, touch the corpse and select “Hold Dagger”
Remembrance of the Countess
How do I unlock the Echoes of the Countess? Equip her and play a round.
First Echo (after Chapter 2):
Talk to the Robber
Talk to the Wylder
Talk to the Robber again
Now search in an expedition for the “Weapon Repair Materials”
The location is marked on your map
Once you have found the materials, you must defeat enemies and then collect the Gold Dew
Hand over the Gold Dew to the Wylder and receive the “Faded Iron Coins”
Talk to the Robber
Talk to the Ghost
Talk to the Iron Attendant
Second Echo (after Chapter 4):
Find the Wylder and collect the flatbread
Talk to the Iron Attendant
Third Echo (after Chapter 5):
Talk to the Robber
Talk to the Ghost on the beach
Defeat the Ghost and receive the “Crown Pendant”
Search for the message in Limveldt
The message will be marked for you on the map
Defeat some enemies and collect “Rooster’s Words”
Talk to the Robber and collect the “Double-Sided Coin”
Fourth Echo (after Chapter 6):
Bless your Iron Coin at the huge table of the Round Table Hold
Give the Iron Attendant your Blessed Iron Coin
Talk to Wylder
Talk to the Iron Attendant
Remembrance of the Robber
How do I unlock the Echoes of the Robber? Equip him and play a round.
First Echo (after Chapter 1):
Talk to the Iron Attendant
Touch the Monument
Talk to the Iron Attendant
Touch the Monument again to enter the arena
Defeat the Single Hit Gladiator
Second Echo (after Chapter 3):
Talk to the Iron Attendant
Touch the Monument
Defeat the Blinding Elder Lion
Talk to the Iron Attendant again
Third Echo (after Chapter 6):
Talk to the Attendant
Touch the Monument
Talk to the Attendant
Travel to the beach
Defeat the White Horn
Talk to the Attendant
Touch the Monument
Talk to the Attendant
Pay respects to the grave next to the Monument
Remembrance of the Ghost
How do I unlock the Echoes of the Ghost? Equip her and play a round.
First Echo:
Talk to the Countess
Talk to the Guardian
Defeat the Tricephalos or the Dark Rift Knight
At the end of your expedition, collect the “Blade of Night Aspect”
Hand the blade to the Guardian
Second Echo (after Chapter 4):
Talk to the Countess
Talk to the recluse
Have a seat on the bench
Eliminate the corruption by defeating all enemies in the room
Interact with the doll
Third Echo (after Chapter 6):
Talk to the Countess
Have a seat on the bench
Defeat the Corruption
Talk to the recluse
Remembrance of the Recluse
How do I unlock the Echoes of the Recluse? Equip her and play a round.
First Echo (after Chapter 1):
Talk to the Iron Attendant
Start an expedition and defeat the Night-Entangled Goldnilpferd
The boss’s location will be marked on the map
Collect the Night Fragment after the battle
Talk to the Iron Attendant and give him the Night Fragment
Second Echo (after Chapter 3):
Interact with the note at the large round table of the Round Table Hold
Talk to the Iron Attendant and get the Night Fragment back
Now go to the sleeping quarters and interact with the contaminated bed
Collect the remnants of the night
Talk to the Iron Attendant
Third Echo (after Chapter 5):
Expose the fraud at the training ground
Talk to the fraudster
Go to the cellar
Recalibrate the magical roots of the Iron Attendant
Talk to the Iron Attendant
Defeat three Night Lords and then challenge Heolstor
After the fight against Heolstor, go to the sleeping quarters
Go to the beds and place your hand on the infant
Talk again to the fraudster in the sleeping quarters after reliving the ending
Remembrance of the Executor
How do I unlock the Echoes of the Executor? Equip him and play a round.
First Echo (after Chapter 1):
Talk to the Guardian
Talk to the Priestess
Start an expedition and collect the Blessed Flower
The flower will be marked for you on the map
Defeat the boss “Tracker Bloodhound Knight” and collect the flower
Talk to the Priestess
Talk to the Iron Attendant
Interact with your canvas
Second Echo (after Chapter 5):
Talk to the Priestess
Start an expedition with the Shifted Earth “Mountain Peak”
Search on the mountain for the Golden Sprout
The Golden Sprout will be marked on the map
Defeat the Avatar of the Earth Tree and collect the Golden Sprout
Give the Golden Sprout to the Priestess
Now defeat the Executor’s Call
Interact in the hut with the Forge Knight
Talk to the Priestess
Remembrance of the Scholar
First Echo:
Unlock the Scholar
Complete expeditions and collect memory fragments
Interact with the codex on the table and start the Echo
Start an expedition
Search for an underground chamber that is marked on the map (during an expedition)
Collect the item “Vassal’s Journal”
Talk to the Gravedigger
Talk to Iron Attendant
Interact with the Vassal’s Journal at the chapel table
Talk to the Gravedigger
Second Echo:
Complete expeditions and collect memory fragments
Talk to the Vessel Bazaar
Defeat the Apostle of the God Skull
Interact with the crystallized knight
Third Echo:
Talk to the Gravedigger
Inspect the mirror in the Round Table
Inspect the chapel
Defeat the Dreglord in Limveld
Talk to the Gravedigger
Remembrance of the Gravedigger
First Echo:
Unlock the Gravedigger
Complete an expedition or defeat a Night Lord to collect memory fragments
Talk to Iron Attendant
Defeat the Iron Attendant
Defeat the Night Wanderers
Apologize to the Iron Attendant
Absorb the power of the night
Talk to the Scholar
Second Echo:
Complete an expedition or defeat a Night Lord to collect memory fragments
Talk to the Priestess
Pray in the chapel
Talk to the Iron Attendant
Start an expedition with the Balancers
Find the Scholar
Take the “Scholar’s Primal Core” to you
Third Echo:
Start an expedition with the Night Aspect
Take the “Dismembered Finger” to you
Drop the finger
Interact with the corpse
These were all the Echoes that you can actively complete for all classes. There are many skins that you can unlock in Elden Ring: Nightreign, and alongside the Echo skins, classics from Dark Souls have also made it into the game. To find out what they look like and how to get them, read here: Elden Ring Nightreign: All Skins and how to unlock them
Third Echo (after Chapter 6):
Talk to the Iron Attendant
Go on an expedition and look for the marked Cursed Merchant
Purchase the book from him for 10,000 runes
Return to the Iron Attendant and give him the Third Volume
Fourth Echo (after Chapter 8):
Interact with the paper fragment in the main hall on the huge table
Go to the room where the Vessel Bazaar is located and interact with a book on the right wall in a cabinet
Go outside to the graves of the Round Table Hold and talk to the recluse
You can now keep or destroy her Witch Brooch.
Regardless of your choice, the effect of the relic remains the same
Remembrance of the Iron Eye
How do I unlock the Echoes of the Iron Eye? Equip him and play a round.
First Echo (after Chapter 2):
Talk to the Priestess
Start an expedition and defeat the traitor “Night Hunter”
You will then receive the “Letter of the Traitor”
Talk again to the Priestess
Second Echo (after Chapter 5):
Talk to the Priestess in the cellar near the graves
Execute the Assassin
Defeat the Night Lord “Fulghor, Hero of Nightglow” and collect the “Blade of Order”
Execute the Assassin again, this time with the Blade of Order
Defeat Heolstor the Night Lord
At the end, touch the corpse and select “Hold Dagger”
Remembrance of the Countess
How do I unlock the Echoes of the Countess? Equip her and play a round.
First Echo (after Chapter 2):
Talk to the Robber
Talk to the Wylder
Talk to the Robber again
Now search in an expedition for the “Weapon Repair Materials”
The location is marked on your map
Once you have found the materials, you must defeat enemies and then collect the Gold Dew
Hand over the Gold Dew to the Wylder and receive the “Faded Iron Coins”
Talk to the Robber
Talk to the Ghost
Talk to the Iron Attendant
Second Echo (after Chapter 4):
Find the Wylder and collect the flatbread
Talk to the Iron Attendant
Third Echo (after Chapter 5):
Talk to the Robber
Talk to the Ghost on the beach
Defeat the Ghost and receive the “Crown Pendant”
Search for the message in Limveldt
The message will be marked for you on the map
Defeat some enemies and collect “Rooster’s Words”
Talk to the Robber and collect the “Double-Sided Coin”
Fourth Echo (after Chapter 6):
Bless your Iron Coin at the huge table of the Round Table Hold
Give the Iron Attendant your Blessed Iron Coin
Talk to Wylder
Talk to the Iron Attendant
Remembrance of the Robber
How do I unlock the Echoes of the Robber? Equip him and play a round.
First Echo (after Chapter 1):
Talk to the Iron Attendant
Touch the Monument
Talk to the Iron Attendant
Touch the Monument again to enter the arena
Defeat the Single Hit Gladiator
Second Echo (after Chapter 3):
Talk to the Iron Attendant
Touch the Monument
Defeat the Blinding Elder Lion
Talk to the Iron Attendant again
Third Echo (after Chapter 6):
Talk to the Attendant
Touch the Monument
Talk to the Attendant
Travel to the beach
Defeat the White Horn
Talk to the Attendant
Touch the Monument
Talk to the Attendant
Pay respects to the grave next to the Monument
Remembrance of the Ghost
How do I unlock the Echoes of the Ghost? Equip her and play a round.
First Echo:
Talk to the Countess
Talk to the Guardian
Defeat the Tricephalos or the Dark Rift Knight
At the end of your expedition, collect the “Blade of Night Aspect”
Hand the blade to the Guardian
Second Echo (after Chapter 4):
Talk to the Countess
Talk to the recluse
Have a seat on the bench
Eliminate the corruption by defeating all enemies in the room
Interact with the doll
Third Echo (after Chapter 6):
Talk to the Countess
Have a seat on the bench
Defeat the Corruption
Talk to the recluse
Remembrance of the Recluse
How do I unlock the Echoes of the Recluse? Equip her and play a round.
First Echo (after Chapter 1):
Talk to the Iron Attendant
Start an expedition and defeat the Night-Entangled Goldnilpferd
The boss’s location will be marked on the map
Collect the Night Fragment after the battle
Talk to the Iron Attendant and give him the Night Fragment
Second Echo (after Chapter 3):
Interact with the note at the large round table of the Round Table Hold
Talk to the Iron Attendant and get the Night Fragment back
Now go to the sleeping quarters and interact with the contaminated bed
Collect the remnants of the night
Talk to the Iron Attendant
Third Echo (after Chapter 5):
Expose the fraud at the training ground
Talk to the fraudster
Go to the cellar
Recalibrate the magical roots of the Iron Attendant
Talk to the Iron Attendant
Defeat three Night Lords and then challenge Heolstor
After the fight against Heolstor, go to the sleeping quarters
Go to the beds and place your hand on the infant
Talk again to the fraudster in the sleeping quarters after reliving the ending
Remembrance of the Executor
How do I unlock the Echoes of the Executor? Equip him and play a round.
First Echo (after Chapter 1):
Talk to the Guardian
Talk to the Priestess
Start an expedition and collect the Blessed Flower
The flower will be marked for you on the map
Defeat the boss “Tracker Bloodhound Knight” and collect the flower
Talk to the Priestess
Talk to the Iron Attendant
Interact with your canvas
Second Echo (after Chapter 5):
Talk to the Priestess
Start an expedition with the Shifted Earth “Mountain Peak”
Search on the mountain for the Golden Sprout
The Golden Sprout will be marked on the map
Defeat the Avatar of the Earth Tree and collect the Golden Sprout
Give the Golden Sprout to the Priestess
Now defeat the Executor’s Call
Interact in the hut with the Forge Knight
Talk to the Priestess
Remembrance of the Scholar
First Echo:
Unlock the Scholar
Complete expeditions and collect memory fragments
Interact with the codex on the table and start the Echo
Start an expedition
Search for an underground chamber that is marked on the map (during an expedition)
Collect the item “Vassal’s Journal”
Talk to the Gravedigger
Talk to Iron Attendant
Interact with the Vassal’s Journal at the chapel table
Talk to the Gravedigger
Second Echo:
Complete expeditions and collect memory fragments
Talk to the Vessel Bazaar
Defeat the Apostle of the God Skull
Interact with the crystallized knight
Third Echo:
Talk to the Gravedigger
Inspect the mirror in the Round Table
Inspect the chapel
Defeat the Dreglord in Limveld
Talk to the Gravedigger
Remembrance of the Gravedigger
First Echo:
Unlock the Gravedigger
Complete an expedition or defeat a Night Lord to collect memory fragments
Talk to Iron Attendant
Defeat the Iron Attendant
Defeat the Night Wanderers
Apologize to the Iron Attendant
Absorb the power of the night
Talk to the Scholar
Second Echo:
Complete an expedition or defeat a Night Lord to collect memory fragments
Talk to the Priestess
Pray in the chapel
Talk to the Iron Attendant
Start an expedition with the Balancers
Find the Scholar
Take the “Scholar’s Primal Core” to you
Third Echo:
Start an expedition with the Night Aspect
Take the “Dismembered Finger” to you
Drop the finger
Interact with the corpse
These were all the Echoes that you can actively complete for all classes. There are many skins that you can unlock in Elden Ring: Nightreign, and alongside the Echo skins, classics from Dark Souls have also made it into the game. To find out what they look like and how to get them, read here: Elden Ring Nightreign: All Skins and how to unlock them
First Echo (after Chapter 3):
Talk to the Iron Attendant
Defeat the Guardian Golem (will be marked on the map during an expedition)
Talk again to the Iron Attendant and hand him the Stone Pillar to receive the book “Annals of Cursed Weapons”.
Second Echo (after Chapter 4):
Talk to the Spirit Merchant in the dressing room and collect the item “Uncanny Talisman”
Go to the main hall of the Round Table Hold and become unconscious
Talk to the Iron Attendant when you wake up
Go back to the Spirit Merchant and select the option “Put Out”
Collect the item “Merchant’s Ledger”
Third Echo (after Chapter 6):
Talk to the Iron Attendant
Go on an expedition and look for the marked Cursed Merchant
Purchase the book from him for 10,000 runes
Return to the Iron Attendant and give him the Third Volume
Fourth Echo (after Chapter 8):
Interact with the paper fragment in the main hall on the huge table
Go to the room where the Vessel Bazaar is located and interact with a book on the right wall in a cabinet
Go outside to the graves of the Round Table Hold and talk to the recluse
You can now keep or destroy her Witch Brooch.
Regardless of your choice, the effect of the relic remains the same
Remembrance of the Iron Eye
How do I unlock the Echoes of the Iron Eye? Equip him and play a round.
First Echo (after Chapter 2):
Talk to the Priestess
Start an expedition and defeat the traitor “Night Hunter”
You will then receive the “Letter of the Traitor”
Talk again to the Priestess
Second Echo (after Chapter 5):
Talk to the Priestess in the cellar near the graves
Execute the Assassin
Defeat the Night Lord “Fulghor, Hero of Nightglow” and collect the “Blade of Order”
Execute the Assassin again, this time with the Blade of Order
Defeat Heolstor the Night Lord
At the end, touch the corpse and select “Hold Dagger”
Remembrance of the Countess
How do I unlock the Echoes of the Countess? Equip her and play a round.
First Echo (after Chapter 2):
Talk to the Robber
Talk to the Wylder
Talk to the Robber again
Now search in an expedition for the “Weapon Repair Materials”
The location is marked on your map
Once you have found the materials, you must defeat enemies and then collect the Gold Dew
Hand over the Gold Dew to the Wylder and receive the “Faded Iron Coins”
Talk to the Robber
Talk to the Ghost
Talk to the Iron Attendant
Second Echo (after Chapter 4):
Find the Wylder and collect the flatbread
Talk to the Iron Attendant
Third Echo (after Chapter 5):
Talk to the Robber
Talk to the Ghost on the beach
Defeat the Ghost and receive the “Crown Pendant”
Search for the message in Limveldt
The message will be marked for you on the map
Defeat some enemies and collect “Rooster’s Words”
Talk to the Robber and collect the “Double-Sided Coin”
Fourth Echo (after Chapter 6):
Bless your Iron Coin at the huge table of the Round Table Hold
Give the Iron Attendant your Blessed Iron Coin
Talk to Wylder
Talk to the Iron Attendant
Remembrance of the Robber
How do I unlock the Echoes of the Robber? Equip him and play a round.
First Echo (after Chapter 1):
Talk to the Iron Attendant
Touch the Monument
Talk to the Iron Attendant
Touch the Monument again to enter the arena
Defeat the Single Hit Gladiator
Second Echo (after Chapter 3):
Talk to the Iron Attendant
Touch the Monument
Defeat the Blinding Elder Lion
Talk to the Iron Attendant again
Third Echo (after Chapter 6):
Talk to the Attendant
Touch the Monument
Talk to the Attendant
Travel to the beach
Defeat the White Horn
Talk to the Attendant
Touch the Monument
Talk to the Attendant
Pay respects to the grave next to the Monument
Remembrance of the Ghost
How do I unlock the Echoes of the Ghost? Equip her and play a round.
First Echo:
Talk to the Countess
Talk to the Guardian
Defeat the Tricephalos or the Dark Rift Knight
At the end of your expedition, collect the “Blade of Night Aspect”
Hand the blade to the Guardian
Second Echo (after Chapter 4):
Talk to the Countess
Talk to the recluse
Have a seat on the bench
Eliminate the corruption by defeating all enemies in the room
Interact with the doll
Third Echo (after Chapter 6):
Talk to the Countess
Have a seat on the bench
Defeat the Corruption
Talk to the recluse
Remembrance of the Recluse
How do I unlock the Echoes of the Recluse? Equip her and play a round.
First Echo (after Chapter 1):
Talk to the Iron Attendant
Start an expedition and defeat the Night-Entangled Goldnilpferd
The boss’s location will be marked on the map
Collect the Night Fragment after the battle
Talk to the Iron Attendant and give him the Night Fragment
Second Echo (after Chapter 3):
Interact with the note at the large round table of the Round Table Hold
Talk to the Iron Attendant and get the Night Fragment back
Now go to the sleeping quarters and interact with the contaminated bed
Collect the remnants of the night
Talk to the Iron Attendant
Third Echo (after Chapter 5):
Expose the fraud at the training ground
Talk to the fraudster
Go to the cellar
Recalibrate the magical roots of the Iron Attendant
Talk to the Iron Attendant
Defeat three Night Lords and then challenge Heolstor
After the fight against Heolstor, go to the sleeping quarters
Go to the beds and place your hand on the infant
Talk again to the fraudster in the sleeping quarters after reliving the ending
Remembrance of the Executor
How do I unlock the Echoes of the Executor? Equip him and play a round.
First Echo (after Chapter 1):
Talk to the Guardian
Talk to the Priestess
Start an expedition and collect the Blessed Flower
The flower will be marked for you on the map
Defeat the boss “Tracker Bloodhound Knight” and collect the flower
Talk to the Priestess
Talk to the Iron Attendant
Interact with your canvas
Second Echo (after Chapter 5):
Talk to the Priestess
Start an expedition with the Shifted Earth “Mountain Peak”
Search on the mountain for the Golden Sprout
The Golden Sprout will be marked on the map
Defeat the Avatar of the Earth Tree and collect the Golden Sprout
Give the Golden Sprout to the Priestess
Now defeat the Executor’s Call
Interact in the hut with the Forge Knight
Talk to the Priestess
Remembrance of the Scholar
First Echo:
Unlock the Scholar
Complete expeditions and collect memory fragments
Interact with the codex on the table and start the Echo
Start an expedition
Search for an underground chamber that is marked on the map (during an expedition)
Collect the item “Vassal’s Journal”
Talk to the Gravedigger
Talk to Iron Attendant
Interact with the Vassal’s Journal at the chapel table
Talk to the Gravedigger
Second Echo:
Complete expeditions and collect memory fragments
Talk to the Vessel Bazaar
Defeat the Apostle of the God Skull
Interact with the crystallized knight
Third Echo:
Talk to the Gravedigger
Inspect the mirror in the Round Table
Inspect the chapel
Defeat the Dreglord in Limveld
Talk to the Gravedigger
Remembrance of the Gravedigger
First Echo:
Unlock the Gravedigger
Complete an expedition or defeat a Night Lord to collect memory fragments
Talk to Iron Attendant
Defeat the Iron Attendant
Defeat the Night Wanderers
Apologize to the Iron Attendant
Absorb the power of the night
Talk to the Scholar
Second Echo:
Complete an expedition or defeat a Night Lord to collect memory fragments
Talk to the Priestess
Pray in the chapel
Talk to the Iron Attendant
Start an expedition with the Balancers
Find the Scholar
Take the “Scholar’s Primal Core” to you
Third Echo:
Start an expedition with the Night Aspect
Take the “Dismembered Finger” to you
Drop the finger
Interact with the corpse
These were all the Echoes that you can actively complete for all classes. There are many skins that you can unlock in Elden Ring: Nightreign, and alongside the Echo skins, classics from Dark Souls have also made it into the game. To find out what they look like and how to get them, read here: Elden Ring Nightreign: All Skins and how to unlock them
Third Echo (after Chapter 6):
Start an expedition to begin Chapter 7
Back in the Round Table Hold, collect the “Key of the Virtuous Thief” from the table in the room before the chambers
Open the chest in the cellar of the Round Table Hold and collect the item “Torn Paper Fragment”
Talk to the recluse
Talk to the Iron Attendant
Start an expedition with the shifted world “Noklateo”
Find the Imitator Tear in Noklateo, it is marked with a golden shimmer in the city and guarded by an Imitator Troll
Defeat the Night Aspect (final boss)
Remembrance of the Guardian
How do I unlock the Echoes of the Guardian? Equip him and play a round.
First Echo (after Chapter 3):
Talk to the Iron Attendant
Defeat the Guardian Golem (will be marked on the map during an expedition)
Talk again to the Iron Attendant and hand him the Stone Pillar to receive the book “Annals of Cursed Weapons”.
Second Echo (after Chapter 4):
Talk to the Spirit Merchant in the dressing room and collect the item “Uncanny Talisman”
Go to the main hall of the Round Table Hold and become unconscious
Talk to the Iron Attendant when you wake up
Go back to the Spirit Merchant and select the option “Put Out”
Collect the item “Merchant’s Ledger”
Third Echo (after Chapter 6):
Talk to the Iron Attendant
Go on an expedition and look for the marked Cursed Merchant
Purchase the book from him for 10,000 runes
Return to the Iron Attendant and give him the Third Volume
Fourth Echo (after Chapter 8):
Interact with the paper fragment in the main hall on the huge table
Go to the room where the Vessel Bazaar is located and interact with a book on the right wall in a cabinet
Go outside to the graves of the Round Table Hold and talk to the recluse
You can now keep or destroy her Witch Brooch.
Regardless of your choice, the effect of the relic remains the same
Remembrance of the Iron Eye
How do I unlock the Echoes of the Iron Eye? Equip him and play a round.
First Echo (after Chapter 2):
Talk to the Priestess
Start an expedition and defeat the traitor “Night Hunter”
You will then receive the “Letter of the Traitor”
Talk again to the Priestess
Second Echo (after Chapter 5):
Talk to the Priestess in the cellar near the graves
Execute the Assassin
Defeat the Night Lord “Fulghor, Hero of Nightglow” and collect the “Blade of Order”
Execute the Assassin again, this time with the Blade of Order
Defeat Heolstor the Night Lord
At the end, touch the corpse and select “Hold Dagger”
Remembrance of the Countess
How do I unlock the Echoes of the Countess? Equip her and play a round.
First Echo (after Chapter 2):
Talk to the Robber
Talk to the Wylder
Talk to the Robber again
Now search in an expedition for the “Weapon Repair Materials”
The location is marked on your map
Once you have found the materials, you must defeat enemies and then collect the Gold Dew
Hand over the Gold Dew to the Wylder and receive the “Faded Iron Coins”
Talk to the Robber
Talk to the Ghost
Talk to the Iron Attendant
Second Echo (after Chapter 4):
Find the Wylder and collect the flatbread
Talk to the Iron Attendant
Third Echo (after Chapter 5):
Talk to the Robber
Talk to the Ghost on the beach
Defeat the Ghost and receive the “Crown Pendant”
Search for the message in Limveldt
The message will be marked for you on the map
Defeat some enemies and collect “Rooster’s Words”
Talk to the Robber and collect the “Double-Sided Coin”
Fourth Echo (after Chapter 6):
Bless your Iron Coin at the huge table of the Round Table Hold
Give the Iron Attendant your Blessed Iron Coin
Talk to Wylder
Talk to the Iron Attendant
Remembrance of the Robber
How do I unlock the Echoes of the Robber? Equip him and play a round.
First Echo (after Chapter 1):
Talk to the Iron Attendant
Touch the Monument
Talk to the Iron Attendant
Touch the Monument again to enter the arena
Defeat the Single Hit Gladiator
Second Echo (after Chapter 3):
Talk to the Iron Attendant
Touch the Monument
Defeat the Blinding Elder Lion
Talk to the Iron Attendant again
Third Echo (after Chapter 6):
Talk to the Attendant
Touch the Monument
Talk to the Attendant
Travel to the beach
Defeat the White Horn
Talk to the Attendant
Touch the Monument
Talk to the Attendant
Pay respects to the grave next to the Monument
Remembrance of the Ghost
How do I unlock the Echoes of the Ghost? Equip her and play a round.
First Echo:
Talk to the Countess
Talk to the Guardian
Defeat the Tricephalos or the Dark Rift Knight
At the end of your expedition, collect the “Blade of Night Aspect”
Hand the blade to the Guardian
Second Echo (after Chapter 4):
Talk to the Countess
Talk to the recluse
Have a seat on the bench
Eliminate the corruption by defeating all enemies in the room
Interact with the doll
Third Echo (after Chapter 6):
Talk to the Countess
Have a seat on the bench
Defeat the Corruption
Talk to the recluse
Remembrance of the Recluse
How do I unlock the Echoes of the Recluse? Equip her and play a round.
First Echo (after Chapter 1):
Talk to the Iron Attendant
Start an expedition and defeat the Night-Entangled Goldnilpferd
The boss’s location will be marked on the map
Collect the Night Fragment after the battle
Talk to the Iron Attendant and give him the Night Fragment
Second Echo (after Chapter 3):
Interact with the note at the large round table of the Round Table Hold
Talk to the Iron Attendant and get the Night Fragment back
Now go to the sleeping quarters and interact with the contaminated bed
Collect the remnants of the night
Talk to the Iron Attendant
Third Echo (after Chapter 5):
Expose the fraud at the training ground
Talk to the fraudster
Go to the cellar
Recalibrate the magical roots of the Iron Attendant
Talk to the Iron Attendant
Defeat three Night Lords and then challenge Heolstor
After the fight against Heolstor, go to the sleeping quarters
Go to the beds and place your hand on the infant
Talk again to the fraudster in the sleeping quarters after reliving the ending
Remembrance of the Executor
How do I unlock the Echoes of the Executor? Equip him and play a round.
First Echo (after Chapter 1):
Talk to the Guardian
Talk to the Priestess
Start an expedition and collect the Blessed Flower
The flower will be marked for you on the map
Defeat the boss “Tracker Bloodhound Knight” and collect the flower
Talk to the Priestess
Talk to the Iron Attendant
Interact with your canvas
Second Echo (after Chapter 5):
Talk to the Priestess
Start an expedition with the Shifted Earth “Mountain Peak”
Search on the mountain for the Golden Sprout
The Golden Sprout will be marked on the map
Defeat the Avatar of the Earth Tree and collect the Golden Sprout
Give the Golden Sprout to the Priestess
Now defeat the Executor’s Call
Interact in the hut with the Forge Knight
Talk to the Priestess
Remembrance of the Scholar
First Echo:
Unlock the Scholar
Complete expeditions and collect memory fragments
Interact with the codex on the table and start the Echo
Start an expedition
Search for an underground chamber that is marked on the map (during an expedition)
Collect the item “Vassal’s Journal”
Talk to the Gravedigger
Talk to Iron Attendant
Interact with the Vassal’s Journal at the chapel table
Talk to the Gravedigger
Second Echo:
Complete expeditions and collect memory fragments
Talk to the Vessel Bazaar
Defeat the Apostle of the God Skull
Interact with the crystallized knight
Third Echo:
Talk to the Gravedigger
Inspect the mirror in the Round Table
Inspect the chapel
Defeat the Dreglord in Limveld
Talk to the Gravedigger
Remembrance of the Gravedigger
First Echo:
Unlock the Gravedigger
Complete an expedition or defeat a Night Lord to collect memory fragments
Talk to Iron Attendant
Defeat the Iron Attendant
Defeat the Night Wanderers
Apologize to the Iron Attendant
Absorb the power of the night
Talk to the Scholar
Second Echo:
Complete an expedition or defeat a Night Lord to collect memory fragments
Talk to the Priestess
Pray in the chapel
Talk to the Iron Attendant
Start an expedition with the Balancers
Find the Scholar
Take the “Scholar’s Primal Core” to you
Third Echo:
Start an expedition with the Night Aspect
Take the “Dismembered Finger” to you
Drop the finger
Interact with the corpse
These were all the Echoes that you can actively complete for all classes. There are many skins that you can unlock in Elden Ring: Nightreign, and alongside the Echo skins, classics from Dark Souls have also made it into the game. To find out what they look like and how to get them, read here: Elden Ring Nightreign: All Skins and how to unlock them
First Echo (after Chapter 2):
Talk to the Iron Attendant
Start an expedition and collect the “Slate Whetstone”
Talk to the Iron Attendant and hand in the Whetstone
Collect the earrings from the rewards
Go to the sleeping quarters and hold the earrings up to the light
Find the Countess and give her the earrings
Second Echo (after Chapter 5):
Read three short passages near the Vessel Bazaar:
The first passage is located to the right of the encyclopedia for important information on the book tower
The second passage is in the same room on the right wall on a shelf
The third passage is on a book tower behind the recluse’s chair
Interact with the three graves in the cellar of the Round Table Hold
Go to the beach and talk to the Countess
Third Echo (after Chapter 6):
Start an expedition to begin Chapter 7
Back in the Round Table Hold, collect the “Key of the Virtuous Thief” from the table in the room before the chambers
Open the chest in the cellar of the Round Table Hold and collect the item “Torn Paper Fragment”
Talk to the recluse
Talk to the Iron Attendant
Start an expedition with the shifted world “Noklateo”
Find the Imitator Tear in Noklateo, it is marked with a golden shimmer in the city and guarded by an Imitator Troll
Defeat the Night Aspect (final boss)
Remembrance of the Guardian
How do I unlock the Echoes of the Guardian? Equip him and play a round.
First Echo (after Chapter 3):
Talk to the Iron Attendant
Defeat the Guardian Golem (will be marked on the map during an expedition)
Talk again to the Iron Attendant and hand him the Stone Pillar to receive the book “Annals of Cursed Weapons”.
Second Echo (after Chapter 4):
Talk to the Spirit Merchant in the dressing room and collect the item “Uncanny Talisman”
Go to the main hall of the Round Table Hold and become unconscious
Talk to the Iron Attendant when you wake up
Go back to the Spirit Merchant and select the option “Put Out”
Collect the item “Merchant’s Ledger”
Third Echo (after Chapter 6):
Talk to the Iron Attendant
Go on an expedition and look for the marked Cursed Merchant
Purchase the book from him for 10,000 runes
Return to the Iron Attendant and give him the Third Volume
Fourth Echo (after Chapter 8):
Interact with the paper fragment in the main hall on the huge table
Go to the room where the Vessel Bazaar is located and interact with a book on the right wall in a cabinet
Go outside to the graves of the Round Table Hold and talk to the recluse
You can now keep or destroy her Witch Brooch.
Regardless of your choice, the effect of the relic remains the same
Remembrance of the Iron Eye
How do I unlock the Echoes of the Iron Eye? Equip him and play a round.
First Echo (after Chapter 2):
Talk to the Priestess
Start an expedition and defeat the traitor “Night Hunter”
You will then receive the “Letter of the Traitor”
Talk again to the Priestess
Second Echo (after Chapter 5):
Talk to the Priestess in the cellar near the graves
Execute the Assassin
Defeat the Night Lord “Fulghor, Hero of Nightglow” and collect the “Blade of Order”
Execute the Assassin again, this time with the Blade of Order
Defeat Heolstor the Night Lord
At the end, touch the corpse and select “Hold Dagger”
Remembrance of the Countess
How do I unlock the Echoes of the Countess? Equip her and play a round.
First Echo (after Chapter 2):
Talk to the Robber
Talk to the Wylder
Talk to the Robber again
Now search in an expedition for the “Weapon Repair Materials”
The location is marked on your map
Once you have found the materials, you must defeat enemies and then collect the Gold Dew
Hand over the Gold Dew to the Wylder and receive the “Faded Iron Coins”
Talk to the Robber
Talk to the Ghost
Talk to the Iron Attendant
Second Echo (after Chapter 4):
Find the Wylder and collect the flatbread
Talk to the Iron Attendant
Third Echo (after Chapter 5):
Talk to the Robber
Talk to the Ghost on the beach
Defeat the Ghost and receive the “Crown Pendant”
Search for the message in Limveldt
The message will be marked for you on the map
Defeat some enemies and collect “Rooster’s Words”
Talk to the Robber and collect the “Double-Sided Coin”
Fourth Echo (after Chapter 6):
Bless your Iron Coin at the huge table of the Round Table Hold
Give the Iron Attendant your Blessed Iron Coin
Talk to Wylder
Talk to the Iron Attendant
Remembrance of the Robber
How do I unlock the Echoes of the Robber? Equip him and play a round.
First Echo (after Chapter 1):
Talk to the Iron Attendant
Touch the Monument
Talk to the Iron Attendant
Touch the Monument again to enter the arena
Defeat the Single Hit Gladiator
Second Echo (after Chapter 3):
Talk to the Iron Attendant
Touch the Monument
Defeat the Blinding Elder Lion
Talk to the Iron Attendant again
Third Echo (after Chapter 6):
Talk to the Attendant
Touch the Monument
Talk to the Attendant
Travel to the beach
Defeat the White Horn
Talk to the Attendant
Touch the Monument
Talk to the Attendant
Pay respects to the grave next to the Monument
Remembrance of the Ghost
How do I unlock the Echoes of the Ghost? Equip her and play a round.
First Echo:
Talk to the Countess
Talk to the Guardian
Defeat the Tricephalos or the Dark Rift Knight
At the end of your expedition, collect the “Blade of Night Aspect”
Hand the blade to the Guardian
Second Echo (after Chapter 4):
Talk to the Countess
Talk to the recluse
Have a seat on the bench
Eliminate the corruption by defeating all enemies in the room
Interact with the doll
Third Echo (after Chapter 6):
Talk to the Countess
Have a seat on the bench
Defeat the Corruption
Talk to the recluse
Remembrance of the Recluse
How do I unlock the Echoes of the Recluse? Equip her and play a round.
First Echo (after Chapter 1):
Talk to the Iron Attendant
Start an expedition and defeat the Night-Entangled Goldnilpferd
The boss’s location will be marked on the map
Collect the Night Fragment after the battle
Talk to the Iron Attendant and give him the Night Fragment
Second Echo (after Chapter 3):
Interact with the note at the large round table of the Round Table Hold
Talk to the Iron Attendant and get the Night Fragment back
Now go to the sleeping quarters and interact with the contaminated bed
Collect the remnants of the night
Talk to the Iron Attendant
Third Echo (after Chapter 5):
Expose the fraud at the training ground
Talk to the fraudster
Go to the cellar
Recalibrate the magical roots of the Iron Attendant
Talk to the Iron Attendant
Defeat three Night Lords and then challenge Heolstor
After the fight against Heolstor, go to the sleeping quarters
Go to the beds and place your hand on the infant
Talk again to the fraudster in the sleeping quarters after reliving the ending
Remembrance of the Executor
How do I unlock the Echoes of the Executor? Equip him and play a round.
First Echo (after Chapter 1):
Talk to the Guardian
Talk to the Priestess
Start an expedition and collect the Blessed Flower
The flower will be marked for you on the map
Defeat the boss “Tracker Bloodhound Knight” and collect the flower
Talk to the Priestess
Talk to the Iron Attendant
Interact with your canvas
Second Echo (after Chapter 5):
Talk to the Priestess
Start an expedition with the Shifted Earth “Mountain Peak”
Search on the mountain for the Golden Sprout
The Golden Sprout will be marked on the map
Defeat the Avatar of the Earth Tree and collect the Golden Sprout
Give the Golden Sprout to the Priestess
Now defeat the Executor’s Call
Interact in the hut with the Forge Knight
Talk to the Priestess
Remembrance of the Scholar
First Echo:
Unlock the Scholar
Complete expeditions and collect memory fragments
Interact with the codex on the table and start the Echo
Start an expedition
Search for an underground chamber that is marked on the map (during an expedition)
Collect the item “Vassal’s Journal”
Talk to the Gravedigger
Talk to Iron Attendant
Interact with the Vassal’s Journal at the chapel table
Talk to the Gravedigger
Second Echo:
Complete expeditions and collect memory fragments
Talk to the Vessel Bazaar
Defeat the Apostle of the God Skull
Interact with the crystallized knight
Third Echo:
Talk to the Gravedigger
Inspect the mirror in the Round Table
Inspect the chapel
Defeat the Dreglord in Limveld
Talk to the Gravedigger
Remembrance of the Gravedigger
First Echo:
Unlock the Gravedigger
Complete an expedition or defeat a Night Lord to collect memory fragments
Talk to Iron Attendant
Defeat the Iron Attendant
Defeat the Night Wanderers
Apologize to the Iron Attendant
Absorb the power of the night
Talk to the Scholar
Second Echo:
Complete an expedition or defeat a Night Lord to collect memory fragments
Talk to the Priestess
Pray in the chapel
Talk to the Iron Attendant
Start an expedition with the Balancers
Find the Scholar
Take the “Scholar’s Primal Core” to you
Third Echo:
Start an expedition with the Night Aspect
Take the “Dismembered Finger” to you
Drop the finger
Interact with the corpse
These were all the Echoes that you can actively complete for all classes. There are many skins that you can unlock in Elden Ring: Nightreign, and alongside the Echo skins, classics from Dark Souls have also made it into the game. To find out what they look like and how to get them, read here: Elden Ring Nightreign: All Skins and how to unlock them
In Elden Ring: Nightreign there is a main quest for each class, the so-called Remembrances or Echoes. With them, you will learn more about the class as well as the story of Nightreign. However, not every quest is easy to solve, which is why we show you all the quest steps in an overview.
Update, January 27, 2026: The article has been reviewed and updated with the Remembrance of the Gravedigger and the Scholar.
What are Remembrances? In Elden Ring: Nightreign, there are several Remembrances for each of the available classes that you can complete.
These Remembrances, also called Echoes, reveal the backstories of the individual classes that you can play in Nightreign. To advance them, however, you must complete, collect, or defeat a variety of things.
In addition to lore fans, players are also rewarded for completing the Echoes. You not only receive useful relics for the respective classes but also a special skin that corresponds to the Remembrance.
If you are therefore working on a class but do not know how to proceed, you will now find all the answers you are looking for in our list. We list all quest steps for each class. You can also use our directory if you want to quickly switch to certain classes.
[toc]
All Echoes at a Glance
What should I know? Each class has automatic Echoes that can be read in the diary, and then active Echoes that require something from you – an item, defeating a boss, or performing an action.
Note that you often have to actively start and complete an expedition with the respective classes to progress the Echoes. Often, victory or defeat does not matter; what is important is that you are equipped with and playing as the respective classes.
In our list, we briefly and clearly show you the active Echoes, as well as short explanations of what you need to do to trigger the automatic Echoes – these are often also important; otherwise, you cannot unlock further steps.
Are the Echoes worth it? For each class that you complete with their Echoes, you receive a skin as well as relics, which can often be very powerful. So, it is definitely worth tackling the Echoes.
Remembrance of the Wylder
How do I unlock the Echoes of the Wylder? Equip him and play a round.
Fourth Echo (after Chapter 8):
Interact with the paper fragment in the main hall on the huge table
Go to the room where the Vessel Bazaar is located and interact with a book on the right wall in a cabinet
Go outside to the graves of the Round Table Hold and talk to the recluse
You can now keep or destroy her Witch Brooch.
Regardless of your choice, the effect of the relic remains the same
Remembrance of the Iron Eye
How do I unlock the Echoes of the Iron Eye? Equip him and play a round.
First Echo (after Chapter 2):
Talk to the Priestess
Start an expedition and defeat the traitor “Night Hunter”
You will then receive the “Letter of the Traitor”
Talk again to the Priestess
Second Echo (after Chapter 5):
Talk to the Priestess in the cellar near the graves
Execute the Assassin
Defeat the Night Lord “Fulghor, Hero of Nightglow” and collect the “Blade of Order”
Execute the Assassin again, this time with the Blade of Order
Defeat Heolstor the Night Lord
At the end, touch the corpse and select “Hold Dagger”
Remembrance of the Countess
How do I unlock the Echoes of the Countess? Equip her and play a round.
First Echo (after Chapter 2):
Talk to the Robber
Talk to the Wylder
Talk to the Robber again
Now search in an expedition for the “Weapon Repair Materials”
The location is marked on your map
Once you have found the materials, you must defeat enemies and then collect the Gold Dew
Hand over the Gold Dew to the Wylder and receive the “Faded Iron Coins”
Talk to the Robber
Talk to the Ghost
Talk to the Iron Attendant
Second Echo (after Chapter 4):
Find the Wylder and collect the flatbread
Talk to the Iron Attendant
Third Echo (after Chapter 5):
Talk to the Robber
Talk to the Ghost on the beach
Defeat the Ghost and receive the “Crown Pendant”
Search for the message in Limveldt
The message will be marked for you on the map
Defeat some enemies and collect “Rooster’s Words”
Talk to the Robber and collect the “Double-Sided Coin”
Fourth Echo (after Chapter 6):
Bless your Iron Coin at the huge table of the Round Table Hold
Give the Iron Attendant your Blessed Iron Coin
Talk to Wylder
Talk to the Iron Attendant
Remembrance of the Robber
How do I unlock the Echoes of the Robber? Equip him and play a round.
First Echo (after Chapter 1):
Talk to the Iron Attendant
Touch the Monument
Talk to the Iron Attendant
Touch the Monument again to enter the arena
Defeat the Single Hit Gladiator
Second Echo (after Chapter 3):
Talk to the Iron Attendant
Touch the Monument
Defeat the Blinding Elder Lion
Talk to the Iron Attendant again
Third Echo (after Chapter 6):
Talk to the Attendant
Touch the Monument
Talk to the Attendant
Travel to the beach
Defeat the White Horn
Talk to the Attendant
Touch the Monument
Talk to the Attendant
Pay respects to the grave next to the Monument
Remembrance of the Ghost
How do I unlock the Echoes of the Ghost? Equip her and play a round.
First Echo:
Talk to the Countess
Talk to the Guardian
Defeat the Tricephalos or the Dark Rift Knight
At the end of your expedition, collect the “Blade of Night Aspect”
Hand the blade to the Guardian
Second Echo (after Chapter 4):
Talk to the Countess
Talk to the recluse
Have a seat on the bench
Eliminate the corruption by defeating all enemies in the room
Interact with the doll
Third Echo (after Chapter 6):
Talk to the Countess
Have a seat on the bench
Defeat the Corruption
Talk to the recluse
Remembrance of the Recluse
How do I unlock the Echoes of the Recluse? Equip her and play a round.
First Echo (after Chapter 1):
Talk to the Iron Attendant
Start an expedition and defeat the Night-Entangled Goldnilpferd
The boss’s location will be marked on the map
Collect the Night Fragment after the battle
Talk to the Iron Attendant and give him the Night Fragment
Second Echo (after Chapter 3):
Interact with the note at the large round table of the Round Table Hold
Talk to the Iron Attendant and get the Night Fragment back
Now go to the sleeping quarters and interact with the contaminated bed
Collect the remnants of the night
Talk to the Iron Attendant
Third Echo (after Chapter 5):
Expose the fraud at the training ground
Talk to the fraudster
Go to the cellar
Recalibrate the magical roots of the Iron Attendant
Talk to the Iron Attendant
Defeat three Night Lords and then challenge Heolstor
After the fight against Heolstor, go to the sleeping quarters
Go to the beds and place your hand on the infant
Talk again to the fraudster in the sleeping quarters after reliving the ending
Remembrance of the Executor
How do I unlock the Echoes of the Executor? Equip him and play a round.
First Echo (after Chapter 1):
Talk to the Guardian
Talk to the Priestess
Start an expedition and collect the Blessed Flower
The flower will be marked for you on the map
Defeat the boss “Tracker Bloodhound Knight” and collect the flower
Talk to the Priestess
Talk to the Iron Attendant
Interact with your canvas
Second Echo (after Chapter 5):
Talk to the Priestess
Start an expedition with the Shifted Earth “Mountain Peak”
Search on the mountain for the Golden Sprout
The Golden Sprout will be marked on the map
Defeat the Avatar of the Earth Tree and collect the Golden Sprout
Give the Golden Sprout to the Priestess
Now defeat the Executor’s Call
Interact in the hut with the Forge Knight
Talk to the Priestess
Remembrance of the Scholar
First Echo:
Unlock the Scholar
Complete expeditions and collect memory fragments
Interact with the codex on the table and start the Echo
Start an expedition
Search for an underground chamber that is marked on the map (during an expedition)
Collect the item “Vassal’s Journal”
Talk to the Gravedigger
Talk to Iron Attendant
Interact with the Vassal’s Journal at the chapel table
Talk to the Gravedigger
Second Echo:
Complete expeditions and collect memory fragments
Talk to the Vessel Bazaar
Defeat the Apostle of the God Skull
Interact with the crystallized knight
Third Echo:
Talk to the Gravedigger
Inspect the mirror in the Round Table
Inspect the chapel
Defeat the Dreglord in Limveld
Talk to the Gravedigger
Remembrance of the Gravedigger
First Echo:
Unlock the Gravedigger
Complete an expedition or defeat a Night Lord to collect memory fragments
Talk to Iron Attendant
Defeat the Iron Attendant
Defeat the Night Wanderers
Apologize to the Iron Attendant
Absorb the power of the night
Talk to the Scholar
Second Echo:
Complete an expedition or defeat a Night Lord to collect memory fragments
Talk to the Priestess
Pray in the chapel
Talk to the Iron Attendant
Start an expedition with the Balancers
Find the Scholar
Take the “Scholar’s Primal Core” to you
Third Echo:
Start an expedition with the Night Aspect
Take the “Dismembered Finger” to you
Drop the finger
Interact with the corpse
These were all the Echoes that you can actively complete for all classes. There are many skins that you can unlock in Elden Ring: Nightreign, and alongside the Echo skins, classics from Dark Souls have also made it into the game. To find out what they look like and how to get them, read here: Elden Ring Nightreign: All Skins and how to unlock them
Third Echo (after Chapter 6):
Talk to the Iron Attendant
Go on an expedition and look for the marked Cursed Merchant
Purchase the book from him for 10,000 runes
Return to the Iron Attendant and give him the Third Volume
Fourth Echo (after Chapter 8):
Interact with the paper fragment in the main hall on the huge table
Go to the room where the Vessel Bazaar is located and interact with a book on the right wall in a cabinet
Go outside to the graves of the Round Table Hold and talk to the recluse
You can now keep or destroy her Witch Brooch.
Regardless of your choice, the effect of the relic remains the same
Remembrance of the Iron Eye
How do I unlock the Echoes of the Iron Eye? Equip him and play a round.
First Echo (after Chapter 2):
Talk to the Priestess
Start an expedition and defeat the traitor “Night Hunter”
You will then receive the “Letter of the Traitor”
Talk again to the Priestess
Second Echo (after Chapter 5):
Talk to the Priestess in the cellar near the graves
Execute the Assassin
Defeat the Night Lord “Fulghor, Hero of Nightglow” and collect the “Blade of Order”
Execute the Assassin again, this time with the Blade of Order
Defeat Heolstor the Night Lord
At the end, touch the corpse and select “Hold Dagger”
Remembrance of the Countess
How do I unlock the Echoes of the Countess? Equip her and play a round.
First Echo (after Chapter 2):
Talk to the Robber
Talk to the Wylder
Talk to the Robber again
Now search in an expedition for the “Weapon Repair Materials”
The location is marked on your map
Once you have found the materials, you must defeat enemies and then collect the Gold Dew
Hand over the Gold Dew to the Wylder and receive the “Faded Iron Coins”
Talk to the Robber
Talk to the Ghost
Talk to the Iron Attendant
Second Echo (after Chapter 4):
Find the Wylder and collect the flatbread
Talk to the Iron Attendant
Third Echo (after Chapter 5):
Talk to the Robber
Talk to the Ghost on the beach
Defeat the Ghost and receive the “Crown Pendant”
Search for the message in Limveldt
The message will be marked for you on the map
Defeat some enemies and collect “Rooster’s Words”
Talk to the Robber and collect the “Double-Sided Coin”
Fourth Echo (after Chapter 6):
Bless your Iron Coin at the huge table of the Round Table Hold
Give the Iron Attendant your Blessed Iron Coin
Talk to Wylder
Talk to the Iron Attendant
Remembrance of the Robber
How do I unlock the Echoes of the Robber? Equip him and play a round.
First Echo (after Chapter 1):
Talk to the Iron Attendant
Touch the Monument
Talk to the Iron Attendant
Touch the Monument again to enter the arena
Defeat the Single Hit Gladiator
Second Echo (after Chapter 3):
Talk to the Iron Attendant
Touch the Monument
Defeat the Blinding Elder Lion
Talk to the Iron Attendant again
Third Echo (after Chapter 6):
Talk to the Attendant
Touch the Monument
Talk to the Attendant
Travel to the beach
Defeat the White Horn
Talk to the Attendant
Touch the Monument
Talk to the Attendant
Pay respects to the grave next to the Monument
Remembrance of the Ghost
How do I unlock the Echoes of the Ghost? Equip her and play a round.
First Echo:
Talk to the Countess
Talk to the Guardian
Defeat the Tricephalos or the Dark Rift Knight
At the end of your expedition, collect the “Blade of Night Aspect”
Hand the blade to the Guardian
Second Echo (after Chapter 4):
Talk to the Countess
Talk to the recluse
Have a seat on the bench
Eliminate the corruption by defeating all enemies in the room
Interact with the doll
Third Echo (after Chapter 6):
Talk to the Countess
Have a seat on the bench
Defeat the Corruption
Talk to the recluse
Remembrance of the Recluse
How do I unlock the Echoes of the Recluse? Equip her and play a round.
First Echo (after Chapter 1):
Talk to the Iron Attendant
Start an expedition and defeat the Night-Entangled Goldnilpferd
The boss’s location will be marked on the map
Collect the Night Fragment after the battle
Talk to the Iron Attendant and give him the Night Fragment
Second Echo (after Chapter 3):
Interact with the note at the large round table of the Round Table Hold
Talk to the Iron Attendant and get the Night Fragment back
Now go to the sleeping quarters and interact with the contaminated bed
Collect the remnants of the night
Talk to the Iron Attendant
Third Echo (after Chapter 5):
Expose the fraud at the training ground
Talk to the fraudster
Go to the cellar
Recalibrate the magical roots of the Iron Attendant
Talk to the Iron Attendant
Defeat three Night Lords and then challenge Heolstor
After the fight against Heolstor, go to the sleeping quarters
Go to the beds and place your hand on the infant
Talk again to the fraudster in the sleeping quarters after reliving the ending
Remembrance of the Executor
How do I unlock the Echoes of the Executor? Equip him and play a round.
First Echo (after Chapter 1):
Talk to the Guardian
Talk to the Priestess
Start an expedition and collect the Blessed Flower
The flower will be marked for you on the map
Defeat the boss “Tracker Bloodhound Knight” and collect the flower
Talk to the Priestess
Talk to the Iron Attendant
Interact with your canvas
Second Echo (after Chapter 5):
Talk to the Priestess
Start an expedition with the Shifted Earth “Mountain Peak”
Search on the mountain for the Golden Sprout
The Golden Sprout will be marked on the map
Defeat the Avatar of the Earth Tree and collect the Golden Sprout
Give the Golden Sprout to the Priestess
Now defeat the Executor’s Call
Interact in the hut with the Forge Knight
Talk to the Priestess
Remembrance of the Scholar
First Echo:
Unlock the Scholar
Complete expeditions and collect memory fragments
Interact with the codex on the table and start the Echo
Start an expedition
Search for an underground chamber that is marked on the map (during an expedition)
Collect the item “Vassal’s Journal”
Talk to the Gravedigger
Talk to Iron Attendant
Interact with the Vassal’s Journal at the chapel table
Talk to the Gravedigger
Second Echo:
Complete expeditions and collect memory fragments
Talk to the Vessel Bazaar
Defeat the Apostle of the God Skull
Interact with the crystallized knight
Third Echo:
Talk to the Gravedigger
Inspect the mirror in the Round Table
Inspect the chapel
Defeat the Dreglord in Limveld
Talk to the Gravedigger
Remembrance of the Gravedigger
First Echo:
Unlock the Gravedigger
Complete an expedition or defeat a Night Lord to collect memory fragments
Talk to Iron Attendant
Defeat the Iron Attendant
Defeat the Night Wanderers
Apologize to the Iron Attendant
Absorb the power of the night
Talk to the Scholar
Second Echo:
Complete an expedition or defeat a Night Lord to collect memory fragments
Talk to the Priestess
Pray in the chapel
Talk to the Iron Attendant
Start an expedition with the Balancers
Find the Scholar
Take the “Scholar’s Primal Core” to you
Third Echo:
Start an expedition with the Night Aspect
Take the “Dismembered Finger” to you
Drop the finger
Interact with the corpse
These were all the Echoes that you can actively complete for all classes. There are many skins that you can unlock in Elden Ring: Nightreign, and alongside the Echo skins, classics from Dark Souls have also made it into the game. To find out what they look like and how to get them, read here: Elden Ring Nightreign: All Skins and how to unlock them
First Echo (after Chapter 3):
Talk to the Iron Attendant
Defeat the Guardian Golem (will be marked on the map during an expedition)
Talk again to the Iron Attendant and hand him the Stone Pillar to receive the book “Annals of Cursed Weapons”.
Second Echo (after Chapter 4):
Talk to the Spirit Merchant in the dressing room and collect the item “Uncanny Talisman”
Go to the main hall of the Round Table Hold and become unconscious
Talk to the Iron Attendant when you wake up
Go back to the Spirit Merchant and select the option “Put Out”
Collect the item “Merchant’s Ledger”
Third Echo (after Chapter 6):
Talk to the Iron Attendant
Go on an expedition and look for the marked Cursed Merchant
Purchase the book from him for 10,000 runes
Return to the Iron Attendant and give him the Third Volume
Fourth Echo (after Chapter 8):
Interact with the paper fragment in the main hall on the huge table
Go to the room where the Vessel Bazaar is located and interact with a book on the right wall in a cabinet
Go outside to the graves of the Round Table Hold and talk to the recluse
You can now keep or destroy her Witch Brooch.
Regardless of your choice, the effect of the relic remains the same
Remembrance of the Iron Eye
How do I unlock the Echoes of the Iron Eye? Equip him and play a round.
First Echo (after Chapter 2):
Talk to the Priestess
Start an expedition and defeat the traitor “Night Hunter”
You will then receive the “Letter of the Traitor”
Talk again to the Priestess
Second Echo (after Chapter 5):
Talk to the Priestess in the cellar near the graves
Execute the Assassin
Defeat the Night Lord “Fulghor, Hero of Nightglow” and collect the “Blade of Order”
Execute the Assassin again, this time with the Blade of Order
Defeat Heolstor the Night Lord
At the end, touch the corpse and select “Hold Dagger”
Remembrance of the Countess
How do I unlock the Echoes of the Countess? Equip her and play a round.
First Echo (after Chapter 2):
Talk to the Robber
Talk to the Wylder
Talk to the Robber again
Now search in an expedition for the “Weapon Repair Materials”
The location is marked on your map
Once you have found the materials, you must defeat enemies and then collect the Gold Dew
Hand over the Gold Dew to the Wylder and receive the “Faded Iron Coins”
Talk to the Robber
Talk to the Ghost
Talk to the Iron Attendant
Second Echo (after Chapter 4):
Find the Wylder and collect the flatbread
Talk to the Iron Attendant
Third Echo (after Chapter 5):
Talk to the Robber
Talk to the Ghost on the beach
Defeat the Ghost and receive the “Crown Pendant”
Search for the message in Limveldt
The message will be marked for you on the map
Defeat some enemies and collect “Rooster’s Words”
Talk to the Robber and collect the “Double-Sided Coin”
Fourth Echo (after Chapter 6):
Bless your Iron Coin at the huge table of the Round Table Hold
Give the Iron Attendant your Blessed Iron Coin
Talk to Wylder
Talk to the Iron Attendant
Remembrance of the Robber
How do I unlock the Echoes of the Robber? Equip him and play a round.
First Echo (after Chapter 1):
Talk to the Iron Attendant
Touch the Monument
Talk to the Iron Attendant
Touch the Monument again to enter the arena
Defeat the Single Hit Gladiator
Second Echo (after Chapter 3):
Talk to the Iron Attendant
Touch the Monument
Defeat the Blinding Elder Lion
Talk to the Iron Attendant again
Third Echo (after Chapter 6):
Talk to the Attendant
Touch the Monument
Talk to the Attendant
Travel to the beach
Defeat the White Horn
Talk to the Attendant
Touch the Monument
Talk to the Attendant
Pay respects to the grave next to the Monument
Remembrance of the Ghost
How do I unlock the Echoes of the Ghost? Equip her and play a round.
First Echo:
Talk to the Countess
Talk to the Guardian
Defeat the Tricephalos or the Dark Rift Knight
At the end of your expedition, collect the “Blade of Night Aspect”
Hand the blade to the Guardian
Second Echo (after Chapter 4):
Talk to the Countess
Talk to the recluse
Have a seat on the bench
Eliminate the corruption by defeating all enemies in the room
Interact with the doll
Third Echo (after Chapter 6):
Talk to the Countess
Have a seat on the bench
Defeat the Corruption
Talk to the recluse
Remembrance of the Recluse
How do I unlock the Echoes of the Recluse? Equip her and play a round.
First Echo (after Chapter 1):
Talk to the Iron Attendant
Start an expedition and defeat the Night-Entangled Goldnilpferd
The boss’s location will be marked on the map
Collect the Night Fragment after the battle
Talk to the Iron Attendant and give him the Night Fragment
Second Echo (after Chapter 3):
Interact with the note at the large round table of the Round Table Hold
Talk to the Iron Attendant and get the Night Fragment back
Now go to the sleeping quarters and interact with the contaminated bed
Collect the remnants of the night
Talk to the Iron Attendant
Third Echo (after Chapter 5):
Expose the fraud at the training ground
Talk to the fraudster
Go to the cellar
Recalibrate the magical roots of the Iron Attendant
Talk to the Iron Attendant
Defeat three Night Lords and then challenge Heolstor
After the fight against Heolstor, go to the sleeping quarters
Go to the beds and place your hand on the infant
Talk again to the fraudster in the sleeping quarters after reliving the ending
Remembrance of the Executor
How do I unlock the Echoes of the Executor? Equip him and play a round.
First Echo (after Chapter 1):
Talk to the Guardian
Talk to the Priestess
Start an expedition and collect the Blessed Flower
The flower will be marked for you on the map
Defeat the boss “Tracker Bloodhound Knight” and collect the flower
Talk to the Priestess
Talk to the Iron Attendant
Interact with your canvas
Second Echo (after Chapter 5):
Talk to the Priestess
Start an expedition with the Shifted Earth “Mountain Peak”
Search on the mountain for the Golden Sprout
The Golden Sprout will be marked on the map
Defeat the Avatar of the Earth Tree and collect the Golden Sprout
Give the Golden Sprout to the Priestess
Now defeat the Executor’s Call
Interact in the hut with the Forge Knight
Talk to the Priestess
Remembrance of the Scholar
First Echo:
Unlock the Scholar
Complete expeditions and collect memory fragments
Interact with the codex on the table and start the Echo
Start an expedition
Search for an underground chamber that is marked on the map (during an expedition)
Collect the item “Vassal’s Journal”
Talk to the Gravedigger
Talk to Iron Attendant
Interact with the Vassal’s Journal at the chapel table
Talk to the Gravedigger
Second Echo:
Complete expeditions and collect memory fragments
Talk to the Vessel Bazaar
Defeat the Apostle of the God Skull
Interact with the crystallized knight
Third Echo:
Talk to the Gravedigger
Inspect the mirror in the Round Table
Inspect the chapel
Defeat the Dreglord in Limveld
Talk to the Gravedigger
Remembrance of the Gravedigger
First Echo:
Unlock the Gravedigger
Complete an expedition or defeat a Night Lord to collect memory fragments
Talk to Iron Attendant
Defeat the Iron Attendant
Defeat the Night Wanderers
Apologize to the Iron Attendant
Absorb the power of the night
Talk to the Scholar
Second Echo:
Complete an expedition or defeat a Night Lord to collect memory fragments
Talk to the Priestess
Pray in the chapel
Talk to the Iron Attendant
Start an expedition with the Balancers
Find the Scholar
Take the “Scholar’s Primal Core” to you
Third Echo:
Start an expedition with the Night Aspect
Take the “Dismembered Finger” to you
Drop the finger
Interact with the corpse
These were all the Echoes that you can actively complete for all classes. There are many skins that you can unlock in Elden Ring: Nightreign, and alongside the Echo skins, classics from Dark Souls have also made it into the game. To find out what they look like and how to get them, read here: Elden Ring Nightreign: All Skins and how to unlock them
Third Echo (after Chapter 6):
Start an expedition to begin Chapter 7
Back in the Round Table Hold, collect the “Key of the Virtuous Thief” from the table in the room before the chambers
Open the chest in the cellar of the Round Table Hold and collect the item “Torn Paper Fragment”
Talk to the recluse
Talk to the Iron Attendant
Start an expedition with the shifted world “Noklateo”
Find the Imitator Tear in Noklateo, it is marked with a golden shimmer in the city and guarded by an Imitator Troll
Defeat the Night Aspect (final boss)
Remembrance of the Guardian
How do I unlock the Echoes of the Guardian? Equip him and play a round.
First Echo (after Chapter 3):
Talk to the Iron Attendant
Defeat the Guardian Golem (will be marked on the map during an expedition)
Talk again to the Iron Attendant and hand him the Stone Pillar to receive the book “Annals of Cursed Weapons”.
Second Echo (after Chapter 4):
Talk to the Spirit Merchant in the dressing room and collect the item “Uncanny Talisman”
Go to the main hall of the Round Table Hold and become unconscious
Talk to the Iron Attendant when you wake up
Go back to the Spirit Merchant and select the option “Put Out”
Collect the item “Merchant’s Ledger”
Third Echo (after Chapter 6):
Talk to the Iron Attendant
Go on an expedition and look for the marked Cursed Merchant
Purchase the book from him for 10,000 runes
Return to the Iron Attendant and give him the Third Volume
Fourth Echo (after Chapter 8):
Interact with the paper fragment in the main hall on the huge table
Go to the room where the Vessel Bazaar is located and interact with a book on the right wall in a cabinet
Go outside to the graves of the Round Table Hold and talk to the recluse
You can now keep or destroy her Witch Brooch.
Regardless of your choice, the effect of the relic remains the same
Remembrance of the Iron Eye
How do I unlock the Echoes of the Iron Eye? Equip him and play a round.
First Echo (after Chapter 2):
Talk to the Priestess
Start an expedition and defeat the traitor “Night Hunter”
You will then receive the “Letter of the Traitor”
Talk again to the Priestess
Second Echo (after Chapter 5):
Talk to the Priestess in the cellar near the graves
Execute the Assassin
Defeat the Night Lord “Fulghor, Hero of Nightglow” and collect the “Blade of Order”
Execute the Assassin again, this time with the Blade of Order
Defeat Heolstor the Night Lord
At the end, touch the corpse and select “Hold Dagger”
Remembrance of the Countess
How do I unlock the Echoes of the Countess? Equip her and play a round.
First Echo (after Chapter 2):
Talk to the Robber
Talk to the Wylder
Talk to the Robber again
Now search in an expedition for the “Weapon Repair Materials”
The location is marked on your map
Once you have found the materials, you must defeat enemies and then collect the Gold Dew
Hand over the Gold Dew to the Wylder and receive the “Faded Iron Coins”
Talk to the Robber
Talk to the Ghost
Talk to the Iron Attendant
Second Echo (after Chapter 4):
Find the Wylder and collect the flatbread
Talk to the Iron Attendant
Third Echo (after Chapter 5):
Talk to the Robber
Talk to the Ghost on the beach
Defeat the Ghost and receive the “Crown Pendant”
Search for the message in Limveldt
The message will be marked for you on the map
Defeat some enemies and collect “Rooster’s Words”
Talk to the Robber and collect the “Double-Sided Coin”
Fourth Echo (after Chapter 6):
Bless your Iron Coin at the huge table of the Round Table Hold
Give the Iron Attendant your Blessed Iron Coin
Talk to Wylder
Talk to the Iron Attendant
Remembrance of the Robber
How do I unlock the Echoes of the Robber? Equip him and play a round.
First Echo (after Chapter 1):
Talk to the Iron Attendant
Touch the Monument
Talk to the Iron Attendant
Touch the Monument again to enter the arena
Defeat the Single Hit Gladiator
Second Echo (after Chapter 3):
Talk to the Iron Attendant
Touch the Monument
Defeat the Blinding Elder Lion
Talk to the Iron Attendant again
Third Echo (after Chapter 6):
Talk to the Attendant
Touch the Monument
Talk to the Attendant
Travel to the beach
Defeat the White Horn
Talk to the Attendant
Touch the Monument
Talk to the Attendant
Pay respects to the grave next to the Monument
Remembrance of the Ghost
How do I unlock the Echoes of the Ghost? Equip her and play a round.
First Echo:
Talk to the Countess
Talk to the Guardian
Defeat the Tricephalos or the Dark Rift Knight
At the end of your expedition, collect the “Blade of Night Aspect”
Hand the blade to the Guardian
Second Echo (after Chapter 4):
Talk to the Countess
Talk to the recluse
Have a seat on the bench
Eliminate the corruption by defeating all enemies in the room
Interact with the doll
Third Echo (after Chapter 6):
Talk to the Countess
Have a seat on the bench
Defeat the Corruption
Talk to the recluse
Remembrance of the Recluse
How do I unlock the Echoes of the Recluse? Equip her and play a round.
First Echo (after Chapter 1):
Talk to the Iron Attendant
Start an expedition and defeat the Night-Entangled Goldnilpferd
The boss’s location will be marked on the map
Collect the Night Fragment after the battle
Talk to the Iron Attendant and give him the Night Fragment
Second Echo (after Chapter 3):
Interact with the note at the large round table of the Round Table Hold
Talk to the Iron Attendant and get the Night Fragment back
Now go to the sleeping quarters and interact with the contaminated bed
Collect the remnants of the night
Talk to the Iron Attendant
Third Echo (after Chapter 5):
Expose the fraud at the training ground
Talk to the fraudster
Go to the cellar
Recalibrate the magical roots of the Iron Attendant
Talk to the Iron Attendant
Defeat three Night Lords and then challenge Heolstor
After the fight against Heolstor, go to the sleeping quarters
Go to the beds and place your hand on the infant
Talk again to the fraudster in the sleeping quarters after reliving the ending
Remembrance of the Executor
How do I unlock the Echoes of the Executor? Equip him and play a round.
First Echo (after Chapter 1):
Talk to the Guardian
Talk to the Priestess
Start an expedition and collect the Blessed Flower
The flower will be marked for you on the map
Defeat the boss “Tracker Bloodhound Knight” and collect the flower
Talk to the Priestess
Talk to the Iron Attendant
Interact with your canvas
Second Echo (after Chapter 5):
Talk to the Priestess
Start an expedition with the Shifted Earth “Mountain Peak”
Search on the mountain for the Golden Sprout
The Golden Sprout will be marked on the map
Defeat the Avatar of the Earth Tree and collect the Golden Sprout
Give the Golden Sprout to the Priestess
Now defeat the Executor’s Call
Interact in the hut with the Forge Knight
Talk to the Priestess
Remembrance of the Scholar
First Echo:
Unlock the Scholar
Complete expeditions and collect memory fragments
Interact with the codex on the table and start the Echo
Start an expedition
Search for an underground chamber that is marked on the map (during an expedition)
Collect the item “Vassal’s Journal”
Talk to the Gravedigger
Talk to Iron Attendant
Interact with the Vassal’s Journal at the chapel table
Talk to the Gravedigger
Second Echo:
Complete expeditions and collect memory fragments
Talk to the Vessel Bazaar
Defeat the Apostle of the God Skull
Interact with the crystallized knight
Third Echo:
Talk to the Gravedigger
Inspect the mirror in the Round Table
Inspect the chapel
Defeat the Dreglord in Limveld
Talk to the Gravedigger
Remembrance of the Gravedigger
First Echo:
Unlock the Gravedigger
Complete an expedition or defeat a Night Lord to collect memory fragments
Talk to Iron Attendant
Defeat the Iron Attendant
Defeat the Night Wanderers
Apologize to the Iron Attendant
Absorb the power of the night
Talk to the Scholar
Second Echo:
Complete an expedition or defeat a Night Lord to collect memory fragments
Talk to the Priestess
Pray in the chapel
Talk to the Iron Attendant
Start an expedition with the Balancers
Find the Scholar
Take the “Scholar’s Primal Core” to you
Third Echo:
Start an expedition with the Night Aspect
Take the “Dismembered Finger” to you
Drop the finger
Interact with the corpse
These were all the Echoes that you can actively complete for all classes. There are many skins that you can unlock in Elden Ring: Nightreign, and alongside the Echo skins, classics from Dark Souls have also made it into the game. To find out what they look like and how to get them, read here: Elden Ring Nightreign: All Skins and how to unlock them
First Echo (after Chapter 2):
Talk to the Iron Attendant
Start an expedition and collect the “Slate Whetstone”
Talk to the Iron Attendant and hand in the Whetstone
Collect the earrings from the rewards
Go to the sleeping quarters and hold the earrings up to the light
Find the Countess and give her the earrings
Second Echo (after Chapter 5):
Read three short passages near the Vessel Bazaar:
The first passage is located to the right of the encyclopedia for important information on the book tower
The second passage is in the same room on the right wall on a shelf
The third passage is on a book tower behind the recluse’s chair
Interact with the three graves in the cellar of the Round Table Hold
Go to the beach and talk to the Countess
Third Echo (after Chapter 6):
Start an expedition to begin Chapter 7
Back in the Round Table Hold, collect the “Key of the Virtuous Thief” from the table in the room before the chambers
Open the chest in the cellar of the Round Table Hold and collect the item “Torn Paper Fragment”
Talk to the recluse
Talk to the Iron Attendant
Start an expedition with the shifted world “Noklateo”
Find the Imitator Tear in Noklateo, it is marked with a golden shimmer in the city and guarded by an Imitator Troll
Defeat the Night Aspect (final boss)
Remembrance of the Guardian
How do I unlock the Echoes of the Guardian? Equip him and play a round.
First Echo (after Chapter 3):
Talk to the Iron Attendant
Defeat the Guardian Golem (will be marked on the map during an expedition)
Talk again to the Iron Attendant and hand him the Stone Pillar to receive the book “Annals of Cursed Weapons”.
Second Echo (after Chapter 4):
Talk to the Spirit Merchant in the dressing room and collect the item “Uncanny Talisman”
Go to the main hall of the Round Table Hold and become unconscious
Talk to the Iron Attendant when you wake up
Go back to the Spirit Merchant and select the option “Put Out”
Collect the item “Merchant’s Ledger”
Third Echo (after Chapter 6):
Talk to the Iron Attendant
Go on an expedition and look for the marked Cursed Merchant
Purchase the book from him for 10,000 runes
Return to the Iron Attendant and give him the Third Volume
Fourth Echo (after Chapter 8):
Interact with the paper fragment in the main hall on the huge table
Go to the room where the Vessel Bazaar is located and interact with a book on the right wall in a cabinet
Go outside to the graves of the Round Table Hold and talk to the recluse
You can now keep or destroy her Witch Brooch.
Regardless of your choice, the effect of the relic remains the same
Remembrance of the Iron Eye
How do I unlock the Echoes of the Iron Eye? Equip him and play a round.
First Echo (after Chapter 2):
Talk to the Priestess
Start an expedition and defeat the traitor “Night Hunter”
You will then receive the “Letter of the Traitor”
Talk again to the Priestess
Second Echo (after Chapter 5):
Talk to the Priestess in the cellar near the graves
Execute the Assassin
Defeat the Night Lord “Fulghor, Hero of Nightglow” and collect the “Blade of Order”
Execute the Assassin again, this time with the Blade of Order
Defeat Heolstor the Night Lord
At the end, touch the corpse and select “Hold Dagger”
Remembrance of the Countess
How do I unlock the Echoes of the Countess? Equip her and play a round.
First Echo (after Chapter 2):
Talk to the Robber
Talk to the Wylder
Talk to the Robber again
Now search in an expedition for the “Weapon Repair Materials”
The location is marked on your map
Once you have found the materials, you must defeat enemies and then collect the Gold Dew
Hand over the Gold Dew to the Wylder and receive the “Faded Iron Coins”
Talk to the Robber
Talk to the Ghost
Talk to the Iron Attendant
Second Echo (after Chapter 4):
Find the Wylder and collect the flatbread
Talk to the Iron Attendant
Third Echo (after Chapter 5):
Talk to the Robber
Talk to the Ghost on the beach
Defeat the Ghost and receive the “Crown Pendant”
Search for the message in Limveldt
The message will be marked for you on the map
Defeat some enemies and collect “Rooster’s Words”
Talk to the Robber and collect the “Double-Sided Coin”
Fourth Echo (after Chapter 6):
Bless your Iron Coin at the huge table of the Round Table Hold
Give the Iron Attendant your Blessed Iron Coin
Talk to Wylder
Talk to the Iron Attendant
Remembrance of the Robber
How do I unlock the Echoes of the Robber? Equip him and play a round.
First Echo (after Chapter 1):
Talk to the Iron Attendant
Touch the Monument
Talk to the Iron Attendant
Touch the Monument again to enter the arena
Defeat the Single Hit Gladiator
Second Echo (after Chapter 3):
Talk to the Iron Attendant
Touch the Monument
Defeat the Blinding Elder Lion
Talk to the Iron Attendant again
Third Echo (after Chapter 6):
Talk to the Attendant
Touch the Monument
Talk to the Attendant
Travel to the beach
Defeat the White Horn
Talk to the Attendant
Touch the Monument
Talk to the Attendant
Pay respects to the grave next to the Monument
Remembrance of the Ghost
How do I unlock the Echoes of the Ghost? Equip her and play a round.
First Echo:
Talk to the Countess
Talk to the Guardian
Defeat the Tricephalos or the Dark Rift Knight
At the end of your expedition, collect the “Blade of Night Aspect”
Hand the blade to the Guardian
Second Echo (after Chapter 4):
Talk to the Countess
Talk to the recluse
Have a seat on the bench
Eliminate the corruption by defeating all enemies in the room
Interact with the doll
Third Echo (after Chapter 6):
Talk to the Countess
Have a seat on the bench
Defeat the Corruption
Talk to the recluse
Remembrance of the Recluse
How do I unlock the Echoes of the Recluse? Equip her and play a round.
First Echo (after Chapter 1):
Talk to the Iron Attendant
Start an expedition and defeat the Night-Entangled Goldnilpferd
The boss’s location will be marked on the map
Collect the Night Fragment after the battle
Talk to the Iron Attendant and give him the Night Fragment
Second Echo (after Chapter 3):
Interact with the note at the large round table of the Round Table Hold
Talk to the Iron Attendant and get the Night Fragment back
Now go to the sleeping quarters and interact with the contaminated bed
Collect the remnants of the night
Talk to the Iron Attendant
Third Echo (after Chapter 5):
Expose the fraud at the training ground
Talk to the fraudster
Go to the cellar
Recalibrate the magical roots of the Iron Attendant
Talk to the Iron Attendant
Defeat three Night Lords and then challenge Heolstor
After the fight against Heolstor, go to the sleeping quarters
Go to the beds and place your hand on the infant
Talk again to the fraudster in the sleeping quarters after reliving the ending
Remembrance of the Executor
How do I unlock the Echoes of the Executor? Equip him and play a round.
First Echo (after Chapter 1):
Talk to the Guardian
Talk to the Priestess
Start an expedition and collect the Blessed Flower
The flower will be marked for you on the map
Defeat the boss “Tracker Bloodhound Knight” and collect the flower
Talk to the Priestess
Talk to the Iron Attendant
Interact with your canvas
Second Echo (after Chapter 5):
Talk to the Priestess
Start an expedition with the Shifted Earth “Mountain Peak”
Search on the mountain for the Golden Sprout
The Golden Sprout will be marked on the map
Defeat the Avatar of the Earth Tree and collect the Golden Sprout
Give the Golden Sprout to the Priestess
Now defeat the Executor’s Call
Interact in the hut with the Forge Knight
Talk to the Priestess
Remembrance of the Scholar
First Echo:
Unlock the Scholar
Complete expeditions and collect memory fragments
Interact with the codex on the table and start the Echo
Start an expedition
Search for an underground chamber that is marked on the map (during an expedition)
Collect the item “Vassal’s Journal”
Talk to the Gravedigger
Talk to Iron Attendant
Interact with the Vassal’s Journal at the chapel table
Talk to the Gravedigger
Second Echo:
Complete expeditions and collect memory fragments
Talk to the Vessel Bazaar
Defeat the Apostle of the God Skull
Interact with the crystallized knight
Third Echo:
Talk to the Gravedigger
Inspect the mirror in the Round Table
Inspect the chapel
Defeat the Dreglord in Limveld
Talk to the Gravedigger
Remembrance of the Gravedigger
First Echo:
Unlock the Gravedigger
Complete an expedition or defeat a Night Lord to collect memory fragments
Talk to Iron Attendant
Defeat the Iron Attendant
Defeat the Night Wanderers
Apologize to the Iron Attendant
Absorb the power of the night
Talk to the Scholar
Second Echo:
Complete an expedition or defeat a Night Lord to collect memory fragments
Talk to the Priestess
Pray in the chapel
Talk to the Iron Attendant
Start an expedition with the Balancers
Find the Scholar
Take the “Scholar’s Primal Core” to you
Third Echo:
Start an expedition with the Night Aspect
Take the “Dismembered Finger” to you
Drop the finger
Interact with the corpse
These were all the Echoes that you can actively complete for all classes. There are many skins that you can unlock in Elden Ring: Nightreign, and alongside the Echo skins, classics from Dark Souls have also made it into the game. To find out what they look like and how to get them, read here: Elden Ring Nightreign: All Skins and how to unlock them
This is an AI-powered translation. Some inaccuracies might exist.
The new survival MMO Dune: Awakening has officially launched. At release, it breaks its own record from the early access phase and climbs into the top 10 on Steam.
How did Dune’s headstart go? The survival MMO by Funcom was already available in headstart on Steam since Thursday, as long as you purchased the deluxe or ultimate edition. Here, the survival MMO set a record on Sunday with 117,087 concurrent players (via SteamDB).
Since Tuesday, June 10 at 16:00, players of the standard game version can also access the servers of the survival game. This moment was also the official release, which the developers have accompanied with a new trailer.
You can see the new trailer here:
Start video
Dune: Awakening presents new action-packed trailer for the release of the game
Record broken, into the top 10
What do the player numbers look like now? With the full release of the survival MMO on Steam, its own record was already broken after 2.5 hours. At 19:00, SteamDB reported a new player record with 122,536 concurrent gamers in the game.
Also in the top 10 on Steam for currently active users, the survival hit is now ranked 8th. There, the game recently displaced the tools “Source SDK Base 2007” and “Wallpaper Engine”, which now occupy spots 9 and 10 with nearly 100,000 players.
In front of Dune: Awakening is currently the genre competitor Rust in 7th place, which with over 136,000 players as of 18:30 still has some distance. In 1st place is – as so often – the Steam hit Counter-Strike 2.
What kind of game is this? Dune: Awakening is a survival MMO set in the Dune universe. In addition to the survival elements that transform your character from a stranded space drifter to an aspiring aristocrat with new tools and devices, Dune: Awakening also offers MMO aspects such as an auction house, regions with hundreds of players, and a political system where guilds can compete against each other.
The game world of Dune: Awakening is built vertically, which means you will constantly have to climb high mountains or buildings. If you want to get down quickly, but safely, there’s a trick.
What is this trick? If you fall from a certain height in Dune: Awakening, you take damage. So far, so predictable. But what actually happens if you are still sitting on your sandbike during the fall? Well, in theory, the vehicle should break apart, explode, and take you to your virtual death. However, the reality is different.
Currently, you take no damage when you crash your sandbike anywhere. It doesn’t matter how deep the fall is. The vehicle also takes hardly any damage. If you even activate the bike’s boost during this, you can expect a real, but harmless speed rush. The Asthma_Queen impressively demonstrates this in a video on Reddit.
Recommended editorial content
At this point you will find external content from Reddit that complements the article.
I consent to external content being displayed to me. Personal data can be transmitted to third party platforms.
Read more about our privacy policy.
How does the community react to the video? Some players celebrate the “insane speed” with a fitting GIF from Spaceballs, while others wonder how this is possible.
HeavyO can hardly believe it on Reddit: “Wait, the bike doesn’t explode?” In a second post, he adds: “Damn, that’s good to know.”
RA_lee already knows the trick and only has one concern on Reddit: “Hope I don’t miss the announcement if they change it.”
UsualWinter1229 adds on Reddit: “I just talked about this with my buddy. If they change this, there will be a lot of dead sleepers.”
Puzzleheaded_Pear_18 will take the risk going forward (via Reddit): “This will change my playstyle. I just assumed that it would take a lot of damage from falls.”
Since this is likely a bug, it could actually be that Funcom will roll out a hotfix soon. MeinMMO will of course keep you updated with news and patch notes.
The new release trailer for Dune Awakening:
Start video
Dune: Awakening presents new action-packed trailer for the release of the game
Alternatively, you can just build yourself an ornithopter and fly safely and legally through the air. How that can be done solo and relatively quickly will be revealed in our guide tomorrow. Until then, you can listen to a round of radio while traveling through Arrakis. If you haven’t found the stations yet, check here: Dune Awakening has a hidden feature that has already sweetened every trip in GTA
This is an AI-powered translation. Some inaccuracies might exist.
In the role-playing game Clair Obscur: Expedition 33, the new patch adjusts the game’s difficulty. Now you can choose between Hardcore and Easy Mode.
What has the new patch brought? In Clair Obscur: Expedition 33, the new patch has made some changes to the difficulty. Although the role-playing game still offers the previously known difficulty levels, it now provides additional options for individual customization. You can choose between the following difficulty levels:
Story Mode (easy): Enemies deal less damage and you have more time to dodge and parry
Expedition Mode (medium): Enemies deal normal damage and the time to dodge and parry is at the desired level
Expert Mode (hard): Enemies deal much more damage and dodging and parrying is much more difficult
Now you can further modify these settings and customize the game in detail to your liking.
Here you can see what Clair Obscur: Expedition 33 triggers in players:
Start video
Clair Obscur: Expedition 33 hinterlässt bei den Spielern eine Leere
From a stroll to a Soulslike
What can you adjust now? With Patch 1.3.0 for Expedition 33, the developers have introduced new customization options for the difficulty. For instance, they have made the Story Mode even easier: The time window for parrying and dodging can be increased by up to 40%, while enemy damage can be reduced between 10% and 50%.
However, if you prefer it tough, you can restrict yourself. The developers now provide the option to limit attacks to a maximum damage number. This allows you to set your attacks to deal only 99,999 or 999,999 damage. This also restricts OP builds.
New is also the option to increase enemy hit points by 2-, 5-, 10-, 20-, 50-, or 100-fold. The customization options will be available to you after the third act at checkpoints.
With the new options, every player is free to choose between an easy stroll and a real tough challenge that has a lot in store. Particularly, the damage limit prevents many OP builds and necessitates a new approach.
Just because Larian doesn’t want to develop a successor to Baldur’s Gate 3, time at Wizards of the Coast is certainly not standing still. On the contrary, ambitions are huge.
What exactly the developers around Swen Vincke are working on is unclear. For a brief moment, it seemed that Larian had returned to their Divinity series. However, the officials quickly squashed the anticipation. So we’ll have to be patient for a while longer.
Casual entertainment: the animated short film for Patch 8 of Baldur’s Gate 3:
Start video
Der animierte Kurzfilm zu Patch 8, dem letzten Update für Baldur’s Gate 3
Big Names, Heavy Legacy
What about the publisher? The rights to Baldur’s Gate and Dungeons & Dragons are known to lie with Wizards of the Coast and the Hasbro group. It surely comes as no surprise that the officials, like President John Hight (formerly at Blizzard, notably as General Manager for World of Warcraft), want to build on the success of Baldur’s Gate 3.
And that without Larian as well. They have brought in veteran developer Stig Asmussen (God of War 3, Star Wars Jedi: Fallen Order and Survivor), who has been working with his new studio Giant Skull on an RPG with AAA ambitions in Unreal Engine 5, focusing entirely on the single-player experience.
Hight and Asmussen know each other well from their time at Sony – John Hight oversaw the production of God of War 3. It is now clear that the new RPG will be set in the universe of Dungeons & Dragons and is intended to feel quite different from Baldur’s Gate 3.
If it were up to Hight, the new D&D RPG could also include a bit of Kratos power fantasy: ‘I think about what Stig and Patrick Murphy did in God of War 3 by bringing these gods and crazy monsters from mythology to life. It’s like: Wow, what if we could unleash them in D&D?’
The focus should be on compelling storytelling, fluid, brutally staged combat, and a smooth movement experience. However, with a game of these ambitions, it will likely take a while before the developers can actually show gameplay.
At the same time, John Hight stated to Polygon that they also plan to develop more classic RPGs in the future that will play more like Baldur’s Gate 3: ‘Don’t get me wrong, we will develop CRPGs that are just as serious as BG3.’
Classic or action-packed – how would you prefer your new D&D RPG? By the way, MyMMO has reported multiple times in recent months that Hasbro’s plans might also involve the license for Baldur’s Gate. However, many fans have a completely different wish: Publisher is eager to make a Baldur’s Gate 4, but players want something else
This is an AI-powered translation. Some inaccuracies might exist.
The demo of Vindictus: Defying Fate has launched on Steam. However, the initial feedback from players is rather negative.
What kind of game is this? Vindictus: Defying Fate is the successor to Vindictus, which was originally released in 2010. It is an MMORPG, though it is mostly played solo. For boss fights, you can team up with random companions. It is developed and published by the Korean studio Nexon.
A few days ago, the demo of the game launched on Steam. While it has already attracted more than 40,000 simultaneous players, the initial feedback has been quite mixed.
Start video
Vindictus: Defying Fate allows you to experience an old MMORPG as a Soulslike
Different concept and poor performance
What rating does the game have? Currently, the game has a total of 2,271 ratings. While 1,222 of them are negative, there are only 1,049 positive ratings (as of June 10, 2025, 11:50 AM). This results in a “Mixed” rating on Steam with 46% positive votes.
Based on the numbers on steamdb.info, it can also be seen that shortly after the demo launched, more than 40,000 players were simultaneously exploring the demo to get an impression.
What do players criticize? Looking at the comments on Steam, there is primarily one major point of criticism about the demo of the game.
A large part of the players, who have already played the predecessor, are bothered by the change in gameplay. While the first part was more in the direction of hack & slash, the successor is oriented towards Souls games.
Some of the comments on Steam read:
“It doesn’t play like Vindictus 1 at all. This game is too much like a ‘Soulslike’. [..] Vindictus 1 was more of a “hack ‘n’ slash“ than a Soulslike,” says Snack
“If you liked Vindictus, you will hate this,” writes Help I’m Stranded
“It’s great that the game gets a second life after one and a half decades, but personally I think Defying Fate misses the core of what made Vindictus so great,” comments Zeta1207
Furthermore, it is criticized that the game does not run very smoothly despite powerful hardware and has performance issues. Since it is currently only a demo of the game, this problem could potentially be resolved before the final release.
How long does the demo run? The demo of the game started on June 8, 2025, on Steam. If you want to test it, you have time until June 17, 2025, at 08:59 AM. After that, the demo will end.
When will the game be released? When the game will celebrate its release is still not finally known.