

In The Division 2, with Title Update 8 and the Warlords expansion, the skill system has been revamped. We will explain what you need to pay attention to now, if you enjoy using skills and focusing on skill builds.

What is the rework about? Recently, the Title Update 8 and the “Warlords of New York” expansion were released for The Division 2. Along with new content, many changes made their way into the game.
For example, the gear system has been fundamentally revamped with Gear 2.0. But there have also been significant changes regarding the skills. We will look at two innovations that are particularly important in this context.
Whether you prefer to defeat enemies with skills or support your team through healing – if you like playing skill builds, you should know the following:
Skill Tiers – The higher, the better
What are Skill Tiers? In the past, one mainly had to rely on skill power to unleash the power of skills with mods and to strengthen individual skills specifically through talents on your gear, but that has now changed.
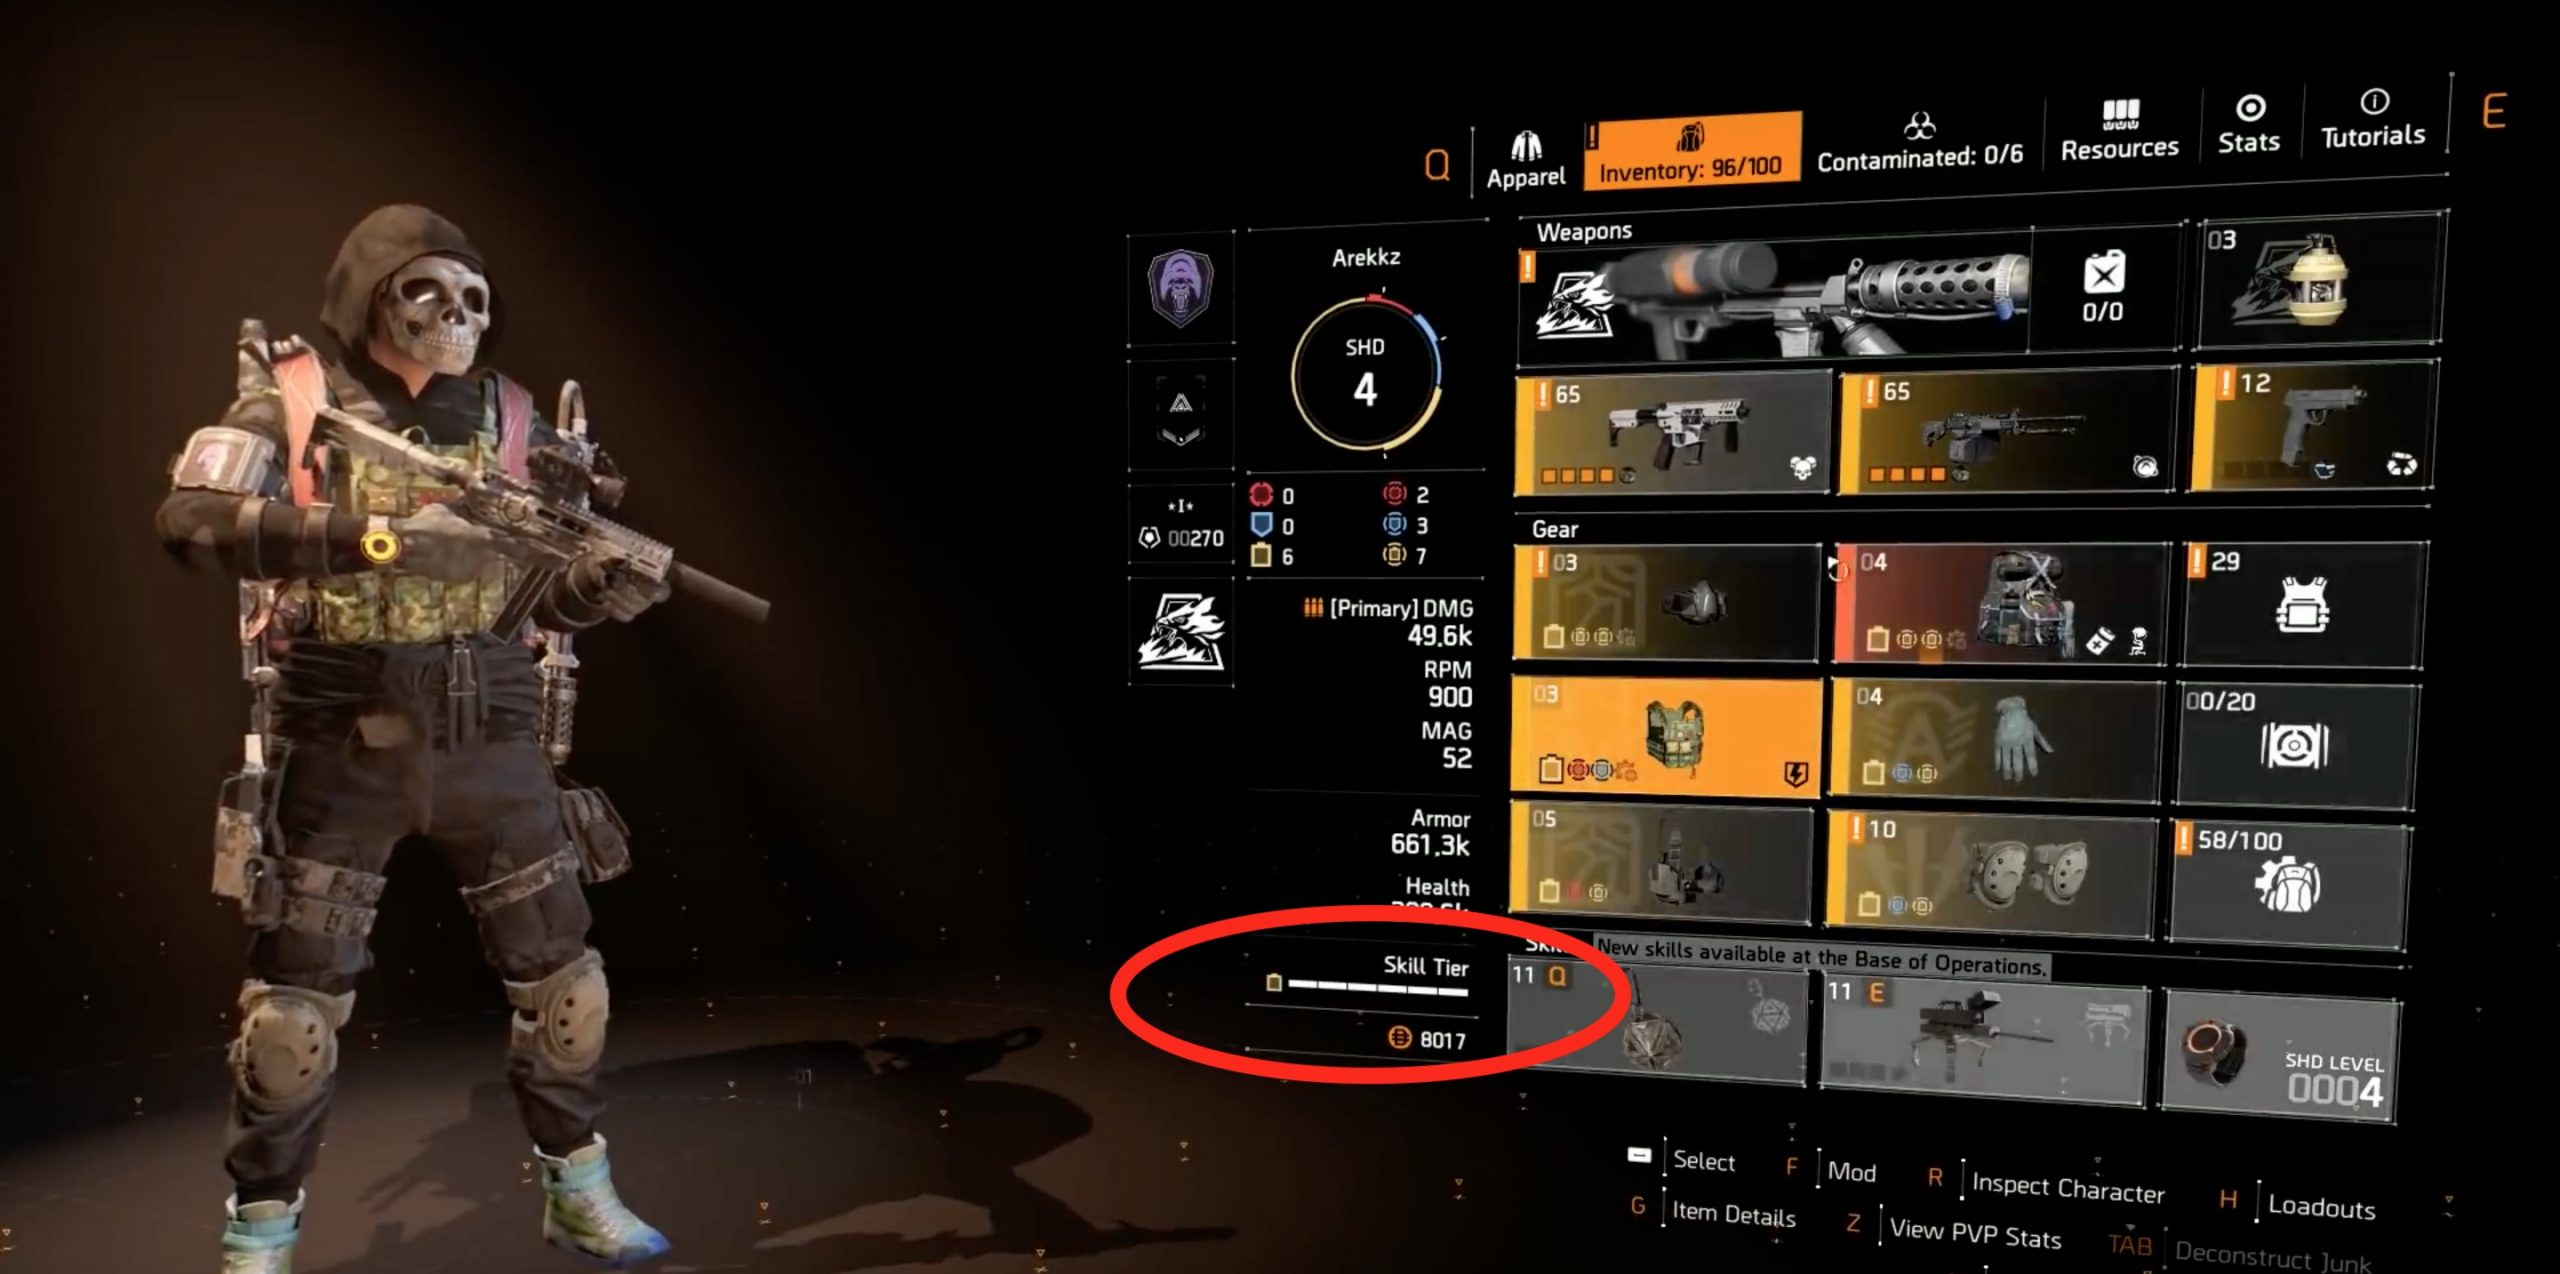
Skill power no longer exists; it has been replaced by universal Skill Tiers – a simplified and much more intuitive system for skills. This illustrates and determines how powerful your skills are from now on.
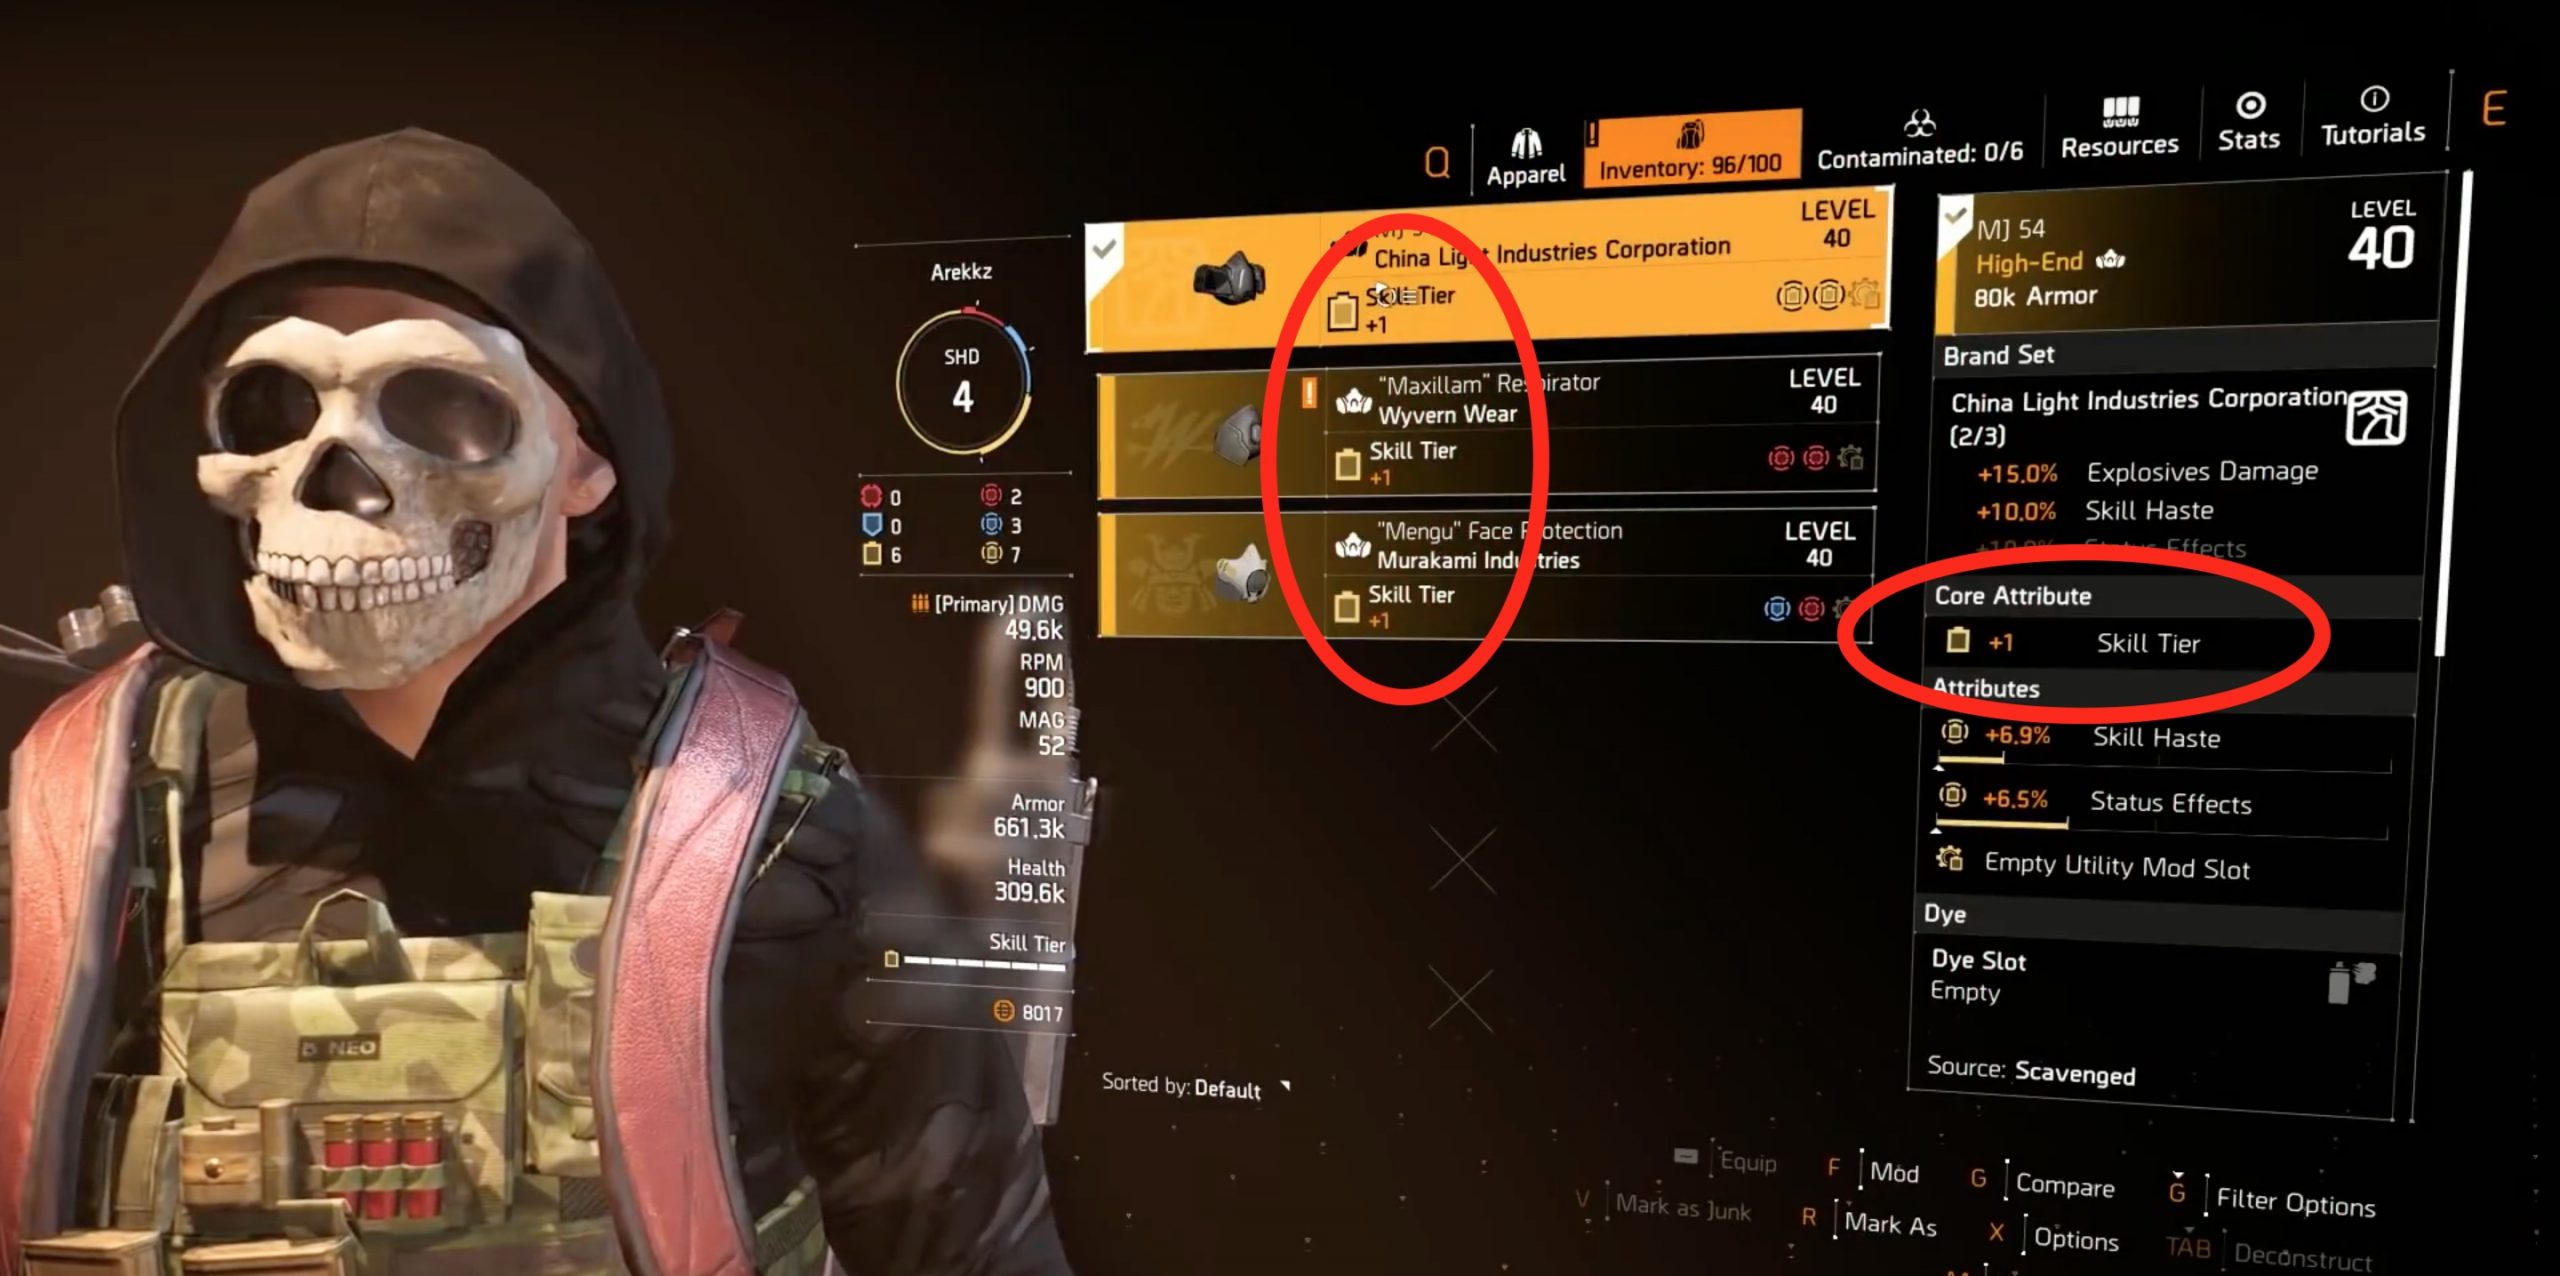
This is how Skill Tiers work: The skill tier is determined by the number of gear pieces with the core attribute “skill tier.” Additionally, you can increase the skill tiers for a short period with certain talents. Each piece provides a maximum of one “skill tier” per piece. The specialization “Technician” comes with an ability that already grants you one skill level.
There are a total of 6 Skill Tiers. So if you have equipped 6 gear pieces, each granting you +1 skill tier, you have reached the 6th and final skill tier. Beyond this cap, you can only increase it with the so-called Overcharge mechanic, a kind of 7th tier, but more on that later.
As your tier increases, you unlock certain bonuses for your skills that will be available to you permanently. These vary from skill to skill, but in general, it can be said – the higher the tier, the more powerful your skills become.
The additional tier effects can be viewed for each skill in the skills selection menu.
This is what the skill tiers do in detail: As the skill level increases, the skills receive an additional boost to their effects.
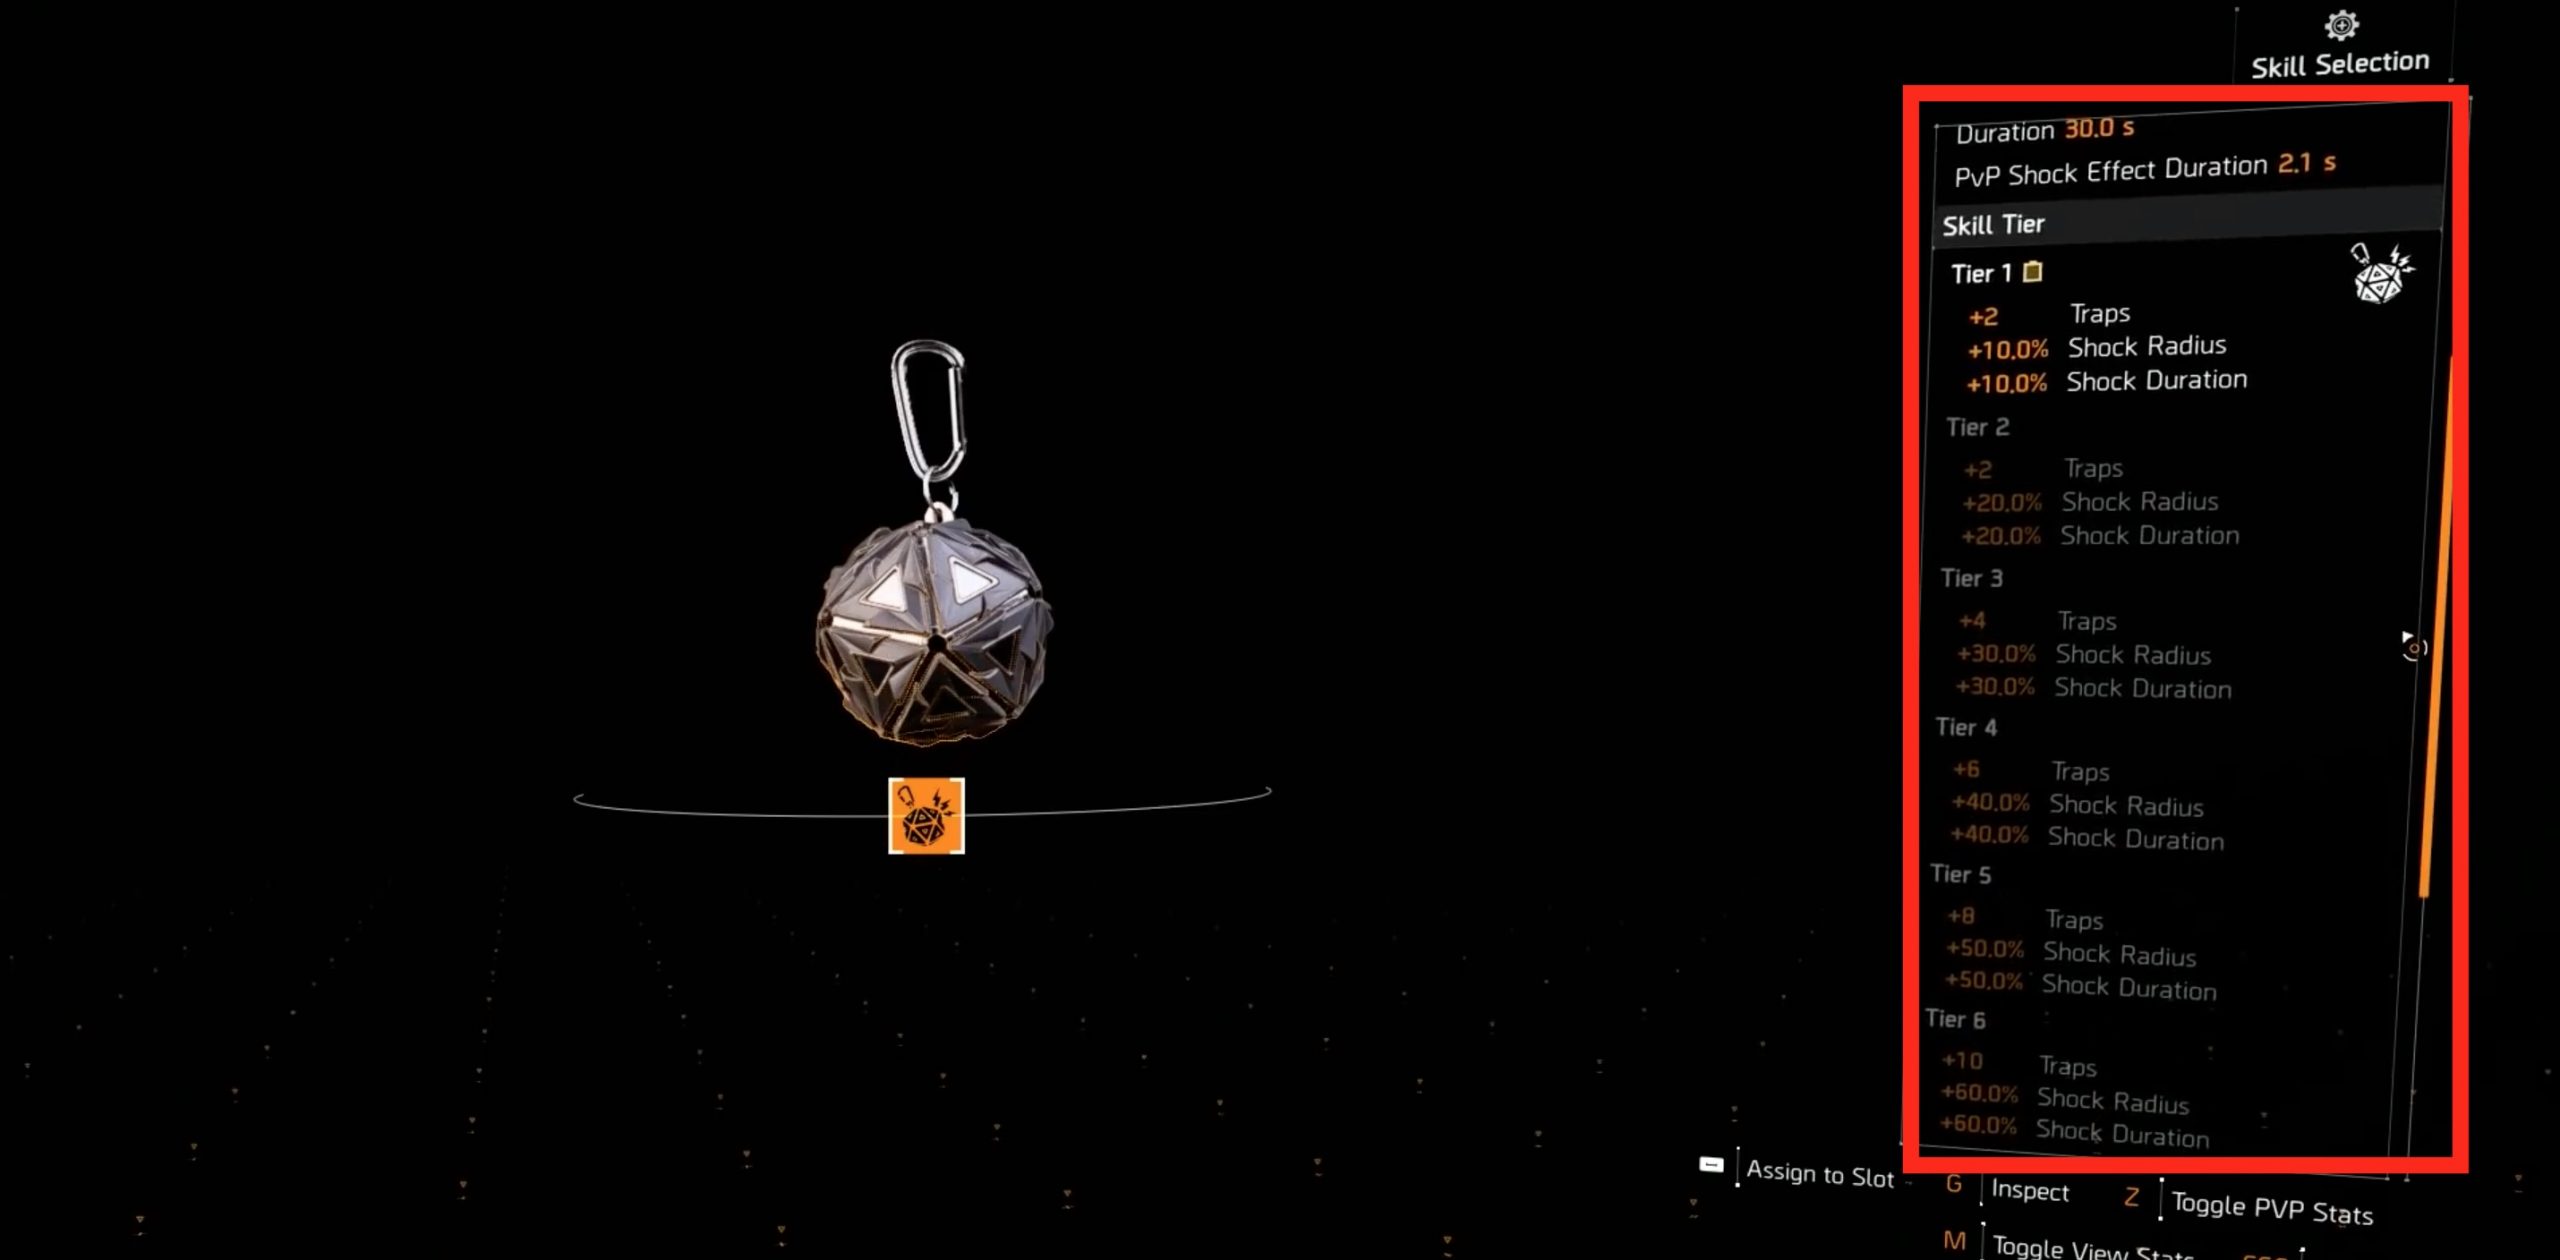
Taking the new shock trap as an example, the tiers have the following effects:
- Tier 1
- +2 traps
- +10% shock radius
- +10% shock duration
- Tier 3
- +4 traps
- +30% shock radius
- +30% shock duration
- Tier 6
- +10 traps
- +60% shock radius
- +60% shock duration
With the drone swarm, for example, the number of charges, damage, and range are increased. For the sticky bomb, it increases the damage, explosion radius, and skill speed.

Things to pay attention to: You can extract the core attribute +1 skill tier and apply it to other items through the library when recalibrating.
You can also strengthen or support your skills in the following ways:
- Through certain talents on weapons and gear
- Through attributes on gear pieces, such as additional repair skills or skill speed
- Through various bonuses from fire sets, like additional skill duration or more skill damage
- Through skill mods
By the way, in Season 1, a new skill variant of the sticky bomb is set to come into the game: The Division 2 will now rely on seasons like Destiny in the endgame – Here’s how they will work
The Overcharge Effect – This makes skills even more powerful
What is Overcharge? The Overcharge effect is essentially a kind of seventh skill tier. When Overcharge is reached, the bonus effects of your equipped skills are greatly amplified for a short duration.
However, the Overcharge effect is only temporary and cannot be maintained permanently. Even if the skill is used with Overcharge or activated, the massive bonus is only temporary.
For example: If the shock trap is used during Overcharge, it receives, among other things, a larger radius than it would have at skill tier 6. When the Overcharge effect ends, the shock trap does not disappear, but its radius shrinks to the size corresponding to your respective skill tier.
How to achieve Overcharge? The Overcharge status can be triggered when you exceed the skill cap (skill tier 6). This is only possible through certain talents on some gear pieces – for example, through the new exotic backpack Acosta’s Go-Bag. Some talents also offer the possibility to go directly from lower tiers into the Overcharged mode – like with the revamped exotic BTSU Data Gloves from Year 1.
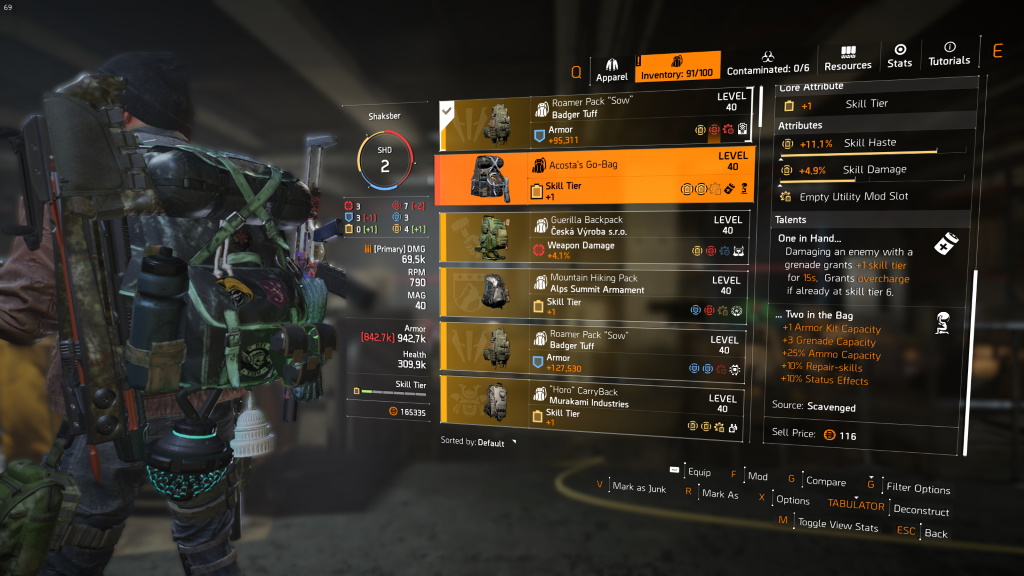
With Acosta’s Go-Bag, you can move from skill tier 6 into Overcharge. The exotic backpack has the perk One in Hand. This means you receive +1 to your skill tier for 15 seconds if you hit an enemy with a grenade. If you are already at skill tier 6 (The backpack itself provides +1 skill tier as a core attribute), the Overcharge effect comes into play.
Overcharge can also be achieved through other gear pieces, including a regular backpack – although it works differently (through the use of repair kits) than with the exotic.
This is what Overcharge does in detail: As mentioned before, the already powerful bonus effects of skill tier 6 are significantly boosted by Overcharge.
Here’s the comparison with the shock trap:
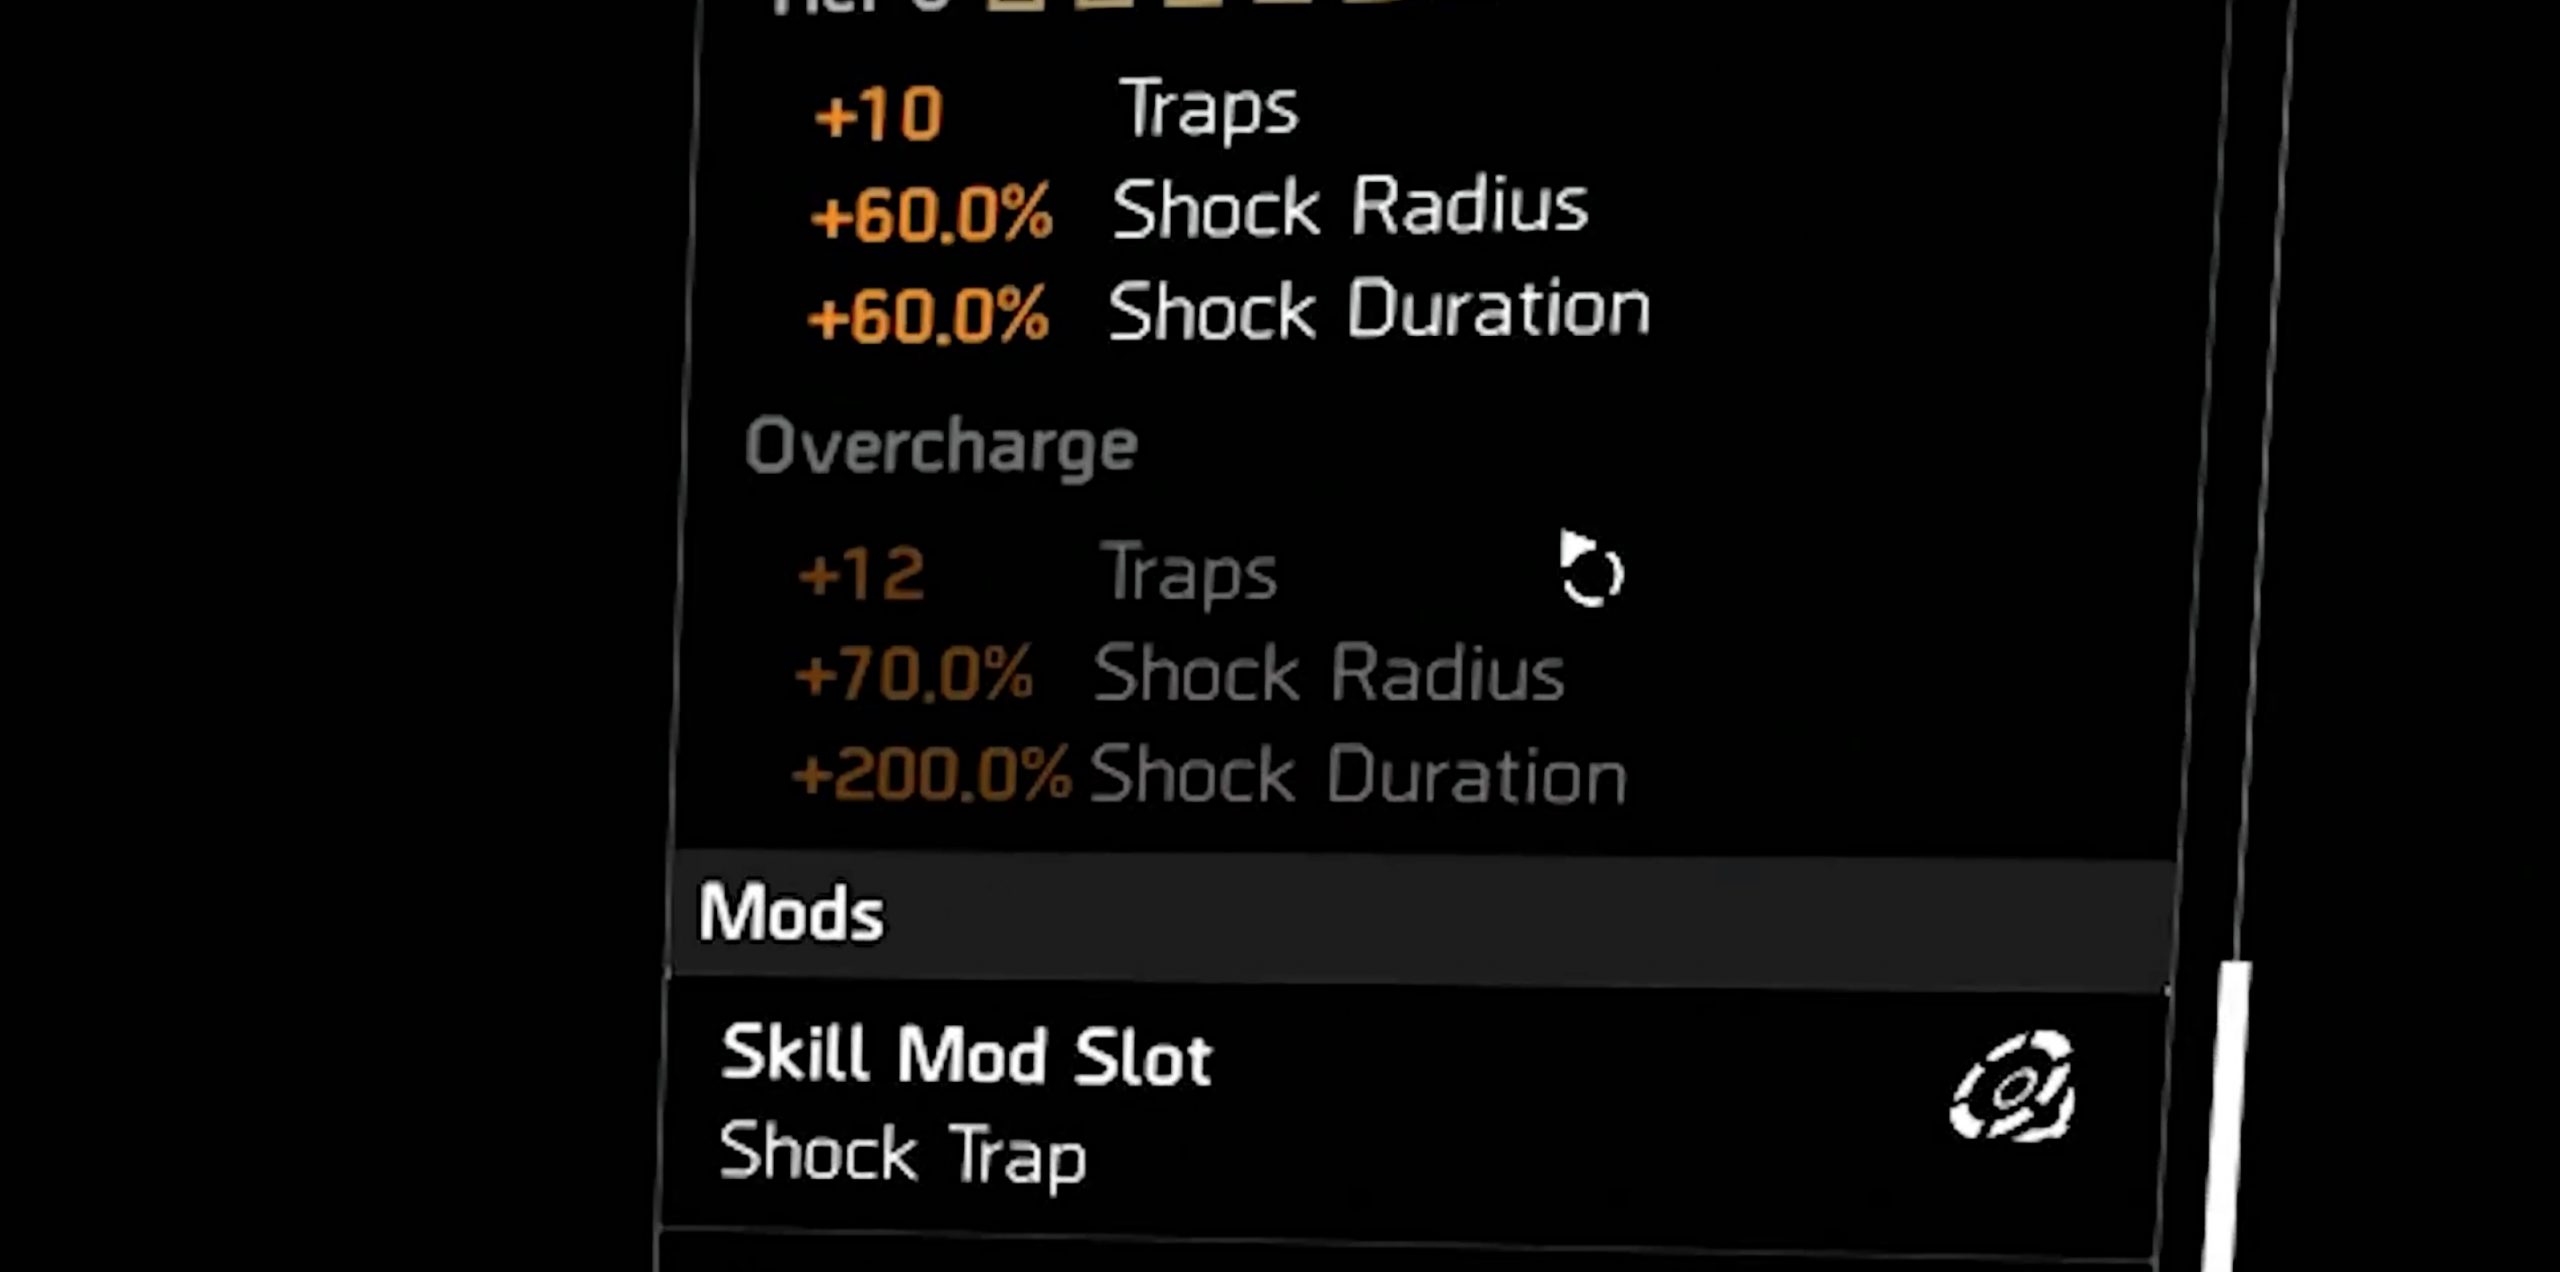
- Tier 6
- +10 traps
- +60% shock radius
- +60% shock duration
- Overcharge
- +12 traps
- +70% shock radius
- +200% shock duration
The Skill Tiers and Overcharge in the video: This is explained again by the well-known YouTuber Arekkz Gaming.

Your opinion is important to us!
Do you like the article? Then let us know!
Comments