

On Ascent, one of the maps of the tactical shooter Valorant, the action can reach its peak shortly after round start. To ensure you are prepared for almost everything, you will find overview maps here, along with attack strategies for both bomb sites and strong positions for defenders.

What kind of map is Ascent? Ascent was introduced as a new map with the release of Valorant, featuring an action-packed middle area, bomb protection gates, and short attack routes on the long lanes. The patch notes mentioned the following for the introduction:
Ascent is a map set in Italy with a large, open center where both teams can engage in battles. The center serves as a playground for the use of various abilities. Controlling this area opens up additional attack routes to both spike sites.
Source: Valorant Patch Notes
To help you visualize the map and develop strategies, you will find overview maps of the map with callouts, important spots, and some starter strategies to assist you in getting started on Ascent.
Ascent Layout with Callouts – Overview Map
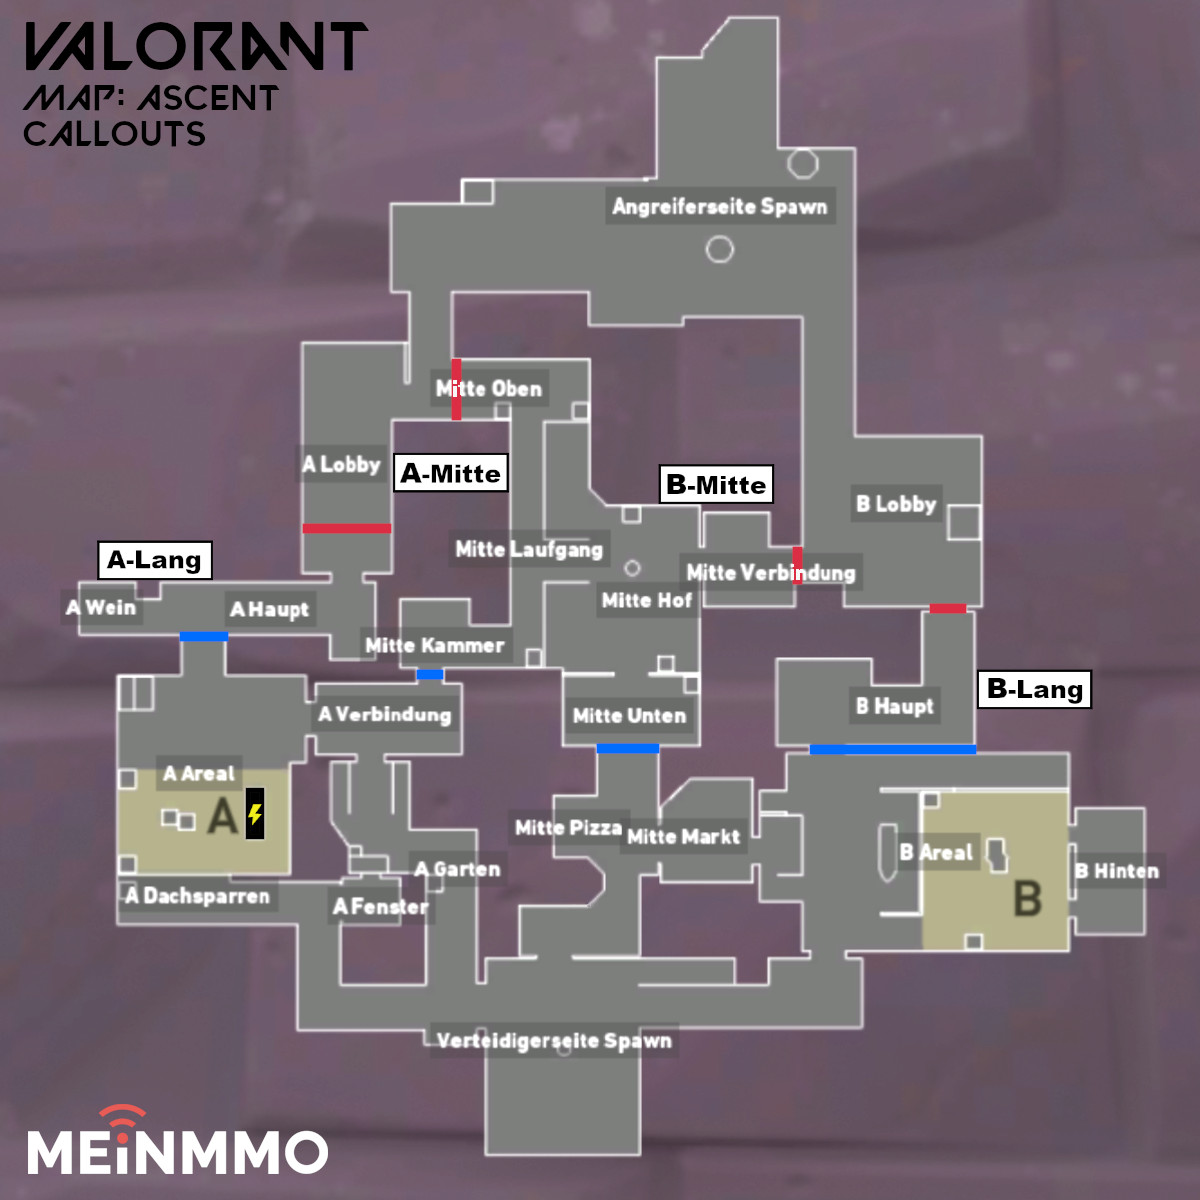
The areas on Ascent can generally be divided into 3 regions, and the names of these regions are accordingly designated. From the defender’s side, you have:
- Left – A
- Center – Mid
- Right – B
Both sides, attackers and defenders, have four routes available to find a good position or initiate attacks. As a little Valorant extra, the map features armored doors near both placement areas that can close with switches, provide cover from view, and withstand a few bullets.
Know the names of the Ascent areas and utilize the features
What special feature does A offer? The spike area is relatively narrow, and there are a few objects you can use for cover. The generator (marked on the map as lightning) is bulletproof. You should definitely take advantage of this, as all thinner walls or wooden objects let bullets through.
“A Connector” serves as the link to the mid and can be separated from “A site” by an armored door. From “A Connector,” you can get a good and secure view of rushing enemies from “A Window” further south.
The ultimate orb is directly in the line of sight of the attackers when they wait in “A Lobby” at the end of the buy phase. For defenders, this orb poses a significant risk.

What special feature does Mid offer? The large mid area offers ample space for action. There are many open areas, ledges to jump on, and penetration plates that prevent early fire on attackers at “Mid Connector” and defenders at “Mid Chamber”.
The area is large and open. Controlling mid gives you the best options for action on Ascent.

What special feature does B offer? The spike area on B also appears somewhat expansive. “B site” is a good deal lower than the surrounding areas, and the objects do not provide good cover. From the left side of the defenders, there is also an armored door that separates “B site” from “Mid Market.” The roof in the middle of “B site” is accessible, but you cannot stand on it.
The barriers between attackers and defenders are very close here. Only the “B Main” area, which is a bit more visible from the defender’s side, separates the two spawn areas. The ultimate orb is also located inside, on a crate – very difficult for defenders to retrieve.
In this corridor, there are also a few windows through which you can already look into the next area. As a defender, pay attention to whether Sage is on the enemy team. Her wall comes at the optimal height to take a long look at “B site” and possibly eliminate a defender.
As attackers, use the windows to your advantage by gaining an overview with Sage, Raze, or even the agile duelist Jett.

Ascent Map with Spots and a Small Tactic Guide
The information on approaches and tips come from several YouTube analyses of the map combined with some of my own initial experiences on the new map. You can find the English videos below in the sources.
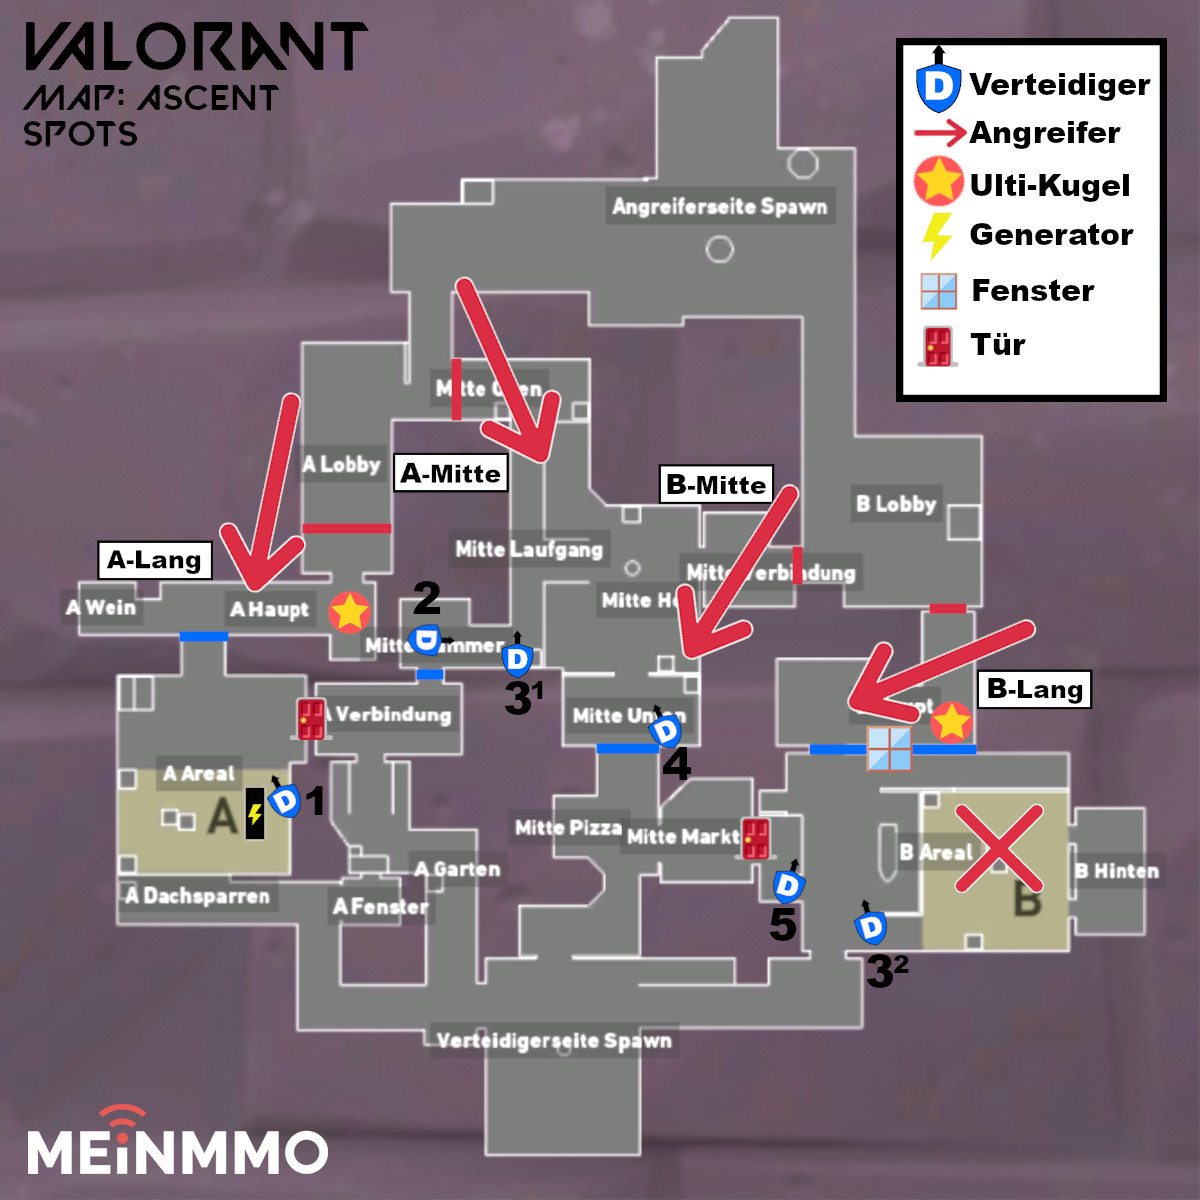
Defender positions for a strong overview at round start:
- D1 – By the generator at “A site” with a view on “A Main”
- D2 – “Mid Chamber” with a view to “Mid Connector”
- D3-1 – Between “Mid Corridor” and “Mid Chamber” with a view on “Mid Top”
- D3-2 – Sharing “B site” with D5, watch the window
- D4 – “Mid Bottom” with a view on “Mid Top”
- D5 – Should not be visible from the “B Main” window. If D3-2 assists, take crossfire positions
A is hard to attack – Mid Control is important
How can I attack A? To effectively attack A on Ascent, you need control of the middle area. If your team only approaches via “A Long,” the defender (D1) on A might get stuck in the corridor at “A Main,” and you will have to take a big risk to get into “A site.”
Split up and send two players through “A Long,” while the other 3 apply pressure to mid. Try to take “Mid Courtyard” or use smoke to quickly move over “Mid Corridor” and “Mid Chamber” to A. Be particularly wary of enemies in the “Mid Chamber” and “A Connector.” Sova is a strong entry agent and can help you with scouting here.
From “A Connector,” you can join the rest of the team to attack the spike site at “A Main” together.
How can I assist in defending A? The opponents have a hard time placing the spike here if they fail to control mid or rush to A quickly from mid. Therefore, only one defender in “A site” is sufficient to apply pressure from the narrow corridor at “A Main” and make encroaching enemies understand that they cannot proceed.
If you notice that the attack is heading towards A, you can isolate yourself quite effectively here. If you have to give up mid, one of the defenders (D2) can position themselves at “A Window.” Together with the defender in “A site,” you still have a full overview of which enemies are heading towards A.

B needs Sage during the attack – Sneaky window view
How can I attack B? For B, you don’t necessarily need mid control to initiate a strong advance. With agents who can elevate themselves or their teammates, you can take a look through the windows in the “B Main” area and gain insight. Sage with her wall can even elevate several teammates to window height.
Another player can peek while moving towards “B site” to spot opponents who are trying to hide from view through the window. This gives you a strong advantage in the attack, as you can either eliminate a defender or know which zones in “B site” might be safe.
Agents attempting to reach the spike site via “B Mid” must watch for enemies in the “Mid Chamber” directly opposite. The thin walls in the passage between “Mid Connector” and “Mid Courtyard” are protected from direct penetration by armored plates, which protects both teams from pre-fire on positions at the start of the round.
How can I assist in defending B? Be aware of the windows, and if the opponents have a Sage on their team, place 2 defenders at B (D3-2 instead of D3-1). If the attack does not occur at B, D3-2 can assist in mid.
Avoid the cramped, lower placement area. The objects here are rather poorly positioned for defense. Additionally, the zone is a good deal lower than the surrounding area. Also, “B Back” is not recommended. You have a poor overview here and no chance of escape once the enemies have invaded “B site.”
On Ascent, Mid Control is Key
The map has only been available since the release on June 2. However, it seems quite clear that the team with control of the mid area has a significant advantage.
- Defenders have optimal visibility to anticipate and disrupt the enemy’s tactics.
- Attackers have many options to initiate their attack from mid.
The tactics outlined here demonstrate fairly direct attacking options. However, as a team, you should quickly develop strategies to take mid from the defenders. The defenders, in turn, should use mid to stop the enemy and maintain an overview.
For getting to know the map, the new mode “Spike Rush” is very suitable. Here, you get a random weapon, but the pace is higher, and you learn a few new ways to conquer or defend mid.
And if you control mid, you hold the key to victory on Ascent.

Your opinion is important to us!
Do you like the article? Then let us know!