What does the trailer show? The trailer presents 17 minutes of fresh gameplay and guides you through the first steps of Soulframe. At the beginning, you can, for example, take a look at character creation, which is somewhat different from what many games offer.
It appears that you are the likeness of your mother and decide in the initial character creation how she looks in your memory. However, the developers promise that this is only the first option to customize your character, with more to follow throughout the game.
The trailer also showcases some of the combat gameplay and exploration of the open world. It shows that you are not limited to ranged or melee combat. You can see how the character throws his shield from a distance or attacks with his bow but can also use weapons for close combat.
All in all, the trailer provides a good insight into the upcoming fantasy MMO and a nice mix of different aspects of Soulframe.
When does the demo start? A demo is also set to launch this year, where you can test Soulframe for the first time. An exact date is not yet known. However, you should be able to expect the open demo in autumn 2024. Recently, the developers reported that the name Soulframe is causing them some trouble. Because it brings unwanted comparisons with another game series.
This is an AI-powered translation. Some inaccuracies might exist.
The Pre-Patch 11.0 for World of Warcraft: The War Within is being released. MeinMMO reveals how you can download the update right now.
The era of Dragonflight is almost over in World of Warcraft. On Wednesday, the major Pre-Patch 11.0 will be released, bringing with it the key dates for the expansion “The War Within”. As usual, such a large patch comes with a fairly hefty download. So that you don’t have to start it on Wednesday, you can download most of the data in advance.
Start video
WoW: Trailer for the release date of The War Within
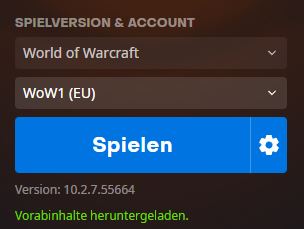
How to download Patch 11.0? To be able to download the large update in advance, you first need to enable this option in the Battle.net launcher, as it may still be disabled by default for many. You can find the option as follows:
Open the Battle.net launcher.
Select World of Warcraft and click on the gear icon next to the “Play” button, then select “Game Settings”.
In the new menu, select the “Downloads” section on the left and scroll down to “Game Updates”.
Under “Automatic Updates”, check the box for “Game-Specific Settings”.
For “World of Warcraft”, select “Latest & Future Updates”.
Confirm by clicking on “Done”.
Additionally, you can check the box for “Pause updates when a game is launched” a bit further up – in that case, patches will only be downloaded when you are not currently playing a game. This helps prevent issues such as high latency in the game due to the large download.
If it looks like this, everything is fine.
You can also check whether everything has been downloaded in the Battle.net launcher. If the pre-download is complete, a notice saying “Pre-download completed” will appear in green text under the blue “Play” button. In that case, you’ll be ready for the patch release on July 24!
Our colleagues at GameStar have created a special issue about the new WoW expansion:
Do you need to download anything on Wednesday? Yes. Even though most game data can be downloaded in advance, a small portion will only appear with the release of the patch. These are the final data necessary for installation, or they might even contain small changes from the PTR. However, this download should be significantly smaller and, in most cases, completed in just a few minutes – if not seconds.
We have explained everything included in the new patch and generally in the expansion The War Within in our comprehensive overview of The War Within. There, you can also find all information related to the story, the new areas, the hero talents, and the Warband feature.
This is an AI-powered translation. Some inaccuracies might exist.
Amazon will reintroduce the office requirement gradually. However, with “Coffee Badging,” they circumvent the obligation. Now, Amazon is taking action against this trick because they do not want to endorse it.
What are some employees doing? According to colleagues from Businessinsider, some employees are resorting to what’s called “Coffee Badging”: employees come to the office, check in, have a coffee, and then leave the office again. This way, they fulfill the presence requirement in the office.
Amazon required its employees to appear in the office three times a week, but there was no minimum hours obligation for each visit. This allowed for a rather elegant solution to the attendance requirement.
Amazon measures working hours and sets minimum for attendance requirement
What is Amazon doing now? Amazon has now started to individually measure the working hours for each person in the office and has established minimum times:
Some employees were informed that a minimum of two hours per visit is required to count as attendance in the office.
Some teams were instructed to stay for at least six hours per visit.
In an email to Businessinsider, Margaret Callahan, a spokesperson for Amazon, stated that the company has begun to speak directly with employees who have not spent enough time in the office.
Reactions to the new regulations have also been lukewarm. Some have already stated that there are surely employees who will soon find out how to circumvent this obligation. And this is not the first time Amazon has struggled with its employees.
Amazon has been struggling for months to bring people back to the office
What’s behind this: Amazon has been trying for months to bring its employees back to the office. However, Amazon has faced strong resistance from employees:
About 30,000 people signed an internal petition opposing this policy. But Amazon was undeterred and even took it a step further:
They blocked the promotion of employees who did not adhere to the work regulations.
Amazon’s CEO Andy Jassy warned employees who do not comply with the guidelines that they would have to leave the company.
Right now, the “Pull Mecces Off” campaign is running at the fast-food chain McDonald’s. Along with this promotion, the company has two syrups on offer that you can pour into your cola: popcorn and passion fruit. MeinMMO editor Benedict Grothaus is into such crazy ideas and has unfortunately tried them.
Normally, food and drinks can’t be crazy enough for me. The more unusual a dish, the more I want to try it – at least if it sounds somewhat appealing. As a (nearly) trained chef, I have a pretty good idea of what can taste good and what can’t.
That’s why I was quite excited when our editor-in-chief Schuhmann shared his outrage with us: “McDonald’s now has cola with popcorn flavor!” That sounded like something I definitely want to try.
Since July 15, the chain has new additions on offer: popcorn and passion fruit syrup that you can pour into your cola or sprite. According to current information, these syrups are only available in Germany.
Still, in the same week, I was at my local McDonald’s to try the stuff. Rarely have I regretted something so much.
One person who would probably celebrate the popcorn-cola is Asmongold:
Start video
Twitch streamer and multimillionaire wants to clean his dirty house because visitors get sick and it ‘debuffs’ him
Tastes just like popcorn – But like the burnt kernels at the bottom of the bucket
I really wanted to like this cola. Not just to prove Schuhmann wrong, but also because I have experience with exactly such syrup. And from that experience, I know: it fits well with cola.
McDonald’s, however, or at least the branch here, hasn’t quite figured it out. For comparison, I ordered regular Coca Cola with the syrup. My conclusion:
The syrup tastes like popcorn, but burnt – like caramel that has been browned for too long.
Accordingly, the cola gets a distinctly bitter note that lingers on the tongue longer because of the syrup.
According to nutritional information, the syrup consists of 80% sugar (via McDonald’s), so the cola becomes quite sweet.
Here you can find the official nutritional values per 100 grams
Energy (kJ/kcal): 1352/323 per 100g (or 175/42 per serving)
The further I got down in the drink cup, the worse the whole thing became. The syrup settled at the bottom and wasn’t properly mixed.
The popcorn syrup has pleasant butter notes, as I would expect. Additionally, the bitter aftertaste makes the cola taste a bit like coffee – which really fits. Just the overall picture is simply not rounded.
I know from experience that popcorn syrup as an ingredient can work excellently. In a bar, I once had a drink with a good Jameson whiskey and popcorn syrup. One of the best drinks I have ever had and that I always order when I’m there.
Bill Gates is a co-founder of Microsoft and thinks that neither renewable energy nor nuclear fusion is the future of power supply. He is investing in a completely different project that relies on a metal you might know from chemistry class.
What kind of metal is that? Bill Gates has been investing in a specific project for many years. It involves a nuclear reactor that uses sodium.
Sodium is a so-called alkali metal and is mostly used in combination with other substances. Most commonly, you find it as part of the table salt sodium chloride or in detergents.
What does the project look like? In conventional nuclear power plants, water is used to cool the reactor. However, Gates believes that sodium is the better coolant. An initial facility currently being built in the U.S. state of Wyoming is scheduled to be operational by 2030.
It is expected to provide around 400,000 households with power at a capacity of 345 megawatts. The company behind the project, TerraPower, wants to increase the capacity to 500 MW, which can be produced in five and a half hours.
Start video
Why is the first drive in Windows always C?
Sodium offers several advantages in energy generation
What are the advantages of sodium? Sodium has several advantages compared to water:
It can absorb up to eight times more heat, allowing for higher energy production
It is the sixth most abundant element in the Earth’s crust at 2.6%, making it plentiful (via Statista)
Sodium protects better against radioactive leaks, thereby reducing the risk of accidents
Surplus power can be stored for several hours, compensating for fluctuations like those from renewable energies that rely on wind and sun
The costs are also an important factor that makes this energy source so attractive. A conventional nuclear reactor is expected to cost around 25 billion US dollars in the U.S. A sodium reactor, on the other hand, comes in at “only” 1 billion US dollars.
What does Gates say about it? Bill Gates believes that sodium is the “most advanced nuclear energy in the world.” It solves all cost and safety issues. He hopes that public perception of nuclear energy would change.
Major accidents like Chernobyl and Fukushima have visibly altered the perception of nuclear energy in the world. The public may fear that similar incidents could occur with sodium-cooled reactors.
The age of The War Within begins in World of Warcraft. We will tell you how the process works and when all events and innovations will be released.
Much sooner than many thought, World of Warcraft: Dragonflight will come to an end this week. Even though the release of the next expansion “The War Within” is still a few weeks away, the big pre-patch 11.0 will already usher in the start of many innovations.
But what is coming when? When will the Warbands features arrive? When does the big pre-event start and when does the new expansion begin?
We have all the dates for you at a glance, so you know exactly when it all starts.
Start video
WoW: Trailer for the release date of The War Within
Pre-Patch 11.0 goes live
When? July 24. What happens? The big pre-patch goes live. You can download large parts of the patch in advance if you enable that in the settings of the Battle.net launcher.
Once the patch is live, the following major changes will take place:
The Warbands system goes live. Most progress is now account-wide, including the glory levels from Dragonflight.
You can learn all transmog templates, even if they are not for your armor class.
Many mounts can now switch between “sky riding” and “regular flying”. More than 400 mounts can now be used for sky riding.
Guilds are now cross-realm.
All classes will receive the talent revisions from the new expansion.
Leveling is faster as the required XP from level 1 to 70 is reduced by over 45%.
Pre-Event “Radiant Echoes”
When? July 31 to August 27. What happens? In Dalaran, a new quest line begins that introduces you to the event. At regular intervals, various echoes of past battles appear on Azeroth that need to be contained. There are various rewards, including pets, mounts, and equipment. Additionally, twinks should level very quickly during the event.
Typically, these rewards are exclusive and cannot be obtained later.
Early access to The War Within
When? August 23 – August 27. What happens? Those who pre-ordered the Epic Edition of The War Within can start playing the new expansion already now. In that case, you can already experience the story campaign, level your character to level 80, and try out new features such as the “Depths” and the hero talents. You can also level professions early. Additionally, you can explore the 8 new dungeons or create a new character as an “Earthen” – a dwarf race that joins both factions.
The start of early access is set for midnight.
Recommended editorial content
At this point you will find external content from Twitter that complements the article.
I consent to external content being displayed to me. Personal data can be transmitted to third party platforms.
Read more about our privacy policy.
When? August 27. What happens? The expansion The War Within officially starts. Everyone who purchased the new addon can now venture into the new areas and play all content.
When? September 11. What happens? After a 2-week “introductory phase” where all players are given the opportunity to complete the story at their own pace, the first season begins. This also starts the usual seasonal content:
The raid “Palace of the Nerub’ar” is unlocked. The mythic variant of the raid follows on September 18.
The mythic and keystone dungeons (“Mythic+”) are unlocked.
The PvP season starts and you can earn rating. For the first time, there is also a solo queue with rating.
The Depths will receive seasonal rewards and adjustments.
You can earn class sets (tier sets) to make your character even stronger.
What happens next? Even though there have already been some potential leaks about how The War Within will proceed, Blizzard has not yet made any concrete statements. However, it should be noted that the release of the new expansion coincides with the date of Gamescom, where Blizzard will be present. It is likely that there will be discussions about upcoming patches and new content.
Are you looking forward to the release of The War Within? Will you play during early access? Or are you waiting for the regular release before you delve deep into the core of Azeroth?
This is an AI-powered translation. Some inaccuracies might exist.
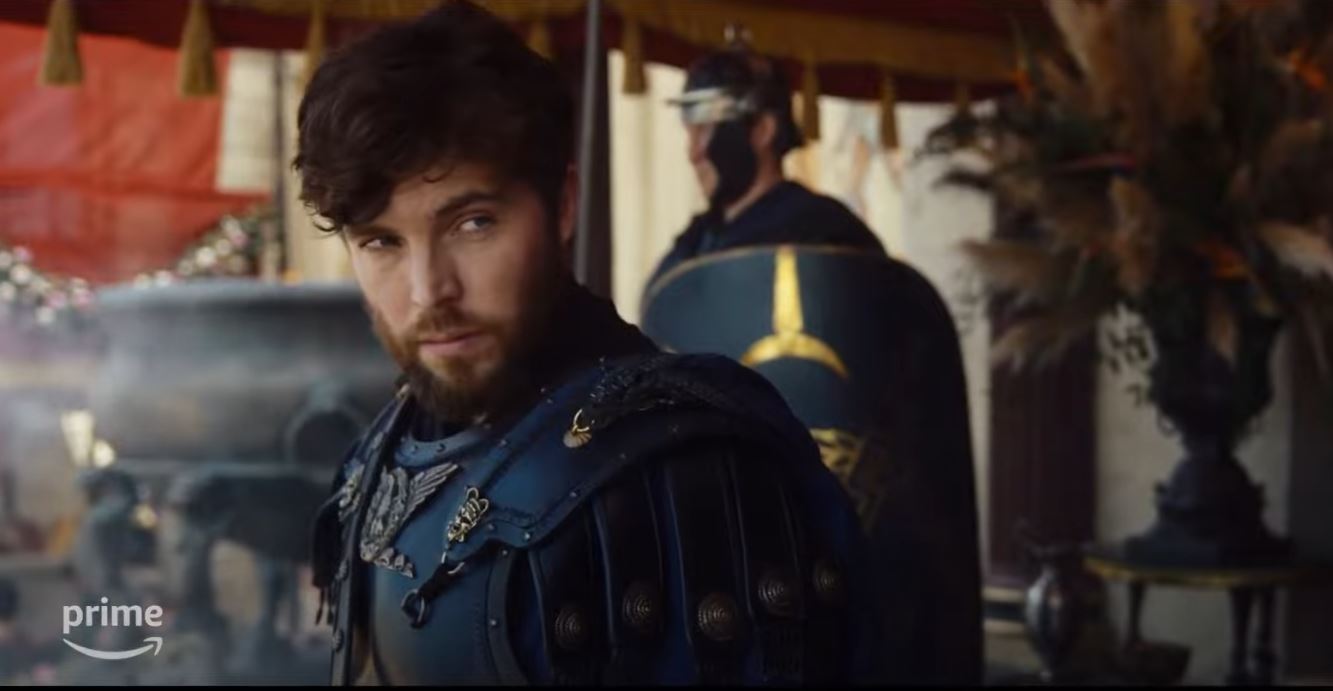
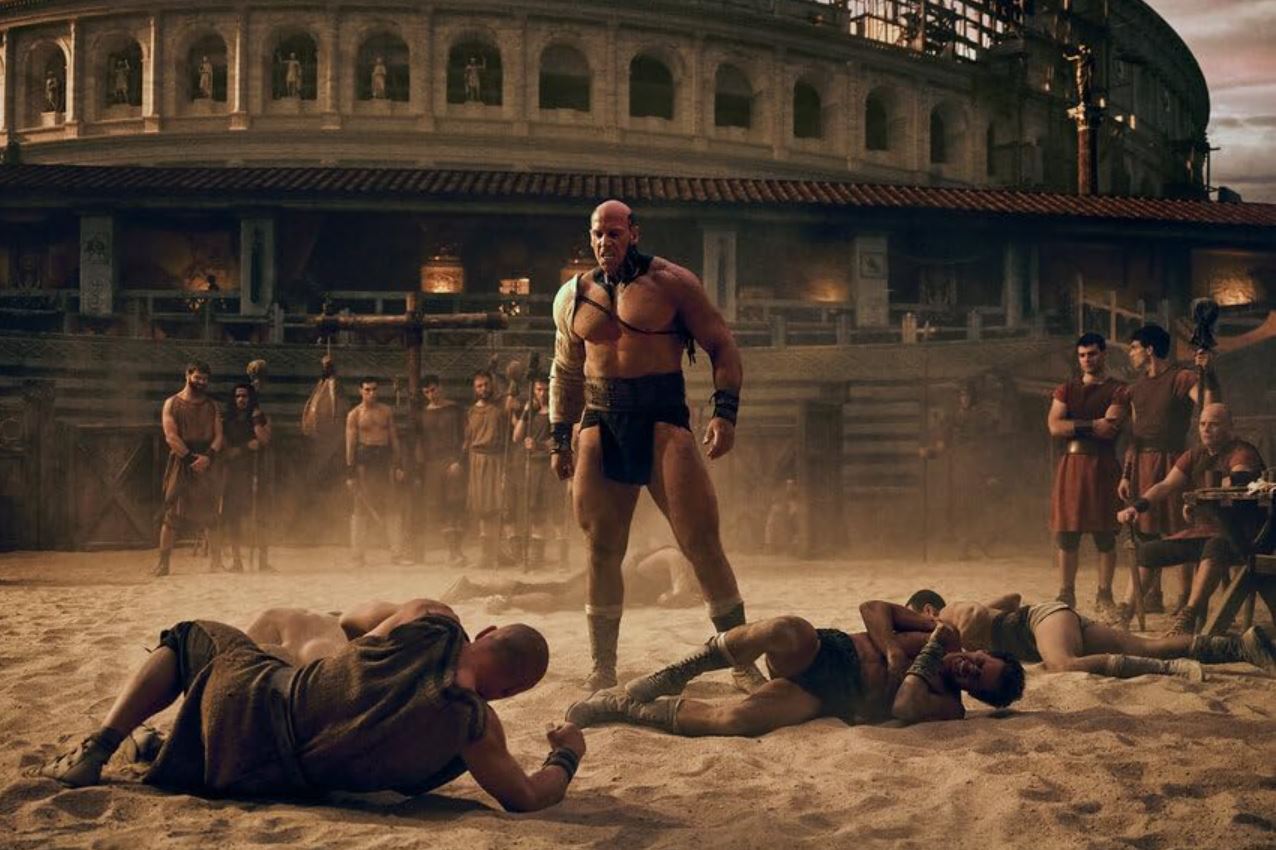
The 10 episodes of the new series “Those about to die” by Roland Emmerich have been released on Amazon Prime. MeinMMO series expert Schuhmann has ventured into ancient Rome and says: The parallels to Game of Thrones are clear: Many murders, intrigues, sex, and violence. The scenario most closely resembles Gladiator.
This is the situation in “Those about to die”: The series takes place 120 years after the assassination of Julius Caesar. From the civil wars, Emperor Vespasian has emerged as the ruler, a descendant of mule breeders. He has reached the end of his life and must decide which son should succeed him:
Titus is a noble Roman and warrior who has subjugated the Jews but has taken their queen as his mistress back to Rome, which is not appreciated there.
Domitian is a weaselly politician who delights in young boys, places high bets on chariot races, and always seems to be brewing an intrigue.
The situation in Rome is tense: The people are starving, and the grain from Egypt simply isn’t arriving. The restless populace must be appeased with chariot races and gladiatorial fights. And then there’s that volcano near Pompeii.
Start video
Those about to Die – Trailer for the Gladiator series directed by Roland Emmerich
The psycho from Game of Thrones is the main character of the new series on Amazon
Tenax runs a betting house and mainly operates in the Circus Maximus and its catacombs. He has already made his fortune, and now he wants to rise in society: Tenax wants to open his own racing stable, which is usually reserved for the old nobility. To rise, he will go over corpses. For in Rome, you either ascend or die trying, as he knows.
To help him rise, he has the drunken racer Scorpus, who speaks of himself only in the third person. Scorpus likes to celebrate racing victories with wine and women.
How do we get to know Rome? Just as we explore the world of Westeros through the eyes of the Stark children in Game of Thrones, we see Rome through the eyes of two families of newcomers:
One family comes from present-day Tunisia: Cala (Sara Martin from Death in Paradise) comes to Rome to ransom her 3 abducted children. Her son Kwame will fight in the arena.
3 young men come from present-day Spain to Rome and want to sell their magnificent horses there. They will enter the business of chariot racing.
A third family whose fate we follow belongs to the old nobility of Rome: Consul Marsus and his wife Antonia own the dominant racing stable, “the Blues,” and strive for political power. It cannot be that the descendant of a mule breeder sits on the throne.
The oldest son of the emperor, Titus, is considered the model Roman.
As bloody as Game of Thrones, but not as clever
So much Game of Thrones is in “Those about to die”: A lot of violence and sex, definitely. There are already severed limbs, or it is enjoyed by four together. However, sex often takes a back seat – the series is rated 16, as it is often only suggested, but not lingered on with the camera.
Additionally, the new series on Amazon offers political power games and indulges in the trend of main characters unexpectedly dying. While there are no major battles, there are bloody duels in the arena.
With Iwan Rheon, viewers know the main actor from Game of Thrones. The “biggest name” in the cast, Anthony Hopkins as Emperor Vespasian, does not play a large role in the series – he is similar to Sean Bean in Game of Thrones, primarily a big name for trailers and posters.
“Those about to die” is not as clever and surprising as Game of Thrones. While there are intrigues, they proceed linearly. The motivation of each character is clearly recognizable. The vibrant side characters from George R.R. Martin are sorely missed; the characters are morally gray but largely remain in their defined roles and do not surprise.
From Game of Thrones, the characters have the pragmatic approach. They are also driven by emotions and moods. Even the so-called heroes are capable of acts of cruelty if the mood strikes. A life holds little value in Rome.
The great Scorpus.
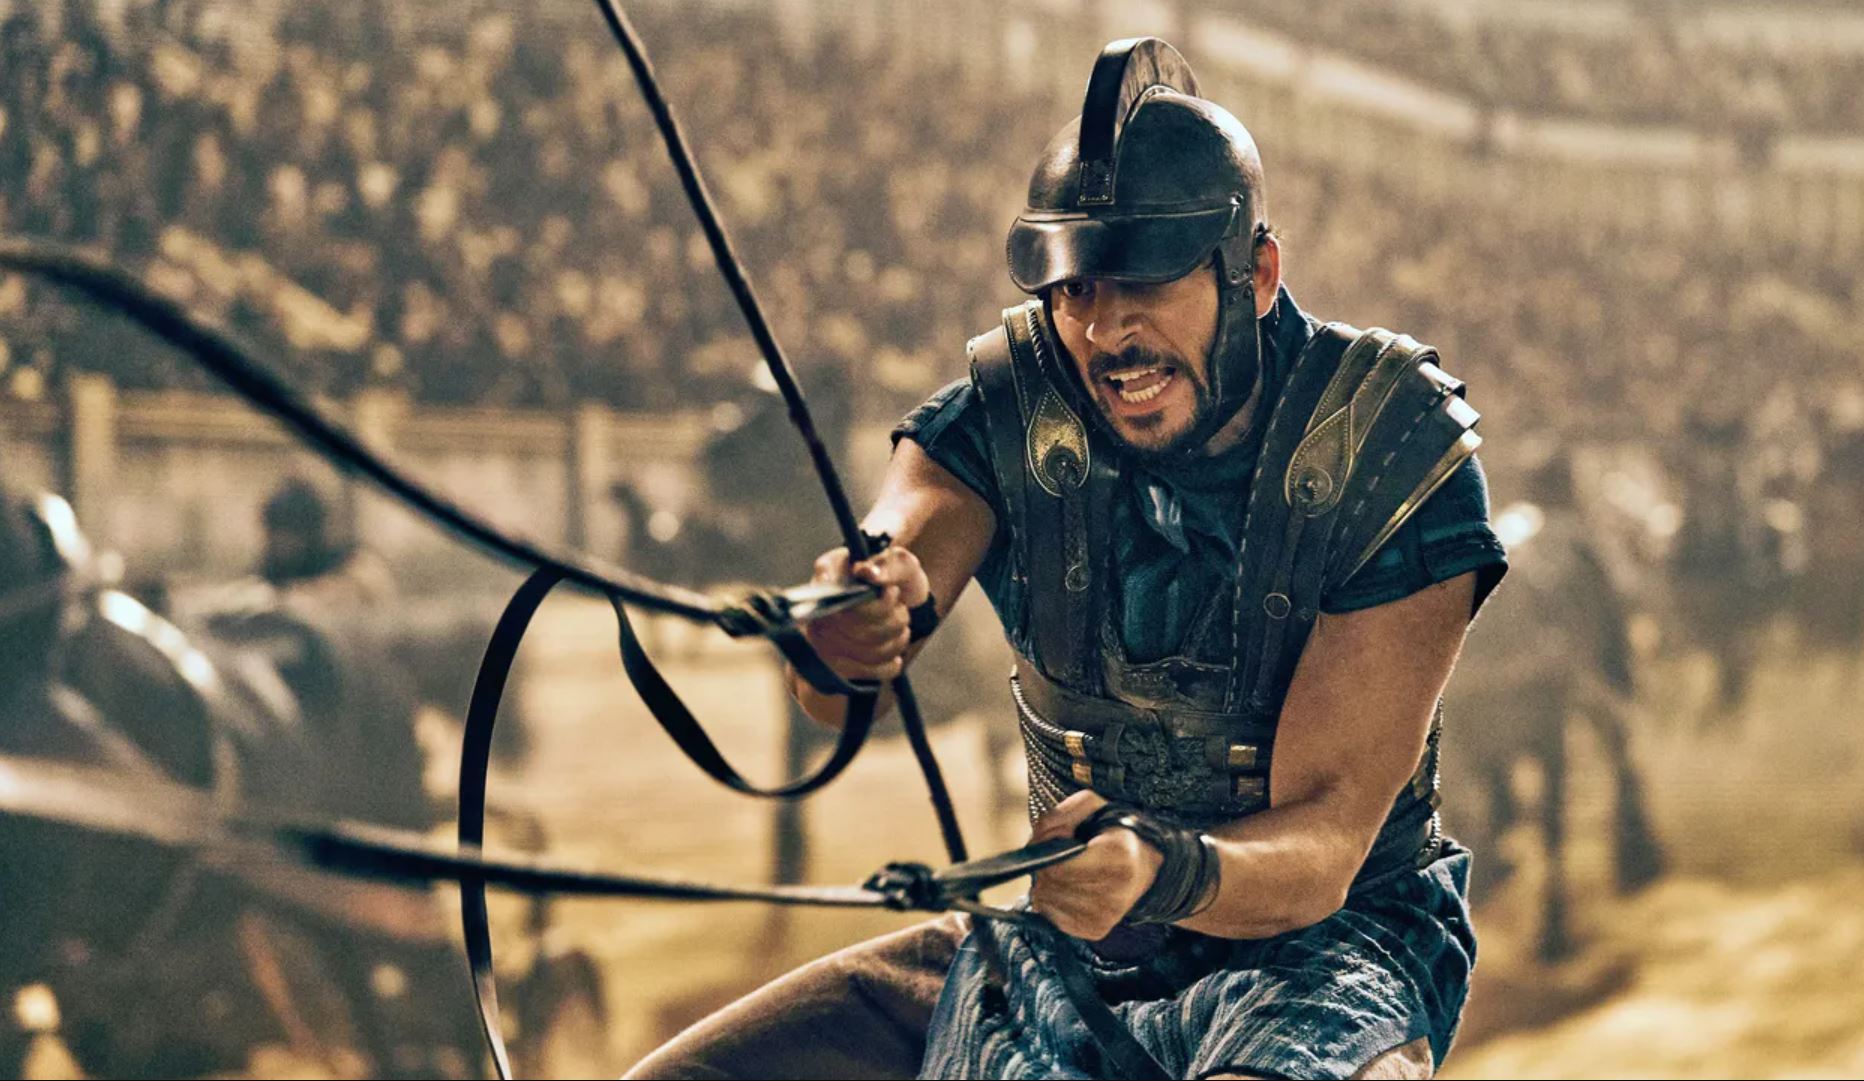
Many chariot races in the arena
So much gladiator is in “Those about to die”: The focus is more on the chariot races than on the gladiatorial fights, roughly in a ratio of two to one. We get to know 5 charioteers but only 3 gladiators, including the enormous “Flamma,” a gigantic warrior who seems to spring directly from “300”.
Towards the end of the series, there are some spectacular scenes in the new Flavian amphitheater, where exotic animals come into play.
This is Flamma. Anyone who fights against him already knows their date of death.
Who is “Those about to die” worth it for? The series is solid, but one should not expect a masterpiece; despite Roland Emmerich and supposedly more than $140 million, the budget probably just wasn’t there. Those looking forward to complex plots or great dialogues will likely be disappointed.
Anyone who had difficulty remembering too many names and following too many plots in Game of Thrones will not have that problem with “Those about to die”. The series operates at a similar narrative level as “Last Kingdom”: a series with multiple plots that ultimately does not delve as deeply into the material as Vikings or Game of Thrones but also asks less of its viewers.
The series is reminiscent of the “SPQR” novels by John Maddox Roberts, which take place 100 years earlier.
A problem with the series is that one never really knows how powerful the individual characters are and how many resources they possess. Can Tenax hire five street fighters or fifty? How well protected is a Roman emperor when he is traveling “with full escort”? How powerful is a consul, and how much power can really be bought with wealth? All questions that remain unanswered.
“Those about to die” offers 10 episodes of good, solid television fare. The close focus on chariot racing and gladiatorial fights makes the series somewhat monotonous over time. But there are always nice highlights and exciting scenes – and ancient Rome provides a fascinating backdrop that has been underrepresented in recent years.
While the series takes some historical liberties to seem even more dramatic than ancient Rome already was.
Where can you watch it? Those about to die is available on Amazon Prime in German. The series is rated 16.
Game of Thrones, with its many characters and plots, was a delight for many fantasy fans, especially in the early episodes. For those who crave more series material in this direction, we have compiled this list: 11 series like Game of Thrones
This is an AI-powered translation. Some inaccuracies might exist.
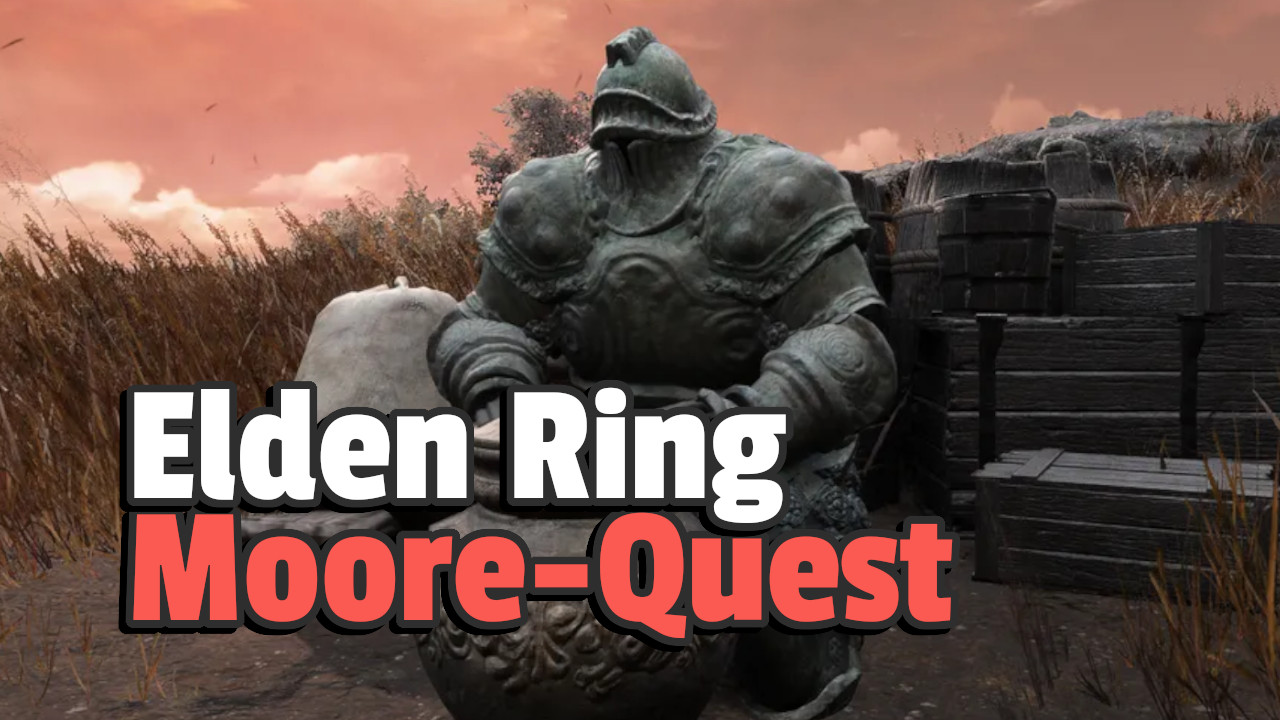
One of the quests in Elden Ring: Shadow of the Erdtree revolves around Moore. We’ll show you where to find him and how to complete his quest step by step.
Update, July 11, 2024: The article has been reviewed and is up to date.
Who is Moore? Moore is a new NPC in Shadow of the Erdtree. He comes with his own quest, just like Ansbach, Thiollier, or Ymir. Moore also acts as a merchant. He is a follower of Miquella. You might encounter him shortly after starting the expansion, provided you move in the correct direction.
We’ll show you where to find the guy and how to solve his quest. With our table of contents, you can jump directly to a point of interest.
[toc]
Start video
Elden Ring: All weapons and spells from the echoes of the DLC bosses
Finding Moore
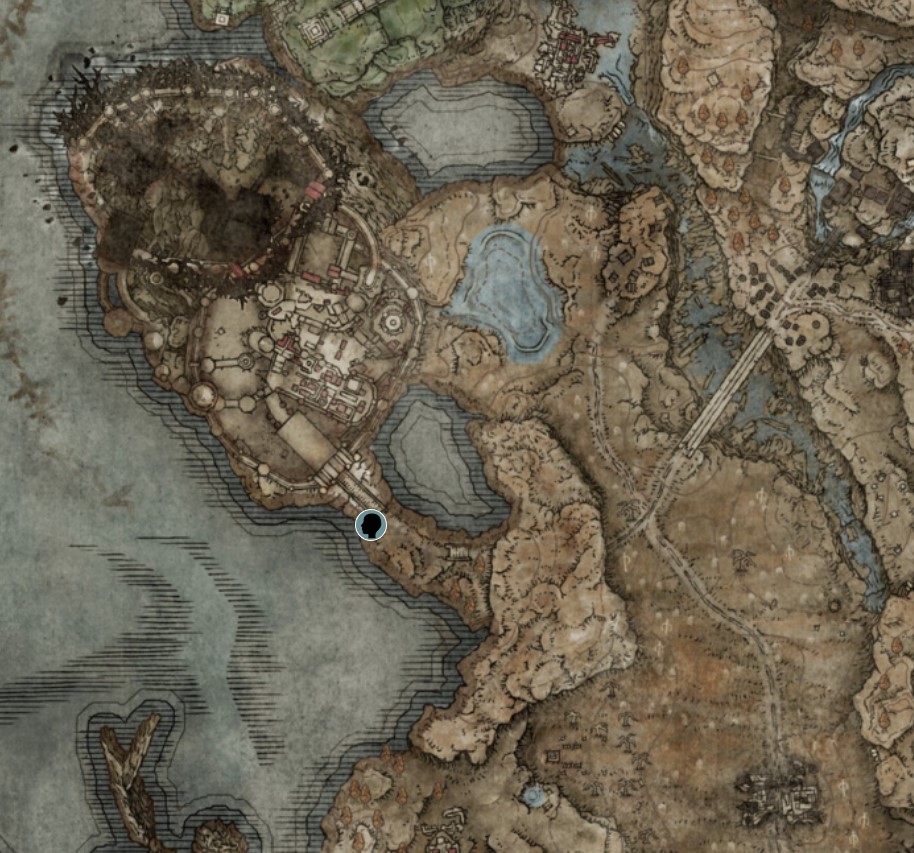
Where do you find the NPC? You first encounter Moore at the grace point “Cross at the Main Gate.” This checkpoint is located right in front of the first legacy dungeon Tower Settlement Belurat. If you are a bit further away, you can recognize the dungeon by the twisted columns in front of the entrances.
You can find Moore at the grace point here.
Moore sits at the grace point in front of the steps and initially acts as a merchant here. You can buy various items from him. Some of these help with resistances, such as the “Fireproof Cooked Liver,” which is useful in the fight against Messmer because it provides more protection against fire attacks.
Also, buy the “Note – Sealed Ghost Sources” because it will give you hints about secret paths in the game world.
Talk to Moore. He will tell you that he enjoys finding things for others. He also mentions the so-called “Collector’s Brood.” These are admittedly somewhat creepy creatures that possess crafting books. You need those to craft items yourself.
Finding the Collector’s Brood
What happens next? Now you need to find the creatures scattered throughout the game world and acquire the crafting books from them. With them, you can craft valuable items like the mentioned livers yourself and no longer have to buy them.
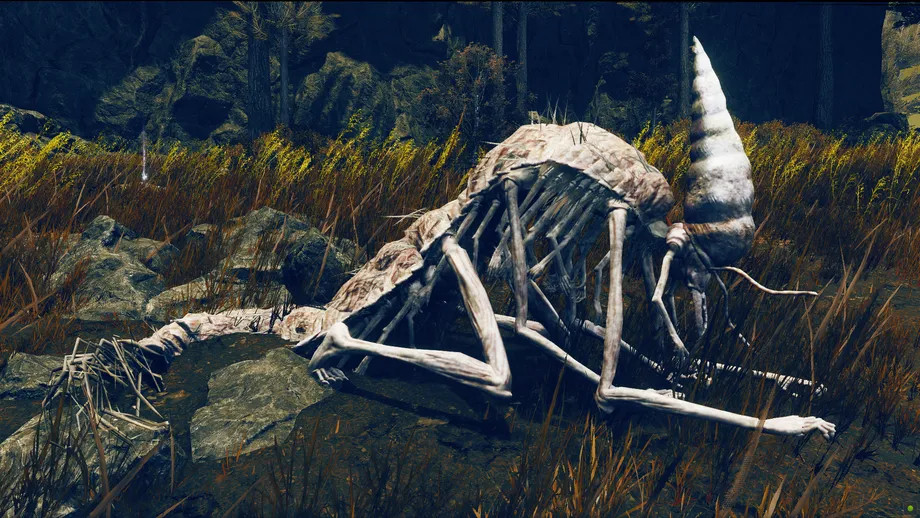
Important: The Collector’s Brood is easily confused with an enemy. So be careful when you see a creature like the one in the picture below. Do not attack them, but approach and speak to the Collector’s Brood.
Once you have spoken to them, you will receive the corresponding manual. However, if you attack the brood, Moore will also become hostile, attack you, and the quest will fail. The same goes if Moore dies for any reason. The strange creatures and their crafting books will then disappear.
The Locations of the Collector’s Brood on the Map
Where you can exactly find the Collector’s Brood in the game world is shown on the map:
You can find the Collector’s Brood at these spots.
As mentioned, in most cases, it is enough to simply talk to the Collector’s Brood. Only one of them, number 4, cannot be interacted with. She is sick and sleeps and must first be healed and awakened with a Warming Stone. Afterward, you will also receive her crafting book (4).
Then return to Moore. As a thank you, he will give you the manual 7 of the Collector’s Brood.
What is the next step? Once the Great Rune has been shattered in the game world, return to Moore. You will recognize this event by a loud noise that preferably occurs in front of the Shadow Keep or in Bonny Village.
Back at Moore, who is still sitting in front of Belurat, speak to him again. He will tell you that Miquella’s light is now gone. He also asks if he must now be sad forever.
You now have three different answers to choose from:
Let it go: If you choose this answer, he will side with you in the boss fight against Leda. You will have to fight him, but as a reward, you will get his gear.
Be sad forever: The NPC takes your advice to heart and disappears at this point. If you want his gear, you can find Moore’s corpse at the Crusade Church, where you previously healed a Collector’s Brood.
I don’t know: If you choose this answer, Moore will remain sitting in this spot. You won’t receive his gear this way. Speak to him once more to give him a definite answer.
Warning: All this must happen before burning the Scadubaum. Otherwise, the quest may automatically fail. Complete all NPC quests before this point in the game.
Receiving the Reward
Depending on which answer you chose, Moore’s quest ends in a fight or with the sad death of the NPC. In both cases, you will receive Moore’s Sound Pearl, the Verdigris Armor Set, and the Verdigris Greatshield as a reward.
That concludes the quest. Have you already found and completed other NPC quests in Shadow of the Erdtree? As is typical for FromSoftware, it’s not always straightforward. If you’re looking for more guides to Elden Ring, you can find a range of guides on MeinMMO.
This is an AI-powered translation. Some inaccuracies might exist.
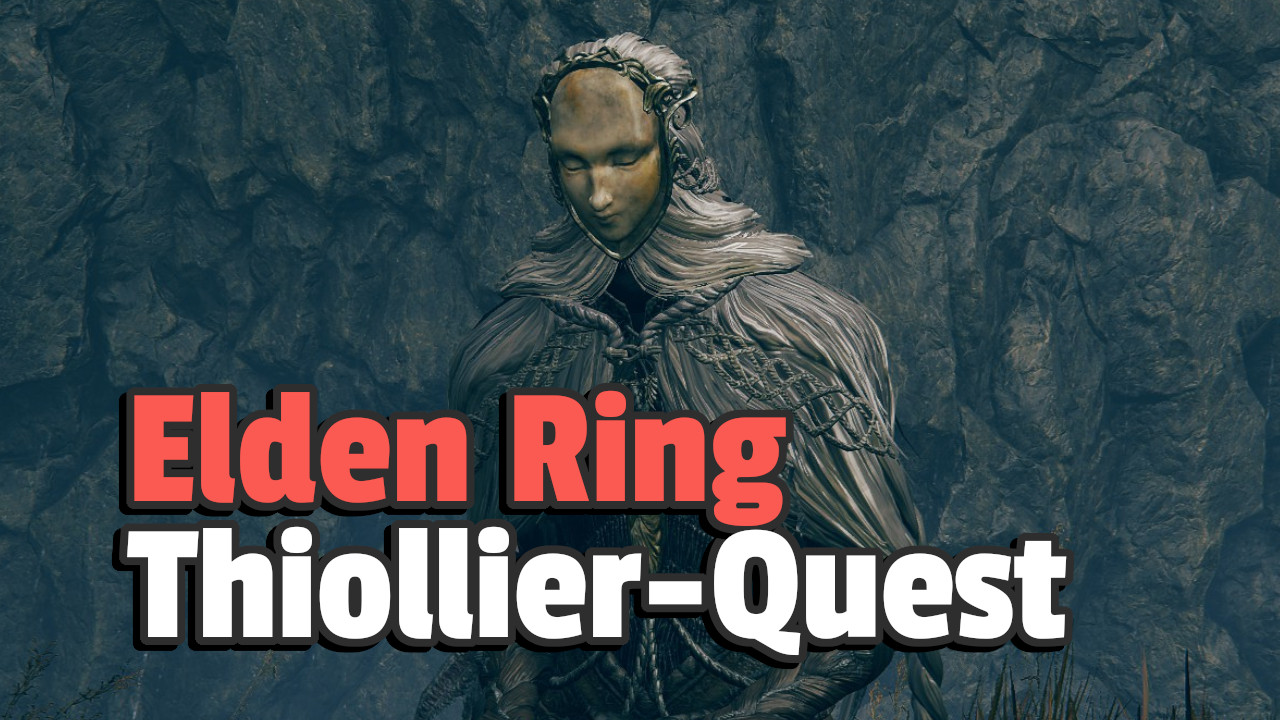
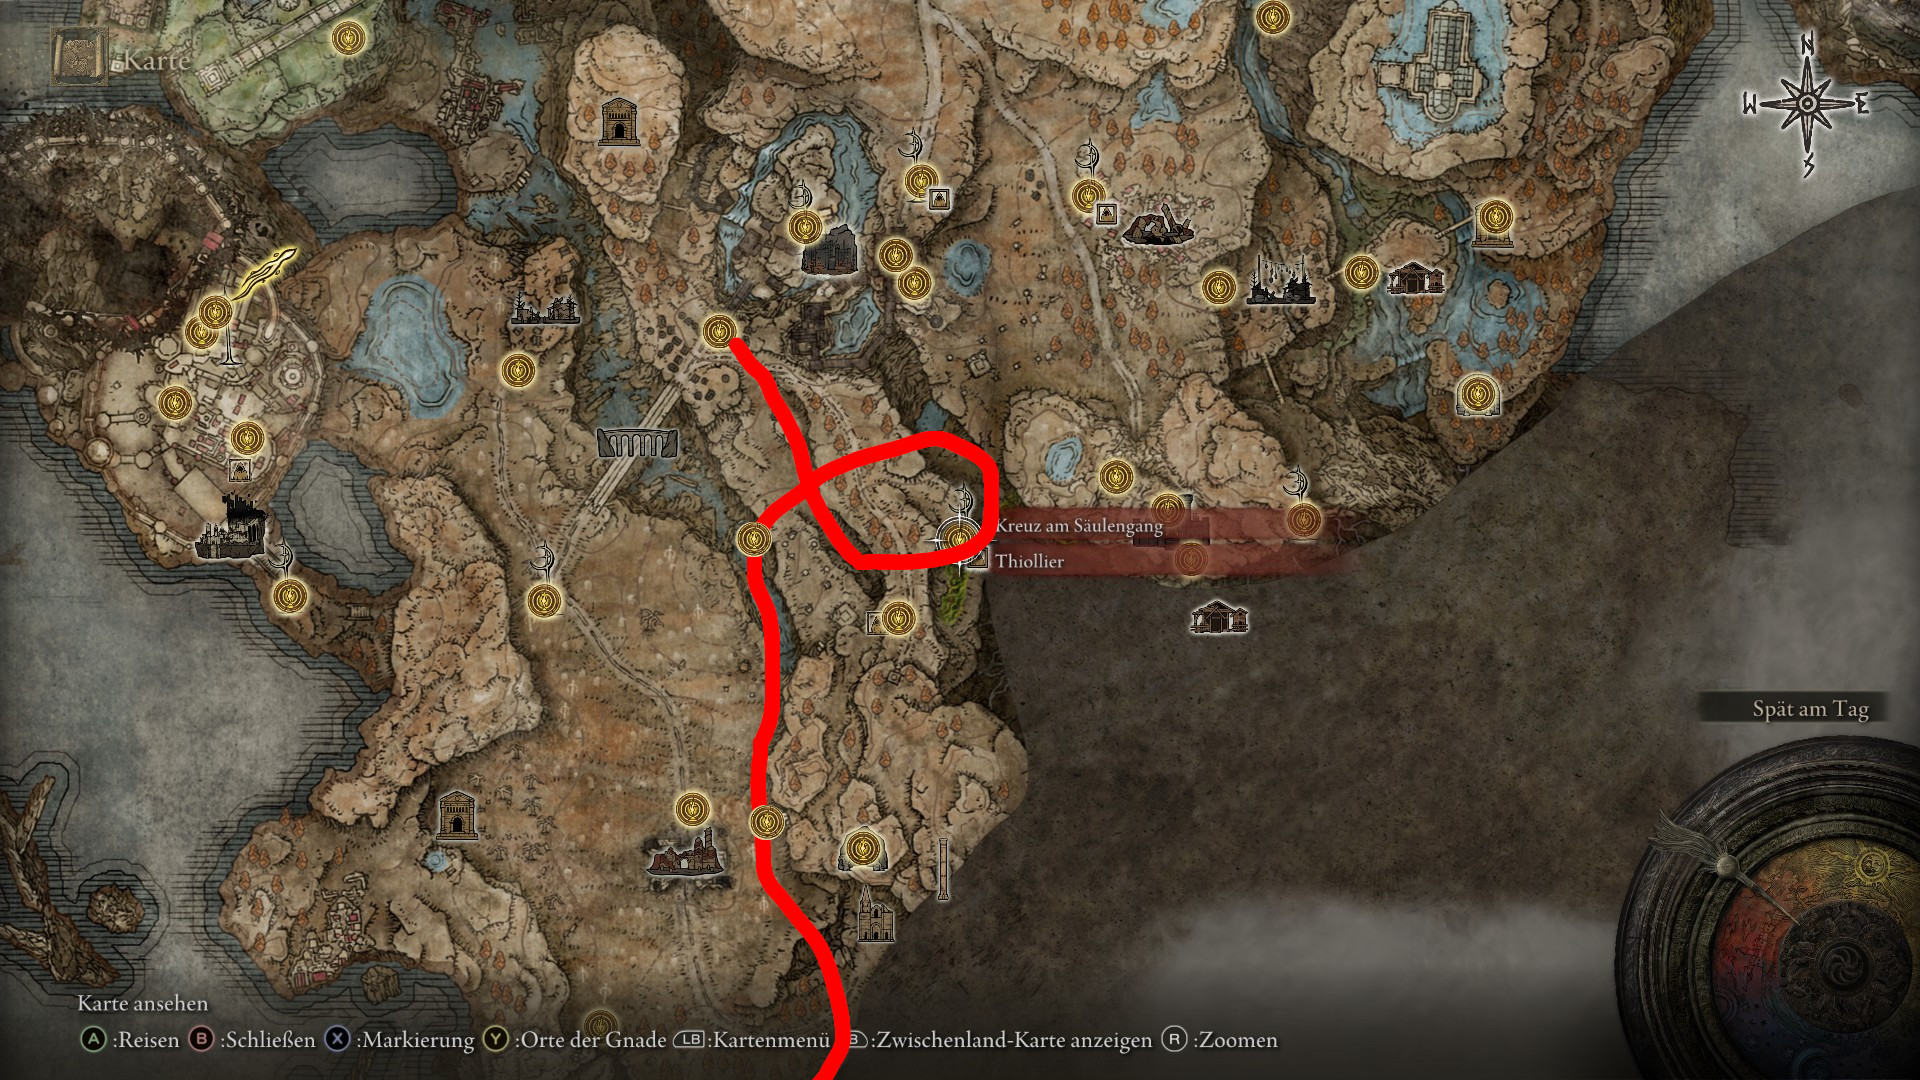
In this guide to Elden Ring, we show you how to complete the quest of Thiollier, one of the new NPCs from the DLC “Shadow of the Erdtree”.
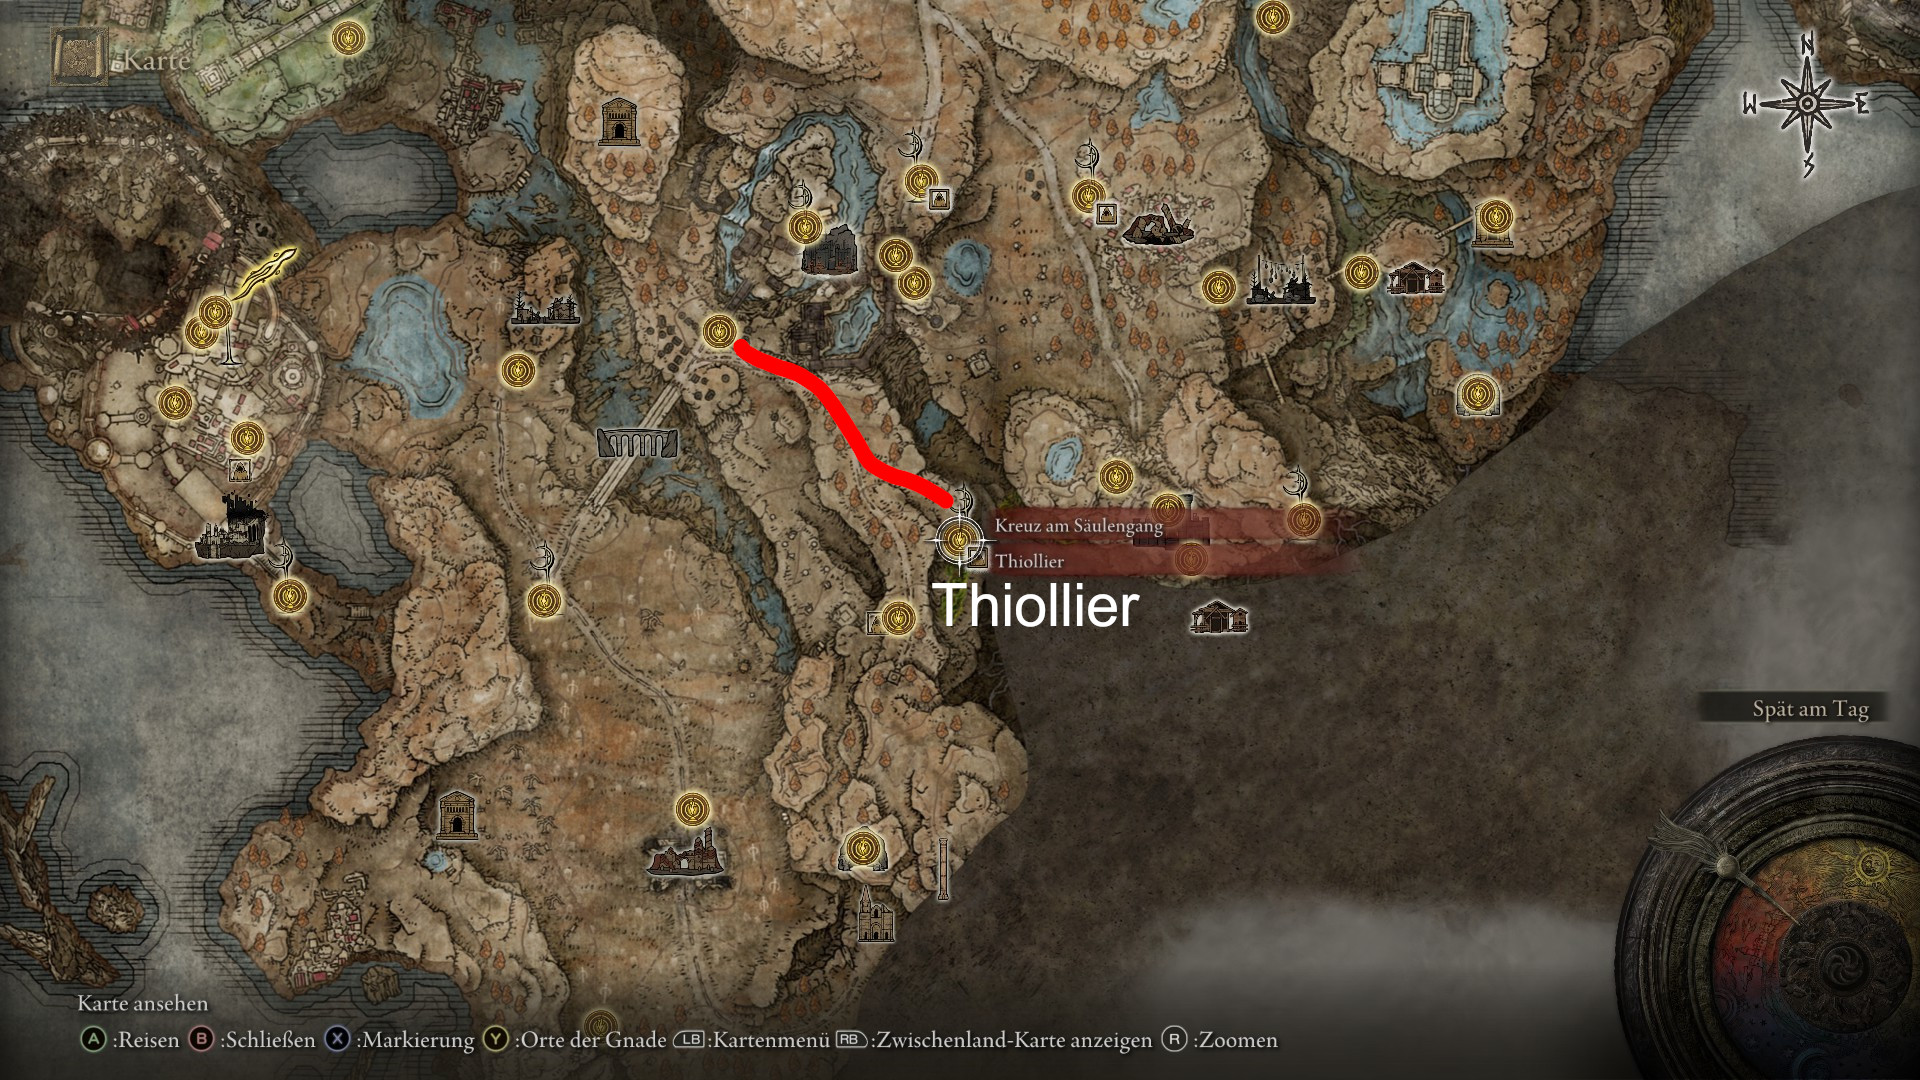
Where can you find Thiollier? The quest of this NPC is one of the side stories in the Elden Ring DLC. Thiollier is a follower of St. Trina, the goddess of sleep.
You will find him early in the DLC, in the east of the Gravefield Plain. From the grace “Three-Way Crossroads”, ride northeast and cross the large bridge, behind which lies Castle Ensis. Before that, turn right and follow the path south.
Where the path forks, choose the descending path and reach a cliff where you will find the grace “Cross at the Columned Hall”. Next to one of the valuable Scadubaum fragments, for which you can find a separate guide on MeinMMO here, you will also meet Thiollier.
Location of Thiollier
He tells you that he follows Miquella and that he is well-versed in poison. From now on, he is available as a merchant. We will now show you all the steps to complete the Thiollier quest. With our directory, you can quickly jump to the individual steps.
[toc]
Solve Thiollier’s Quest – All Steps
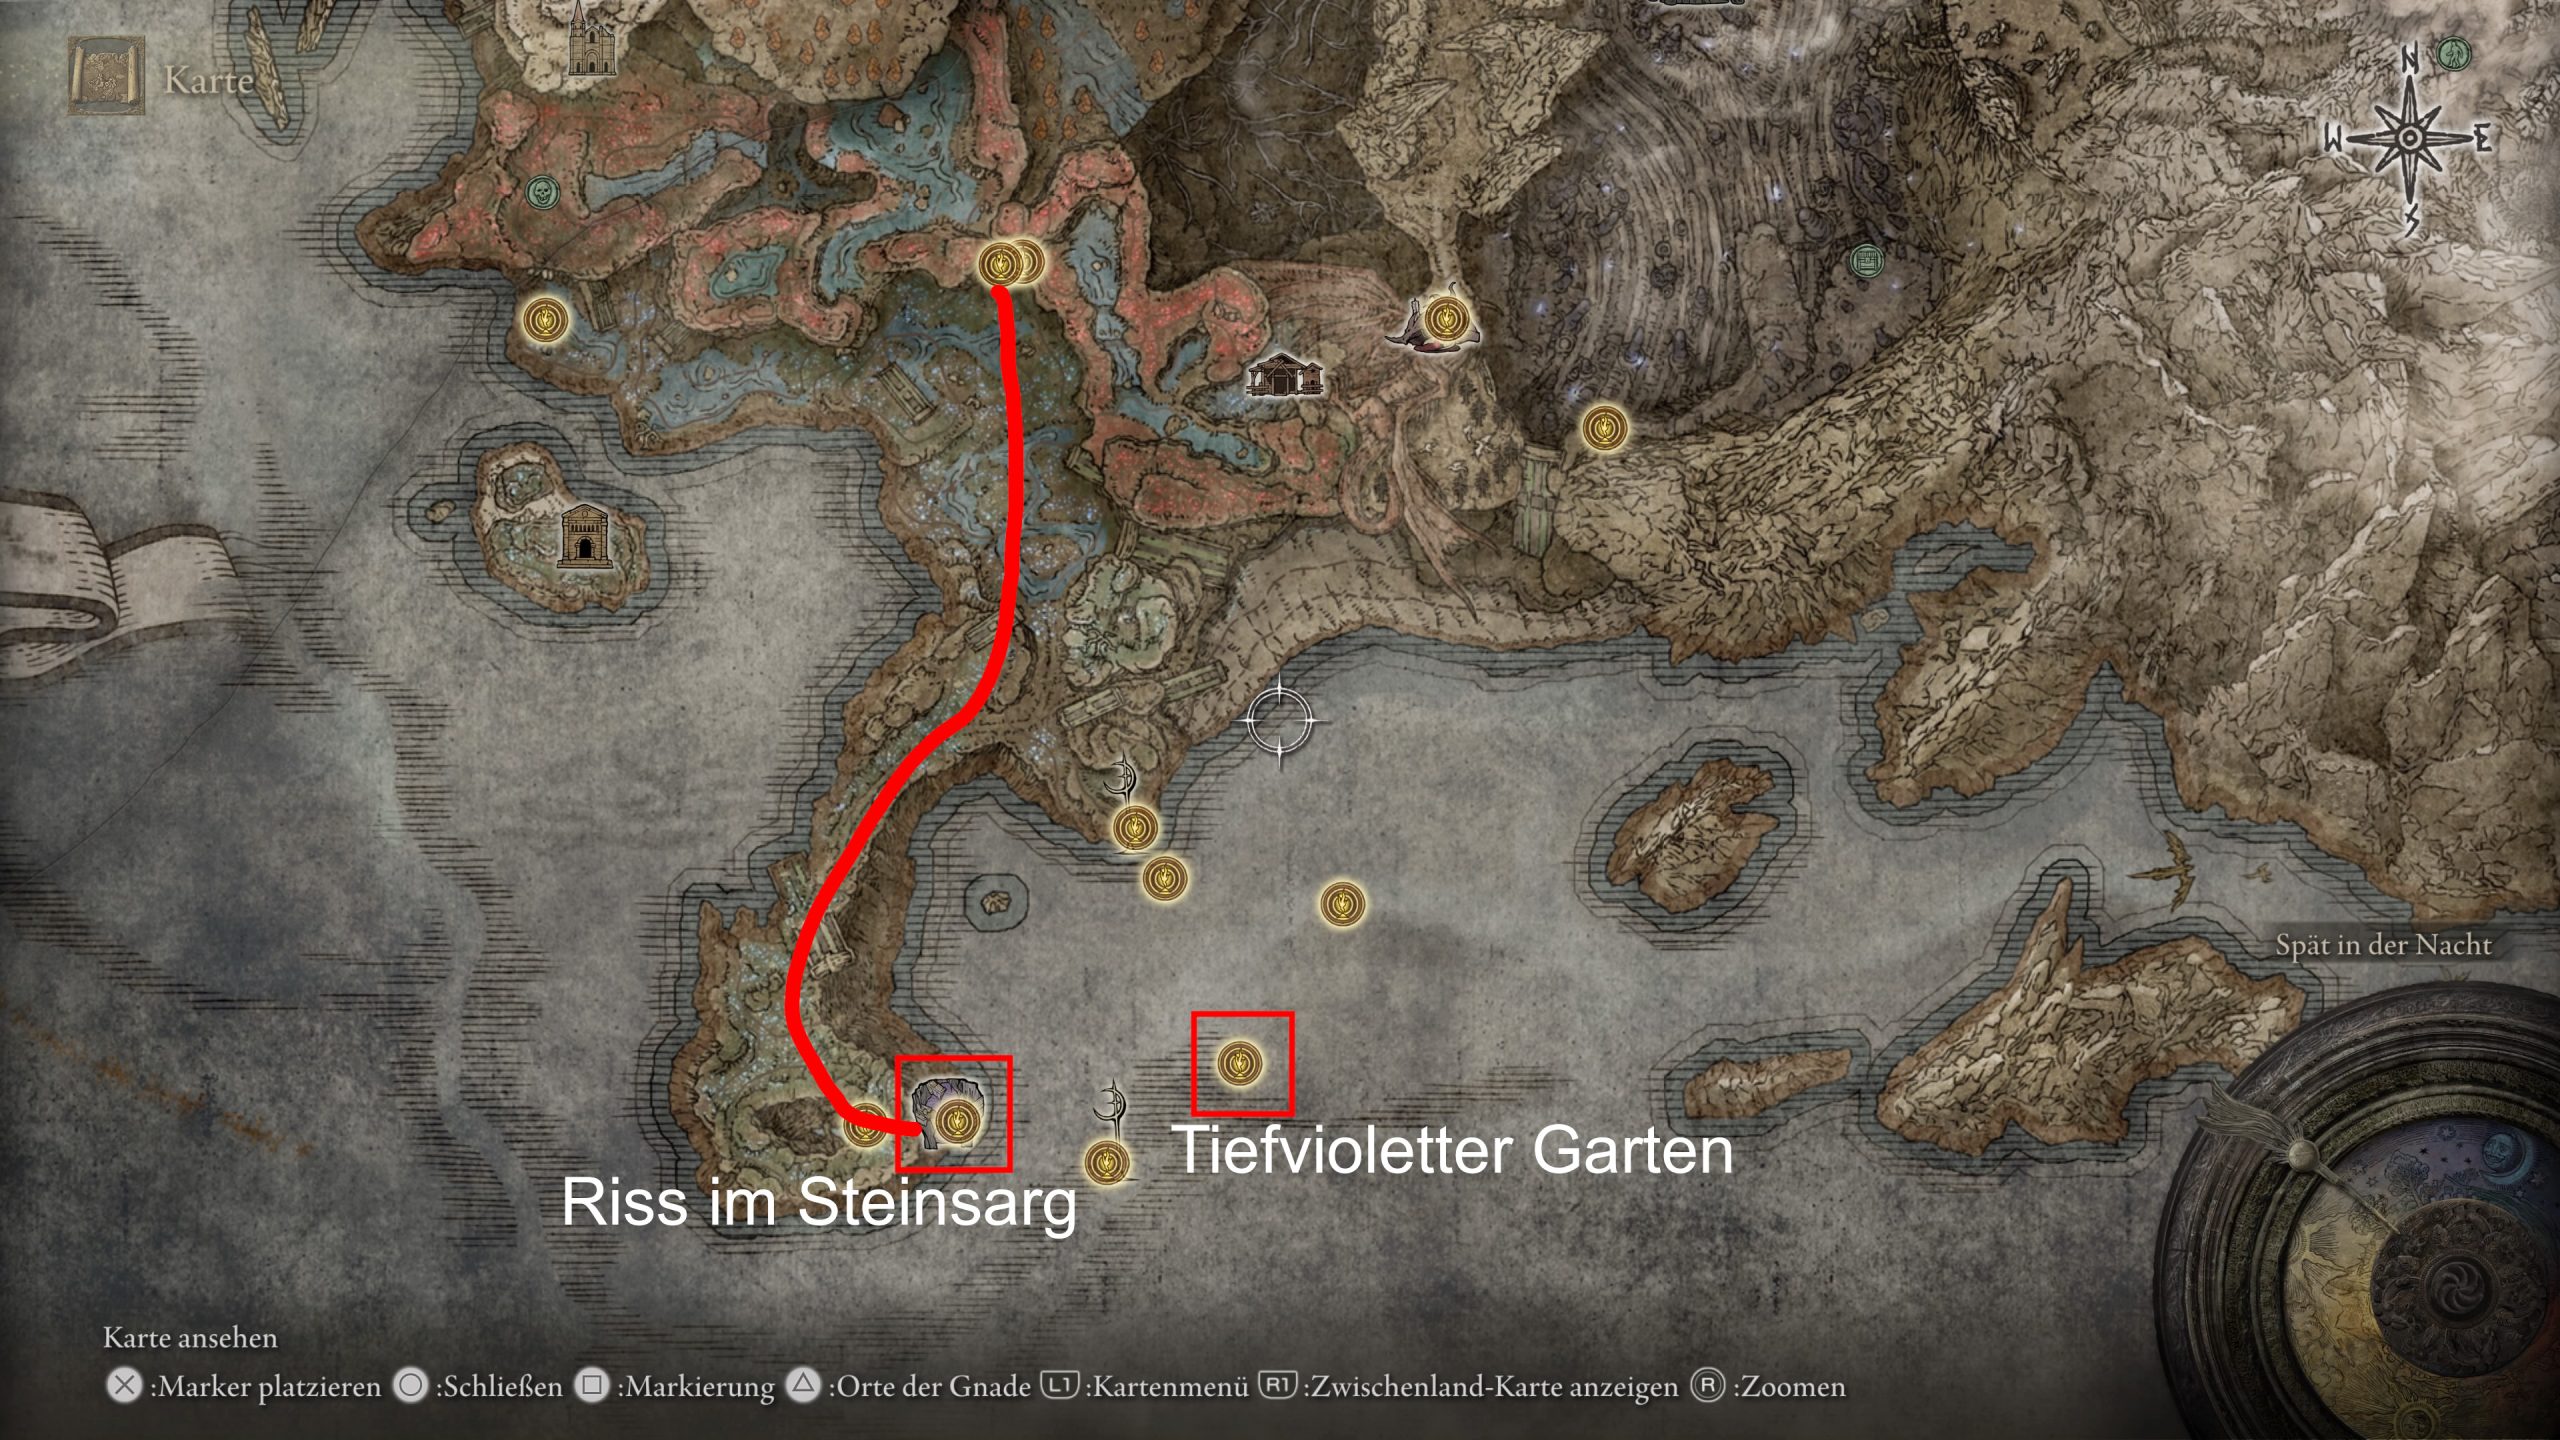
How do you solve the quest? To solve the quest involving Thiollier, you must first find St. Trina at the rift in the stone coffin. This NPC is essential for continuing Thiollier’s journey.
Find the Rift in the Stone Coffin
How do you find the Rift in the Stone Coffin? Start from the grace “Front of the Castle” in front of Castle Ensis and ride southeast until you reach a poisonous swamp. From there, follow the path north to a riverbed. Now proceed west, where you will find a tunnel that leads to the grace “Cave at Ellac”.
A picture depicting the necessary route
From there, go along the river south. You need to jump over the rocks and overcome some platforming. Work your way down to the next grace. Jump further down, pass the furnace golem, and reach the Sky Blue Shore along with its grace.
Ride south to the tip of the peninsula. Look for a hole in the ground, the rift.
From the grace “Cross at the Sky Blue Shore”, continue south.
Warning: This part of the area can only be explored after Miquella’s seal is broken. This happens when you approach the entrance of Castle Shadowbergfried. You will then hear a loud noise.
Defeat the Rot Knight and Find the Deep Violet Garden
Once the seal is destroyed, you can descend into the rift. This will take you to the underground area “Rift in the Stone Coffin”. Many guardians guard the ruin, so be prepared for ranged combat. To reach its end, you must defeat the boss Rot Knight. Thiollier can be summoned as an NPC.
The Rot Knight is agile and can quickly move around the arena on his horse. Also, watch out for his ranged attacks and throwing blade, which he likes to throw through the air like a boomerang.
After the fight, you will enter the Deep Violet Garden and thus find the whereabouts of St. Trina. Return to Thiollier and tell him about it. He will travel there and will be in a strange state afterwards.
What are the next steps? Talk to St. Trina. Choose the option “Revive at the Nectar” in the dialogue. This will lead to your immediate death. You must perform the same action three more times, for a total of four deaths.
Afterward, you will hear St. Trina’s voice during your demise. Then talk to Thiollier again, who has remained on the spot and wants to fall asleep. Choose the dialogue option “Pass on St. Trina’s words”. Then Thiollier will become angry and furious that you were able to hear St. Trina’s words.
You must drink the poison once more, after which you will be thrown into an arena where you will encounter Thiollier. He shouldn’t pose much of a problem. Once he is defeated, return to St. Trina and drink the nectar one more time. She will give you the task to kill Miquella.
How do you complete the quest? Once you have defeated Messmer, you can burn the Scadubaum. Be careful, after this event there is no going back, so complete any other quests by then.
Return to St. Trina once more. Although you have defeated him, you will still find Thiollier in the cave. He lies there on the ground lamenting that he could not fulfill all his wishes. Drink the nectar one last time, talk to Thiollier again, and hear him say: “A-Ah.” Once you have done this, you can summon the NPC in the battle against Leda and her allies.
This concludes the quest. For the final boss, summon him one more time. After the fight, Thiollier will drop his equipment. At this point, Thiollier’s quest ends. Are you looking for more guides for Elden Ring? On MeinMMO we have compiled an overview for you.
This is an AI-powered translation. Some inaccuracies might exist.
Ansbach is one of the new NPCs in the DLC of Elden Ring. In this guide, we will show you how to complete his quest and summon him for the final boss.
Update, July 11, 2024: We have reviewed the article, and it is up to date.
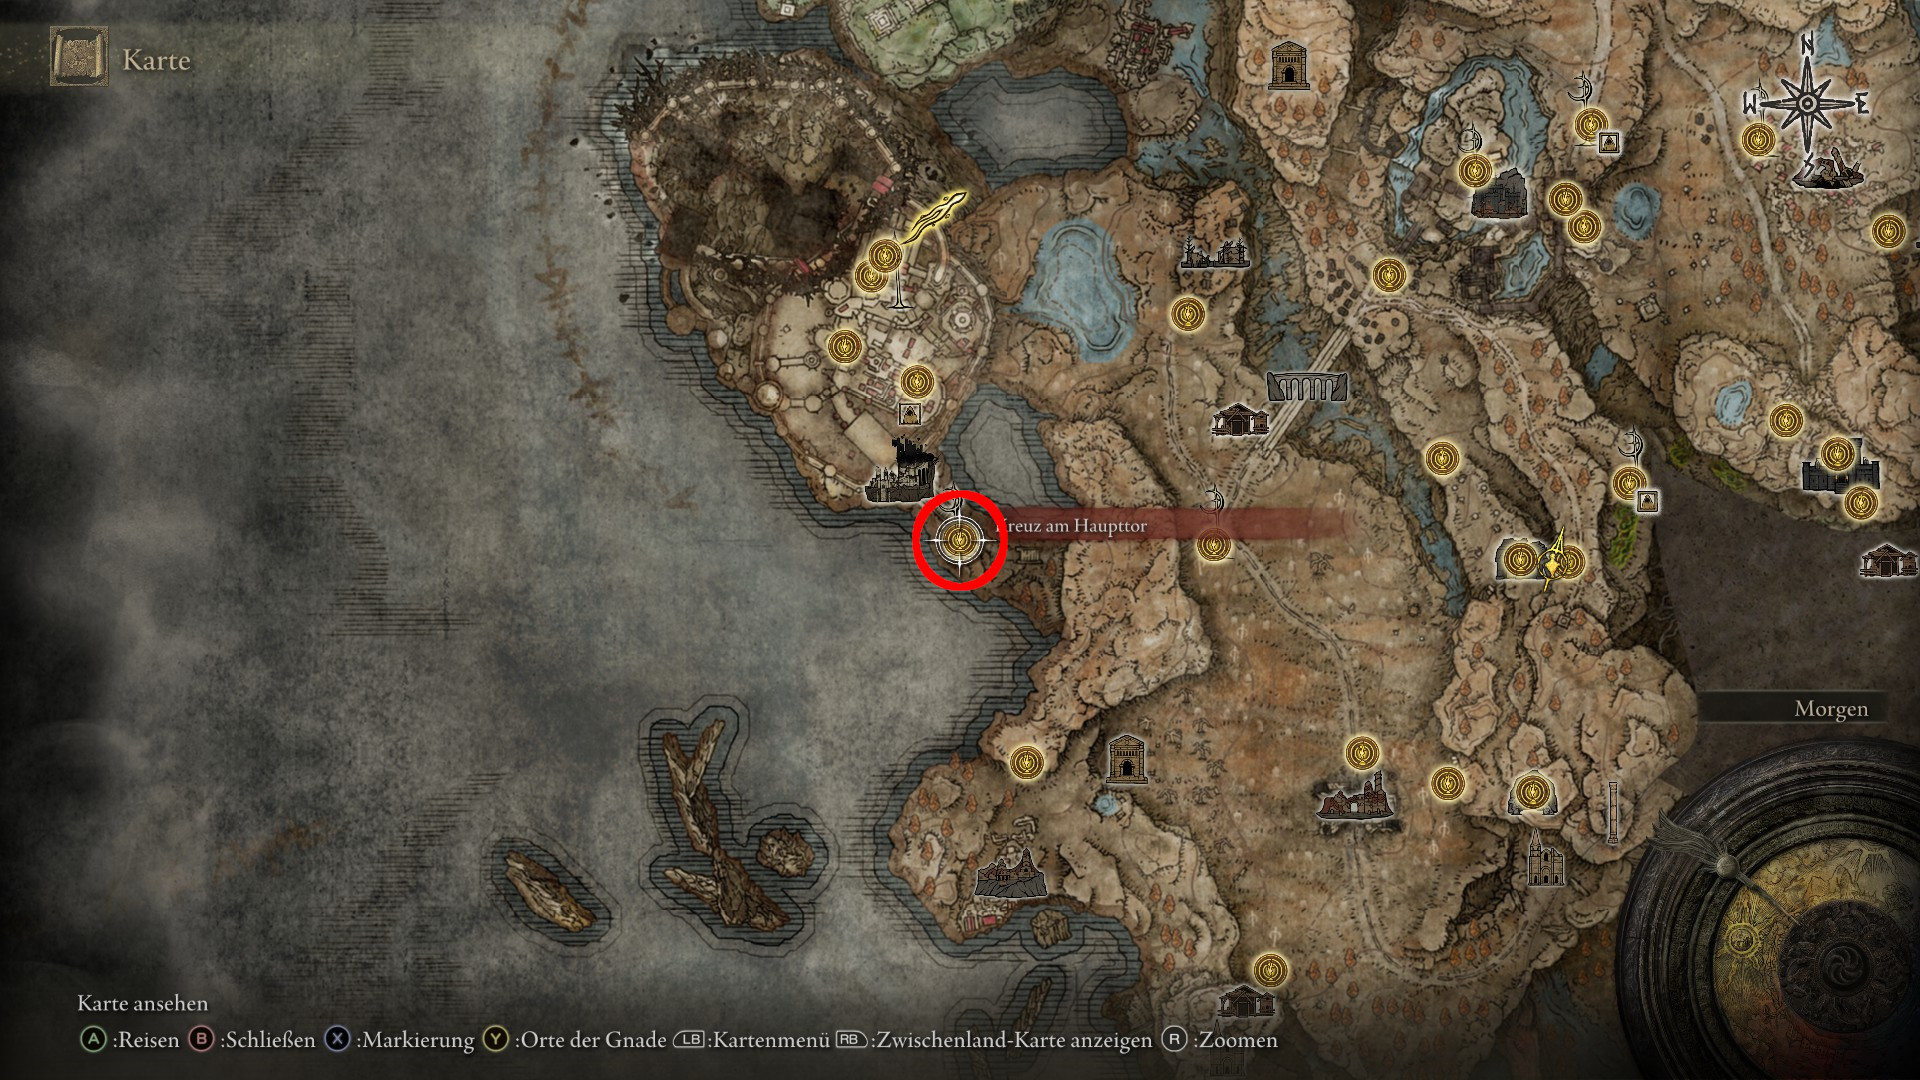
Where can you find Ansbach? The quest from Ansbach starts shortly after the beginning of the DLC, provided you head towards Castle Belurat. Before the entrance, you will find the Site of Grace “Cross at the Main Gate,” and next to it, the desired NPC.
There is also one of the valuable Scadubaum fragments here. Be sure to pick it up to enhance your character, and talk to Ansbach. He will explain to you that his proud days as a warrior are over.
Here you will find Ansbach for the first time.
He asks you to find all of Miquella’s crosses in the game world and let him know. This starts the quest. We will show you the further steps below. You can jump directly to what you want with the table of contents.
[toc]
Start video
Elden Ring DLC: Collecting Scadubaum Fragments – Here’s Why They’re Important and How to Get Them
Solve Ansbach’s Quest – All Steps
What are the next steps? When you reach Scadu Altus, the Great Rune breaks, which you will notice by a loud sound. You will also receive a notification about it.
Return to Ansbach and speak with him again. He will then head to the Shadow Keep.
Find Ansbach in the Shadow Keep
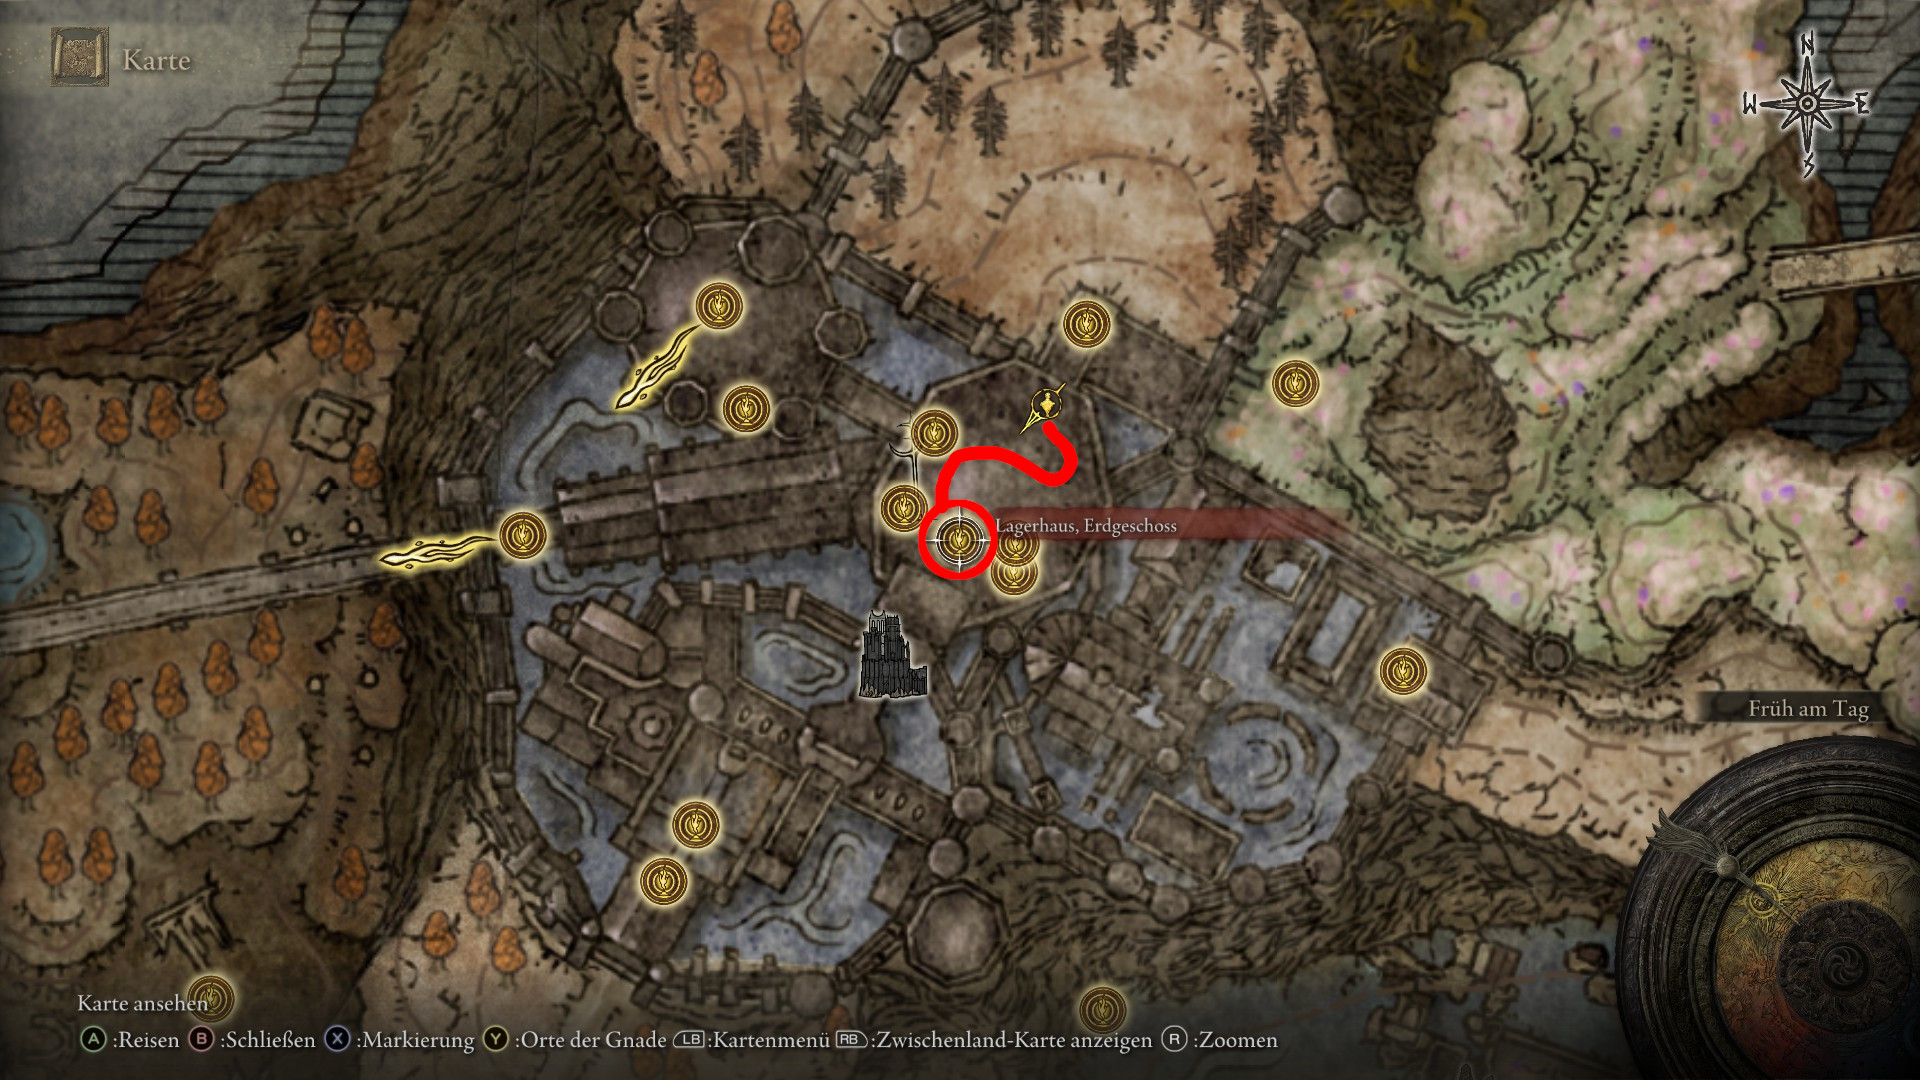
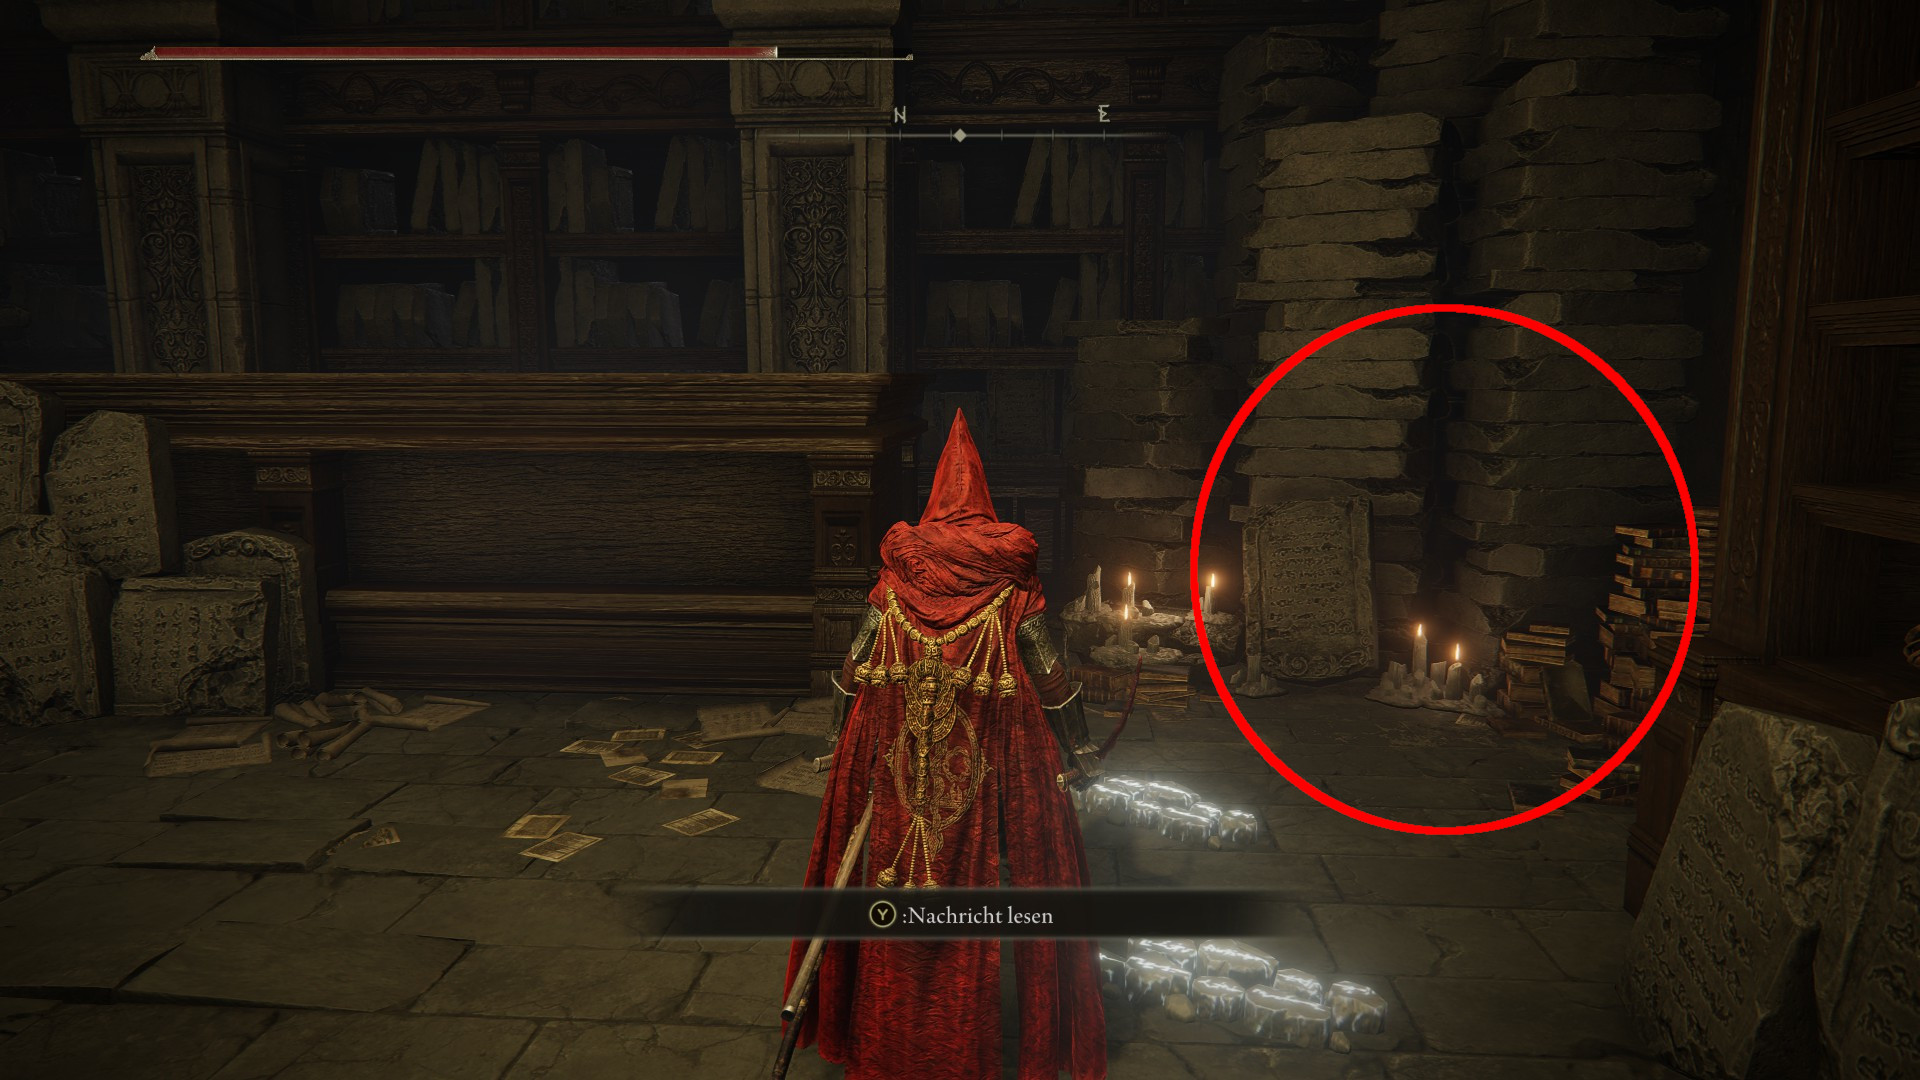
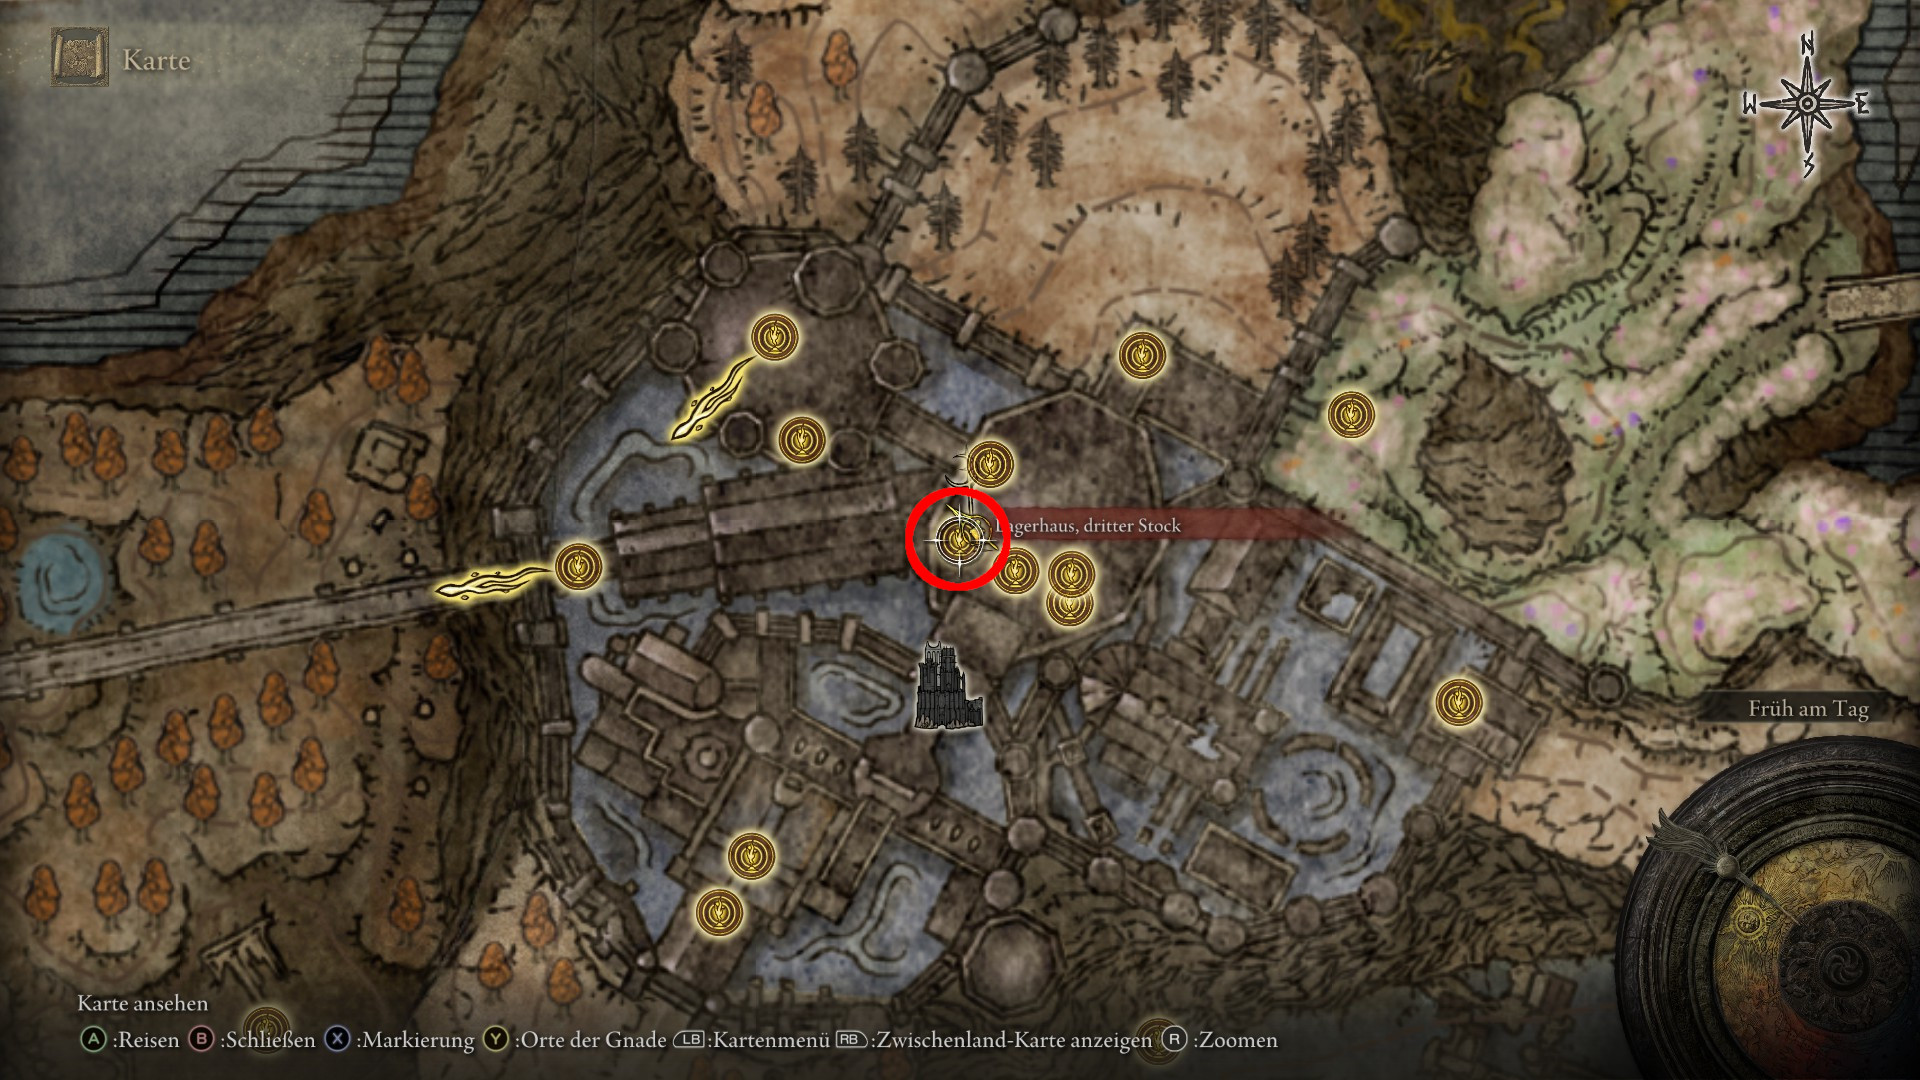
Where is Ansbach located next? Fight your way through the large legacy dungeon to the Site of Grace “Warehouse, Ground Floor.” From there, ignore the passage on the left and follow the narrow level path up the stairs to the first mezzanine. Some steps lead to a room where Ansbach is waiting for you.
Travel to the Warehouse, Ground Floor in the Shadow KeepAnsbach is in a room after you have climbed the first stairs
He studies a book and talks to you. Exhaust all dialogue options. This step is thus complete.
Find the Secret Ritual Scroll
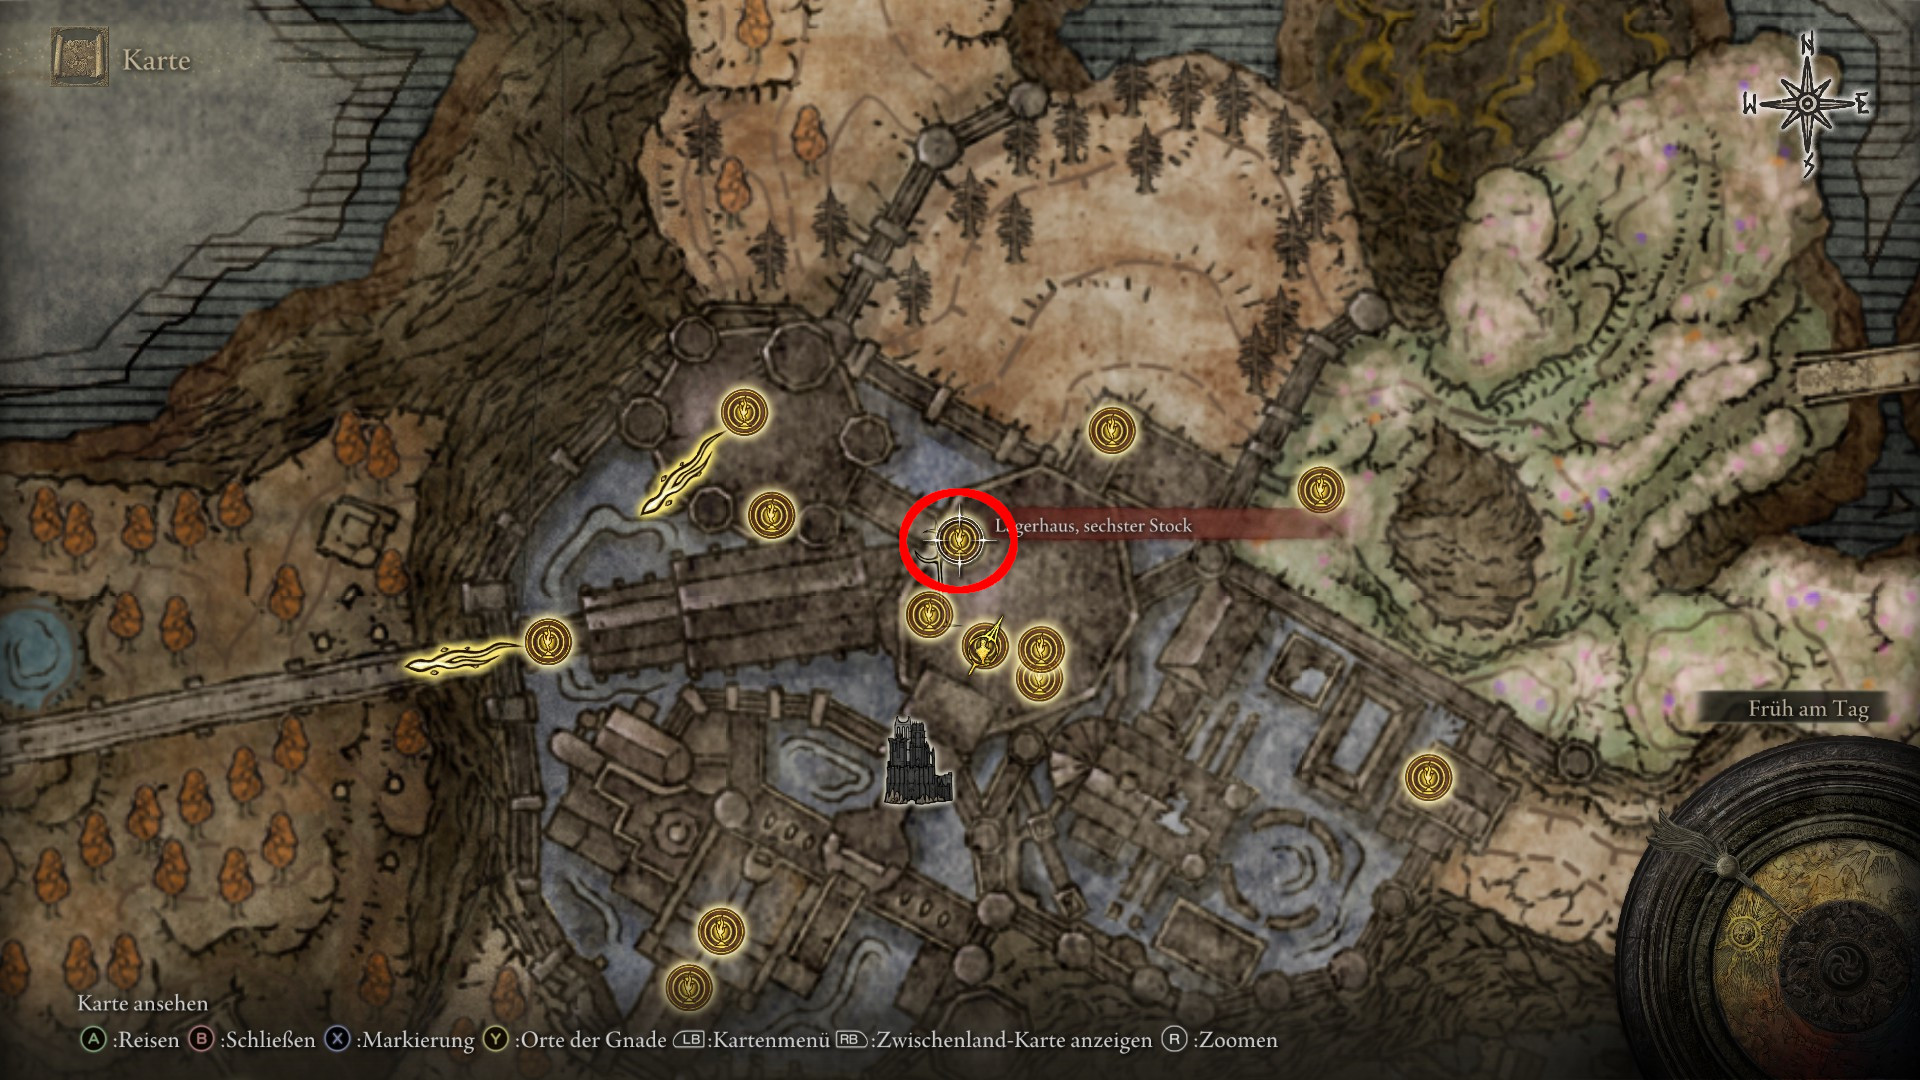
Where can you find the scroll? This item is essential for progressing the quest. You will find the scroll when you continue upwards in the Shadow Keep and find the Site of Grace “Warehouse, Third Floor.”
Start from here.
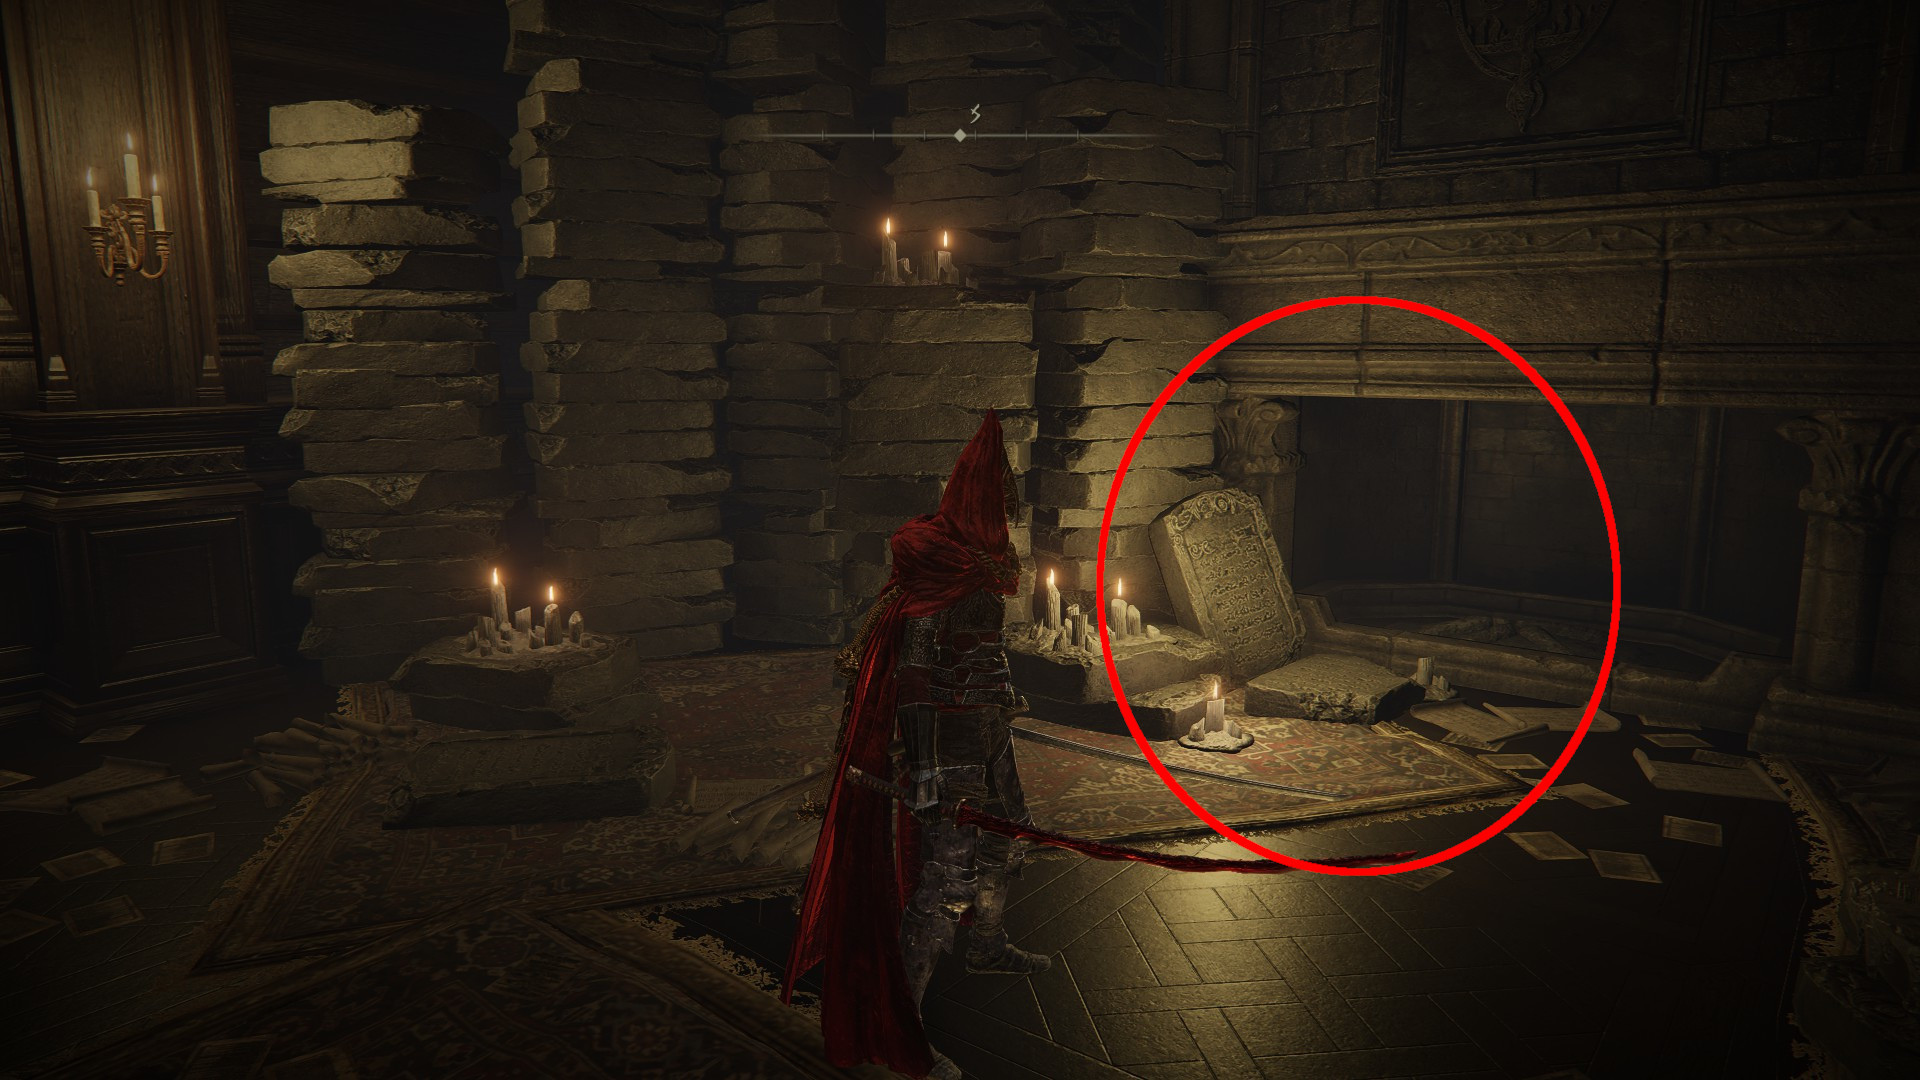
There, next to another Scadubaum fragment, is also an item. It is a letter from Ansbach. Take it with you, continue towards the west, and then southeast up the stairs. Clear the enemies out of the way or run past them. On the left, a staircase leads down. Take the next door and enter a room with some bookshelves.
There you will find the sought-after scroll. Take it with you. You now have the option to either give it to Ansbach or not. If you choose not to, the quest will not continue. We therefore recommend handing Ansbach his scroll. But wait a moment with that, otherwise you might miss another NPC.
Find Freya
On the sixth floor of the Shadow Keep, you will meet the NPC Freya at the Site of Grace. Her quest is connected to Ansbach’s. Talk to her and then return to Ansbach. For the next step of the quest to unlock, you need to rest at a Grace site.
This is where it startsFreya is located near a fireplace on the upper floors
Hand Over the Letter to Freya
The next time you talk to Ansbach, he will give you a letter to Freya. Take it back to the sixth floor and speak with Freya a few more times. Once all dialogue options are exhausted, you will receive the Golden Lion Shield.
After speaking with her, you can return to Ansbach one last time on the first floor to give him his scroll.
Defend or Fight Ansbach against Leda
How does the quest continue? Travel to the Site of Grace “Cross on the High Road.” There, talk to Leda, who will now reveal that she wants to kill Ansbach. You can help her – if you want.
Leda tells you about her plans.
Return to the Shadow Keep and to the room where Ansbach used to stand. He is now gone, and two summoning signs are on the ground. Here you can choose to aid either Leda or Ansbach in the fight against each other.
If you help Leda, Ansbach’s quest ends here, and he will not be available later. If you help him instead, you can summon him for later bosses. If you want to make things easier for yourself, we recommend this option.
Warning: This step can only be completed if you have previously helped Leda against the Horn Herald. Additionally, Messmer must not be dead in the Shadow Keep.
How does Ansbach’s quest end? If you help the guy, you will receive Ansbach’s Longbow and Leda’s Rune, which is always worth 40,000 runes.
After you have burned the Scadubaum, the quest enters its final phase. Note that you must also complete any other NPC quests before this point, or else some may fail.
Just before the final boss, Leda and her allies will confront you once again. Here you can summon Ansbach for the first time to help.
Summon Ansbach for the Final Boss
Your efforts will also pay off against the great final opponent of the expansion. After defeating Leda, you will meet Ansbach and can talk to him. Once you have done that, you can summon the NPC to help you in the final boss fight.
If he is dead in the dust, some of your nerves may have been more than strained. Good thing there is at least a reward. After the fight, you will find Ansbach’s body in the arena. From him, you can loot his equipment and the weapon Obsidian Lamina.
If you follow our steps, you can easily solve the quest. However, Ansbach is just one of several NPCs that bring their own quest in Shadow of the Erdtree. If you are looking for more guides, we have plenty on MeinMMO for you. Feel free to check out our overview of Elden Ring.
This is an AI-powered translation. Some inaccuracies might exist.
The most important thing about a horror movie is probably the monster or antagonist that the protagonists are up against. Ghostface, Jason, or Michael Myers are icons of pop culture. But there are also villains that you couldn’t even imagine in your dreams. We present 7 of them here.
How was this ranking created? The ranking is based on villains from all sorts of horror movies. An unusual premise or simply the absurdity of the villain is taken into account.
The ranking ranges from barely believable to totally absurd. If you have another pick for this list, feel free to let us know in the comments.
[toc]
Killer Klowns are the most normal pick on this list:
Start video
Space Invaders – Trailer for the Movie about a Clown Threat from Space
Despite his size, Chucky has the strength of a normal man
Intelligence
Talent with various weapons
Basically immortal
Chucky was actually the serial killer Charles Lee Ray, who transferred his soul into a Good Guy doll shortly before his death through voodoo magic, thus becoming Chucky. Chucky is basically immortal, but his greatest weakness is his arrogance, and he is just a man in a doll’s body. MyMMO editor Nikolas Hernes is also a big fan of the Chucky series: The Chucky series has everything to become the perfect trash – But it is surprisingly good
This is an AI-powered translation. Some inaccuracies might exist.
The DLC of Elden Ring requires a good build to take down the challenging bosses. We have a strength build for you that makes quick work of them and is also very flexible.
Strength is one of the most important stats in Elden Ring, and weapons that scale with it usually deal decent damage. This is especially required in the new DLC Shadow of the Erdtree, as the expansion raises the difficulty level even further.
Very convenient: The following build is extremely flexible regarding your weapon choice. This means that with the build, you can use most strength weapons in the game, depending on your preferred playstyle.
[toc]
Start video
Elden Ring introduces the boss enemies of the DLC
Leveling the Strength Build Properly
What to level up? In our proposed build, “Strength” is of course the main attribute in focus. Because corresponding weapons scale with it, and the higher your strength level, the more damage you deal.
To play the build as we specify, you should have already reached level 150. This is already a good point to start in the DLC – so it’s practical if you have a strong build with you.
This is how you level up: The skill points for the strength build are distributed as follows:
Strength: 50
Mind: 10
Endurance: 29
Strength: 65
Dexterity: 17
Intelligence: 10
Faith: 25
Arcane: 23
At the start, you should ideally choose the Vagabond class. With its balanced attribute distribution, it has the best prerequisites to build any character. We will now explain why our points are distributed this way. As you can see, most points are invested in strength. You only need to level dexterity up to level 17, which is sufficient for most strength weapons in the game.
23 points in Arcane are required to use the weapon “Executioner’s Sword of the Marais.” If you don’t want that anyway, you can invest these points elsewhere. For example, in more strength, whose last “soft cap” is at 80. Beyond that, further levels in the attribute are hardly worthwhile.
Strength Build – Weapons
Which weapons should you use? As already mentioned, this is the big advantage of this build: You have the choice. Nevertheless, we would like to give you a few tips.
The great advantage of many strength weapons is that they deal a lot of poise damage in a short time. If you deal enough poise damage in a very short time, it will break on your opponent. Then you can land a critical hit on the glowing spot and deal an extreme amount of damage.
The following weapons are suitable for this purpose:
Great Sword
Ordovis’ Great Sword
Blasphemous Blade
Siluria’s Tree
Giant Crusher
Of course, your weapon should be upgraded to the maximum. But that’s not enough, you should also have the right selection of Ashes of War, Talismans, and a suitable potion mix with you.
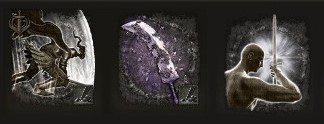
Which Ashes of War are good? To enhance your weapons with abilities, you can choose an Ash of War. We particularly recommend the following three:
Lion’s Claw: With this, you perform a somersault and deal a lot of poise damage. Usually, the poise will break after two or three uses. Additionally, your poise cannot be broken.
Stonecutting Claw: Physical damage is increased by 15%, and poise damage by 10%.
Courage of the Knight’s Vow: With this, you deal 80% more damage on the next hit.
The three recommended Ashes of War.
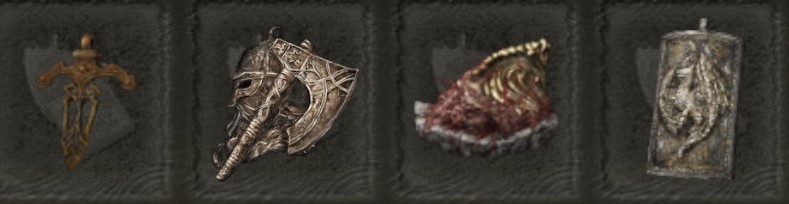
Which Talismans should you have? We recommend the following Talismans:
Ritual Shield Talisman: Increases attack power by 10% when at maximum HP
Axe Talisman: Enhances charged attacks by 10%
Shard of Alexander: Increases damage dealt with abilities by 15%
Dragoncrest Greatshield Talisman: Increases resistance to physical damage by 20%
These are the Talismans.
If you do not have abilities in your weapons, you can also replace the Shard of Alexander with the following alternatives:
Two-Handed Sword Talisman: Enhances attacks with two-handed weapons (only found in the DLC)
Green Turtle Talisman: Accelerates stamina regeneration
Great Jar’s Arsenal: Greatly increases maximum equip load (to wear heavier armor)
Which Tears should be in the potion mix? We recommend the following combination of Tears:
Strength Knot Crystal Tear: Increases your strength by 10 points
Cracked Rock Spike Tear: Increases your poise damage by 30%
The two Tears in the mix.
Armor for the Build
Which armor should you take? In general, your build should have enough poise and a good overall weight of your armor. You should reach the minimum poise of 51, otherwise you will be staggered by the enemies’ attacks.
The actual weight of your armor, on the other hand, is relevant when it comes to dodging and stamina consumption. Clearly: The heavier your equipment, the more you carry around, increasing your load. This results in a slow, cumbersome roll, for example. Therefore, always try to maintain at least a medium load so that you can roll quickly enough.
If you keep all of this in check, you can basically wear any armor you want, with a particularly strong option being the Veteran’s Set or Radahn’s Set.
With this build, you should do well through the DLC, but of course also through the main game. Feel free to share your ideas on how you prefer to play with strength characters. On MeinMMO, you will find more guides on the topic of Elden Ring, and currently, also on the DLC. Here you can find the overview of all guides.
This is an AI-powered translation. Some inaccuracies might exist.
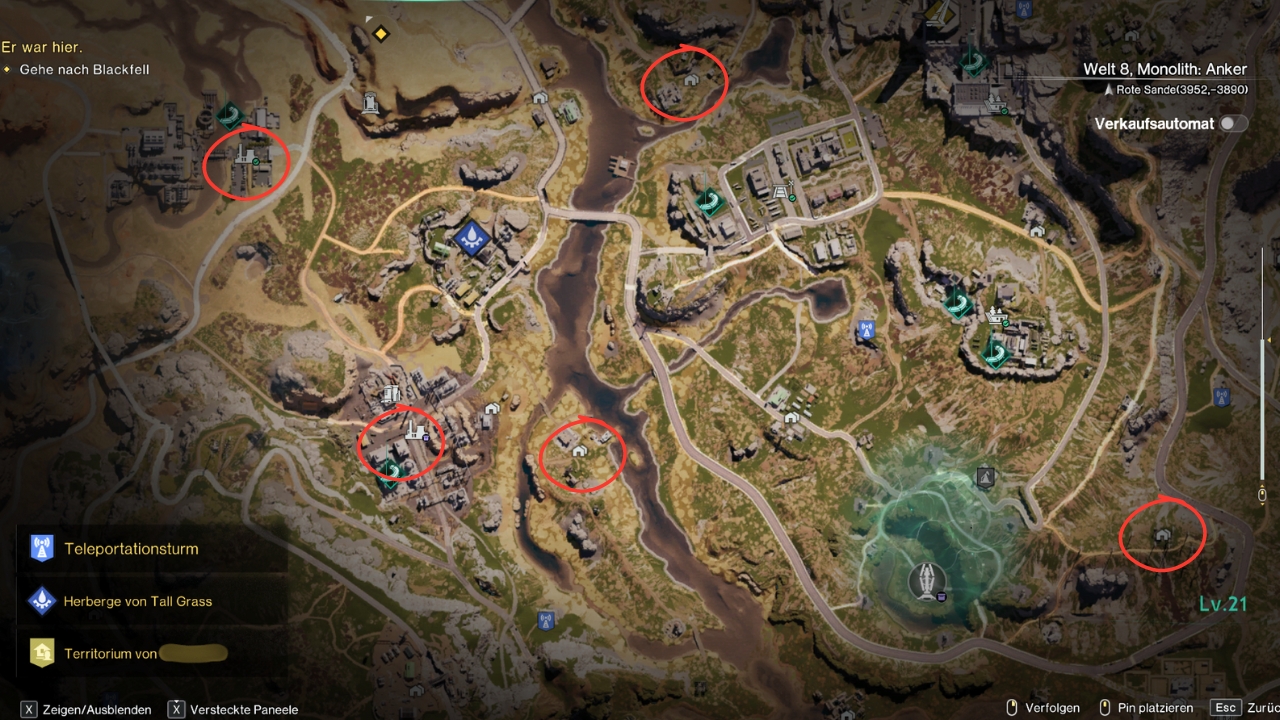
In Once Human, there are numerous different resources that you need for crafting and expanding your base. We will show you how to obtain fireproof plastic in the game on Steam.
Especially when you want to craft better weapons and armor, you will need fireproof plastic in Once Human. You also need this resource for the expansion of your base.
Here’s how to get fireproof plastic: There are three methods to obtain fireproof plastic:
You are lucky when opening supply crates in various locations
You receive it from the scrap you collect and dismantle during your travels
You get it as rewards when you explore locations
The best area for farming fireproof plastic is the “Iron River” region (Level 21–28). You should check the following locations when searching for the resource:
Greywater Industrial Zone (Level 23)
Refinery Pollution Point (Level 23)
Riverhart Port (Level 23)
Exhausted Oil Well (Level 24)
Wind Farm (Level 28)
In locations in Iron River, you will find fireproof plastic.
If you have collected scrap during your explorations, you should dismantle it at your dismantling bench in the base. This will give you many important resources needed for crafting and expanding your base – including fireproof plastic.
What do I need fireproof plastic for? In Once Human, weapons and armor items have different tiers. For crafting, depending on the tier, you will require certain materials. For weapons and armor of Tier 3, fireproof plastic is required, among other materials. The plastic also plays a role in upgrading your motorcycle – such as for better tires and a larger tank.
You will also need the plastic for building various machines and elements in your base, including the advanced equipment workbench and the solar generator, which powers your machines. For that, you will also need refined parts. You can find out where to get that material here: Once Human: How to get refined parts – Here’s how to find the rare resource
This is an AI-powered translation. Some inaccuracies might exist.
Do you want to improve your defense in FIFA 23 with a strong goalkeeper talent? Then you’ll find here goalkeepers with potential for the career mode.
What does a goalkeeper talent bring in the FIFA 23 career mode? Every team should have a strong goalkeeper. A reliable support is crucial for the defense and can secure you one or two points in the FIFA 23 career mode.
If you sign one of the best talents early in your career, the keeper can develop over the years and thus become a crucial part of your team. Since a goalkeeper plays in almost every match, their development should progress fairly quickly.
The advantage of young goalkeepers is that they are usually not very expensive – with a few exceptions. After a few years, however, they can cost quite a bit of money (or bring in money when you sell them). Therefore, it is worth signing a strong goalkeeper talent early in your career.
However, keep the following points in mind regarding goalkeeper talents:
Potential is dynamic. Depending on training and match performance, the overall rating can end up being higher or lower.
The market value is not fixed. You can also get keepers at a better price if you make a corresponding offer. However, you risk that your counterpart may end negotiations prematurely. On the other hand, you can also be taken advantage of if too much is demanded.
In the following list, you will find strong goalkeeper talents ordered by potential. Further down, you will also find particularly inexpensive goalkeepers.
FIFA 23: Best goalkeeper talents with the highest potential
These are the best goalkeeper talents: In the first list, you will find the 10 goalkeepers under 23 years old with the highest potential in the career mode. However, keep in mind: Some of them are already expensive, established stars who can become costly.
FIFA 23: Affordable goalkeeper talents for the career mode
What kind of list is this? Here you will find another list of goalkeepers under 23 years old, but with a maximum market value of 10 million. They start at low overall ratings but can quickly rise and bring you a profit.
Player
Age
Overall Rating
Potential
Position
Market Value
Bazunu
20
70
85
GK
3.4 million
Mier
22
72
84
GK
5 million
Vandevoordt
20
70
84
GK
3.4 million
Restes
17
60
83
GK
700,000
Chevalier
20
67
83
GK
2.4 million
Samuel Soares
20
65
82
GK
1.7 million
Marquines
19
63
82
GK
1.1 million
Andrew
21
70
82
GK
3.4 million
Gorter
22
71
82
GK
3.6 million
Luiz Júnior
21
72
82
GK
4.6 million
Are you more into Ultimate Team than the career mode? Even there you should try to sign the cheapest players possible, so your coin balance doesn’t get emptied too quickly. How to earn coins effectively is shown here: Trading tips to earn coins in FUT, so you can build a strong team.
This is an AI-powered translation. Some inaccuracies might exist.
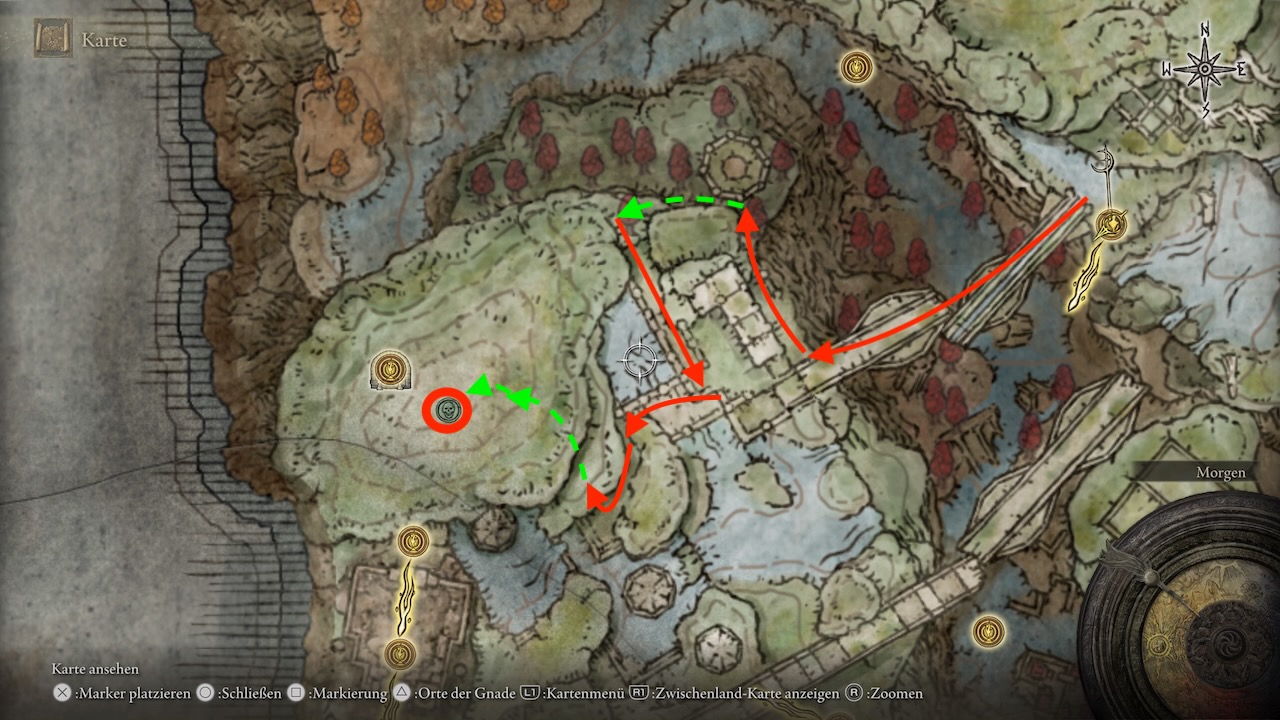
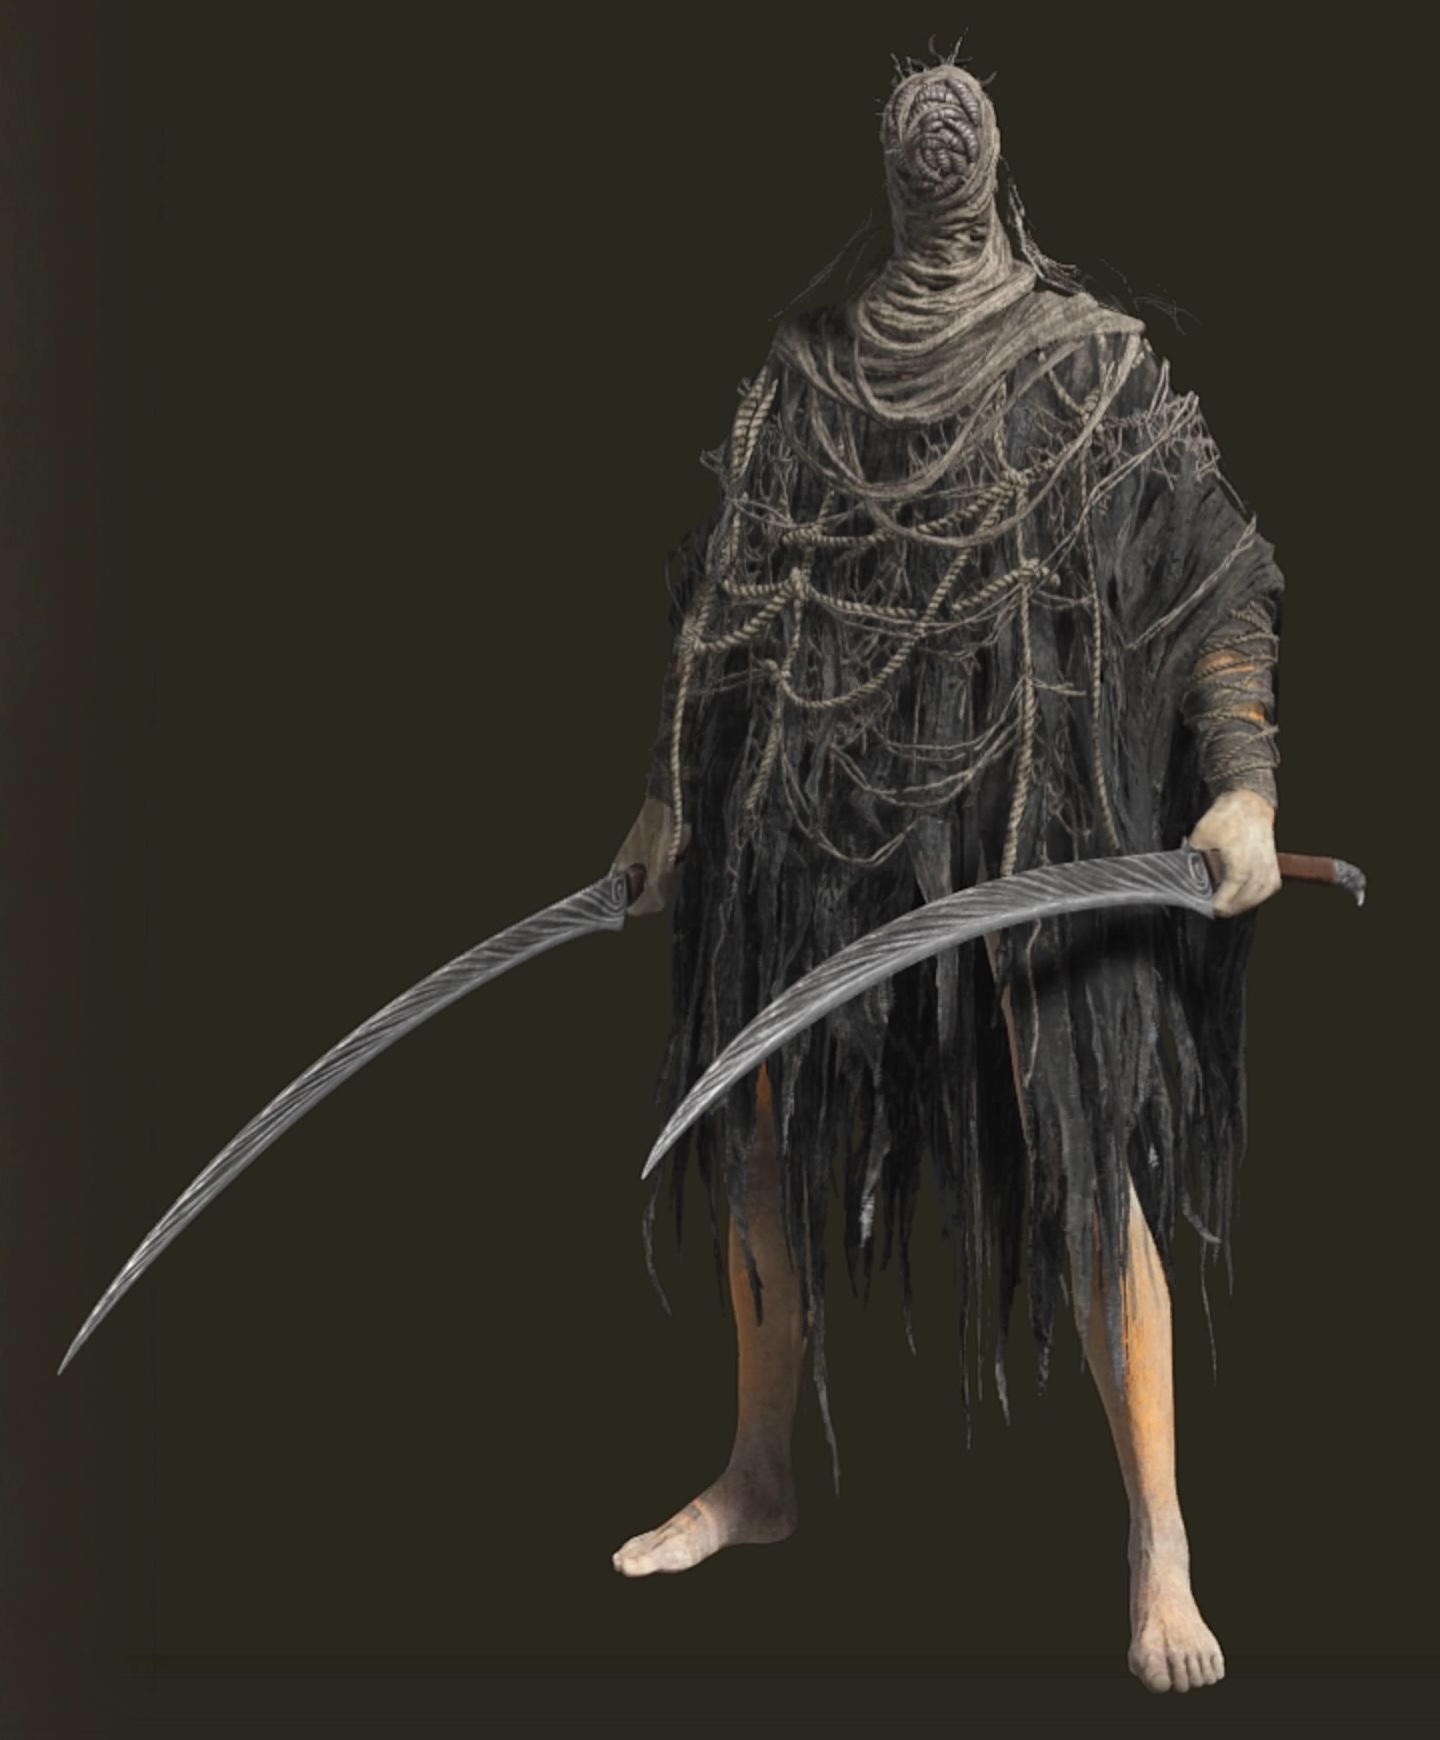
In the new DLC of Elden Ring, you can find the Horn Herald who is on a revenge quest. We will show you how to start his quest, find his locations, and get his items in our guide.
The article was updated on July 22, 2024, reviewed, and is up-to-date.
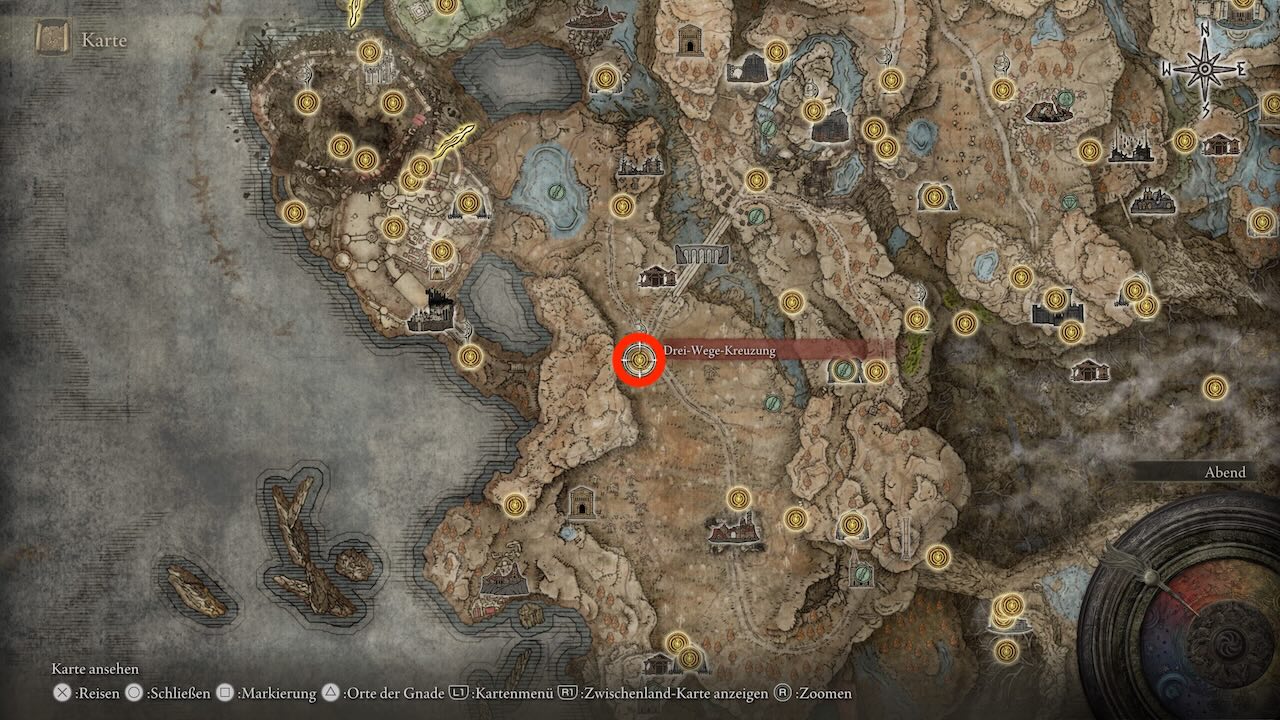
Where can I find the Horn Herald? You can find the Horn Herald right at the beginning of your journey at the Grace site “Three-Way Crossroad.” Talk to him to introduce yourself, but don’t be surprised – the Horn Herald has no love for the tarnished and is grumpy.
First location of the Horn Herald
After talking to him, the quest will start and you will now have to complete a few tasks to get his items.
We will show you step by step what you need to do for the Horn Herald’s quest and how you can find his locations. With our directory, you can jump to the individual steps of the quest.
[toc]
Start video
Elden Ring DLC: Collecting Scadubaum Fragments – Here’s Why They’re Important and How to Get Them
Talk to the Horn Herald after the Rune is broken
To break the Rune of Miquella and thus end his hypnosis over the other NPCs, you should visit the Shadow Castle. Places like the Ruins of Rauh or the Bonny Village may also work. You will know the Rune is broken when you hear a loud bang paired with a message.
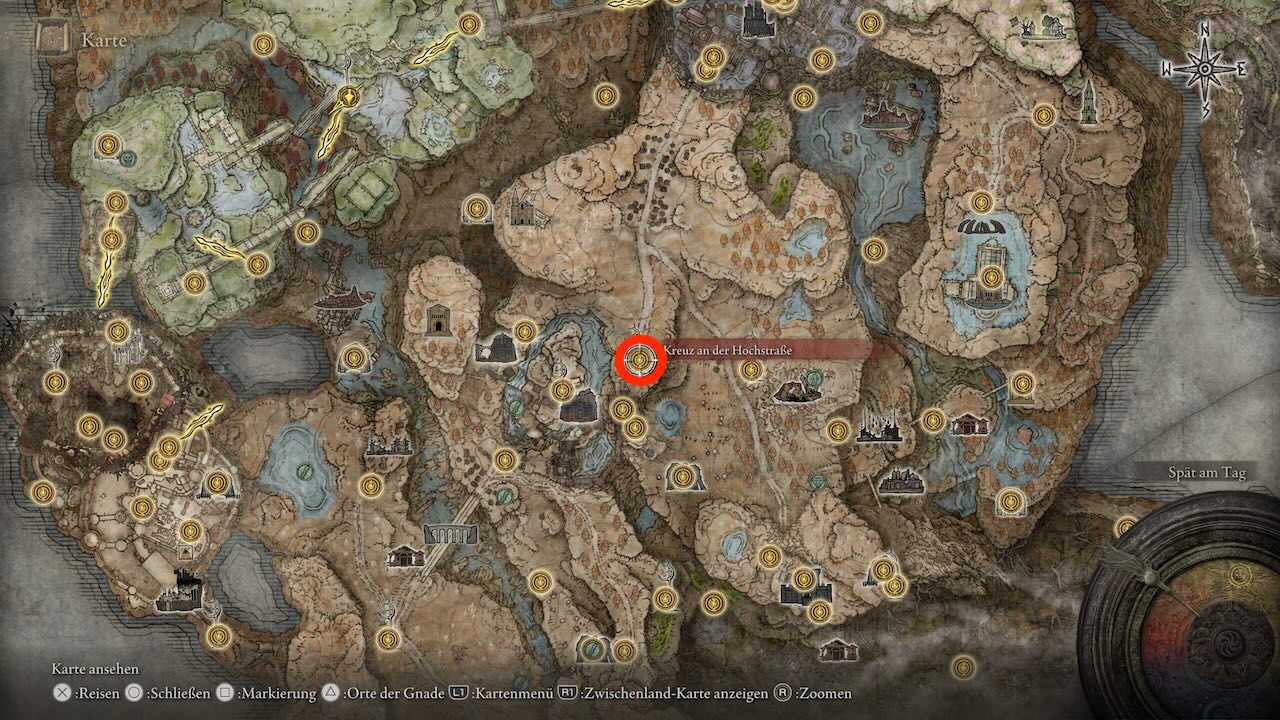
If the Rune is broken, you need to talk to the Horn Herald at the Grace site “Cross at the High Road.”
Second location of the Horn Herald
Suggest Leda as a target for the Horn Herald
After talking to the Horn Herald, you need to rest at the Grace site “Cross at the High Road.” Now stand up and talk to Leda, who is also nearby. She will fall into her bloodlust and want to kill NPCs that stand in Miquella’s way. Unfortunately, she does not know who to defeat first, and you can suggest the Horn Herald to her.
IMPORTANT: This step is not important and therefore optional. However, if you want to reach Leda’s or the Horn Herald’s items faster, you can suggest Leda to make the Horn Herald her first target.
Defeat or assist the Horn Herald in the fight against Leda
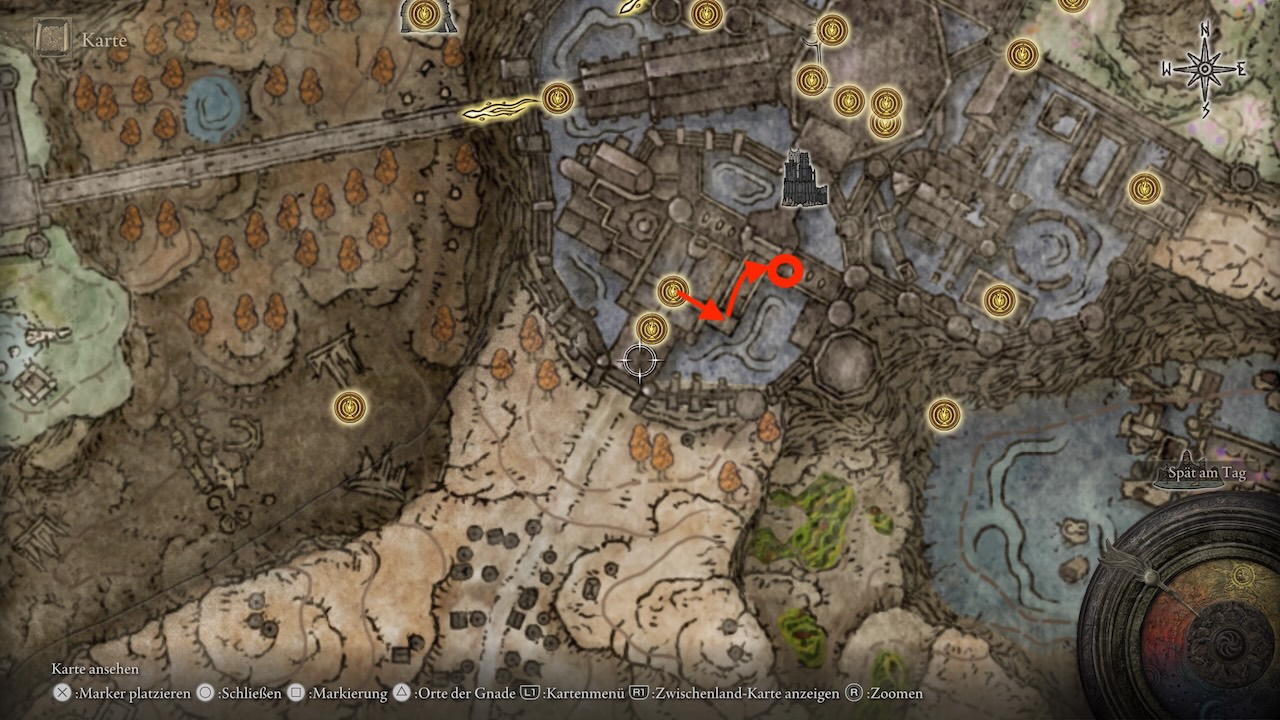
If you have given Leda the tip for her first target, you need to travel to the Shadow Castle at the Grace site “Place at the Main Gate.” Now use the right shortcut, walk through the huge gate past the shadow militia, and up the stairs. Right after the stairs, you will see two summoning symbols – one red and one yellow.
Third location of the Horn Herald
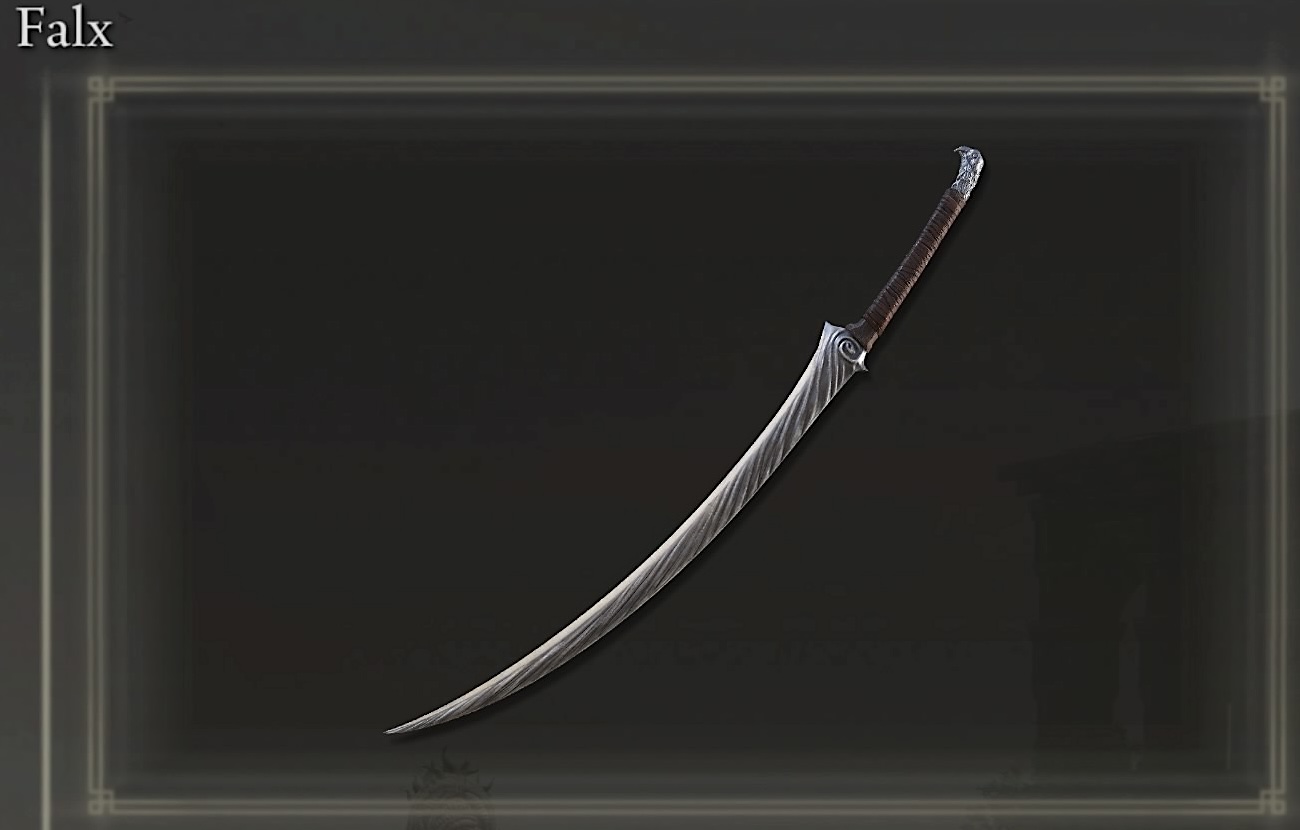
Red summoning symbol – Assist Leda
Reward: Horn Herald armor set, Falx (scimitar)
Yellow summoning symbol – Assist the Horn Herald
Reward: War ashes: Quick cut, Leda’s Rune
Depending on which symbol you choose, the quest from the Horn Herald will continue or end. We recommend supporting the Horn Herald against Leda, as you will later get the items from the NPC anyway.
Summon the Horn Herald at Messmer
If you have helped the Horn Herald, you now need to look for the Grace site “Entrance to the Dark Chamber” in the Shadow Castle. From there, you start the boss fight against Messmer. Now you need to summon the NPC. You can only do this in the arena, so you need to catch a good moment when the boss does not greet you with a spear. Now defeat Messmer together.
Talk to the Horn Herald after the fight against Messmer
If you have survived the fight against Messmer, you should rest at the new Grace site “Messmer’s Dark Chamber.” Now, the Horn Herald will appear before Messmer’s throne. Talk to him to get new info about his next steps as a avenger. Once you have exhausted all his dialogue options, you must visit his last location.
Defeat the Horn Herald in the Ruins of Rauh
After talking to the Horn Herald in Messmer’s chamber, you must make your way to the Ruins of Rauh. Start from the Grace site “Ancient Ruins of Rauh, East” and cross the broken aqueduct to the southwest.
Just before leaving the broken aqueduct, you will see a small path on the right side. Follow this until you see a cliff. Jump over it with a sprint and your horse, and then ride past the Miranda flowers to the southwest.
Fourth location of the Horn Herald
You will then see a large platform that you can use as an elevator. Ride all the way up and then jump past the shadows to the next lower level. Stay left until you have escaped the enemies and can follow a straight path to the southeast.
At the end of the path, take a right turn until you arrive on the other side of the plane. Now take the left path upward to gain height. Now you can turn 90 degrees to the right and will discover a cave with vermin and Scarlet Rot.
Ride past it with your horse and keep to the left until you find another elevator platform. Activate it and ride upward. Once at the top, you will see a large staircase in front of you. Now walk towards the stairs and greet the Horn Herald who will challenge you as an intruder.
What rewards are there? Once you have completed the Horn Herald’s quest, you will receive the Horn Herald set and the weapon Falx:
The armor set of the Horn HeraldThe bloody swords “Falx”
The weapon consists of two scimitars that can cause bleeding damage. They cannot carry war ashes, but are extremely deadly due to their talent.
As for the armor, it is rather mediocre and offers little protection. However, the Horn Herald’s mask can surely find a place in one or the other fashion set.
Can I summon the Horn Herald at the final boss? The Horn Herald belongs to the NPCs that are not friendly to you, no matter what you do or how you do it. Either you defeat him with Leda or later in the Ancient Ruins of Rauh. You cannot appease him as his desire for revenge is so great that it will drive him to attack you sooner or later.
However, there is an interesting interaction when you receive a scorpion stew from the Horn Herald Grandam in Belurat. If you give this to the Horn Herald, he will gift you an oven face – for nostalgic reasons.
That was all the important info about the quest of the Horn Herald. Which NPC quests do you like, have you completed them all or missed some? If you are looking for more guides, we have compiled a large overview of all tips and assistance for Elden Ring: Elden Ring: All guides, beginner tips, and builds in overview
This is an AI-powered translation. Some inaccuracies might exist.
The DLC for Elden Ring not only brings new weapons but also new talismans that you can find. In our overview, we show you all the talismans and how you can find them.
The article was last updated on July 22, 2024, reviewed, and is currently up-to-date.
How many talismans does the DLC bring? In Shadow of the Erdtree, you can find and equip up to 39 new talismans. Some of them are improved versions from the base game, while a large portion represents new items with unique effects.
In our list, you’ll find all the talismans from the DLC along with their locations in an overview. We sort them by their location in the respective area so you can quickly collect them all at once. With our directory, you can easily jump between the different areas:
[toc]
Start video
Elden Ring DLC: Collecting Scadubaum Fragments – Here’s Why They’re Important and How to Get Them
All Talismans on the Gravefield Level
Name of the Talismans
Effect
Location
Blade of Grace
Increases your attack power by 20% for 20 seconds after each critical hit.
You can find it in the Scorched Ruins in a chest on the tower.
Misery Talisman
Increases your resistance to the last inflicted misery.
You can find it northeast of the location “Abandoned Suffering Village” on a wooden platform.
Heritage of the Foreign Deity
Increases your arcane energy by 5 points.
You can find it in City of Outlook at the highest point in a chest.
Blessed Blue Dew Talisman
Slowly regenerates FP. (0.5 FP per second)
You can find it in the Church of Blessing in front of the statue of Marika.
Cruisade Insignia
Increases your attack power by 15% for 20 seconds after defeating each enemy.
Defeat Fire Knight Queelign in Belurat.
Horn Talisman of Immunity +2
Increases your immunity by 180 points.
Defeat the Tree Spirit in the toxic swamp of Belurat.
Dried Bouquet
Increases your attack power by 15% for 20 seconds after your Spirit Ash dies.
From Miquella’s Cross in Belurat, exit the door to the right and immediately go left. The talisman is located in a chest.
Wrathful Divine Beast
Enhances the effect of storms by 10%.
Exchange the Echo of the Dancing Lion at the Finger Reader in the Table of Grace.
Magic Dragon Talisman +3
Increases resistance against magic damage to the maximum. (22%)
From the Front of the Castle, keep left and go under the bridge. Follow the path past the bats until you find a gap leading to a new room. The talisman is in this room.
Rellana’s Cameo
Improves attacks by 15% that are executed after not changing posture for a while.
From “Checkpoint of Castle Ensis”, follow the path into the castle until you reach Moonrithyll. Defeat it and continue following the path into the church. The talisman is located on the altar.
Purple Amber Medallion +3
Increases the maximum HP to the maximum. (10%)
Defeat the dungeon boss “Death Knight” in the Fog Rift Catacombs.
From the place of grace “Cave at Ellac”, follow the path northwest. At the end, you just need to walk through the waterfall to grab the talisman.
All Talismans in Scadu Altus
Name of the Talismans
Effect
Location
Green Mold Disc
Increases defense with higher equipment weight.
Use the portal northwest of the place of grace “Cross by the High Road”. In the Ruins of Rauh, head northeast to collect the talisman in front of a statue.
Sailing Shot Talisman
Increases the range of bows by 50% and enhances your attack power of arrows and bolts by 8%.
Located in the Fog Rift Fortress in the building where Knight Garrew is. Keep left and climb the stairs. After climbing two ladders, you will find the talisman in a chest.
Smithing Talisman
Improves weapon throw attacks by 10%.
You can find it in the Ruined Starfall Forge.
Shattered Stone Talisman
Enhances the effect of kick and stomp talents by 10%.
You can find it northeast in the Ruins of Moorth in a destroyed building on the roof.
Flame Dragon Talisman +3
Increases resistance against fire damage to the maximum. (22%)
You can find it in the Fortress of Reproach in the cage room. Keep left and jump over the cages until you spot a chest. The talisman can be found in this chest.
Talisman of Fear
Enhances the effect of magma by 14%.
Located on a corpse in the Elder’s Cabin south of the Fortress of Reproach.
Lord’s Offering Talisman
Improves balance after using a flask of tears by 54%.
From the square at the main gate in the Shadow Mountain Cemetery, keep left and follow the path past the two Black Knights until you exit the room. Now jump to the right onto the small Earth Tree. The talisman is located in front of the tree.
Flesh-Rending Entanglement
Improves sprint attacks by 15%.
Defeat the Horn Herald together with Leda and report back to her about the success. To defeat the NPC, you need to find Leda’s summon symbol in the Shadow Mountain Cemetery. For this, follow the right shortcut from the square at the main gate and then climb the stairs. At the end of the stairs, you will find the symbols on the right side.
Lightning Dragon Talisman +3
Increases resistance against lightning damage to the maximum. (22%)
In the Shadow Mountain Cemetery at the place of grace “Warehouse, Ground Floor”, keep right. At the stone books, jump up until you reach one floor higher. From there, jump northwest down again to find the talisman on a corpse.
Pearl Dragon Talisman +3
Increases resistance against non-physical damage to the maximum. (11%)
In the Shadow Mountain Cemetery, follow the path from “Warehouse, Ground Floor” until you can go up two floors. On the second floor, keep right and ignore the Fire Knight in front of you. The talisman is located on a massive corpse.
IMPORTANT: The corpse only appears at this location after you have activated the warehouse’s rotation mechanism.
Retributive Entanglement
Improves attacks performed after rolling or stepping back by 17%.
Defeat the NPC “Ansbach” in the Warehouse, Ground Floor in Shadow Mountain Cemetery with Leda. The summon symbols are in a room after you’ve taken the stairs for the first time. Keep right to find the room. After your victory, you must report back to Leda.
Emerald Amber Medallion +3
Increases the maximum stamina to the maximum by 17%.
Located in the Darklight Catacombs. Illuminate the catacombs with light and follow the path until you see a railing on the right side. Jump over it and follow the edge until you can drop down to a broken spot. There should be a new room in front of you with a chest that you need to open.
Brave Horn Talisman +2
Significantly increases robustness. (180 points)
In the Dungeon of Bonny, follow the path until you find the sewer canal. Follow the northern route past the rats until you find a ladder. Go up this ladder and collect the talisman from a corpse.
Beloved Stardust
Reduces the effect duration for sorcery and summons to the maximum, but increases damage taken by 30%.
Let the first bell toll for Ymir and then visit him in the Cathedral of Manus Metyr. He will give you the talisman.
Golden Braid
Increases resistance against holy damage to the maximum. (22%)
You can find it southeast in the Shaman Village on a corpse located in a tree.
Sky Seed Talisman +1
Significantly enhances the FP regeneration of flasks with Sky Tears. (30%)
Let the first bell toll for Ymir in the Finger Ruins of Dheo. You will receive the talisman afterwards.
Sharpshooter Talisman
Enhances the attack power of targeted shots by 12%.
Found in the Albinauric’s Cabin after defeating Commander Gaius.
All Talismans in the Skyblue Shore
Name of the Talismans
Effect
Location
Purple Seed Talisman +1
Significantly enhances HP regeneration of flasks with purple tears. (30%)
St. Trina’s Smile
Increases attack power when sleep is triggered nearby.
Horn Talisman of Clarity +2
Significantly increases focus. (180 points)
All Talismans from the Ruins of Rauh
Name of the Talismans
Effect
Location
Pearl Shield Talisman
Increases all non-physical damage resistances when guarding by 20%.
You can find it northwest of the place of grace “Foot of the Ancient Ruins” in a soldier camp.
Two-Handed Sword Talisman
Increases attacks with two-handed weapons by 15%.
You can find it in a chest at the highest point in the Ruins of the Temple City.
Sky Amber Medallion +3
Increases the maximum FP to the maximum. (12.5%)
Defeat the Death Knight final boss in the Catacombs at Scorpion River.
Fine Crucible Feather Talisman
Improves backsteps but increases damage taken by 15%.
You can find it in the first ruins of Rauh northwest of the place of grace “Little Viaduct Tower”. Look for a large room with several roots. On the roots is a corpse with the talisman.
Speckled Necklace +2
Significantly increases robustness, immunity, and focus by 100 points each.
Located in a chest at the top of the second ruin behind the viaduct. Use the spirit jump with your horse to reach the top of the ruin from the air column. Go up the stairs and open the chest. To activate the air column, you must take the northeastern path from the place of grace “Church of the Bud, Main Gate” until you can break the seal of the spirit jump at a cliff.
Talisman of All Crucibles
Grants the effects of all crucible talismans but also increases damage taken by 45%.
From the place of grace “Ancient Ruins of Rauh, West”, head southwest and enter the ruin. Take the next elevator up. Upon arrival, keep left and jump along the remnants of the ruin, going deeper down. At the lowest point, continue southeast until you reach a large platform. Look for a hole in the wall and follow it to another hole leading you to a chest.
All Talismans from the Abyss Forest
Name of the Talismans
Effect
Location
Joy of the Elder
Increases attack power by 20% when madness is triggered nearby.
From the place of grace “Church Ruins”, follow the path northwest until you find one of the madmen. You must defeat it. Use a parrying shield to counter its grab attack and make it vulnerable. Once defeated, it will drop the talisman.
That was all the talismans from the new DLC. In addition to 39 talismans, there are also 101 new weapons that you can find in the Shadowlands. What they are and where you can find them, we show you in our large overview: Elden Ring DLC: All Weapons in Overview with Locations
This is an AI-powered translation. Some inaccuracies might exist.
The DLC from Elden Ring brings eight new weapon types and many numerous weapons that you can collect. Which new weapons are available in Shadow of the Erdtree and where you can find them are shown in this list.
The article was last updated on July 22, 2024 and all German names of the weapons have been added.
[toc]
How many new weapons are there in the DLC? Currently, there are up to 102 new weapons in the new DLC of Elden Ring (including talismans, shields, torches, and staves). Many can be obtained quickly at the beginning of your journey, but the majority must be either searched for or earned through boss fights.
In our list, we reveal all new weapons from the DLC and explain exactly where you can find them.
We sort all new weapons into their corresponding categories in tables. With our directory, you can quickly jump to the individual categories and see what new additions have been made.
Start video
Start the Igon Quest in Elden Ring, defeat Bayle and become a dragon – Here’s how to do it
All new weapons from the DLC at a glance
All daggers from the DLC
Name of the weapon
Location
Left-handed dagger
Travel to Shadowmount Grave to the place of grace “Place at Main Gate”. Head northwest and follow the path through the room outside. Now go up the stairs to the right until you can turn right into another room again. Go right again past a soldier and black knight to a corpse. The dagger is there.
All throwing knives from the DLC
Name of the weapon
Location
Smith’s dagger
You can find it in the dungeon “Lavazulauf of the ruined smith” on Scadus Atlus. It can be found on a corpse that is guarded by a golem.
Dagger of the Fire Knights
Must be farmed from the fire knights in the castle “Shadowmount Grave”.
All swords from the DLC
Name of the weapon
Location
Stone-coated sword
You can pick it up in the Ruins of Unte at an altar.
From the place of grace “Cross at the Rift”, head northwest towards the huge stone coffin. Jump onto its sloping surface and try to go deeper until you can jump onto the rubble of the coffin. You should then see a small cave to the east where loot is located. The sword is waiting for you there.
All light greatswords from the DLC
Name of the weapon
Location
Milady
You find the sword in a chest northwest of the grace “Front of the Castle”. Cross the bridge and keep left until you see a tower with a ladder. Go up the ladder and open the chest.
Leda’s sword
You obtain Leda’s sword when you defeat all followers and Leda in Enir-Ilim. Collect the sword from Leda’s corpse.
Rellana’s twin blades
Defeat Rellana in Castle Ensis and exchange her echo at the Finger reader in the table of grace.
All greatswords from the DLC
Name of the weapon
Location
Lizard greatsword
Farm the weights in the dungeon “Catacombs at Scorpion River” that wield this weapon.
Greatsword of Solitude
Defeat the knight of the lonely dungeon in the mausoleum “Western nameless mausoleum”.
Greatsword of Damnation
Defeat Midra in Midra’s parish and exchange his echo at the Finger reader in the table of grace.
All colossal swords from the DLC
Name of the weapon
Location
Moonrithyll’s knight sword
Defeat the intruder “Moonrithyll” in Castle Ensis.
Ancient meteorite greatsword
Loot the dungeon “Ruined Starfall Forge” and complete it. You can find the dungeon southwest of the Ruins of Moorth.
Radahn’s greatsword (Lord)
Defeat Radahn in Enir-Ilim and exchange his echo at the Finger reader in the table of grace.
Radahn’s greatsword (light)
Defeat Radahn in Enir-Ilim and exchange his echo at the Finger reader in the table of grace.
Greatsword of the fire knights
Must be farmed from the fire knights in the castle “Shadowmount Grave”.
All thrusting swords from the DLC
Name of the weapon
Location
Caria magic sword
From the place of grace “Cross at the High Road” keep left until you reach the river. Ride south until you can jump to Castle Ensis. Jump from the ledge onto the castle and on the same level in the southern direction, look for a chest. The sword is in this chest.
All heavy thrusting swords from the DLC
Name of the weapon
Location
Swort lance
Defeat Commander Gaius behind the Shadowmount Grave and exchange his echo at the Finger reader in the table of grace.
Queelign’s great sword
Give Queelign the Iris of the eclipse in Shadowmount Grave. Queelign is located to the west of the place of grace “Church District, Entrance”. Look for the large cathedral and try to jump over the roof onto the support arches. Now jump onto the level below you, which is to the southwest and enter the prayer room. You will find Queelign on the floor.
Defeat the dancer of Ranah in the mausoleum “Southern nameless mausoleum”.
Sword of the horn warrior
Farm the horn warriors in Belurat, who wield this weapon.
Sword of the spirit
Start from the place of grace “Western sky blue shore” and ride in the northwest direction where the ghost worms are located. To the east, you will see graves and loot, and that’s where the sword is.
All twisted greatswords from the DLC
Name of the weapon
Location
Greatsword of the horn warrior
Farm the horn warriors in Belurat, who wield this weapon.
Freya’s greatsword
You receive Freya’s greatsword when you defeat all followers and Leda in Enir-Ilim. Collect the sword from Freya’s corpse.
All backhand blades from the DLC
Name of the weapon
Location
Backhand blade
You can find the backhand blade near the place of grace “Three-Way Crossroad”. Move east until you recognize the stone monuments from afar. You find the swords at the grave.
Smith’s cirque
Loot the dungeon “Ruined Starfall Forge” that you find southwest of the ruins of Moorth.
Smith’s cirque d. the curse blade
Defeat the aspects in front of you at the place of grace “Gravefield level”.
Defeat the half-human queen Marigga, whom you can find northwest of the place of grace “Western sky blue shore”. She is located on the beach next to a giant coffin.
All great katanas from the DLC
Name of the weapon
Location
Great katana
You can find it in a lake located northwest of the place of grace “Three-Way Crossroad”. Collect the sword from a corpse in front of a dragon.
Dragon hunter great katana
Defeat the boss in the dungeon “Dragon group”. The dungeon is located south of Castle Ensis.
Rakshasa’s great katana
Defeat Rakshasa in the mausoleum “Eastern nameless mausoleum”.
All dual blades from the DLC
Name of the weapon
Location
Black steel dual blade
Defeat the black knight in the large camp in front of the Shadowmount Grave, who wields this weapon.
Euphoria
From the place of grace “Spiral Tower” go out the door in an eastern direction, until you have crossed the second staircase halfway. Now look to the south and jump onto the stairs you see below you.
Go through the broken railing onto the ledge below you and continue past the wall decorations in the southern direction. Eventually, you must take another floor down.
Go around the corner and jump onto the tower in a southerly direction. Follow the spiral down until you see an opening in the wall to the south. Take a run-up and jump through. Follow the path in a southeastern direction and take an elevator down.
Continue along the path past a lion warrior and then take the next stairs down. Now comes a second elevator. Once you’re one more floor down, you just have to open the door in front of you. Collect the item from a corpse.
All axes from the DLC
Name of the weapon
Location
Split tongue axe
You must farm at the weights that are located in various catacombs.
Messmer soldier axe
You can farm at the soldiers of Messmer who wield this weapon.
Smith’s axe
Loot the dungeon “Ruined Forge of Taylew”, which you can find north of the place of grace “Foot of the ancient ruin”.
Double axe of the death knight
Defeat the final boss in the dungeon “Fogtear Catacombs”.
All great axes from the DLC
Name of the weapon
Location
Butcher’s knife from Bonny
You can find it in Bonny village near the broken bridge in the northeastern direction.
Longstaff axe of the death knight
Defeat the boss from the dungeon “Catacombs at Scorpion River”.
Rotten axe
Defeat the rotten knight and exchange his echo at the Finger reader in the table of grace.
All hammers from the DLC
Name of the weapon
Location
Flowerstone hammer
You get it after completing Igon’s quest at the place of grace “Great Altar of Dragon Communion” – where the dragon priestess stood.
All flails from the DLC
Name of the weapon
Location
Snake flail
Jump from the place of grace “Scadu Altus, West” down to the Fogtear fortress. Continue through the fortress until you find a ladder on your left side in the southern direction. Take the ladder and go north past the guards until you find a chest. The weapon is in this chest.
All war hammers from the DLC
Name of the weapon
Location
Smith’s great hammer
Loot the dungeon “Ruined Forge of Taylew”, which you can find north of the place of grace “Foot of the ancient ruin”.
Black steel great hammer
From the place of grace “Gravefield level”, go northeast until you reach the Church of Comfort. In this church waits a black knight. Defeat this opponent and receive the hammer.
All gigantic weapons from the DLC
Name of the weapon
Location
Arm of a bloodless being
Farm the bloodless beings that carry this weapon.
Ambush hammer
Loot the dungeon “Lavazulauf of the ruined smith” and complete it. This is located south of Castle Ensis.
Devonia’s hammer
Defeat the forge knight “Devonia” near the grace “Ancient ruins of Rauh, East”.
Staring finger
Defeat Metyr during the quest of Ymir and exchange his echo at the Finger reader in the table of grace.
Shadow sunflower bloom
Defeat the shadow sunflower and exchange her echo at the Finger reader in the table of grace.
All spears from the DLC
Name of the weapon
Location
Swift spear
From the place of grace “Front of the Castle” go southeast and follow the field path until you reach a road barricade. The spear is on a corpse in front of the barricades.
Smith’s spear
Loot the dungeon “Ruined Starfall Forge”. You can find the dungeon southwest of the Ruins of Moorth.
Fork of the bloodless being
Farm the bloodless beings that carry this weapon.
All great spears from the DLC
Name of the weapon
Location
Messmer soldier spear
Farm the soldiers of Messmer who carry this weapon.
Stingy spear
Defeat Jori after you have explored the dungeon “Darklight Catacombs”.
Stake spear
Defeat Messmer and exchange his echo at the Finger reader in the table of grace.
Holy spear of the bloodless being
Defeat the bloodless being in the lake west of the dungeon “Ruined Forge of Taylew”, who wields this weapon.
All halberds from the DLC
Name of the weapon
Location
Budding spear
Defeat Romina, the Holy of the Bud and exchange her echo at the Finger reader in the table of grace.
Ghost gleve
Travel to the place of grace “Charos hidden grave” and walk north. At the end of the path, you will discover some graves and loot that you can collect. The gleve is located there.
All reapers from the DLC
Name of the weapon
Location
Obsidian blade
Complete Ansbach’s quest and collect the weapon from his corpse.
All whips from the DLC
Name of the weapon
Location
Tooth whip
You can find it at the whip hut, northeast of Bonny village.
All fist weapons from the DLC
Name of the weapon
Location
Insane hand
You can find it south of the place of grace “Forest Path” in the Abyss Forest. Look for the intruder who wields this weapon and defeat him.
Pata
You can find it in front of the church of blessings. To reach the church, follow the southeast path from the place of grace “Cliff Road, End Point”.
Golem fist
Farm the golems in the dungeon “Ruined Forge of Taylew”, which you can find north of the place of grace “Foot of the ancient ruin”.
Poisonous hand
From the place of grace “Belurat, Tower Settlement”, go up the southeast path two flights of stairs and then turn sharply right. Now go west and keep left.
Take the ladder down then unlock the locked grate with the key to the well bottom. Now exit the sewer and follow the northern path until you see a corpse. The poisonous hand is located on it.
You obtain Danes legwork when you defeat all followers and Leda in Enir-Ilim. Collect the martial art from Dane’s corpse.
Dry leaf art
Use the gesture “May the best win” at Dane in the ruins of Moorth and then defeat Dane in battle.
All claws from the DLC
Name of the weapon
Location
Claws of the night
Defeat Anna, sword hand of the night beneath the cathedral of Manus Metyr.
All beast claws from the DLC
Name of the weapon
Location
Beast claw
Defeat the naked man in the woods southeast of the grace “Gravefield level”.
Claw of the red bear
Defeat the boss in the mausoleum “Northern nameless mausoleum”.
All perfume bottles from the DLC
Name of the weapon
Location
Fire spark perfume bottle
Southeast of the place of grace “Front of the Castle” near Castle Ensis.
Lightning perfume bottle
Northeast of the place of grace “Sky Blue Shore” near a golden buck.
Frost perfume bottle
In the dungeon “Prison of the Accuser”. You can only access the dungeon at the place “Charos hidden grave”.
Poison perfume bottle
Can be purchased at the place of grace “Cross at the Pillar Hall” from Thiollier. It’s located south of Castle Ensis.
Perfume bottle of the raging flame
You can find it at the place of grace “Church Ruins” in the Abyss Forest. Look for a corpse in the nearby area.
All light bows from the DLC
Name of the weapon
Location
Bone bow
You can find it in Belurat, Tower Settlement, in the room guarded by two giant scorpions. The bow is found on the corpse beneath the scorpions.
All bows from the DLC
Name of the weapon
Location
Ansbach longbow
Defeat Ansbach near the grace “Warehouse, Ground Floor” in Shadowmount Grave. You must have progressed the quest from Leda for this.
All great bows from the DLC
Name of the weapon
Location
Igon’s great bow
Complete Igon’s quest and summon him in the fight against Bayle. Then find his last location and collect the bow from his corpse.
All crossbows from the DLC
Name of the weapon
Location
Scatter crossbow
From the place of grace “Front of the Castle”, near Castle Ensis, take the route southeast until you come across a small camp. The crossbow is there.
Volley crossbow
Located north of the Fortress of Blame. Travel to the place of grace “Moorth Road, South” and follow the road north until you see a corpse on the left side. The crossbow is there.
All ballistae from the DLC
Name of the weapon
Location
Rabbath’s cannon
Jump with your spectral horse onto Rabbath’s tower and open the chest in the tower. The tower is located east of the grace “High Road to the Church District”.
All shimmerstone staves from the DLC
Name of the weapon
Location
Maternal staff
Defeat Ymir at the end of his quest in the cathedral of Manus Metyr.
Staff of the great beyond
Defeat Metyr during the quest of Ymir and exchange his echo at the Finger reader in the table of grace.
All holy seals from the DLC
Name of the weapon
Location
Dry leaf seal
From the place of grace “Uplands of the Klausner River” near the ruins of Unte, continue south. Follow the path until you reach the graves guarded by death birds. Ignore these and jump down further until you discover loot. The seal is located there.
Seal of the fire knights
Located behind the large statue of Queen Marika in the great cathedral in the church district near Shadowmount Grave. You need to lower the water level to reach the seal.
Seal of the spiral tree
Collect the death painting northeast of the Scorched Ruins on Gravefield level. Now go into the area where the “Northern nameless mausoleum” is located and search in the southwest direction for two rocks that look towards “Belurat”. There you will receive the seal.
All torches from the DLC
Name of the weapon
Location
Nanaya’s torch
You can find it in Midra’s parish on a corpse in the rocking chair.
Lamenting visage
In the dungeon “Prison of the Accuser”. You can only reach the dungeon at the place “Charos hidden grave”.
All small shields from the DLC
Name of the weapon
Location
Shield of the night
You can find it in the dungeon of Bonny near Bonny village.
Smith’s shield
Loot the dungeon “Ruined Forge of Taylew”, which you can find north of the place of grace “Foot of the ancient ruin”.
All shields from the DLC
Name of the weapon
Location
Messmer soldier shield
You can farm from the soldiers of Messmer who wield this shield.
Golden lion shield
You receive the shield from Freya when you defeat all followers and Leda in Enir-Ilim. Collect the shield from Freya’s corpse.
Wolf herald shield
Located in Castle Ensis in a chest. From the place of grace “Checkpoint of Castle Ensis”, follow the path further inside the castle. After defeating Moonrithyll, head west until you find stairs going down. Follow the path to a room where the chest with the shield is located.
Snake herald shield
Collect the death painting southeast of the place of grace “Cliff Road, End Point” in the artist’s hut.
Now go to the place of grace “Three-Way Crossroad” and follow the northwest path to the lake until you see three pines standing in front of stone monuments. There you will get the shield.
All great shields from the DLC
Name of the weapon
Location
Black steel great shield
Is randomly dropped by the black knights in the Shadowlands. Defeat Garrew, the black knight of the fogtear fortress.
Greenstone great shield
You receive Moore’s shield when you defeat all followers and Leda in Enir-Ilim. Collect the shield from Moore’s corpse.
All thrust shields from the DLC
Name of the weapon
Location
Duelist shield
You can find it in Shadowmount Grave in the warehouse. Follow the path up to the middle floor. You will see various wooden beams in the eastern direction. Use these to reach a distant platform that houses the shield.
Carian thrust shield
You can find it in Shadowmount Grave in the warehouse. Follow the path up until you see several enemies and a fire knight. A corpse will carry the shield.
These were all the weapons currently available in Elden Ring’s DLC. Which weapons did you like, and which do you still need? We have written a lot of guides for the DLC, and if you need help, feel free to check out our overview: Elden Ring: All guides, beginner tips, and builds at a glance
This is an AI-powered translation. Some inaccuracies might exist.
In the DLC of Elden Ring, there are 42 bosses that you can defeat. Some of them are relevant to the story, while others guard dungeons and small caves. We will show you all the bosses on the map and provide you with a sequence in which you should defeat them.
Update, July 22, 2024: The article has been checked, updated, and is now up to date.
How many bosses are there in the DLC? Currently, there are 42 bosses in the DLC of Elden Ring (as of July 22, 2024, 02:00 AM). Four of them are major bosses that need to be defeated to reach the final boss and complete the DLC.
We will now list all the bosses and reveal their locations. Since the order for optional bosses is a matter of personal preference and they are only difficult if the Scadubloom blessing is too low, we will only provide a sequence for the main bosses, so you know which ones to prioritize to progress in the story.
All optional bosses can be found in their tables, sorted by their locations. With our directory, you can jump to the individual items on our list:
[toc]
Some of the boss locations in a visual form can be found here in our interactive map:
Recommended editorial content
At this point you will find external content that complements the article.
I consent to external content being displayed to me. Personal data can be transmitted to third party platforms.
Read more about our privacy policy.
Note: The map was created in collaboration with our colleagues from Gamepressure. Please note that the map is still in progress and is constantly being expanded.
Elden Ring DLC: All Bosses and Their Orders (Story-relevant)
Golden Hippo
Location: Shadow Cemetery – Site of Grace: Shadow Cemetery, Main Gate
The golden Hippo
Messmer the Impaler
Location: Shadow Cemetery – Site of Grace: Entrance to the Dark Chamber
Messmer the Impaler
Romina, the Blessed of the Bud
Location: Ancient Ruins of Rauh – Site of Grace: Church of the Bud, Main Gate
Romina, the Blessed of the Bud (Image source: YouTube)
IMPORTANT INFO: If you ignite the tree behind the church of the bud with Messmer’s flame, the rune of Miquella will break. Many NPCs will turn against you if you haven’t completed their quest. So make sure to finish these first before proceeding.
Leda and Her Followers
Location: Belurat, Tower Settlement – Site of Grace: Anteroom of the Cleansing Chamber
Leda and her followers
Radahn, Miquella’s Betrothed
Location: Belurat, Tower Settlement – Site of Grace: Front Steps at the Divine Portal
Radahn, Miquella’s Betrothed
Elden Ring DLC: All Bosses and Their Locations (Optional)
In this list, you will be revealed the names of the bosses as well as their locations. Since they are optional, we will not provide an order. However, we will categorize the bosses by their respective areas, so you know where to find them.
Bosses in the Gravefield Plain
Names of the Bosses
Location
Blackgaol Knight
Western Nameless Mausoleum
Chief Bloodfiend
Cave at the River Mouth
Demi-Human Swordmaster Onze
Prison of Belurat
Divine Beast Dancing Lion
Theater of the Divine Beast (Belurat, Tower Settlement)
Ghostflame Dragon
In the Great Lake between Belurat and Abandoned Suffering Village
Lamenter
Prison of the Accuser
Bosses in Scadu Altus
Names of the Bosses
Location
Black Knight Edreed
Fortress of Blame
Rellana, Twin Moon Knight
Castle Ensis
Black Knight Garrew
Fogbreak Fortress
Commander Gaius
Shadow Cemetery, Back Gate
Count Ymir, Mother of Fingers
Cathedral of Manus Metyr (After completing his quest)
Curseblade Labirith
Prison of Bonny
Dryleaf Dane
Ruins of Moorth (Can be challenged with a gesture)
Ghostflame Dragon
Northwest of the Fortress of Blame
Metyr, Mother of Fingers
Finger Birthplace (Requires Ymir’s quest)
Rakshasa
Eastern Nameless Mausoleum
Ralva the Great Red Bear
At the lake northeast of the Site of Grace “Cross by the Highway”
Red Bear
Northern Nameless Mausoleum
Bosses in Ancient Ruins of Rauh
Names of the Bosses
Location
Death Knight
Catacombs at Scorpion River
Divine Beast Dancing Lion
Northeast of the Grace “Ancient Ruins, Large Staircase”
Bosses in Sky Blue Shore
Names of the Bosses
Location
Dancer of Ranah
Southern Nameless Mausoleum
Ghostflame Dragon
South of the Grace “Sky Blue Shore” in the Great Lake
Putrescent Knight
Crack in the Stone Coffin as Final Boss
Demi-Human Queen Marigga
Northeast from the Site of Grace “Western Sky Blue Shore”
Bosses in Charos Hidden Grave
Names of the Bosses
Location
Death Rite Bird
West of the Site of Grace “Charos Hidden Grave”
Bosses at Blade Summit
Names of the Bosses
Location
Ancient Dragon-Man
Dragon Pit (Cave)
Ancient Dragon Senessax
In Blade Summit in a Large Lake
Bayle the Dread
At the top of Blade Summit
Jagged Peak Drake 3x
East of the Site of Grace “Dragon Pit, Last Stop”
Bosses in Abysswood
Names of the Bosses
Location
Jori, Elder Inquisitor
Darklight Catacombs
Midra Lord of Frenzied Flame
Midra’s Parsonage
Bosses in Scadu’s Vista
Names of the Bosses
Location
Fallingstar Beast
Northeast of the Site of Grace “Backland Bridge” in a Crater
That was all the important and optional bosses to hunt in the Elden Ring DLC. Have you been able to discover them all yet? We collect all our guides in a large overview. So if you are looking for information on unknown quests, you should check there: Elden Ring: All Guides, Beginner Tips, and Builds Overview.
This is an AI-powered translation. Some inaccuracies might exist.
MeinMMO editor Karsten Scholz has completed the leveling phase of Dawntrail and had some fun with Final Fantasy XIV. However, he only reluctantly recalls about a dozen quests from the new continent of Tural.
By a stroke of luck, the launch of Final Fantasy XIV: Dawntrail coincided with the beginning of my two-week summer vacation. And indeed, besides visiting the lakes in Leipzig, enjoying long naps with the little one, and series evenings with my wife (especially The Orville), there was enough time to explore Eorzea and level up the monk to level 100.
The mixed judgment of the community after the launch I can certainly understand in hindsight. The story gets off to a slow start despite the extensive cutscenes, and the rather supporting role next to Wuk Lamat is unfamiliar. However, what bothered me the most were certain quest types that have never been fun for me in any online RPG.
The launch trailer for FFXIV: Dawntrail gets you ready for the expansion:
Start video
Final Fantasy XIV: Launch trailer for Dawntrail prepares for the adventure in Tural
Escort, accompany, follow – ugh!
I likely completed my first escort quests sometime in 2005. In the Caves of Wailing from World of Warcraft, a Tauren druid has to be brought alive through half the instance. However, he didn’t run; instead, he sluggishly trudged through the dungeon, only to stop every few meters for a break. God, what a waste of time on two legs. How annoyed I was!
Similar feelings were stirred in me by at least a dozen quests from Dawntrail (why did there have to be so many?!), in which I had to escort NPCs through dangerous areas, accompany them through peaceful zones, or stealthily follow them.
Of course, these tasks are handled much more modernly in 2024 than almost 20 years ago. The residents of Eorzea can do more than just stroll and are no longer constantly out of breath. In the peaceful accompany quests, you can even use the city’s Aetherites to reach your destination as quickly as possible.
All this does not change the fact that these assignments still annoy me. They take the pace out of the gaming experience, offer no excitement or fun, and limit my freedom and flexibility for a certain period. If you break out of the specified framework of the quest, it often fails immediately, and you have to start over. Annoying!
Fortunately, there were also some highlights during the leveling phase of Dawntrail, especially whenever a dungeon, a challenging duel, or a raid challenge was on the agenda. I particularly enjoy the combat events where I can step into different roles for a while and use fresh skills. More of that in the future, Yoshi-P!
In a survey on MeinMMO, we wanted to know from you which anime you liked best from the earlier RTL2 television program. Almost one in three of you has a clear winner.
The anime program on RTL2 was the first point of contact for a whole generation after school. Various anime series played repeatedly on the TV channel during lunchtime. MeinMMO wanted to know, which of the animes you enjoyed watching the most.
These are the results: 1,314 people participated in the survey. You could cast your vote for the anime series you liked watching the most. Since the selection was so large, we gave you three votes.
Here we list which anime series made it to places 4-10:
Place 10: Naruto (4%, 85 votes)
Place 9: Pokémon (5%, 101 votes)
Place 8: Inu Yasha (5%, 103 votes)
Place 7: Ranma ½ (5%, 109 votes)
Place 6: Sailor Moon (5%, 110 votes)
Place 5: Yu-Gi-Oh! (5%, 117 votes)
Place 4: Digimon (8%, 175 votes)
Digimon just missed out on the top 3 of the best anime series. Although Pokémon is the larger franchise, the series managed to gain some votes ahead of Pokémon. On the other hand, Jeanne, the Kamikaze thief, narrowly missed the jump into the top 10. Additionally, there are three animes that did not receive a single vote: Calimero, Hamtaro, and Pretty Cure.
Even today, feature films about Digimon are regularly released. Check out the trailer for Digimon Adventure 02 – The Beginning here:
Start video
Digimon Adventure 02 – The Beginning: German Anime Trailer for the Movie
Besides that, you mentioned your preferences outside of the channel and other animes that were not in the preliminary selection:
User Zischrot believes that we should have included the best anime series of the late 80s in the preliminary selection. For him, Saber Rider and the Star Sheriffs is “the absolute best.”
Blackstone30 enjoyed watching not only Sailor Moon and Detective Conan after school but also Die Kickers and Mila Superstar. He also liked Captain Planet, Biker Mice from Mars, and Samurai Pizza Cats on television, even though not everything aired on RTL2.
Unfortunately, for N0ma, there was no anime he watched on RTL2. His last ones were Bezerk, Hell’s Paradise, and Claymore. Maybe you have a tip for him about which RTL2 animes might suit him?
Sutil did not only watch RTL2, but also animated series like Ariel, The Gummy Bear Bunch, Chip & Dale, and Aladdin.
We will introduce the top three places in more detail. One anime clearly stood out from the others – even though it does not have 1,000 episodes like the other two series.
The anime for Detective Conan started in 1996. Hard to believe, but the series is still ongoing. There are now over 1,129 episodes in which Conan Edogawa solves various cases. He has the unique characteristic of actually being a high school student named Shinichi Kudo, who is trapped in the body of a child due to the side effect of a poison.
Place 2: One Piece
Result: 11% with 247 votes
Your favorite pirate crew made it to place 2. The anime series set sail in 1999. Since then, over 1,112 episodes have been produced in which Luffy and the Straw Hat Pirates embark on the wildest adventures. According to mangaka Eiichiro Oda, an ending is in sight – however, he has postponed his deadline for the conclusion of the story several times.
Place 1: Dragon Ball
Result: 32% with 713 votes
Taking the throne of your favorite RTL2 animes is Dragon Ball with great ease. Almost one in three of you preferred to watch the Saiyan during the afternoon program. From the original series from 1986, we now have Dragon Ball Z (1989), Dragon Ball GT (1996), and Dragon Ball Super (2015).