
The Technomancer is one of the most versatile classes in Outriders. It has its strengths both solo and in a team. We at MeinMMO present you here a build that allows you to complete the expeditions in the endgame at rank 15 alone.

What kind of build is this? It belongs to the pestilential builds, which are among the strongest combinations in Outriders. Some YouTube videos and our own experiences from our tests served as inspiration. This is not a meta build with the best mods in the game.
With this build, you can solo almost all expeditions; we were able to complete most of them with gold and challenge rank 15. And this without a group.
You don’t need any legendary armor pieces or even level 3 modifications. You can build this entirely with epic gear.
You will benefit from both poison and frost effects. An overview of the status effects in Outriders can be found here: Vulnerability, Ash Effect, and Weakness – This is what the status effects do in Outriders
Additionally, there are the challenge ranks that apply only to the expeditions. The higher the rank, the harder the missions. At the same time, you will also receive gear with higher levels.
The amount of rewards you can earn at the end depends on the time in which you complete the mission. There are gold, silver, and bronze rewards. An overview of the expeditions can be found here: Expeditions are the endgame of Outriders – This is how they work
Technomancer Build – Skill Tree, Abilities, Gear
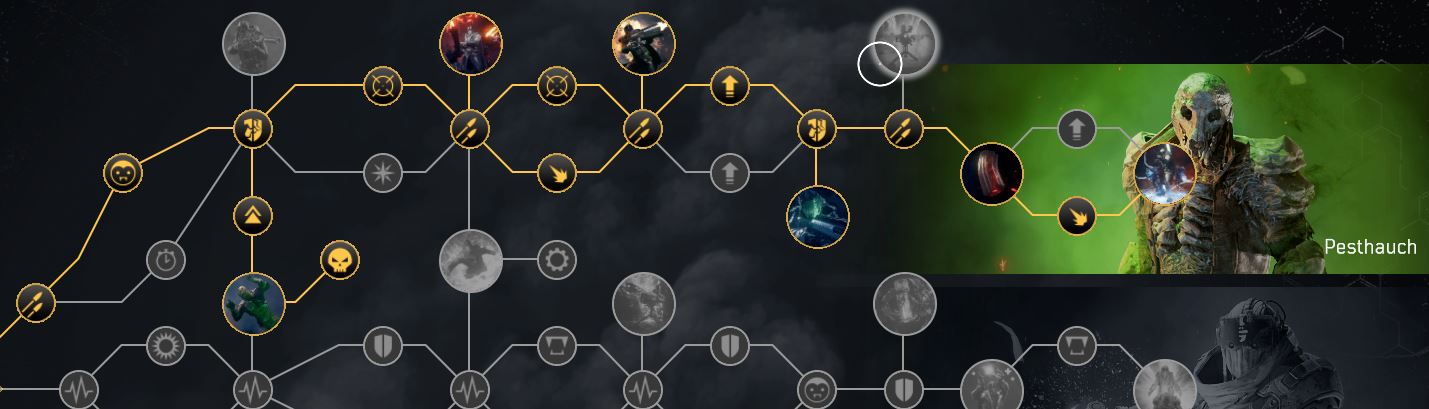
The build is based on the Pestilence skill tree, which massively increases your weapon and poison damage.
This is our skill setup:
- Br/8-Boost Amplifier (x3)
- Increases weapon damage by 8%
- Siphoning Module
- Increases life steal from weapons by 5%
- Penetrating Alloy (x2)
- Increases armor piercing by 10%
- BL-STM-Chaos Nexus
- Increases critical damage by 15%
- Exposing Poison
- Whenever an enemy is affected by poison, they also receive the vulnerability status
- Mark of Damnation
- Vulnerability caused on an enemy is 40% more effective
- Nitrogen Capsules (x2)
- Reduces the distance considered “long range” by 3 m.
- Turret Fire
- Activating field weapons abilities increases your and your group’s damage by 30% for 10 seconds.
- Purification
- Enemies affected by poison take an additional 10% damage
- Mastery: Assault Weapons
- Increases damage with assault weapons by 20%
- Expert: Assault Weapons
- Increases damage with assault weapons by 12%
- Two Sides of Power
- Increases damage taken from all sources by 15% and damage dealt by 20%
- Sniper
- Increases weapon damage at long range by 30%
- UT-14-Magazines
- Increases your weapon’s magazine size by 50%
- Purification 2
- Enemies affected by poison take an additional 15% damage
- Enhancing Antenna
- Using decay abilities increases your and your group’s damage by 40% for 10 seconds.
The catch with this skill setup: By using your abilities, you can increase the weapon damage of you and your group by 70%. Additionally, there are many more damage bonuses.
But what abilities should be used for the build?
The Skills of the Technomancer Build
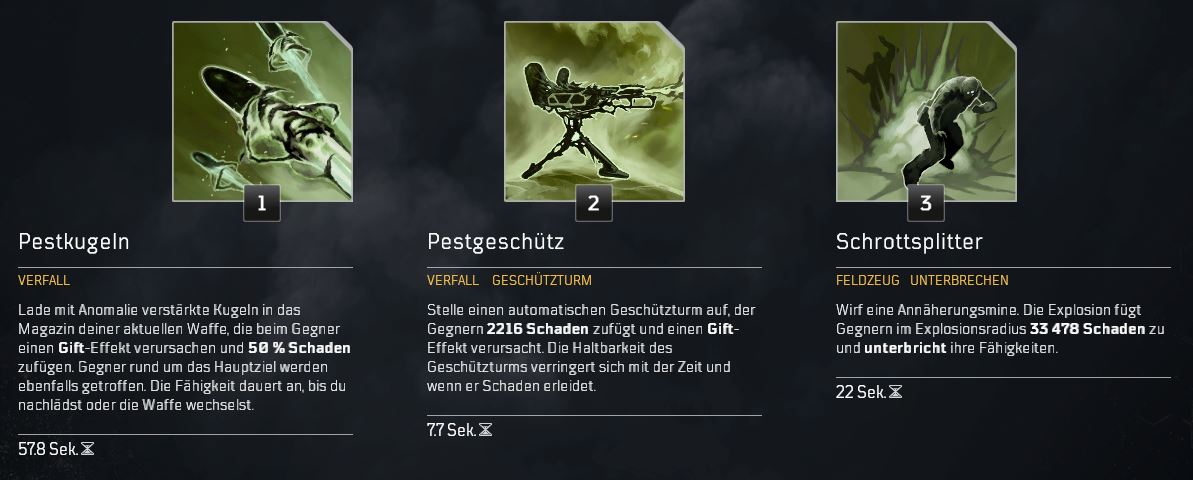
Pestilence Balls:
- This skill is extremely important for dealing damage. On one hand, you poison the enemies and deal 25% extra damage through your perks.
- On the other hand, the Pestilence Balls also increase your attack. The poison effect spreads across multiple enemies and damages them continuously.
- Thanks to the healing ability of the Technomancer, the continuous poison damage also keeps you alive. So make sure to poison as many enemies as possible.
- An armor mod ensures that the skill can be maintained permanently if you achieve enough kills.
Pestilence Turret:
- The Pestilence Turret is usually used to poison masses of enemies.
- Since we are already doing that with the Pestilence Balls, we need the armor mod that turns the Pestilence Turret into a Frost Turret. More on that below.
- There is already the Freeze Turret, but that belongs to a different category of skills (gadgets), while the Pestilence Turret is part of the decay skills.
- This is important because the buff from “Enhancing Antenna,” from the Pestilence skill tree, is only activated by decay skills. This buff lasts for 10 seconds.
- The turret activates this buff not only, but also has only a 7.7 seconds cooldown.
- This way, you can maintain the buff almost permanently.
- As a big bonus, the turret with the frost mod can freeze a lot of enemies.
Scrap Shard
- The skill primarily serves to activate the “Turret Fire” buff.
- This gives you, as already shown above, a 30% damage bonus when activating field weapon abilities.
- This gives you another decent damage boost.
- As a nice bonus, you can deal damage to enemies with the mine and stagger them.
Weapons and Weapon Mods
These stats should the weapon have:
- Critical Damage
- Damage at Long Range
- Damage at Close Range
Here it is again a god roll, for which you first need to find the appropriate mods.
These weapons are the best: We have experimented with various weapons. Since the build is based on Pestilence Balls, it mainly depends on your primary weapon. Its base damage should be as high as possible.
Unfortunately, there is no weapon standing to collect exact data. In our tests, however, a tactical assault rifle turned out to be the strongest choice so far.
Although the fire rate is rather low due to the tactical variant and the burst fire mode, this is easily outweighed by the damage per hit. Overall, tactical rifles seem to be among the strongest weapons in the game.
These weapon mods should you take:
- To maximize damage, you should use rank 3 mods like Fortress or Rampage.
- Both are only available through legendary weapons and are initially unavailable to many with some bad luck.
- But with the buffs from the Pestilence Balls and the skill tree, you are not dependent on rank 3 mods.
In our test, we were able to complete the Star Grave at challenge rank 15 and gold rank with the build. We used the level 2 mods Claymore and Bone Shards.
It is difficult, but quite possible. However, keep in mind that the difficulty varies from expedition to expedition.
What about the secondary weapon? It should only be used when you should not have Pestilence Balls available. Take here a defensive option with mods like Shield Maiden or Life Essence.
Armor and Armor Mods
These are the ideal stats:
- Bonus Weapon Strength
- Damage at Long Range
- Damage at Close Range
These are god rolls, which you first need to find with the right mods.
Alternatively, stats like status power or cooldown reduction can be used to enhance poison and frost effects or to reduce your cooldown. Healing also works, as you become a little more resilient and regain more health points through your dealt damage.
The build is therefore quite flexible. The important thing is to maximize your weapon strength. Equally important are, of course, the mods.
These mods our build has:


- Headwear
- Freezing Components: The Pestilence Turret causes frost instead of poison
- Protective Death: When you kill enemies while aiming with the sights, you gain armor for 10 seconds. Can stack three times.
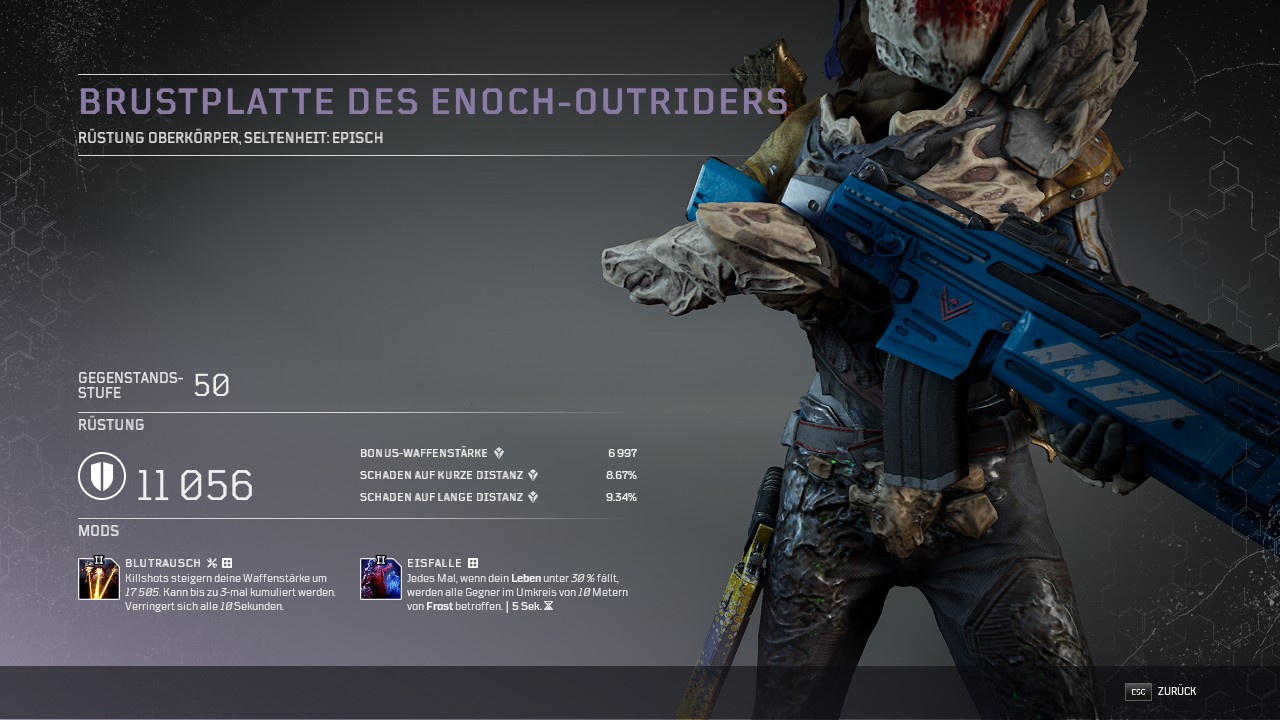
- Upper Body Armor
- Blood Rage: Killshots increase your weapon strength. Can stack up to three times. Reduces every 10 seconds.
- Ice Trap: Every time your health drops below 30%, all enemies within 10 meters are affected by frost. (Cooldown: 5 seconds)
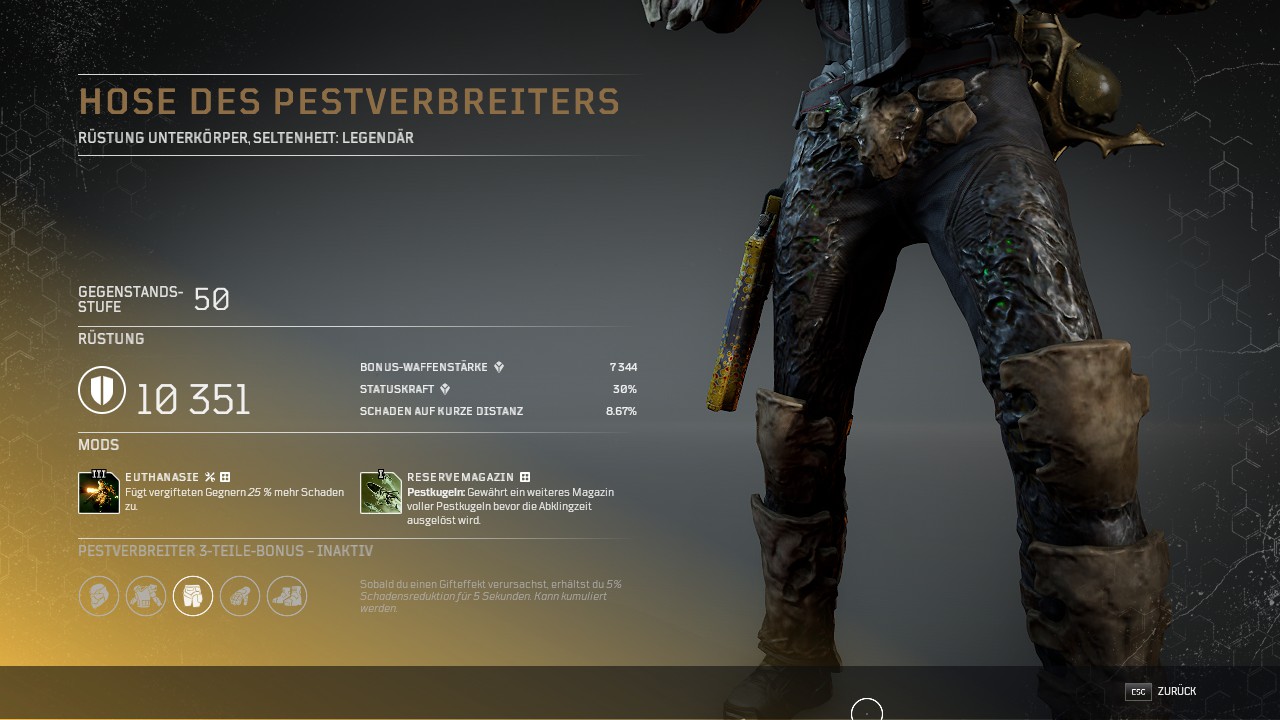
- Lower Body Armor
- Euthanasia: Increases damage against poisoned enemies by 15%
- Reserve Magazine: Grants an additional Pestilence magazine before the cooldown is triggered.
- Gloves
- Poisons Bullet: When you kill enemies affected by poison, 40% of the ammunition in your magazine is instantly replenished.
- Dum-Dum Bullets: Increases damage from assault weapons by 10%.
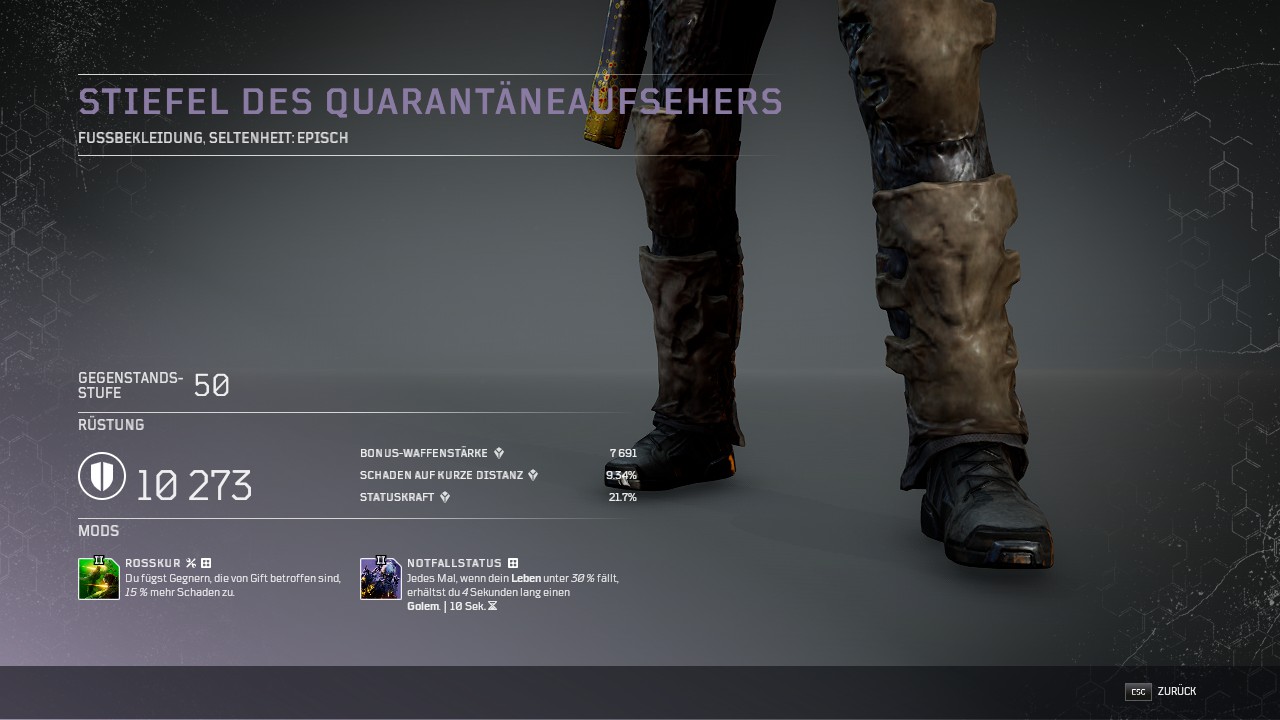
- Footwear
- Ross Cure: You deal 15% more damage to enemies affected by poison.
- Emergency Status: Every time your health drops below 30%, you gain a golem for 4 seconds. (Cooldown: 10 seconds)
Although there is a legendary item and a rank 3 mod in this set, these are not crucial and can just as well be replaced by an epic item or a rank 2 mod.
Here you will find a selection of level 2 and 3 mods that are particularly useful: 10 weapon and armor mods that are essential in the endgame of Outriders
A stronger variant of the build can be found with YouTuber NickTew in this video:
With some adjustments, the damage potential for his build is significantly higher, and he completes expeditions at rank 15 in about 4 minutes.
For the start, you can use the build presented above until you have found enough mods and god rolls.
What do you think of our build? Have you tried similar setups? Do you have suggestions for improvement? Feel free to let us know in the comments.

Your opinion is important to us!
Do you like the article? Then let us know!
Comments