
In Call of Duty: Modern Warfare there are many multiplayer modes designed to keep the game fresh and the players engaged. Included: The exciting gunfights. Here are some tips and tactics for all maps.

This is the “Gunfight” mode: The multiplayer of Call of Duty: Modern Warfare comes with a lot of modes, some of which even take place on different maps than the classic 6v6 battles.
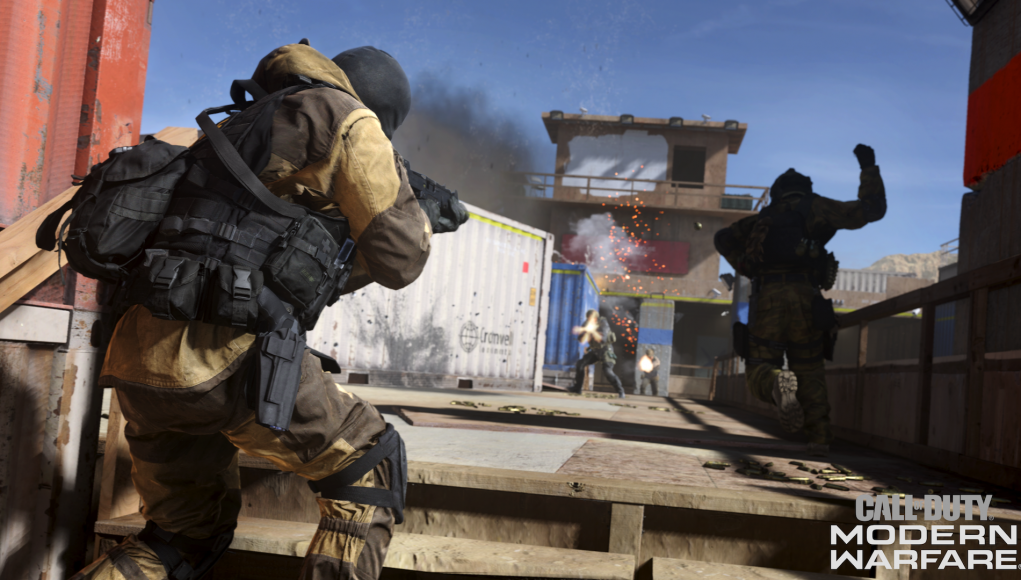
This includes Gunfight. A fast-paced 2v2 mode with very small maps and its own unique charm. Due to the small teams, coordination and precise knowledge of the map are essential for a successful battle.
You play with random weapons that are already built – so you can’t play with your own creations from the gunsmith. This mode is perfect for getting to know new weapons or taking a closer look at less played weapons.
Gunfight – Function and Goal
How does standard Gunfight work exactly? 2 teams of 2 players each try to gain the upper hand on the tiny maps.
- The round time is 40 seconds
- The loadout is randomly determined
- There is no health regeneration
- If both teams have survivors after 40 seconds, there will be an extension
- During the extension, a target flag must be captured
- The extension lasts 10 seconds
- The time is reset on capture
- Flag capture takes 3 seconds
- After 2 rounds, teams and loadouts switch
- The team with 6 round victories wins
What are the victory conditions? There are several ways to win the round. Sometimes it’s enough to have more health than the opponents left:
- All opponents have been eliminated
- Capture of the extension flag
- After the extension expires, the remaining total health counts
- The team with the highest remaining health wins

General Tactics and Tips for Gunfight
Gunfight is a close-quarters battle and accordingly, the maps are designed to be small. Tiny maps with varying amounts of cover for quick action.
The maps offer plenty of variety, but there are some tips that generally apply to this close combat fight.
Gunfight Best Done as a Team
- Get a teammate
- The 2v2 mode is most fun and makes the most sense with a buddy. Many opposing teams will be moving in a squad and thus have a significant advantage over solo fighters.
- Play regularly
- The 2v2 mode is excellent for establishing a regular gaming night with a friend to practice routines and memorize the opponents’ pathways.
- Don’t get stuck, try new things
- You can try one strategy 2-3 times in a row and try to force the opponent into your playing style. But sometimes that doesn’t work. Change the tactic if it absolutely doesn’t work twice in a row.
- Play together
- Especially after several rounds in a row, this aspect can fall by the wayside. Always try to know where your teammate is and communicate frequently. Coordinate as many actions as possible. Whoever has a steady hand should provide cover. Whoever has already become accustomed to the run-and-gun style is suitable as a striker.

Starting the 2v2 Round
- The Game Start
- The first seconds of the round often determine victory or defeat in many gunfights. Plan the match start carefully and get yourself into good positions right away.
- Sniper Duel
- You may not see the opponents directly at the start, but you are usually just a few steps away from a good sniper point.
- If you have a skilled sniper on your team, go early into the sniper duels to decimate and intimidate the opposing team.
- You can also use sniper points to keep opponents occupied with a feigned duel for a few seconds, allowing your teammate to clear the spot with a well-aimed grenade.
- Feigning Start Movement
- Cross the opponent’s line of sight briefly to indicate a direction, then disappear behind cover.
- If the opposing team is communicating, they will expect a quick attack from that direction.
- Take the route in the opposite direction to surprise the enemies. Sometimes an enemy pushing from the other side may not expect you and becomes an easy target.
All Small Gunfight Maps with Tips
The current maps for Gunfight are all quite small yet still vary in size. Some forest maps are surprisingly spacious, while the Atrium map is nothing more than a large entrance to a house.
We have compiled some tips for all maps and provided a starting tactic for each map, with a brief overview map highlighting key points:
- Flag: Position of the target during the extension
- Spot: Point with good visibility and decent cover
- Sniper: Easily reachable sniper spot from the start
- Danger: Opponents can unexpectedly appear here
Docks
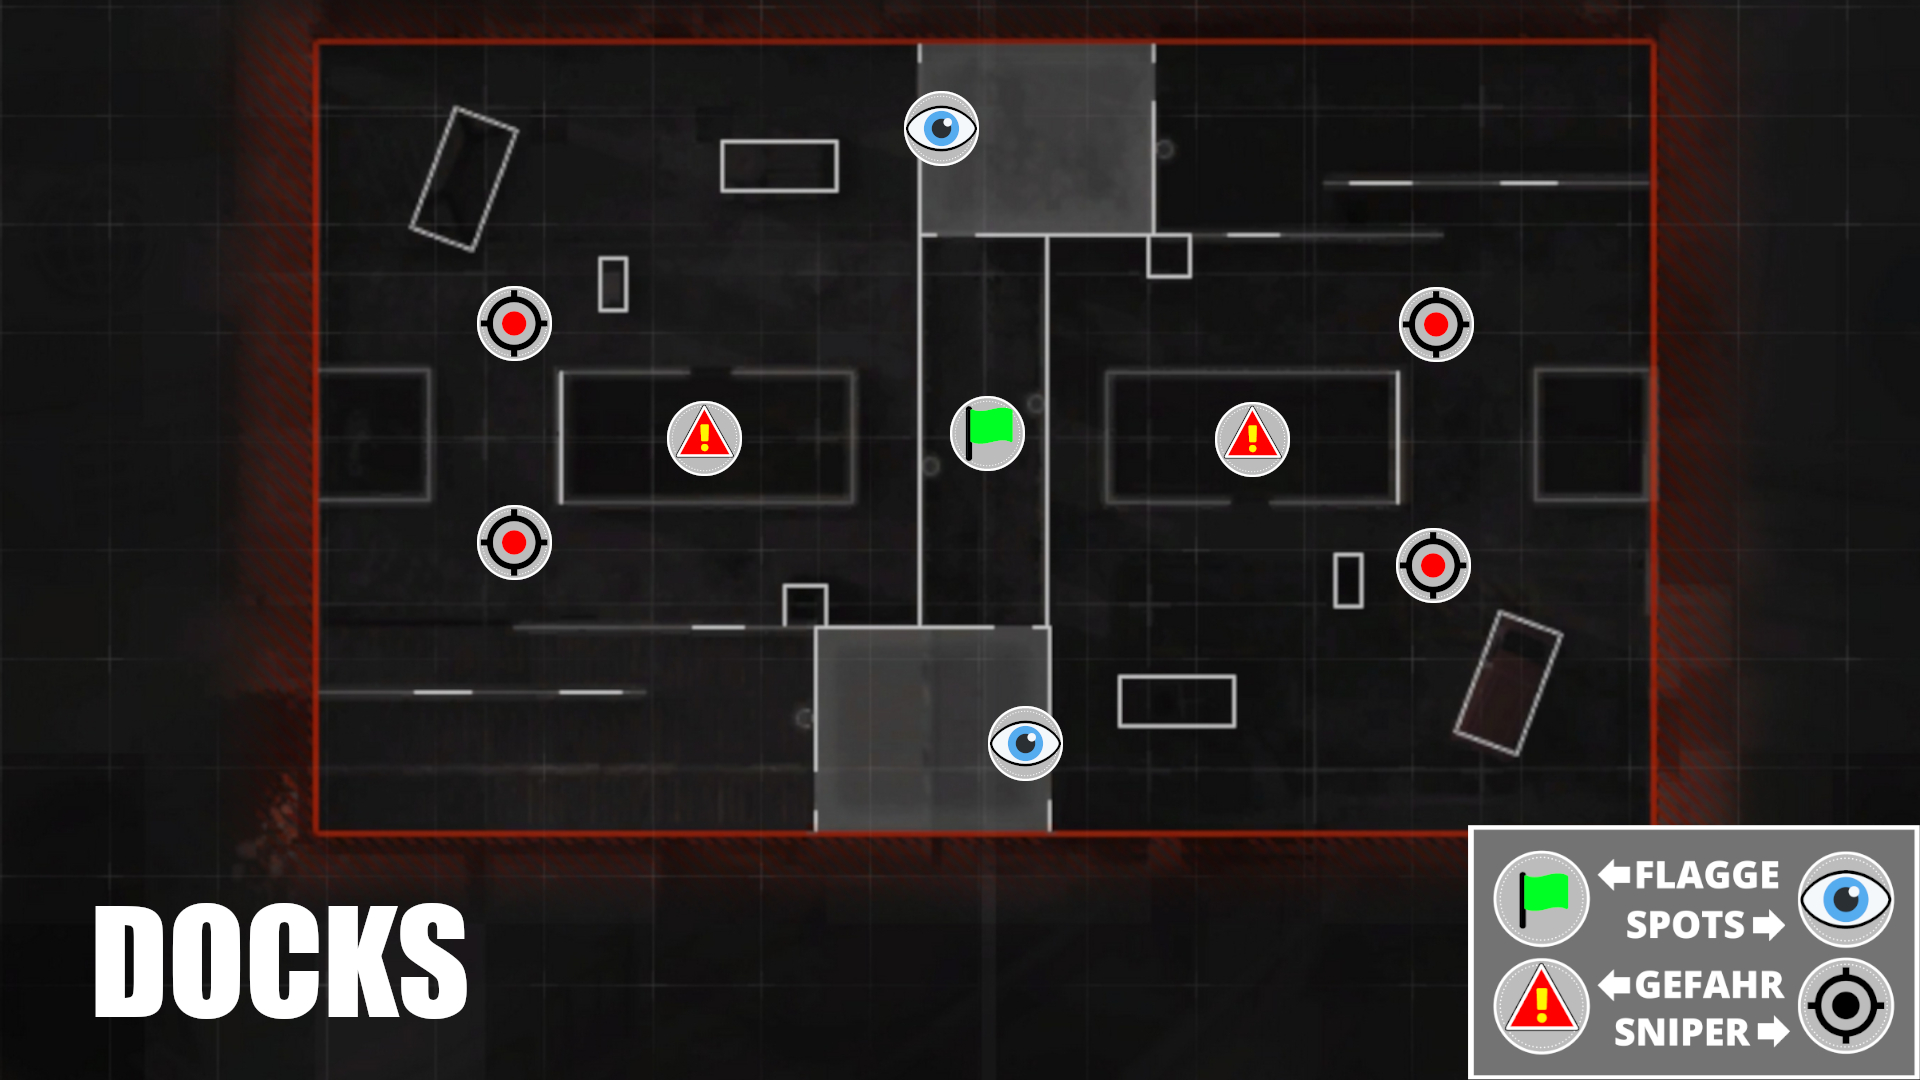
Layout: Docks is a waterfront map in a harbor with appropriate elements. The spawn areas are quite open but also provide good cover. In the middle, the map is crossed by a bridge connecting 2 houses. The houses and the bridges provide 2 levels. A 3rd level is offered by the canal that runs through the map from left to right.
Flag: The flag is located right in the middle, on the middle level in an arc of the bridge.
Tips: Additionally, there is a water canal at a slightly lower level, allowing you to cross the entire map. Vehicles on one side will not explode from explosives.

Tactic: The map features a narrow upper level in the middle, protected on both sides by the houses. Try to take the high ground immediately after the start and capture the spots. Be particularly cautious when moving across the bridge. While you have excellent visibility, you are also vulnerable to attacks.
Pay attention to the canal in the middle, as opponents can often appear there! The deep passage is also very suitable for surprise attacks and unusual tactics.
Gulag Showers

Layout: The Gulag Showers is a small shooting range with little visibility and fast action. At the start, opponents are hard to see, and the map allows for many tactics with a quick advance if you keep an eye on the most important spots.
Flag: The flag is located right in the middle of the map and is hardly protected, it can even be seen directly from the start.
Tips: Although the map only has one level, you can climb the cover elements to surprise opponents. The spots provide very good visibility, but many teams are already aware of them. So be particularly cautious when standing by the spot windows.
Tactic: One of you climbs up to the spots and scouts the opponents while the other uses one of the three passages to advance. Try to anticipate which passage will remain uncovered by the opponent and fire a few initial shots to lure the enemies out from the back area.
Many teams also separate on this map. You should try to stay together as much as possible and start the advance together through the uncovered side. Quick play is key here and quick reactions to the opponent’s actions.
The team that gets the first opponent on this map has a significant advantage as you can then exert strong pressure on the remaining enemy, who has little chance to hide or take cover.
Hill
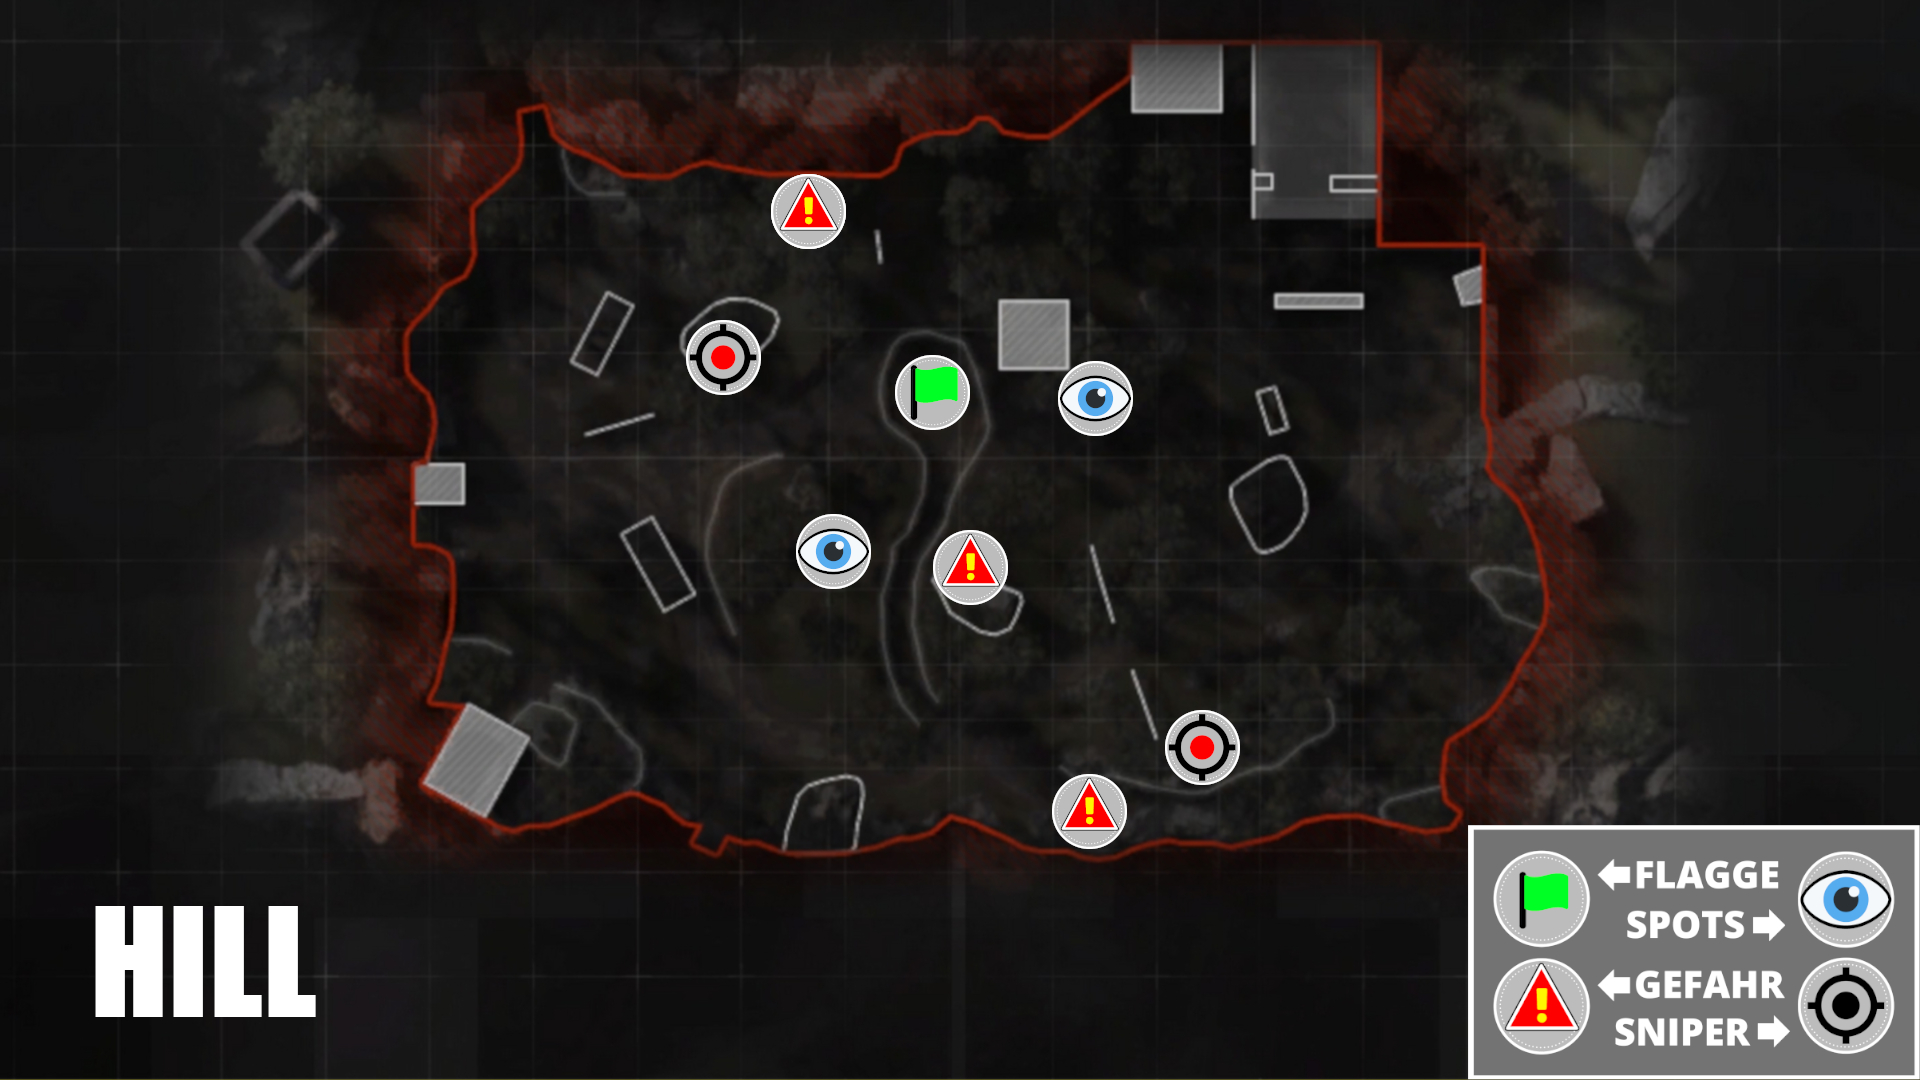
Layout: Hill is a forest map with many hiding places, tricky sniper spots, and little visibility. You are protected during the spawn, and the enemy cannot predict your movements.
Flag: The flag is located in the middle, in a small trench that is somewhat lower than the surrounding railing.
Tips: Keep an eye on the outer lanes. Opponents often sprint along here if you focus too much on the central area. In rounds with sniper rifles, watch out for snipers in the enemy spawn area.
Every bush, every corner offers cover and can be used for tactical waiting. A very dangerous map with slight advantages for the left side, as there is better visibility from the back.
Tactic: Take advantage of the fact that opponents cannot see you at the start. Capture one of the spots on the map and show yourself to the enemy, but remain in cover.
Many teams go over the covered outer lanes here. Provoke one of the outer lane enemies from that spot and pressure them with the second teammate. Always watch the opposite outer lane as enemies can quickly sprint over to your side.
King

Layout: The King map lives up to its name. The map provides everything that makes close-quarter combat exciting and is quite difficult to master, basically the king of the Gunfight maps.
Covered passages on the outer lanes and through the middle, elevated sniper points at the start, tricky stairs, and a 2nd level that is only protected by wooden railings. Action can come quickly and from all directions.
Flag: The flag is located right in the middle, in one of the passages. Well protected but difficult to hold, as the enemy can appear from above and on both sides.
Tactic: Play the first round and see if the opponents engage in a sniper duel at the start. In the next round, you can exploit this behavior to your advantage.
One of you plays cautiously in the sniper duel or takes a few shots at the opponent and takes cover. The other player quickly runs upstairs and heads straight for the spot on the side with the sniper.
From here, the sniper likely won’t expect you at first, and this tactic works well if the opponents hardly change their behavior at the start.
However, the spots on this map should be approached with caution. An opponent can quickly come up the stairs or surprise you with explosives if you sprint to the position one too many times.
Pine
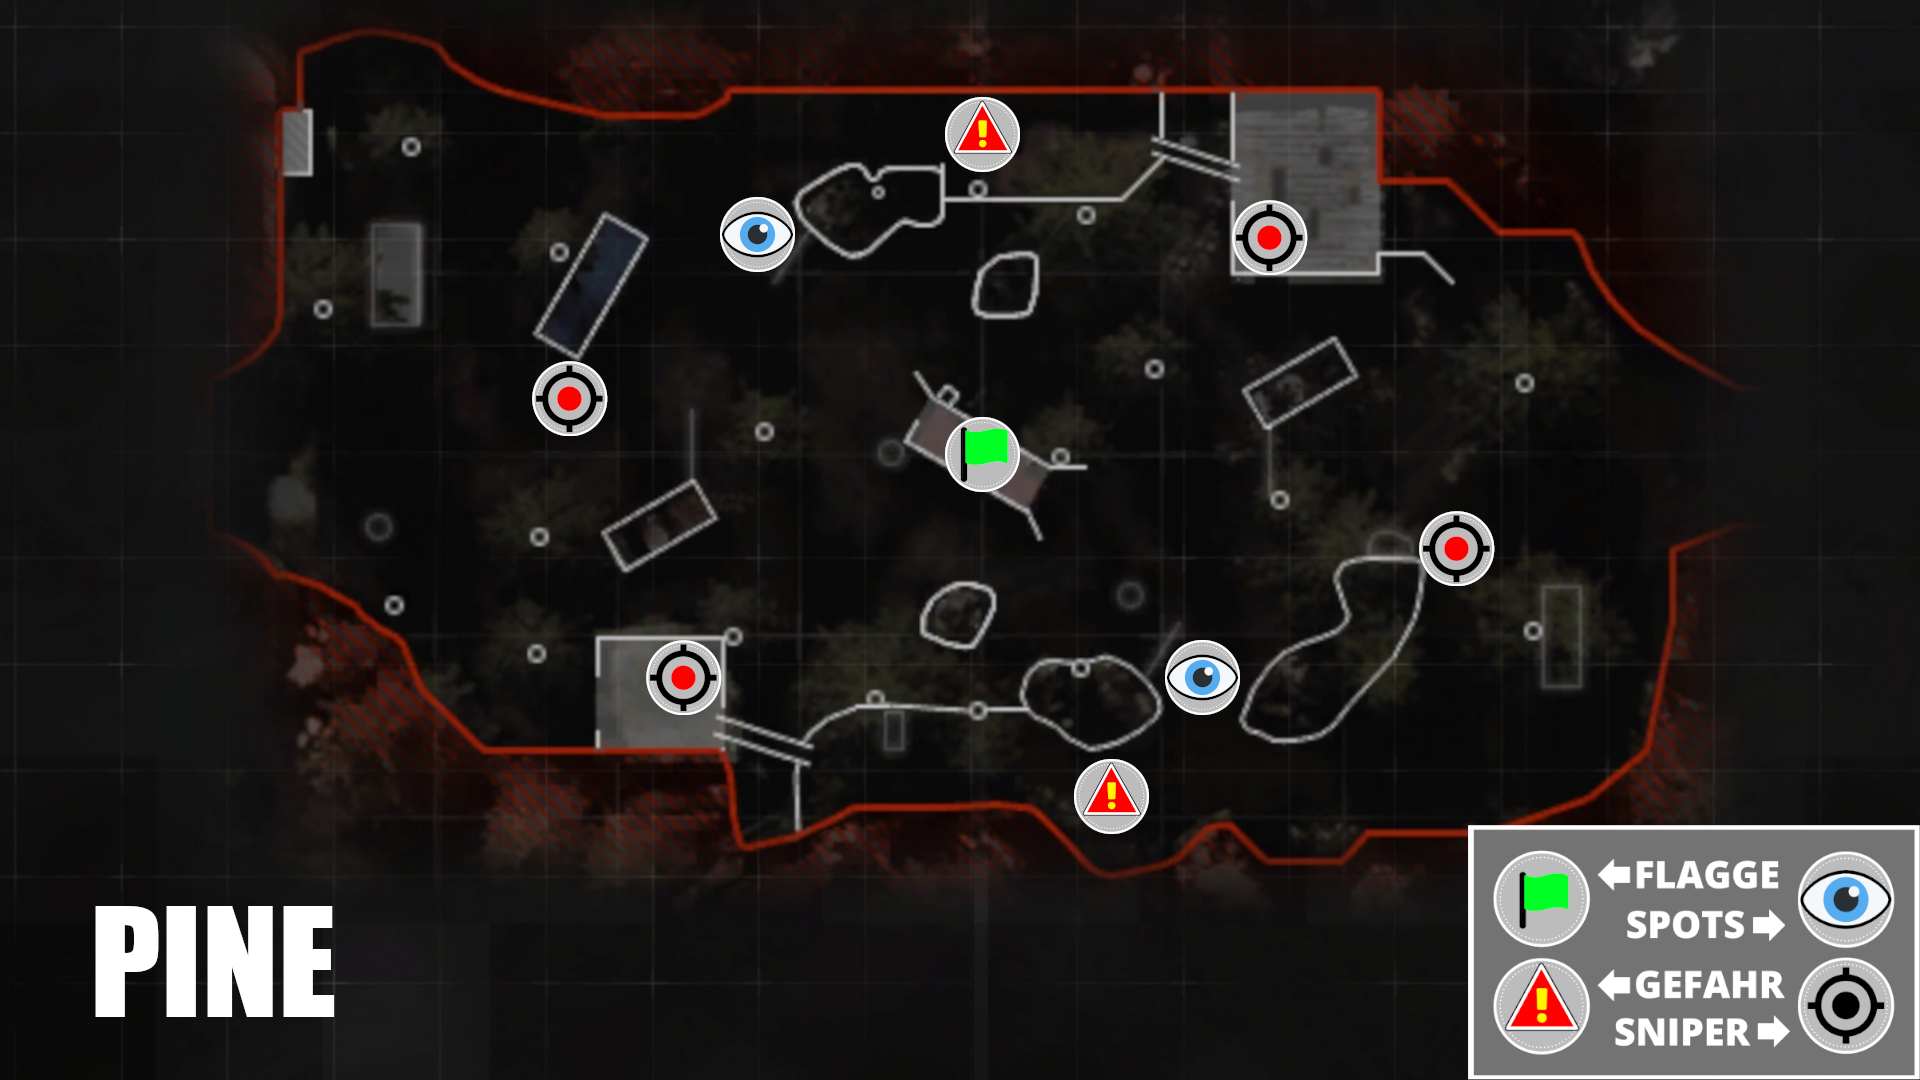
Layout: Pine is also an unbalanced forest map, with slight side advantages for the left side, which offers a slightly better overview at the start. The map is relatively large, with many items and objects for hiding or planning an ambush.
Flag: The target point is located centrally in a transport container. The exit to the left is only half open.
Tips: If you keep this in mind, the two elevated sniper spots shouldn’t pose a problem. Watch for opponents, and if you see a foe running into one of the wooden huts at the start, greet him with a small hit from your hardscope.
Tactic: On this map, you might not directly see the opponents at the start and have to draw conclusions about their tactics. There are small gaps between the objects that provide good visibility of the starting area. At least one team member should focus on the opponents’ pathways from the start and try to land an initial hit.
Player number 2 takes the spot on your side and scouts the map from there. These spots offer excellent visibility and are well covered. Keep an eye on the outer lanes! Many teams play this map more cautiously. You can use this to surprise them offensively.
One of you stays at that spot to provide cover. The other player should take the position around the container near the flag to ambush opponents as they advance or flank when you attack.
Near the container, there are also very good cover options, and upon spotting an opponent, the player near the flag can act immediately in all directions while the player at the spot provides suppressive fire.
Speedball
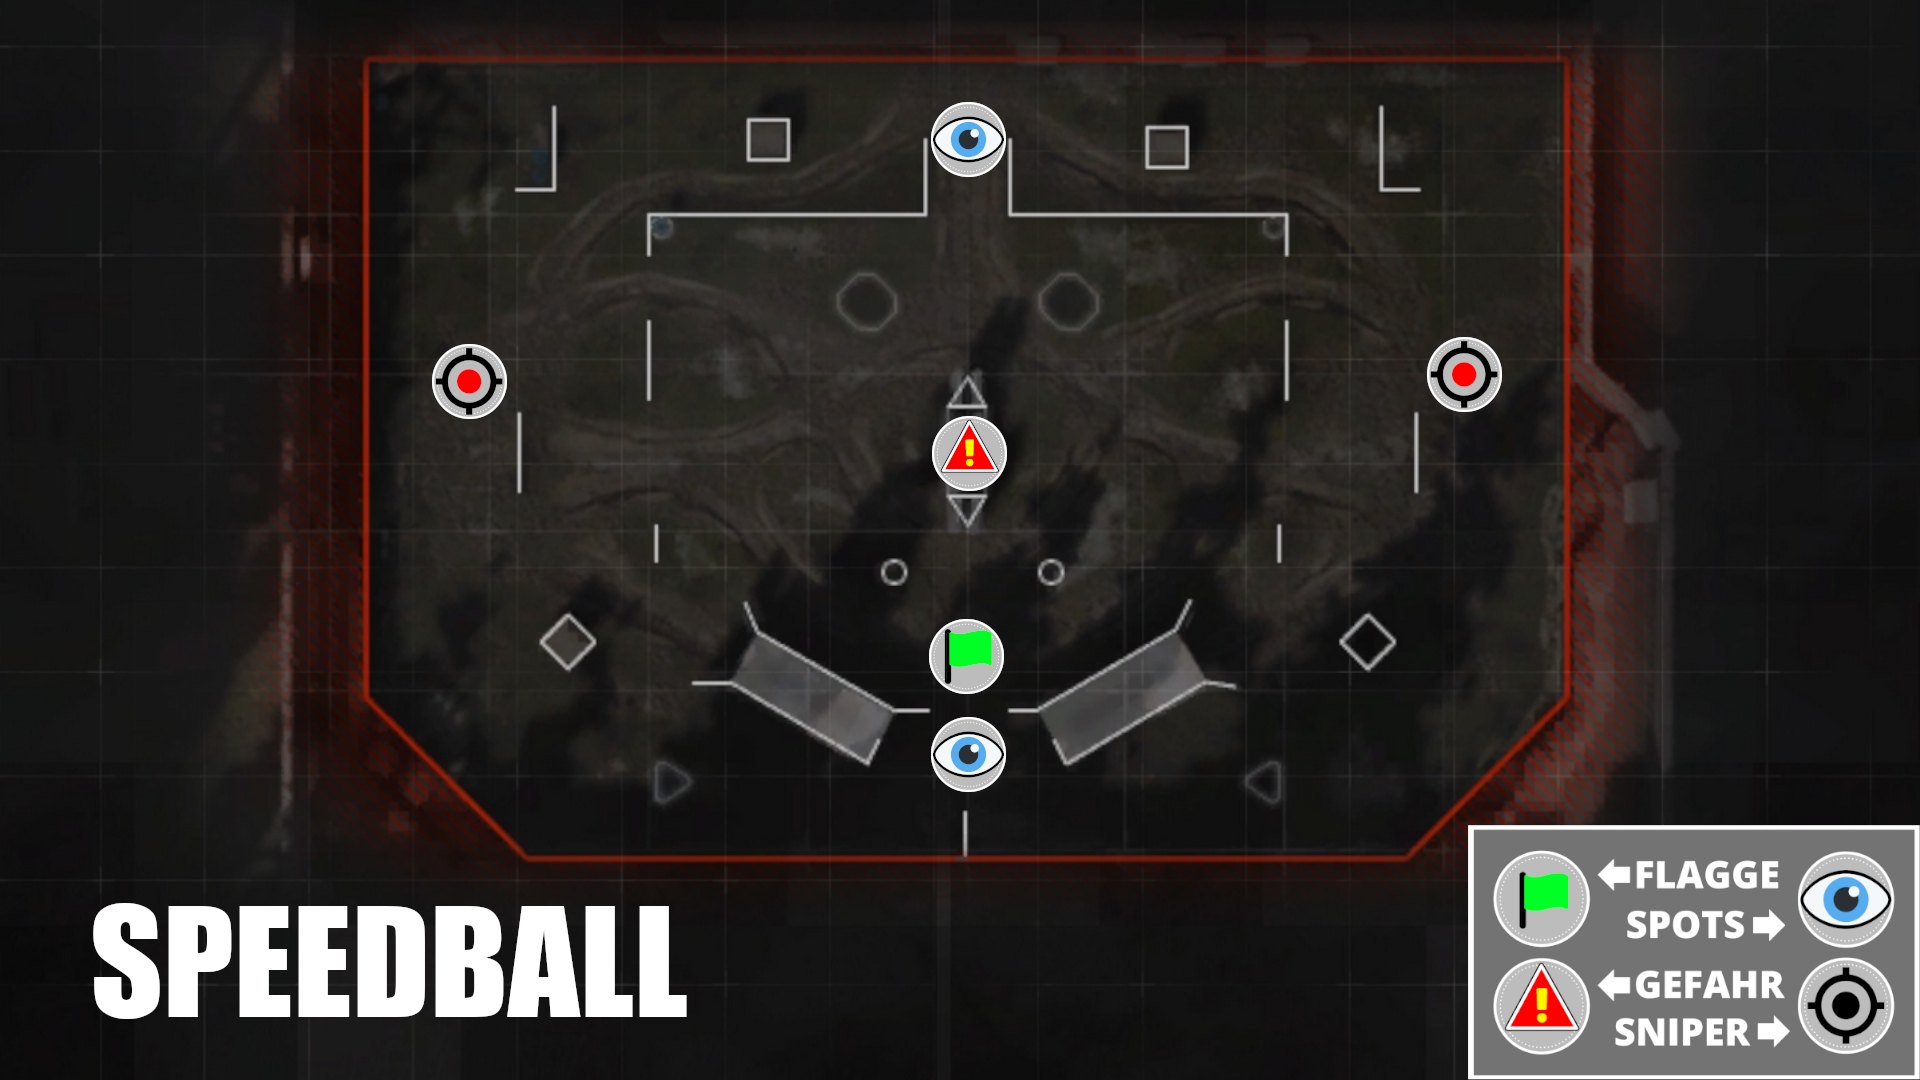
Layout: The Speedball map resembles a paintball arena with many cover elements, targets, and short paths. Almost all advances can be well covered, but also watch out for long-range attacks.
Flag: The flag here is slightly offset in the lower area, near the containers. The spot close to the flag is therefore more dangerous and is used more often, but once you take it, it provides direct access to the target point.
Tips: Try to keep an eye on opponents right from the start. The map is very suitable for fast play, and if you act too slowly and the opponent takes the center before you have a good view, the round can end quickly.

Tactic: Choose a side and try to quickly get to one of the spots. Move in sync, with one player further forward at the spot and the second player somewhat behind, deep in cover, watching the other side to keep an eye on pushing opponents.
Always pay attention to the middle and ideally use explosives to clear the good cover in the middle without risk. Once you reach the spot, you should have scouted the positions of the two opponents, and player 2 can attack from the background without being seen.
Stack

Layout: Stack is a simple map with quick action and often requires a direct 1-on-1 fight. At the start, the opponents are only a step away from the scope, and many teams play the initial sniper game.
Flag: The flag is located in the middle, protected by a transport container and easily accessible for both teams.
Tips: Don’t get into a fight on the stairs. It’s more or less a gamble whether you manage to hit the opponent’s head first. It’s better to work with explosives if you scout an enemy on the stairs.
Tactic: Choose a side, one player acts as the sniper and the other as the runner. The runner briefly crosses the line of sight of the enemy sniper and can provoke a reaction from the player or disrupt the aim assist on consoles. But watch out not to jump too far into the opponent’s line of sight; otherwise, you’ll quickly take a hit.
The sniper keeps an eye on the back area and observes the opponent’s reactions, while the runner carefully makes his way along the outer lane of the selected side to flank the sniper or hold off incoming enemies.
Atrium
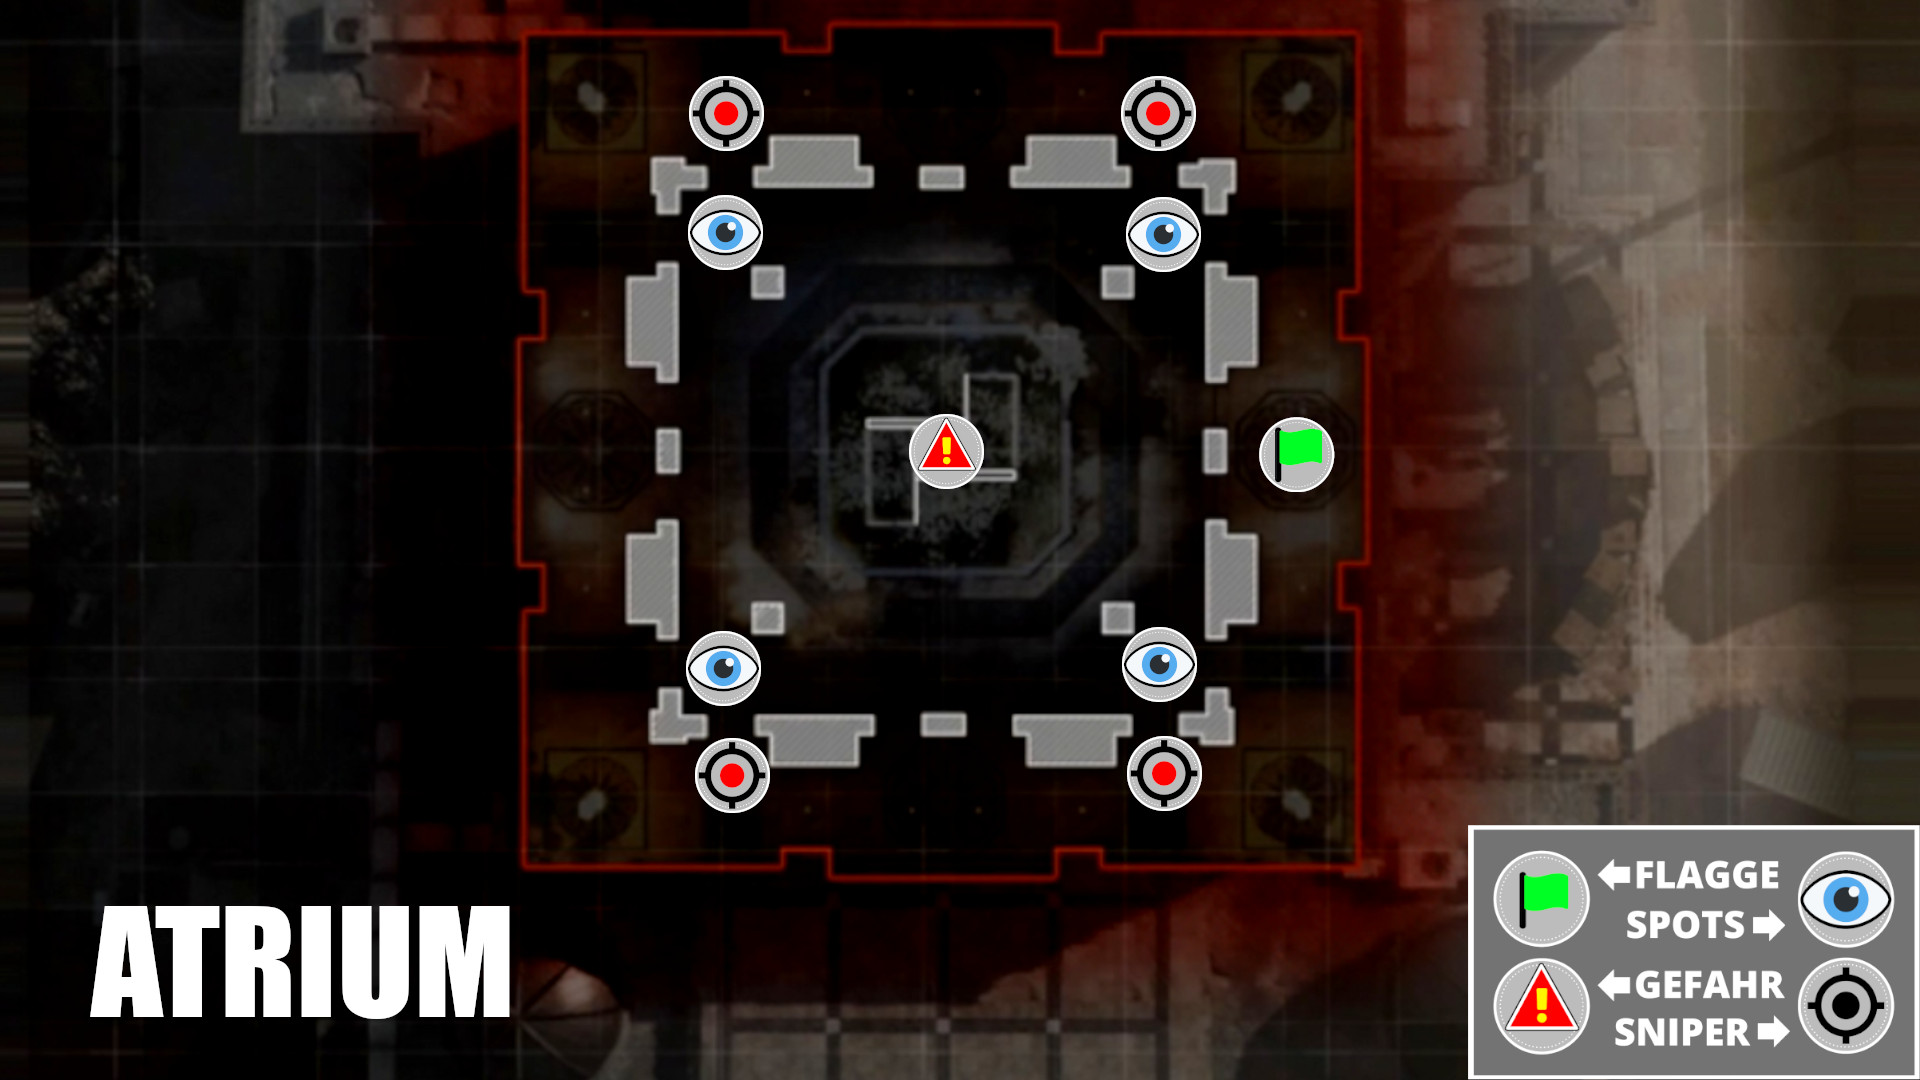
Layout: The Atrium is a tiny, square map featuring a large cover element in the center. Hits can come quickly and unexpectedly, as many areas are directly visible, but the spawn offers plenty of cover for surprises.
Flag: The target appears on the right side and can be well observed, but the columns near the flag also protect against enemy fire. Check the map at each new spawn and orient yourself towards the flag point immediately.
Tips: The fountain in the middle can provide good cover and visibility, and players at this point are pressed for a quick decision. If you have opponents who occupy this point quickly, hold back a bit at the start and use your explosives.
If the round involves sniper rifles, you may try to take out your opponents right at the start. Objects in the middle can be shot through, and shots from the AX-50 or HDR easily penetrate this cover.
Tactic: Split at the start and take positions near the columns. Once the pathways of the opposing teams are clear, shift towards the flag. The player closer to the flag keeps an eye on the field and the opponents from the column.
Player 2 moves around Player 1 and tries to get a sight on the opponents while Player 1 reports movements and shoots at appearing opponents.
Cargo
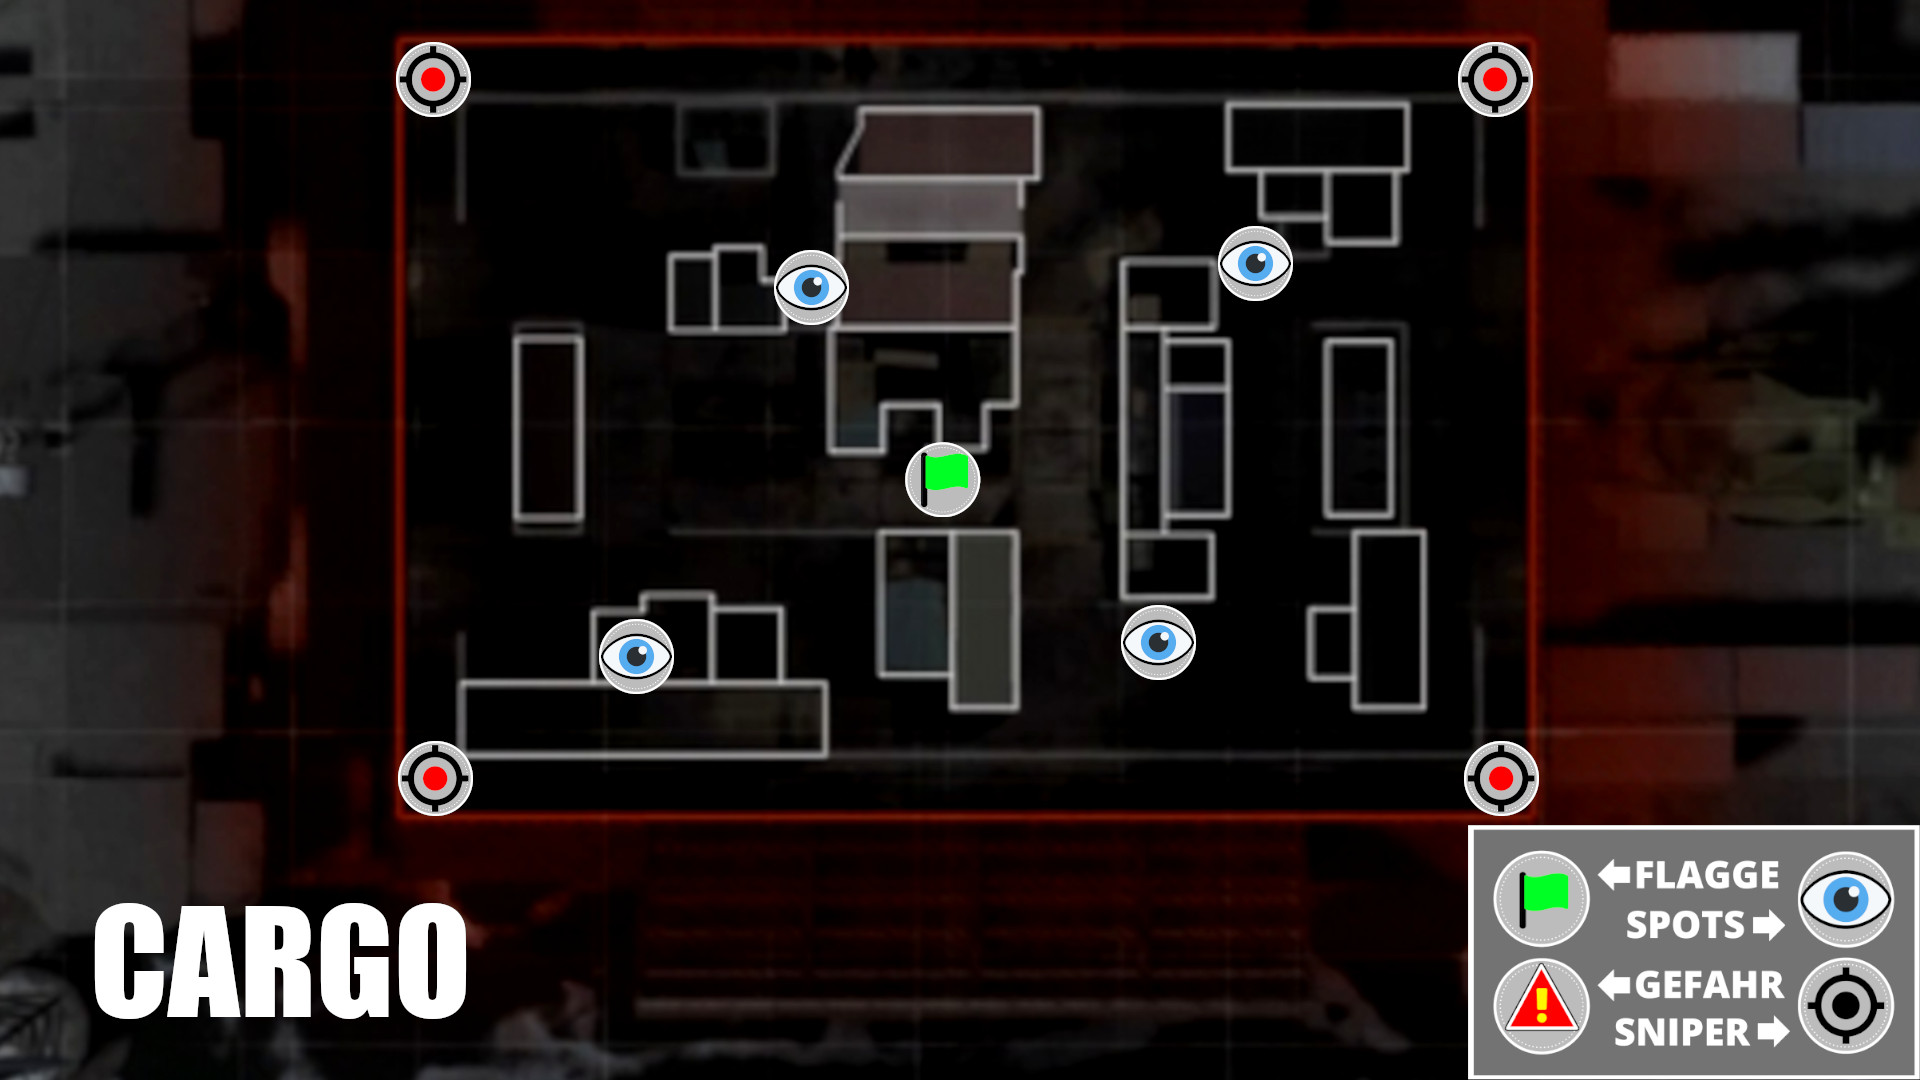
Layout: Cargo takes place in the storage area of a container ship and is full of containers and cargo for cover. Many various heights, the size, and plenty of cover make this map a real challenge.
Flag: The flag is located almost exactly in the center and is open downward. Use this to your advantage for the flag and look for a good spot to apply pressure on the target point at the end.
Tips: Don’t get surprised by opponents rushing through the containers to your side. The entire map could be filled with “danger icons”, as there are many ways to cross the map.
Tactic: One of you takes one of the spots from the start and tries to observe the opponents’ pathways. Player 2 comes to the same side, and as soon as player 2 reaches the spot, player 1 pushes to the other side.
The lower side with the open container is best for this approach, and you are also already on the right side to apply pressure on the flag.
Gunfight in Tournaments and Other Modes
Are there any other Gunfight modes? Shortly before the start of Season 1, which rewards players with a packed battle pass, the beta of a gunfight tournament took place. In this mode, a total of 16 teams played in a knockout round for the grand prize, which in this case was a blueprint.
The developers apparently want to try out several things here, as there have already been talks about 3v3 gunfights. A 1v1 duel mode has also been mentioned.
The Gunfight: OSP even sends you into battle without weapons, so you first have to pick up weapons before you can go after the enemies at range. The OSP mode replaces the normal gunfight from December 10-18.
What do you think of the 2v2 Gunfight mode? Have you already developed a foolproof tactic or other helpful tips?

Your opinion is important to us!
Do you like the article? Then let us know!