
With the right techniques, you can often stay one step ahead of your opponent in Call of Duty: Black Ops Cold War and quickscoping is definitely part of it. MeinMMO shows you everything important about the sniper quick shot.

What is quickscoping? It’s a technique with sniper rifles where you spot an enemy, quickly aim, and take down annoying opponents with a single shot – if everything goes smoothly.
This is a popular technique among advanced players in Call of Duty, which is also very strong in Black Ops Cold War. If you want to try out being a sniper or are looking for strong setups for sniper weapons, then you are in the right place at MeinMMO.
Why is it so strong? The large rifles of the sniper category take down enemies with just one shot. If you learn to exploit that in every gameplay situation, you’ll have an advantage over every opponent with a different weapon. Except for shotguns and knives, which can also take you out with one hit at very close ranges.
But quickscoping also involves preventing these situations from occurring and proceeding tactically. We cover all these points here in the quickscope guide.
Check out the English video from YouTuber “Scope” if you want to get an impression of what is possible with the technique:
Select fast sniper weapons
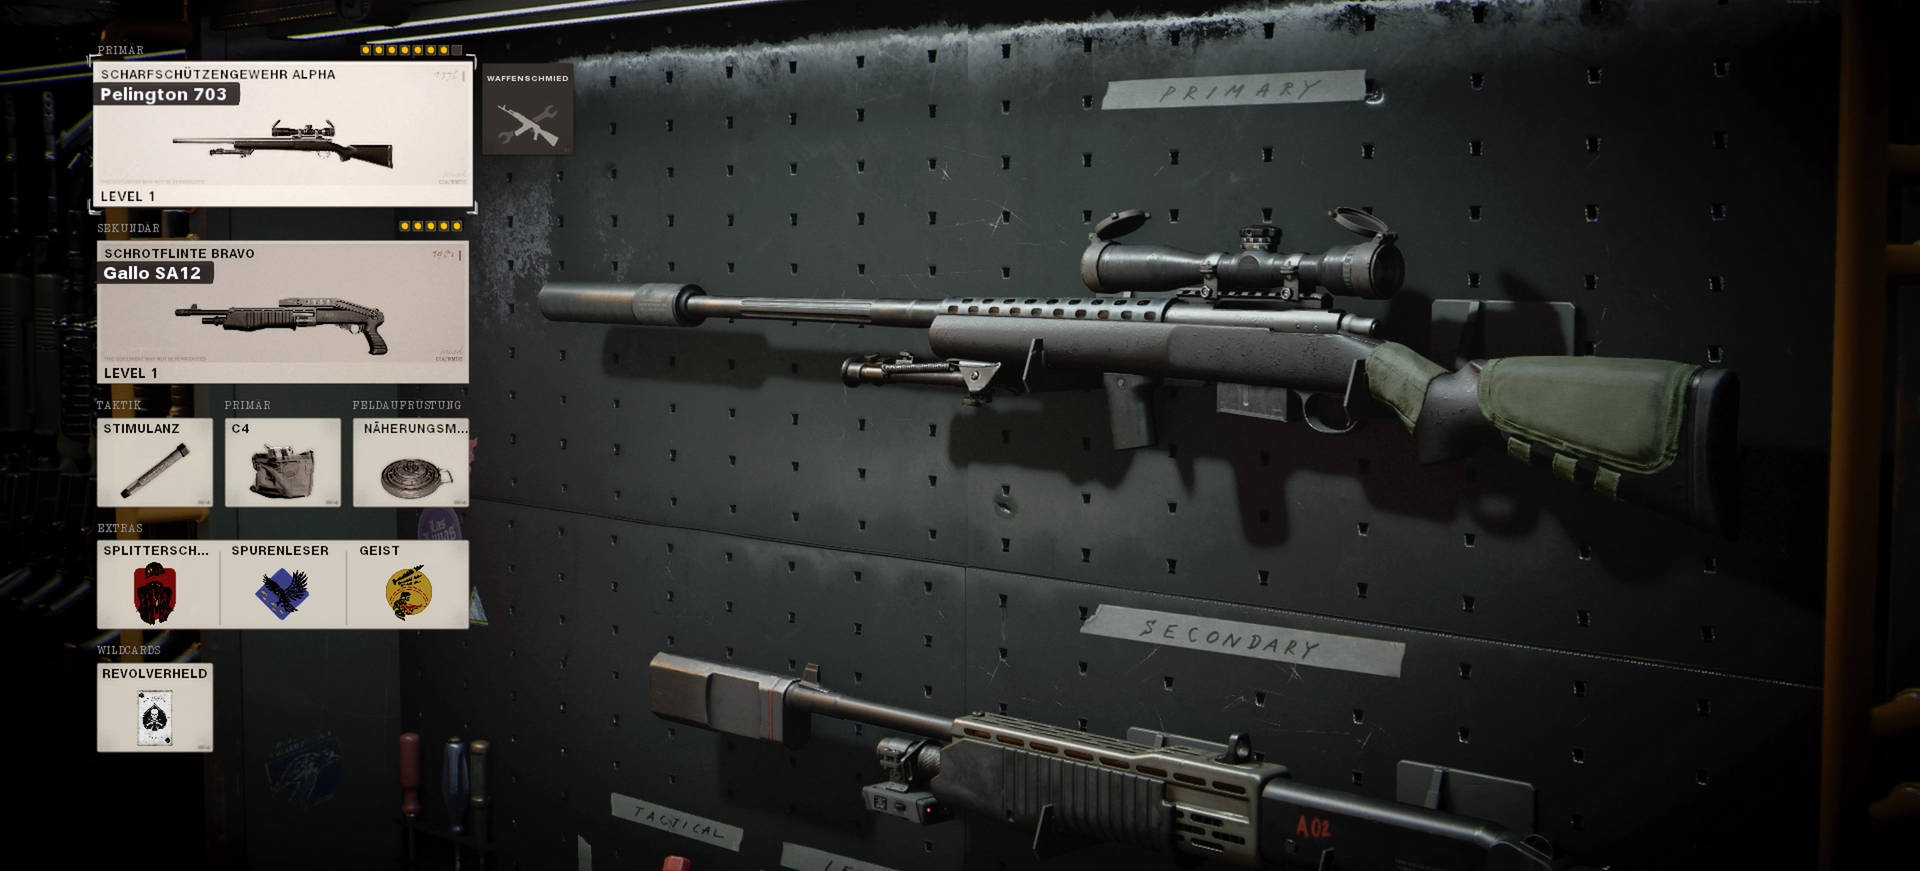
Which sniper weapon should I take? Cold War offers you 3 snipers to choose from, each with its advantages and disadvantages:
- Pelington 703: quickest to aim
- LW3-Tundra: largest one-shot area
- M82: highest fire rate, slower to aim
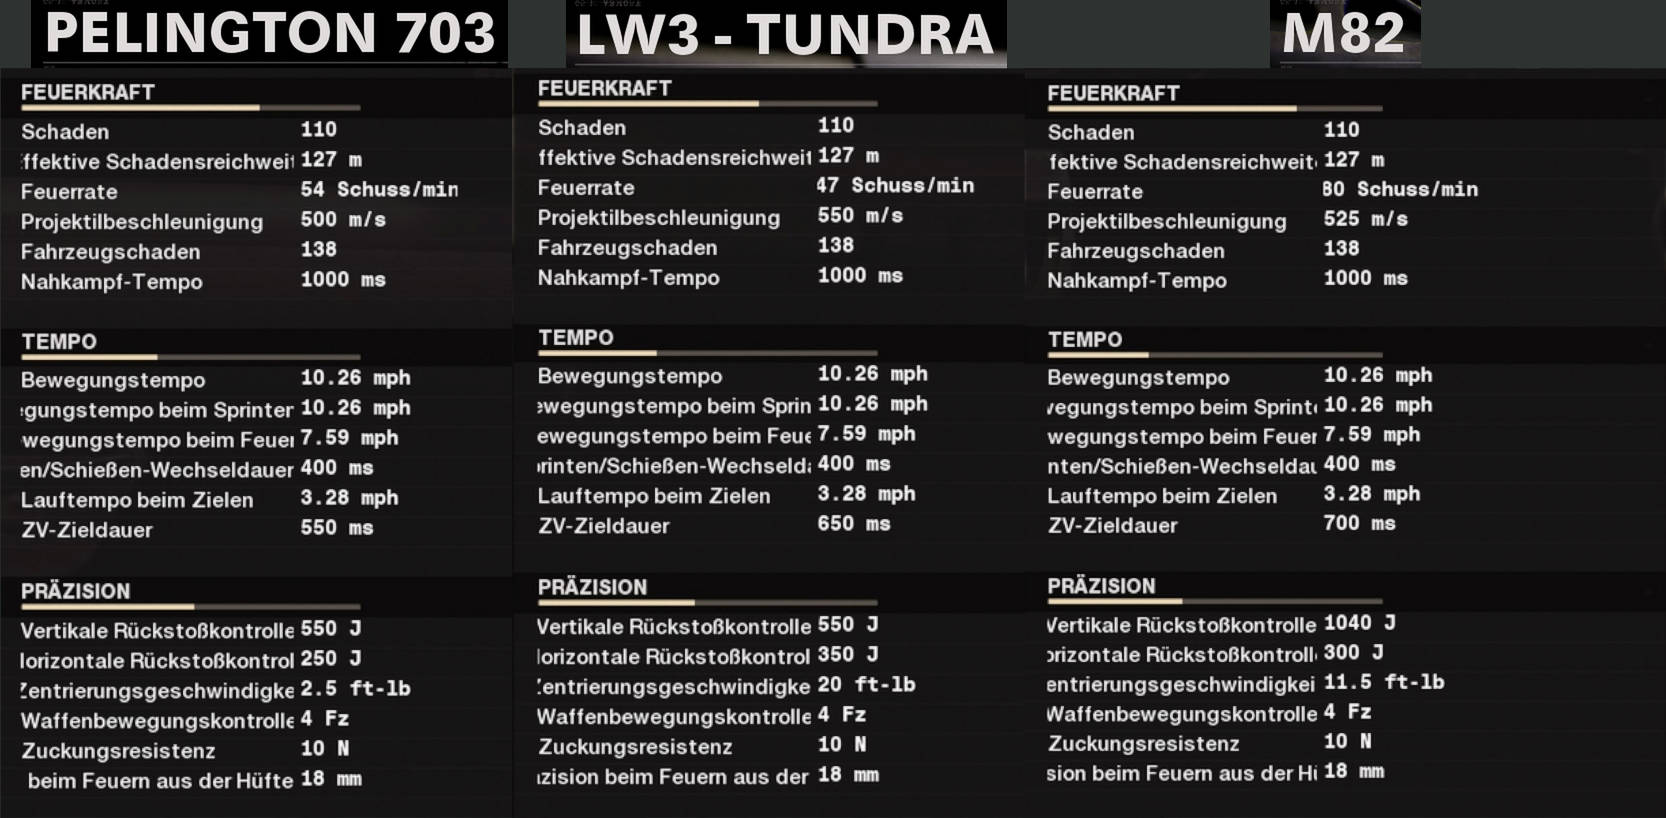
Interesting here are the Pelington, because it inherently has a relatively low ADS aiming duration, and the LW3 – Tundra, as it gives you a larger hit area for your insta-kills.
The M82 shines with its high fire rate, as it is the only one that offers a semi-automatic fire mode, and you don’t need to pull a lever to chamber a new round. However, it falters in the ADS aiming duration, which is more important when quickscoping than a high fire rate.
If you are a newbie at quickscoping, then lean towards the Tundra. It offers a bit more control and more room for your hits. However, these advantages cost you a bit of ADS aiming duration.
If you want to dive right in, the Pelington is recommended. It is the quickest to aim and comes with a slightly better fire rate.
Build your setup for speed and flinch resistance
What should I pay attention to in a quickscope setup? In general, you should push your ADS aim speed and movement values to the maximum.
The faster you aim, the quicker you can take down your enemies. A higher movement speed helps you to circle your opponents and surprise them from behind or from the side. When flanking, muzzle flash concealment is also important, so you don’t immediately show up on the mini-map when you take a shot at the overwhelmed enemies.
Additionally, you should pay attention to the “flinch resistance” value. This enables you to reduce your character’s movements when hit, which helps when aiming under fire.
But it also depends on how you set up your loadout. Cold War actually offers a strong wild card that allows you to attach a total of 8 attachments to your weapon instead of the usual 5. You have to decide:
- Gunslinger – 3 additional attachment slots for primary weapons
- Lawbreaker – 2 primary weapons for your loadout
With a quickscope playstyle, you get a weapon in your hand that allows quick kills at all distances. But if you don’t want to do without a strong secondary weapon, you can already adjust your sniper rifles very well with 5 attachments. The MP5 is a good secondary weapon that performs well with the right setup.
Cold War: Pelington 703 Setup / LW3-Tundra Setup – 5 attachments
- Muzzle: Suppressor
- Barrel: 26.5″ Tiger Team
- Underbarrel: Infiltrator Grip
- Handle: Airborne Elastic Wrap
- Stock: Looter’s Pad

With this setup, you get almost everything you need: maximum reduced ADS aiming duration, sound suppression, a 90% increase in flinch resistance, and improved movement speed. Especially the Tiger Team barrel is interesting, as it gives you a higher fire rate and compensates for your shot projectile speed with the suppressor.
The attachment combo does compromise, and you should pack the perk “Looter.” The Tiger barrel is strong but decreases your ammunition capacity – in the magazine and reserve. Instead of 20, you only have access to 12 rounds after spawning. Moreover, the weapon loses effectiveness for “no-scope” shots due to the looter stock, as your hip-fire accuracy decreases.
Cold War: Pelington 703 Setup / LW3-Tundra Setup – 8 attachments
- Muzzle: Suppressor
- Barrel: 26.5″ Tiger Team
- Body: Steady Aim Laser
- Underbarrel: Infiltrator Grip
- Magazine: 7-Round
- Handle: Airborne Elastic Wrap
- Stock: Looter’s Pad
With the additional attachments, you offset the compromises of the first setup. The laser on the body gives you better hip-fire for no-scopes and the 7-round magazine gives you extra ammunition in the magazine. However, due to the penalty of the Tiger barrel, you only get 6 shots and a total of 18.
You can also experiment with other sights, but the default sight does its job at all distances.
Use a suitable loadout
In your loadout, you have some leeway and can choose the equipment according to your preferences. Basically, only the wildcard and 2 equipment are fixed:
- The wildcard for 8 attachments or a second primary weapon
- Tactic: Stimulant, to be ready for combat again quickly
- Yellow perk: Ghost, to protect against reconnaissance drones
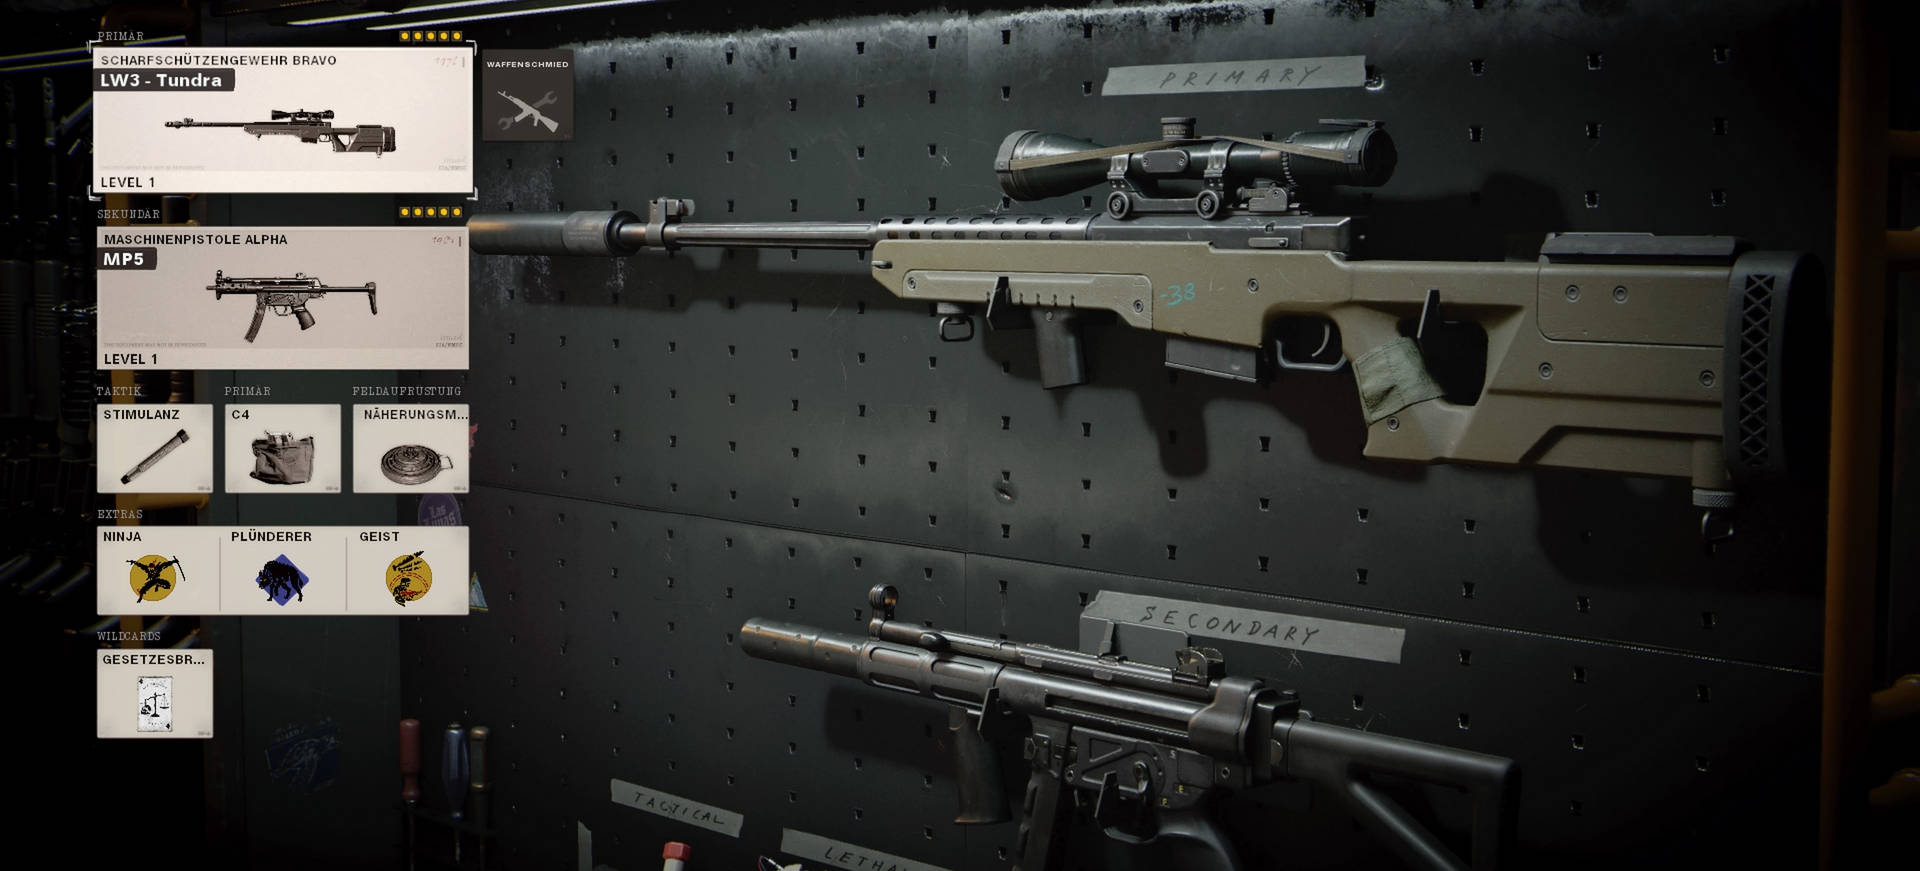
With the perks, the loadout with the “Lawbreaker” wildcard has a slight advantage. Here you can pack the stealth perks “Ghost” and “Ninja.” Looter helps you recover the lost ammunition due to the Tiger Team barrel.
- Primary weapon: Sniper with 5 attachments
- Secondary weapon: Your best SMG
- Tactic: Stimulant
- Primary: C4
- Field upgrade: Proximity Mine
- Wildcard: Lawbreaker
As a “Gunslinger,” you can only pack one yellow perk, but you won’t be so reliant on the blue perk “Looter.” Choose “Tracker” here. This allows you to briefly follow the footstep trails of nearby enemies. The red “Flak Jacket” protects you from damage caused by explosives, while “Paranoia” is also strong since you get signals when enemies are aiming at you, even if they are not in your line of sight.
As a secondary weapon, you can bring a shotgun that supports you in fights at the closest distances. Also worth considering are pistols or even a knife. This allows you to run much faster and cover areas in sprint, but you have limited firepower in your off hand.
- Primary weapon: Sniper with 5 attachments
- Secondary weapon: Strong or fast melee weapon
- Tactic: Stimulant
- Primary: C4
- Field upgrade: Proximity Mine
- Wildcard: Gunslinger
If you have other preferences for field upgrades or primary equipment, pack Semtex or a directional microphone. For a quickscope playstyle, other gear in these slots also works quite well. However, with C4 and the mine, you can secure areas behind you, which is very helpful.
Find more information and tips about Cold War here:

Find your technique
Now comes the practical execution. In quickscoping, it’s basically about quickly putting an opponent in your large sight and sending them to the impressive killcam with a shot at their one-shot zones. There are 2 proven techniques:
- Center-Scoping
- Drag-Scoping
If you want to get into sniping, start by focusing on one technique while also taking a look at the other variant. A mix of both makes you more flexible and an even better sniper.
How does Center-Scoping work? In center-scoping, you try to get your opponent directly in the crosshairs from the beginning, aim, and take the deadly shot. You don’t have to pay much attention and can just run around shooting visible enemies.
However, this technique is prone to errors. If the shot doesn’t hit, you are at a disadvantage in combat at close and medium ranges. Furthermore, flinching decreases your accuracy when hit while you are aiming.
Center-scoping is the “pure” form of quickscoping – crosshairs on the enemy, scoping, firing. However, the higher the distance, the harder center-scoping becomes.
How does Drag-Scoping work? This technique is particularly interesting for controller players. Because you can benefit from the aim assist of Cold War with a controller.
Instead of relying on immediately having your opponent perfectly in your sights, you aim beside the enemy and drag your crosshairs across the opponent. At the right moment, you then pull the trigger.
This shifts your focus from precise aiming to your reaction speed with the firing trigger. It takes some practice, but once you master it, you’ll be slightly slower than center-scopers, but your hit rate will increase.
When aiming, briefly stop to further increase your aim accuracy. An analysis of the technique from “CoD MW” times can be found here.

What about No-Scoping? This refers to hits and kills you get from hip-firing your sniper. You completely skip the process of aiming down sights and fire at an opponent in your crosshairs. However, this technique is not very reliable. It’s immensely satisfying when you hit, but generally not recommended.
Flanking brings great success
How should I proceed when quickscoping? Always be aware of where your strengths with quickscope loadouts lie and when you are at a disadvantage.
- Your greatest strength: You can take down enemies with one shot
- Your greatest weakness: You are generally a bit slower than with other weapon classes
If your opponent sees you first and possibly hits you with the first shot, immediately go back into cover. With an SMG and quick headshot hits, you might still manage to salvage the situation. However, with sniper rifles, you take longer to aim than the time-to-kill (TTK) of many automatic weapons lasts. Your advantage is that your TTK consists only of your aiming time and the time it takes to pull the trigger.
It is also important to set the right settings so that no disturbing filters distort your image. Check here to learn more about the optimal settings:
How can I exploit that? Try to flank your enemies with quickscope loadouts by taking the long route. This is particularly strong in objective-based modes like “Hardpoint” or “Domination.” Keep a close eye on enemy movements and try to predict their paths. This becomes easier the more often you run into flanks on a map. If you catch multiple enemies from the side without being discovered, you hit the jackpot. If done correctly, you can wipe them out before the foes even understand what’s going on.
If you advance together with your team or in pairs, rather stay in the second row. You are strong in close combat as well, but if you can freely aim and shoot, you’ll take down charging enemies in droves, as they often focus on the foes closer to them first.
Moreover, you still have a long-range weapon in hand. Although quickscope setups are not optimally adjusted for long distances, strong hits and longshot kills are still possible. But stay with your quickscope style – quickly aim, shoot at the enemy, and then quickly return behind cover.
What else should I pay attention to? Don’t let your opponents get too close. Play together with your team when charging the objective and only go hunting alone when you spot a good opportunity to flank.
Staying cool is key
Sniping, especially quickscoping, is one of the king disciplines of weapon mastery in Call of Duty. Here, it’s all about practice, practice, practice before consistent success sets in. But it can be worth it.
Whether you are a beginner or an advanced player – maintaining calm and precision are the most important skills if you want to be a good quickscoper. Don’t let defeats get you down and learn from your losses. Practice the techniques, and when you land the first really great hits, you won’t want to put the sniper down anymore. But until then, it’s often a long road.
Especially because you need to level up the sniper rifles to a high weapon level to assemble the setups mentioned in this article. But we can help you with that too: 7 tips to level up your rank and weapons faster.

Your opinion is important to us!
Do you like the article? Then let us know!