Baldur’s Gate 3: House of Hope – Solve Ritual, Find Orphic Hammer or Contract, Defeat Boss

In the House of Hope in Baldur’s Gate 3, you have to overcome some challenges, but you will be richly rewarded. MeinMMO will tell you how to enter the house, grab the Orphic Hammer, and defeat the boss.

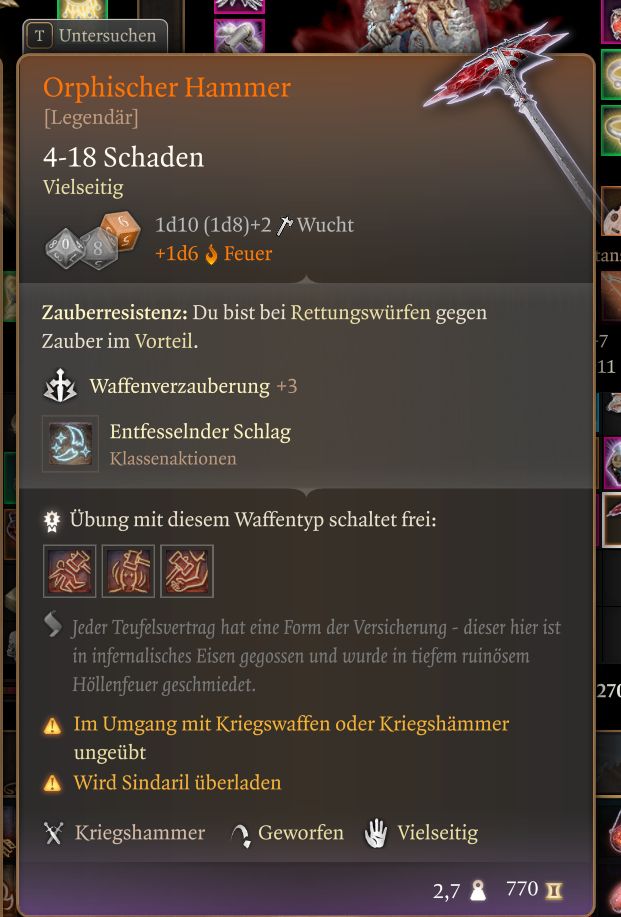
What is the House of Hope all about? The goal is to get the Orphic Hammer from the House of Hope to free Orpheus from his chains in the Astral Prism (if you want to). Raphael has the hammer and is located in his estate – the House of Hope. Besides that, a cool battle and legendary items await you.

Alternatively, you can also make a pact with the devil Raphael in the brothel Sharess’ Caress to directly obtain the Orphic Hammer. However, at a price: In exchange for the promise to hand him the Crown of Karsus once you have defeated the Elder Brain.

Note: It is also possible to enter the House of Hope if you have already made a pact with Raphael. In this case, you can destroy your contract on-site to free yourself from the pact. However, Raphael will be anything but pleased about it.

Update on April 7, 2025: We have adjusted the structure of the article and updated information.
Start video
3 Tips to Reduce Your Carrying Weight in Baldur’s Gate 3

[toc]

How to get into the House of Hope – Use the Ritual Circle

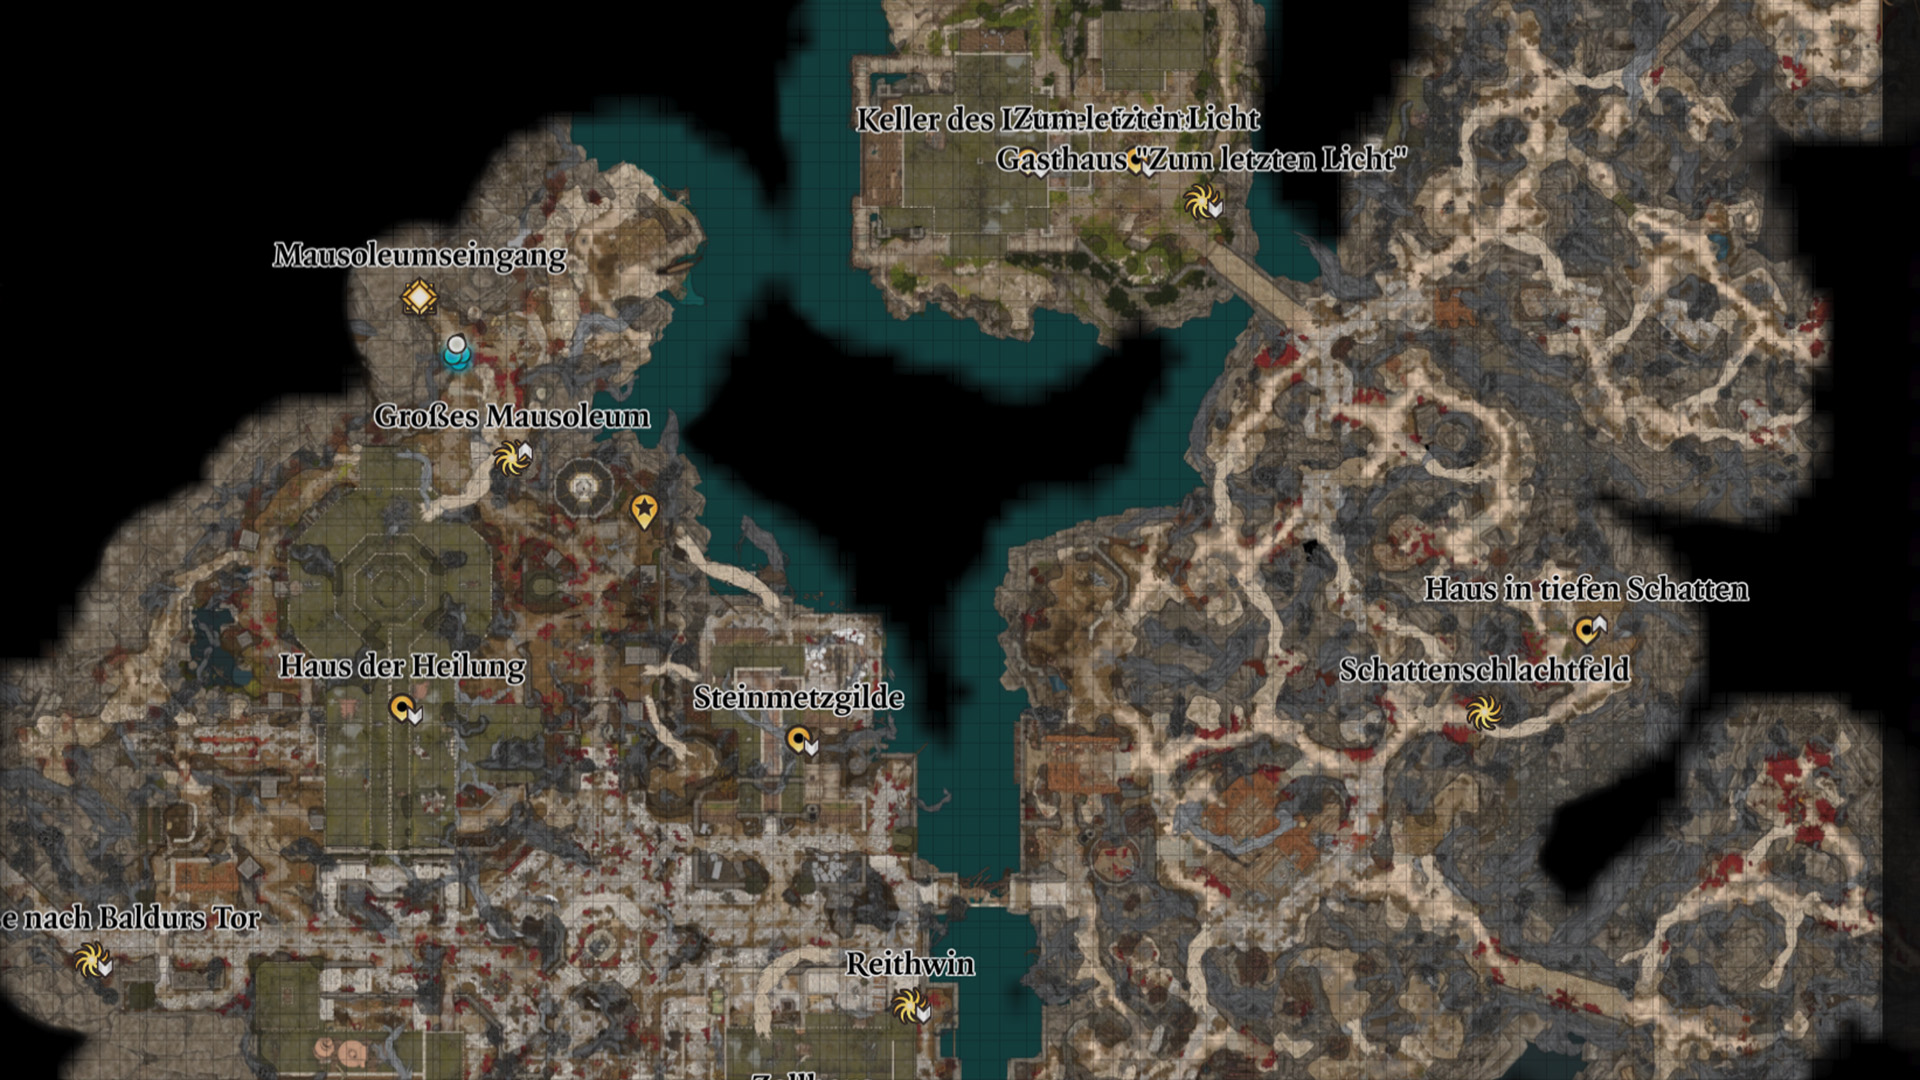
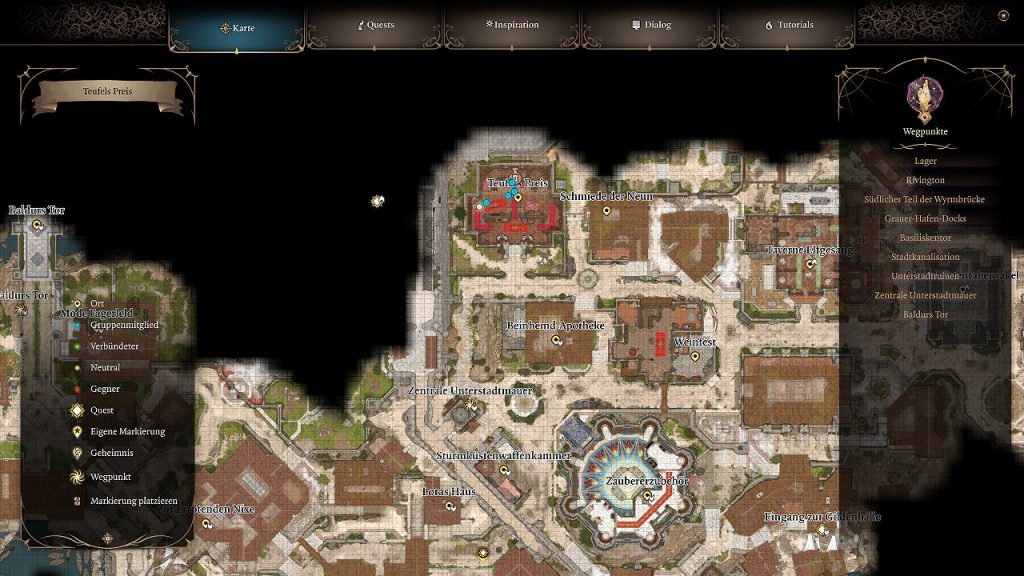
First, you need to get into the House of Hope. To do this, go to the occult shop Devil’s Price in Baldur’s Gate – about northwest of the Lower City, west of the smithy. This shop has many curious items, including items from hell. Examine the items to find out that there is more behind Helsik. Then speak with Helsik.

Baldur's Gate 3: Devil's Price Map
Go to the shop Devil’s Price to access the House of Hope.

Either convince her with the right price, promise to bring her Gauntlets of Hill Giant Strength, or use skilled pickpocketing to obtain the necessary information. The Diabolist Helsik will reveal the secret ritual that will give you access to the House of Hope.

Baldur's Gate 3: Hellsik
The Diabolist Helsik in the shop Devil’s Price

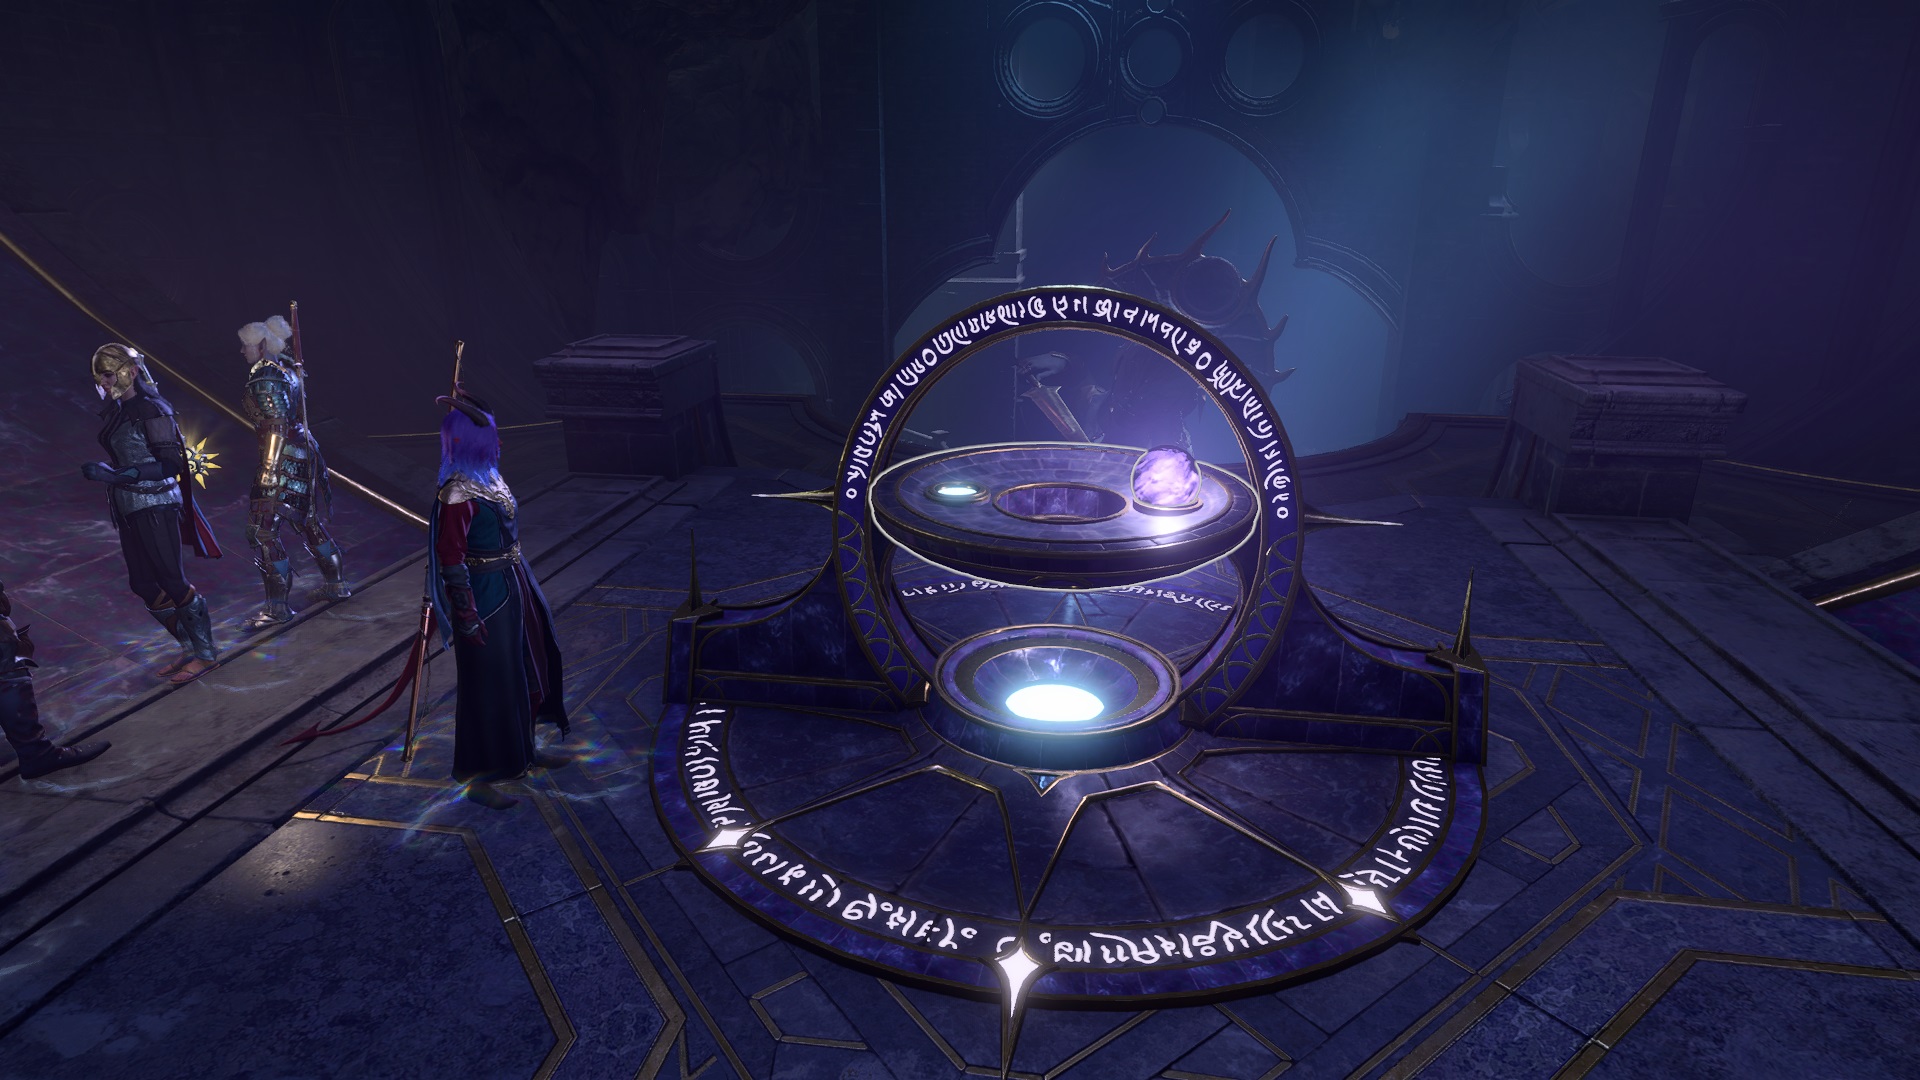
Solve the Ritual and Open the Portal to the House of Hope

From Helsik, you will receive a Spellbook Bound in Devil Skin with instructions on how the ritual to open the portal works and a ritual pouch with five materials. You will also receive a key to the upper floor of her shop, where the blood circle of the ritual is located.

What is in the portal’s instructions:

Baldur's Gate 3: Instructions for Ritual Circle House of Hope
Instructions on what you need to do to open the portal.

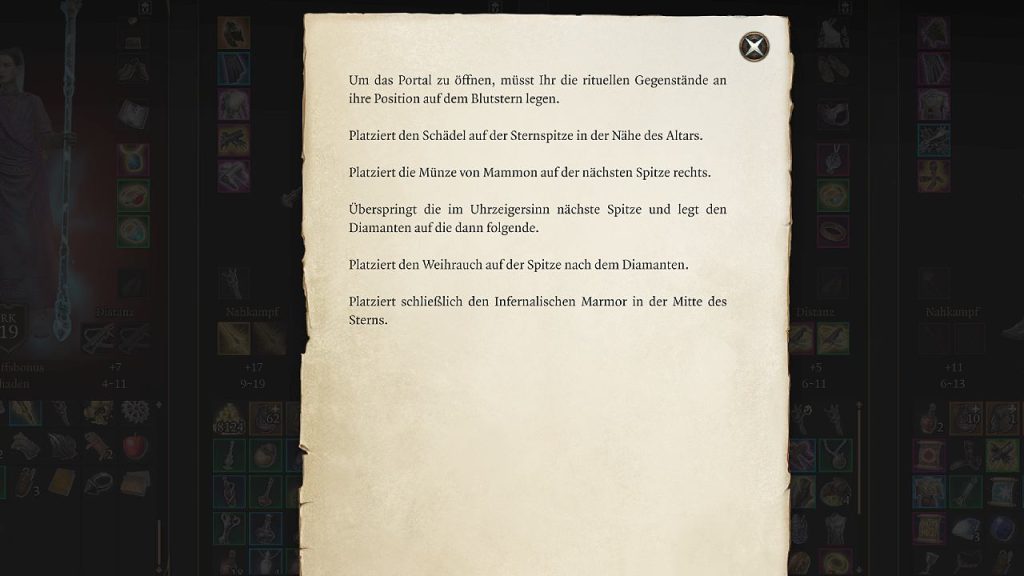
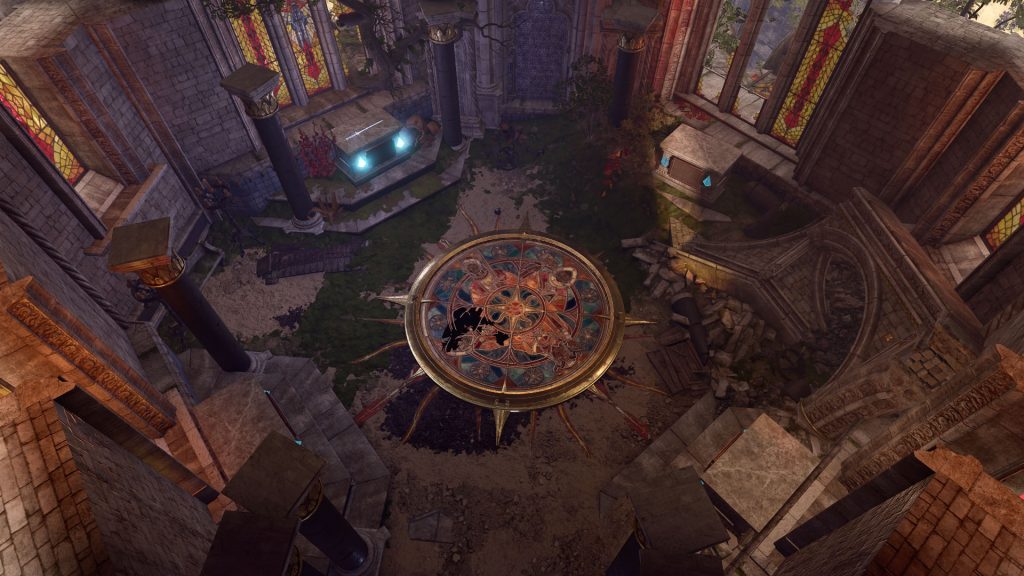
This is how you implement the instructions at the ritual circle: Treat the table in the room as south. From there, lay out the following items correctly:

  • The skull on the star tip in the south (by the table)
  • The coin of Mammon (looking from the table) left on the tip
  • The diamond on the left tip in the north
  • The incense on the right tip in the north
  • The infernal marble in the middle of the star
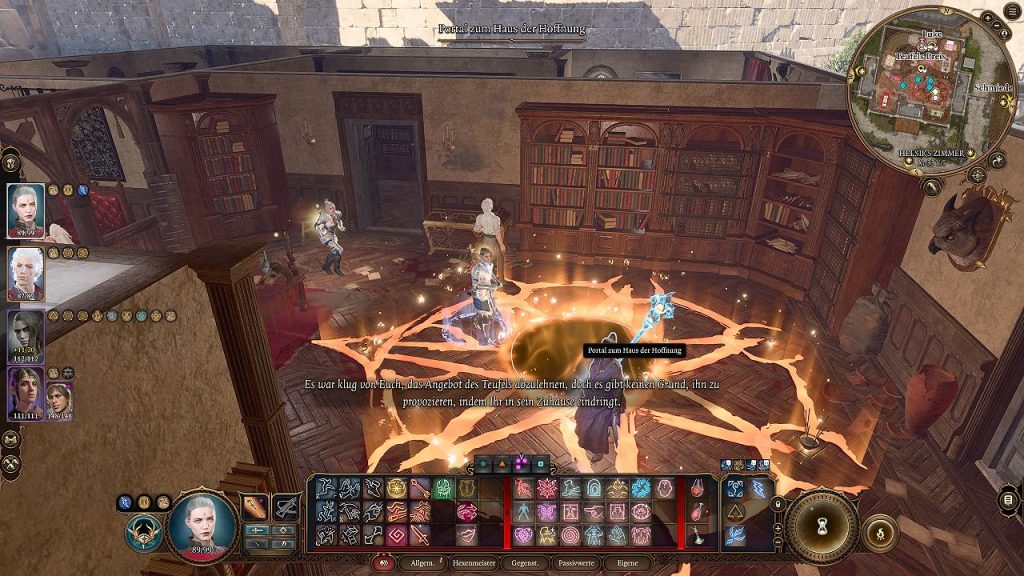
Baldur's Gate 3: Ritual Circle House of Hope
Ritual Circle House of Hope

After you have taken the necessary steps, you can interact with the portal to get to the House of Hope.

Tip: It’s better to rest again and stock up on supplies – such as potions, elixirs, or certain scrolls. Once you are in the House of Hope, you can no longer use fast travel.

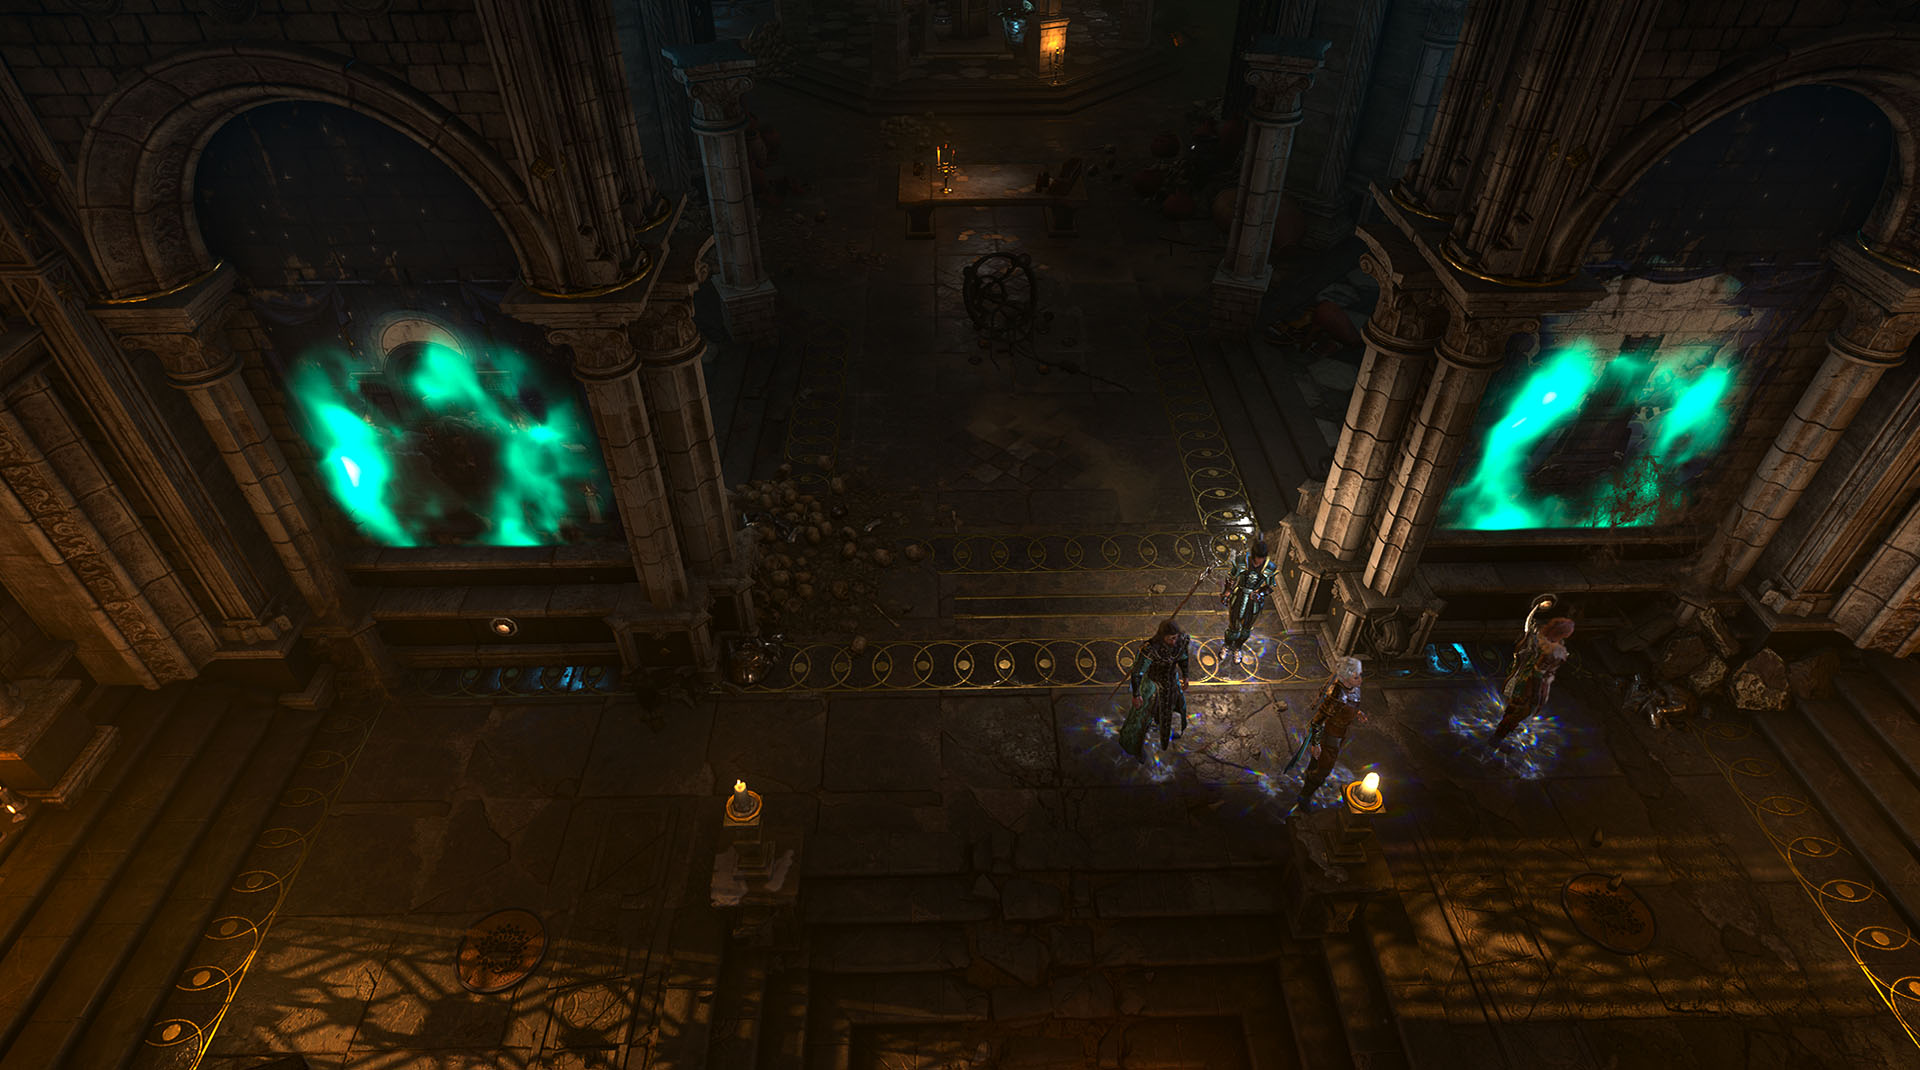
House of Hope – All Tasks and Solutions

Once you have arrived in the House of Hope, various tasks await you.
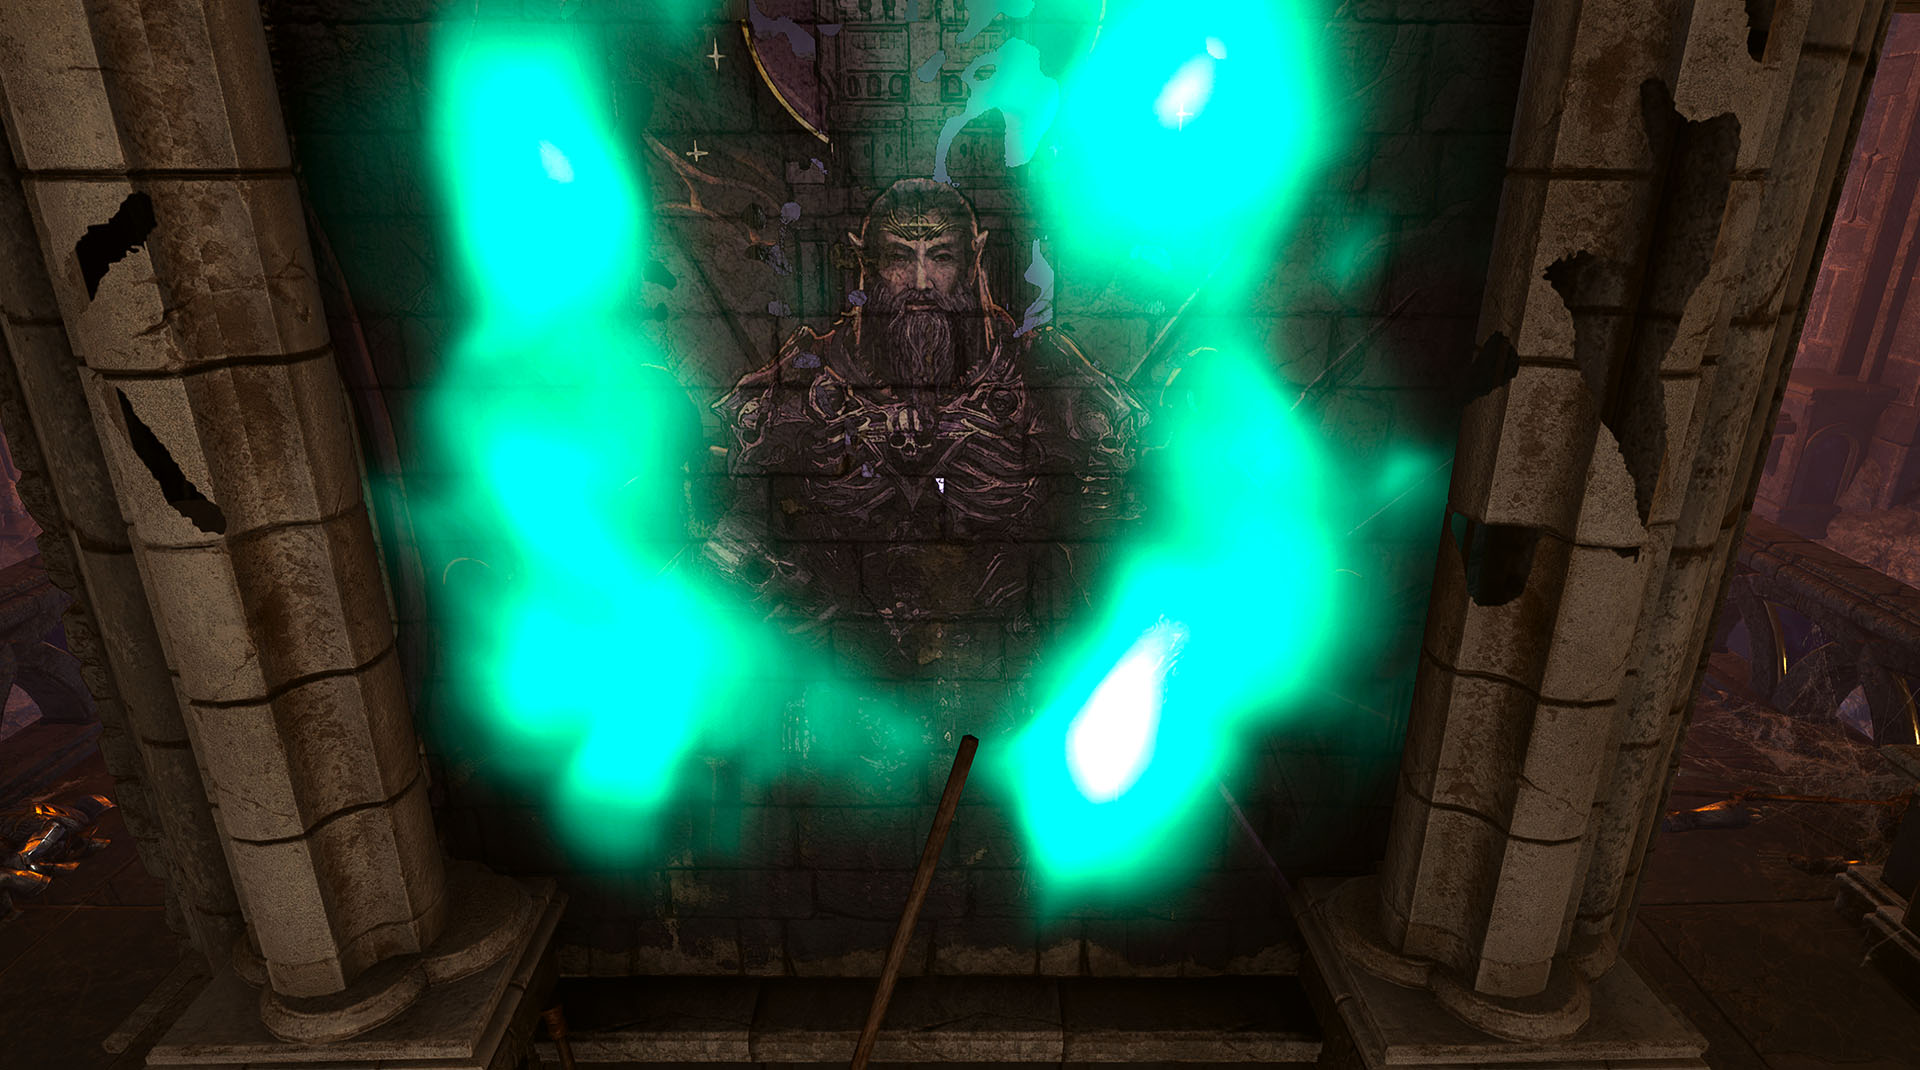
Encounter with Hope

Upon arriving at the House of Hope, you will first encounter a dwarf named Hope – more precisely, a projection. She gives you clothing so that you can move inconspicuously in the House of Hope. You should keep this clothing on, as otherwise, several opponents will appear, all of whom are hostile towards you.

Baldur's Gate 3: Hope
Hope will help you with navigating the House of Hope.

There are still several skill checks to obtain information. She will explain to you that you need a key, the Orphic Hammer, or the contract (if you have made a pact with him) with Raphael and need to find them. In the end, you are also supposed to free her. The first step, however, is the archive.

Baldur's Gate 3: Treasure Chamber House of Hope
House of Hope secret hideaway

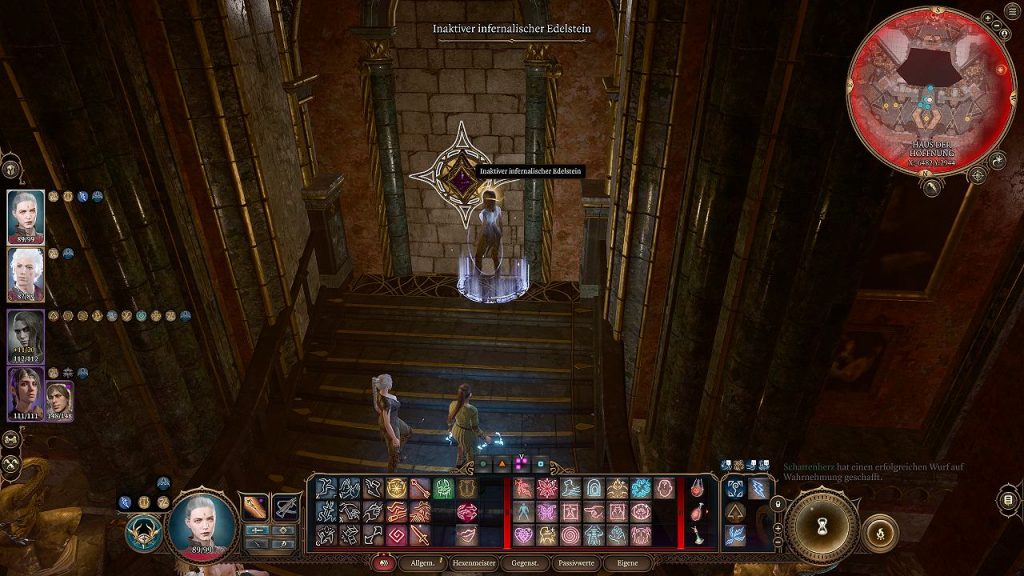
House of Hope – Secret Hideaway

Explore the House of Hope and make your way to the archive. At a wall (X: – 6482, Y: 2944), you will encounter an inactive infernal gemstone with which you can interact. Pass the Wisdom and Intelligence checks to reveal a hidden chamber and loot the items. Here you will also find the contract of Mol.

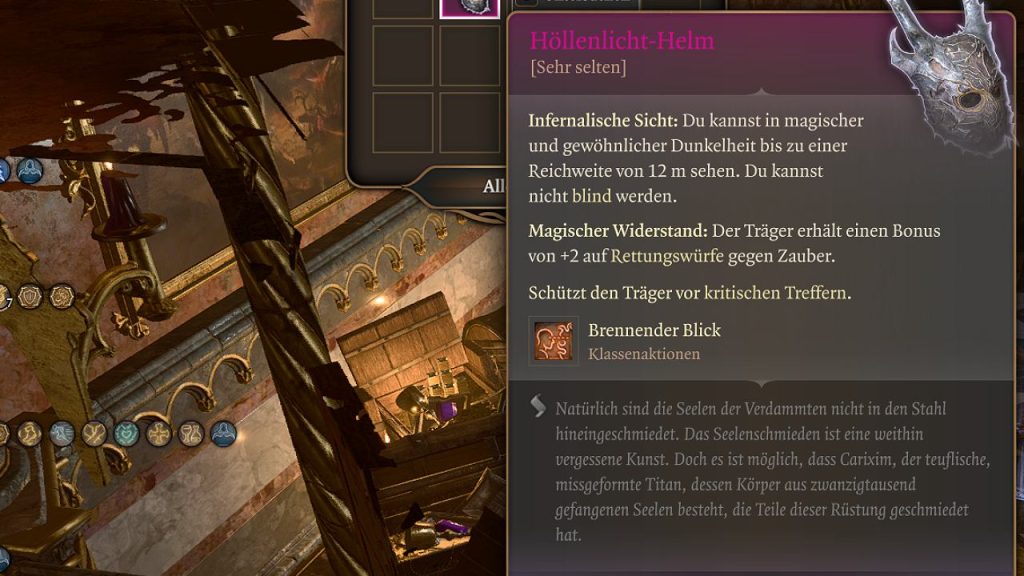
This item can be looted:
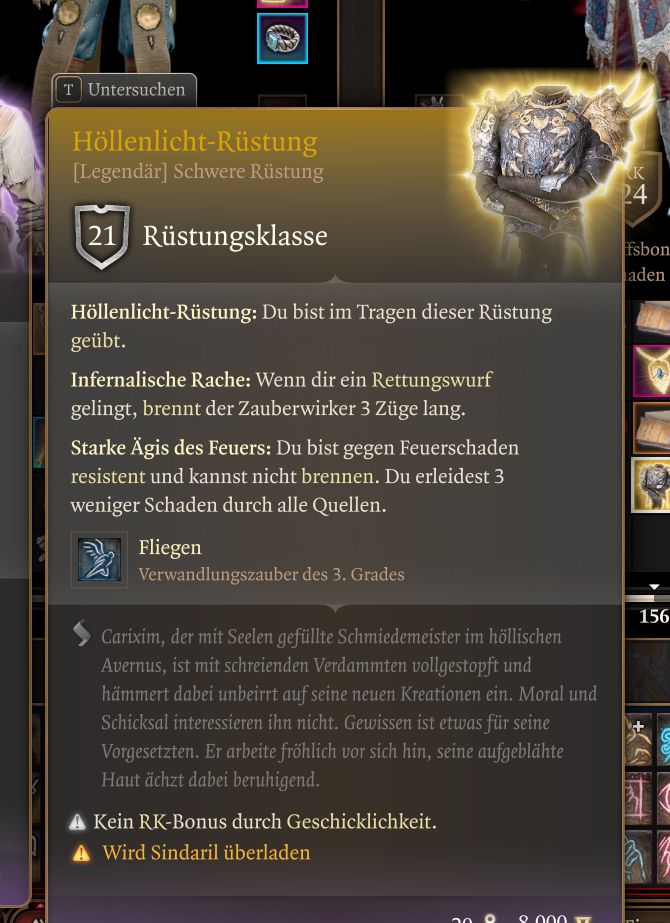
  • Helllight Helm
Baldur's Gate 3: Helllight Helm
Helllight Helm: What it can do

Go to the Archive to Obtain the Boudoir Invitation

Before the archive, it’s best to talk to Hope again. She will give you information that you can use to deceive the Archivist in order to obtain the invitation to the boudoir. For this, you must again pass skill checks. After that, you go into the archive.

This is how you obtain the invitation:

  • Go into the archive and talk to the Archivist, try to deceive him; this will immediately get you the boudoir invitation
  • Alternatively, you can try other skill rolls to get the invitation
  • If all fails, you can attack the Archivist or steal the invitation from him

After you have successfully received the invitation, make your way to Raphael’s boudoir.

Baldur's Gate 3: House of Hope Map
Map of House of Hope

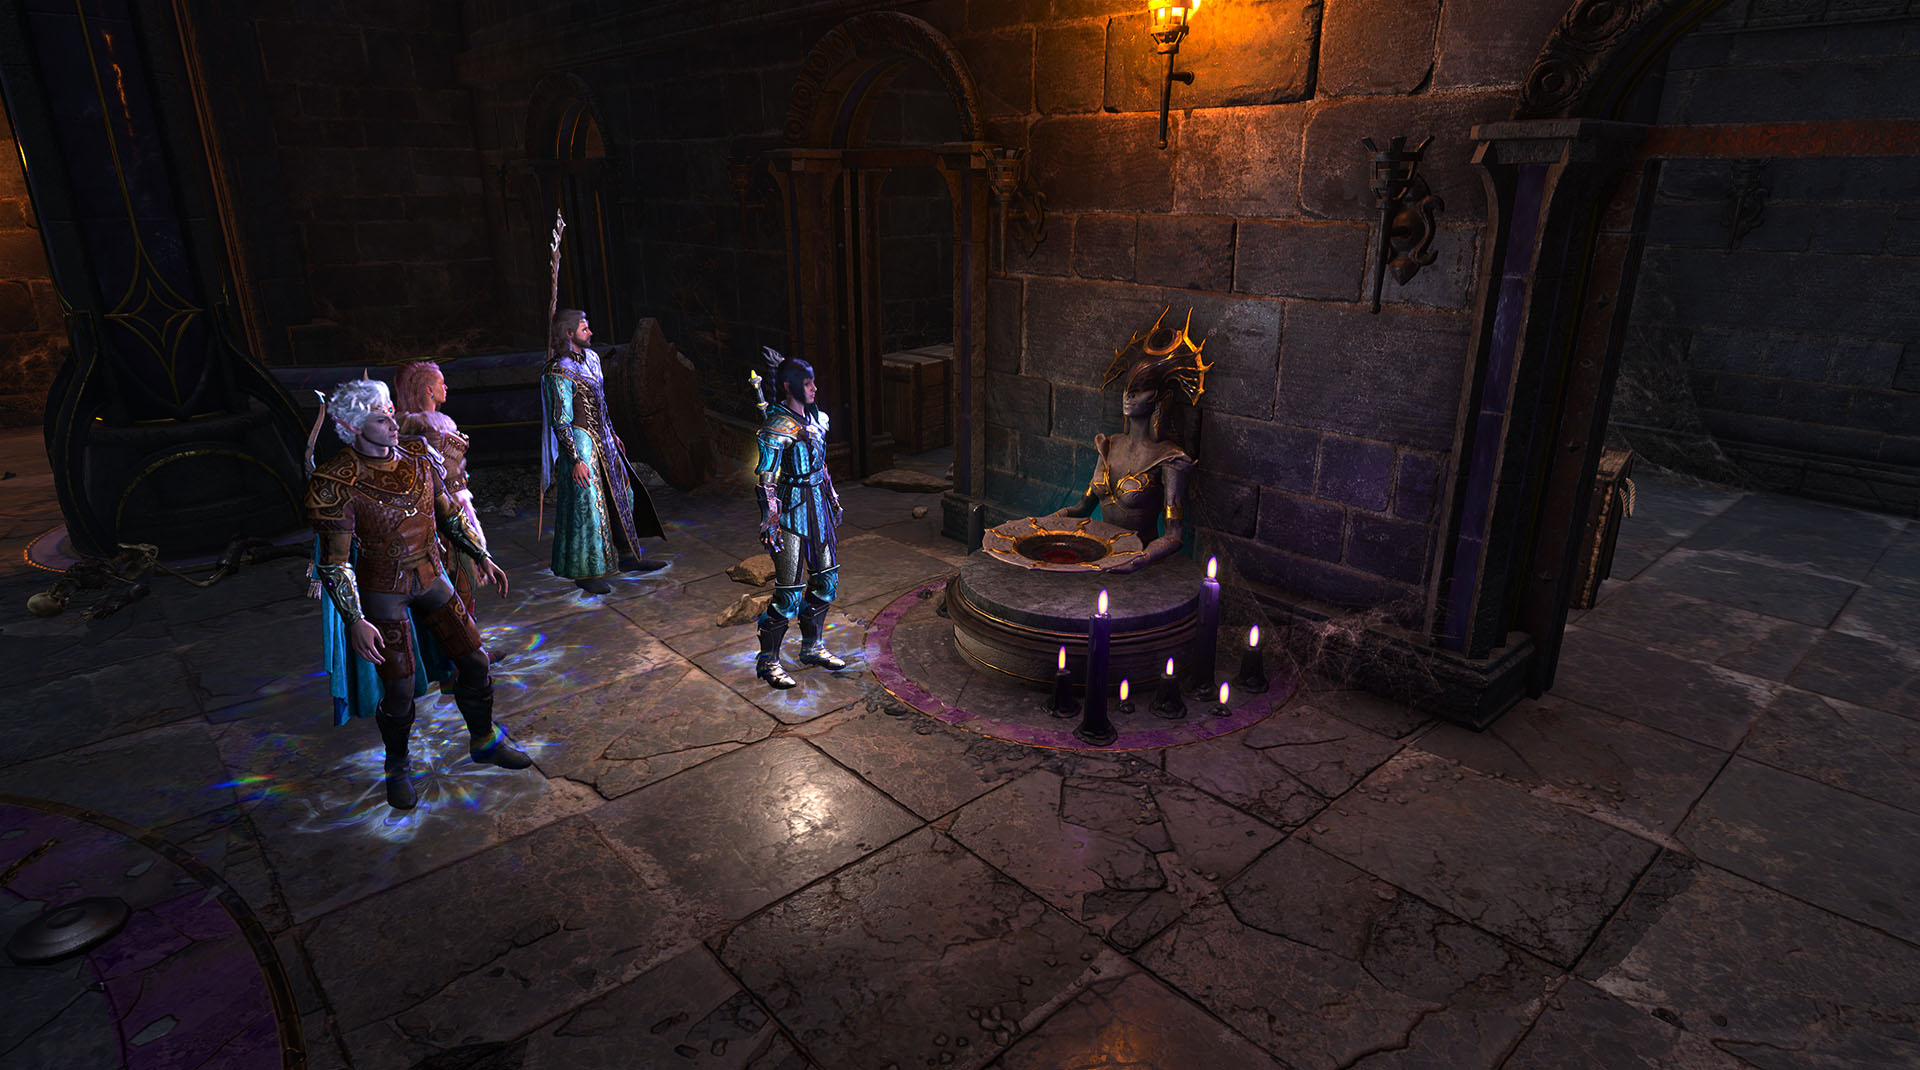
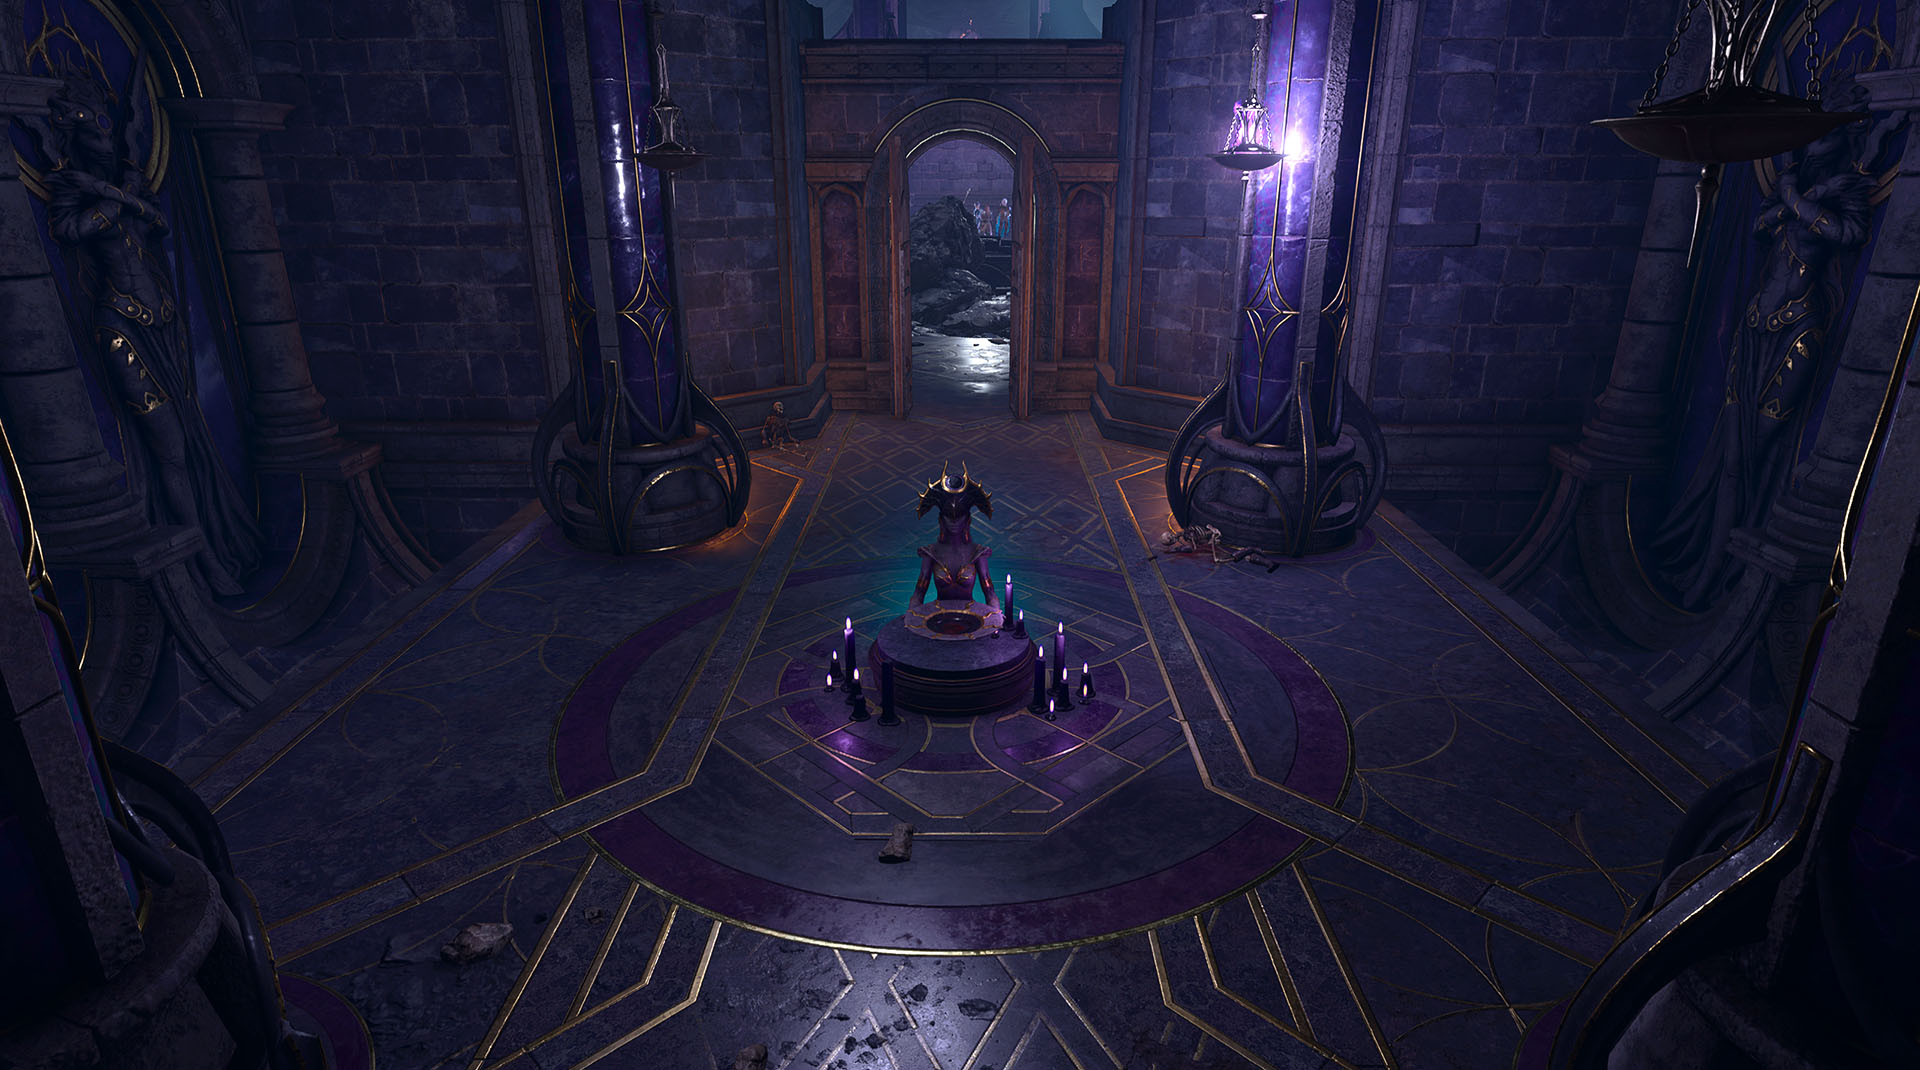
The Boudoir – Meeting Haarlep in the House of Hope

In Raphael’s bedroom, you do not meet the devil himself, but an incubus named Haarlep. He lies there on a magnificent bed wearing alluring lingerie. A player deciphered the mysterious inscription on Haarlep’s underwear and revealed what the message actually means.

The incubus challenges you to a game of seduction. He can change his appearance at will, which is why you see him in the form of Raphael.

Tip: There is a fountain in the room that allows you to effectively take a long rest.

What options do you now have with Haarlep? Haarlep has the key to the vault, where the password for the Orphic Hammer is located.

  • Allow Haarlep to use your body as a disguise (disguise) to obtain the key. But do not sell your soul, because that leads to a Game Over.
  • Or: Fight Haarlep to obtain the key

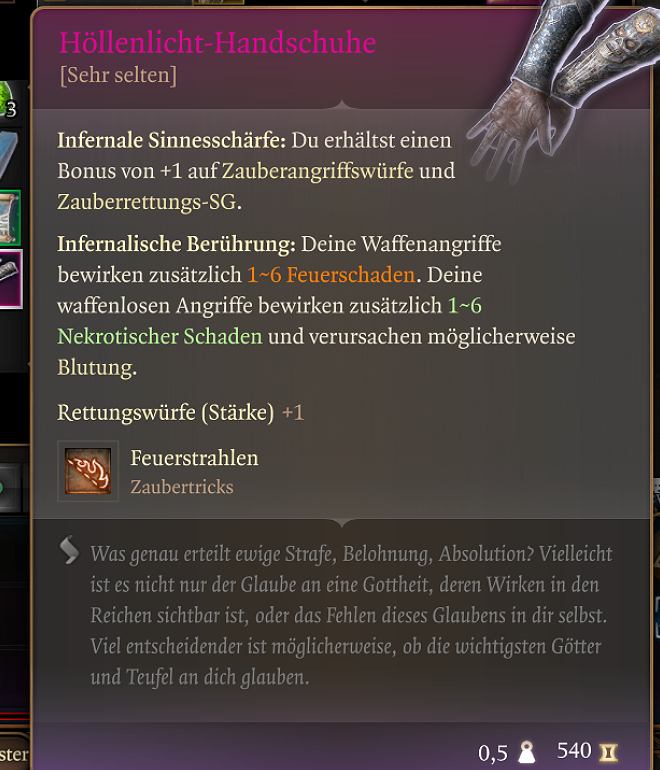
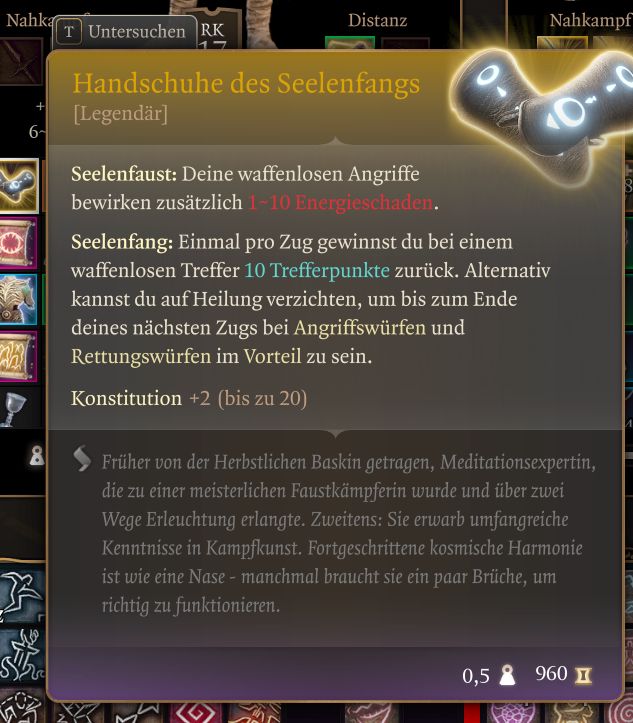
Tip: If you want the Helllight Gloves, you need to fight Haarlep to loot them.

This is what the gloves can do:

Baldur's Gate 3: Helllight Gloves
You will obtain the Helllight Gloves when you defeat Haarlep in combat.

Once you have the key, look for a painting of Raphael – it is located to the left of the magnificent bed. Pass the perception check to notice the trap and disarm it. Under the painting is a button you can press, and behind the painting, the vault will reveal itself.

In the vault, there is also a note with the sought-after password. You need this password to deactivate the dome in the archive that protects the Orphic Hammer (or your contract).

Tip: Use the fountain in the boudoir to regain your spell slots and HP, and prepare for a fight.

Back to the Archive to Retrieve the Orphic Hammer or Contract from the House of Hope

Make your way back to the archive. Now you can go to the Orphic Hammer (or contract) and remove the dome using the password to grab the hammer or tear up the contract.

The Archivist will notice, and everyone will be hostile towards you as soon as you leave the room. Fight your way through after you have collected the items.

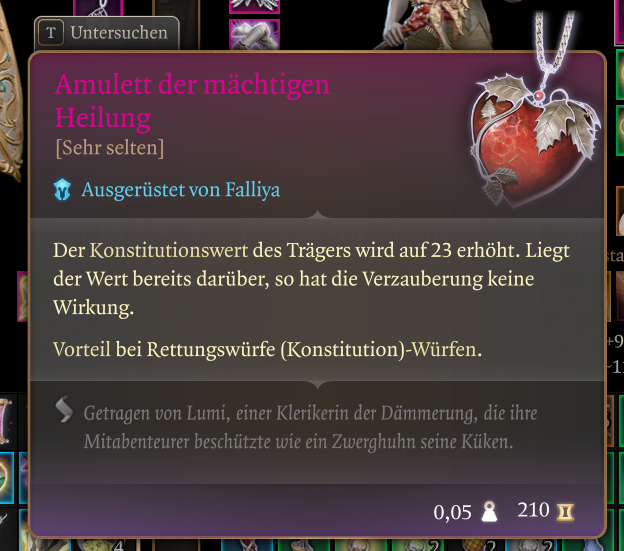
In addition to the Orphic Hammer (or the contract), you can collect other powerful items found in the archive, including:

  • Amulet of Greater Healing
  • Gauntlets of Hill Giant Strength (which Helsik desperately wants)

Here’s a closer look at the items:

Baldur's Gate 3: Amulet of Greater Healing
Amulet of Greater Healing
Baldur's Gate 3: Gauntlets
Gauntlets of Hill Giant Strength
Baldur's Gate 3: Orphic Hammer
Orphic Hammer

Save Hope

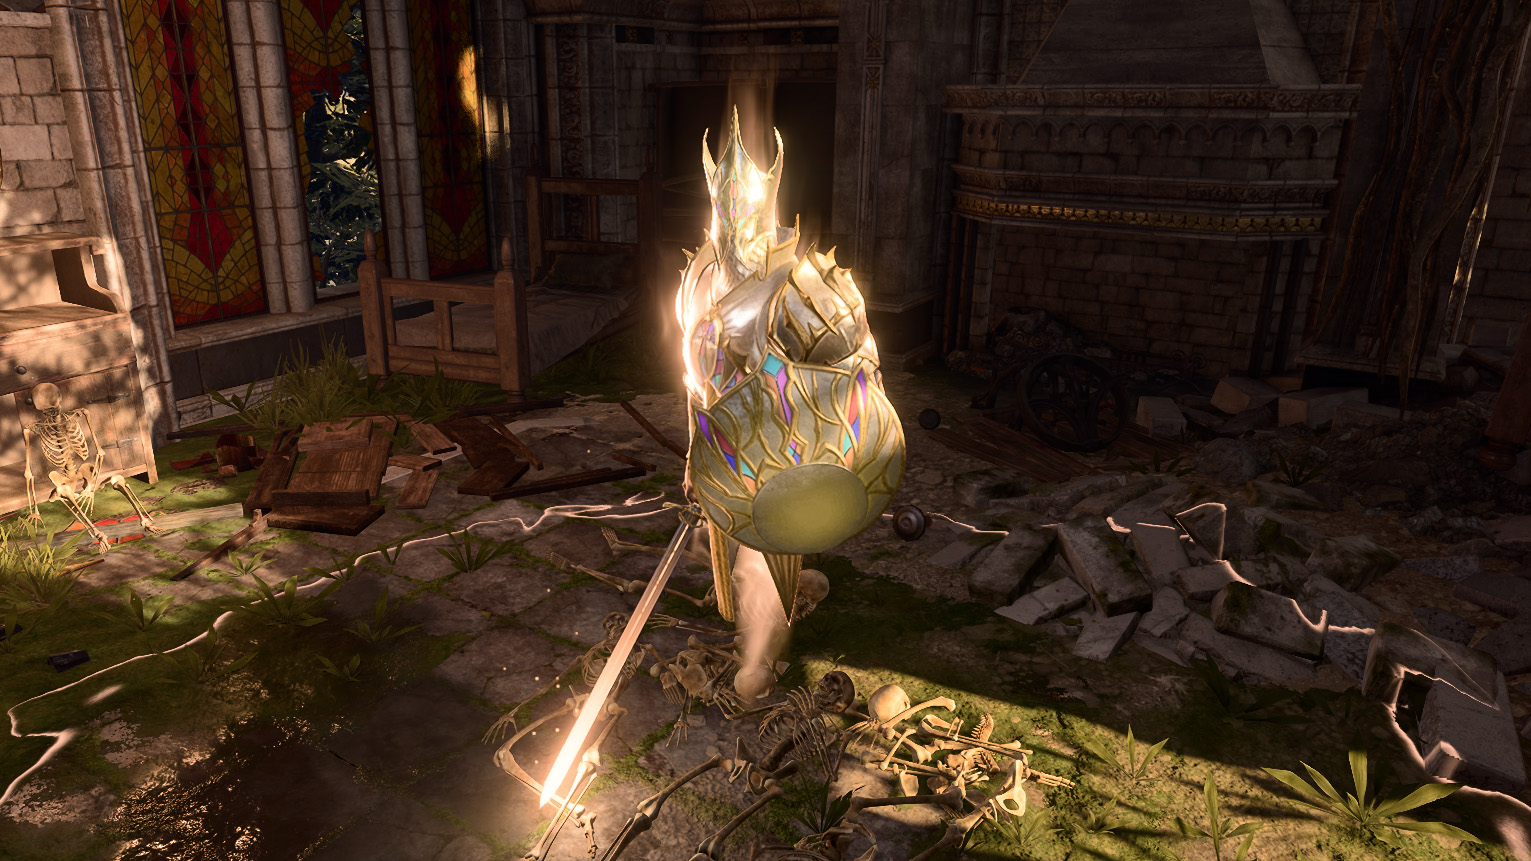
After fighting your way through, head east to rescue Hope from the prison. To do this, climb down through a hatch into the prison. In the prison, Hope is chained, and another fight awaits you – so get ready.

After that, you can destroy Hope’s chains and free her by equipping the Orphic Hammer and smashing the crystals. She will assist you in the fight against Raphael.

Tip: Afterward, go back to the boudoir to heal yourself using the fountain and refresh your spell slots.

Defeat Raphael in Battle – 666 Hit Points

After that, you will encounter Raphael when you go back to the portal. The battle against Raphael is a very difficult one. If you have the option (depending on the decision in the Shar Temple), Yurgir will appear alongside Raphael. With a Charisma roll, you can try to convince Yurgir to fight on your side.

Baldur's Gate 3: House of Hope Raphael and Yurgir
Raphael and Yurgir

Raphael has 666 hit points, which is a symbol for the devil, and an armor class (AC) of 21. Additionally, he has his own boss room and song. In the room, there are four soul pillars, which grant him additional fire damage and a bonus on Dexterity and saving throws. He uses the pillars to restore HP and cast powerful spells.

Tips:

  • Destroy the soul pillars before focusing on Raphael and the adds and ideally take blinding damage with you. With blinding damage, you can also disable the pillar for one round. Because if more pillars are active, it is harder to hit Raphael – as he gains more AC.
  • You can also try spells like Hold Monster or Tasha’s Hideous Laughter by casting spells on Raphael.
  • Hold Monster or Tasha’s Hideous Laughter work well because the saving throws are based on Wisdom – and Raphael has 13 Wisdom, which is not very much against his Charisma score of 19.

After you have defeated Raphael, you can loot the legendary Helllight Armor. If Hope has survived, you will also receive the Legendary Gloves of Soul Catching as a quest reward from her.

This is what the two items can do:

Baldur's Gate 3: Helllight Armor
Helllight Armor
Baldur's Gate 3: Gloves of Soul Catching
Gloves of Soul Catching for the Monk

There are many ways to effectively defeat Raphael. And that is a good thing, as the devil can cause you serious problems with his minions. However, the boss in the House of Hope can also be dealt with rather quickly – a player even defeated Raphael in just 2 moves: Baldur’s Gate 3: Lonely fighter defeats boss with 666 HP and his army in 2 moves – This is how she did it

This is an AI-powered translation. Some inaccuracies might exist.
Source(s):
  1. Dot Esports
  2. YouTube

Baldur’s Gate 3: Best Druid Build for Halsin – Which Subclass, Talents, Spells, and Attributes Should You Choose?

The Druid is a versatile class in Baldur’s Gate 3. This time, we show you the Druid build, the subclass “Circle of the Moon”, where you fight in animal form. We list subclass, attribute points, talents, and spells in our overview.

Update, April 7, 2025: We have reviewed the article, adjusted the structure, and updated information.

What is the Druid? The Druid is one of the major classes in Baldur’s Gate 3. It is nature-oriented and can thus cast various spells related to shape-shifting, spores from fungi, and necromancy.

In this guide, we will show you a build for the subclass “Circle of the Moon”, which specializes in transforming into other creatures like bears, spiders, panthers, or even saber-toothed tigers. So you predominantly fight in animal form.

We will now show you in the following section which attribute points, talents, and spells you should focus on if you want to play the Druid predominantly in animal form.

[toc]

Start video
Baldur’s Gate 3: Reset Character and Choose New Class

Druid Build: Subclass Circle of the Moon – Choose the following attribute points

Which subclass should I choose as Druid? Use the Circle of the Moon as your subclass.

Which attributes should I focus on? As a Druid with the Circle of the Moon, you should concentrate on Wisdom. As a second focus, concentrate on Constitution.

Note that for the attributes, you should focus on even rather than odd numbers, as otherwise, you won’t benefit from improved dice rolls. You can find more about the attributes in our overview.

This is how you distribute your attribute points as a Druid (Circle of the Moon):

  • Strength: 10
  • Dexterity: 14
  • Constitution: 16
  • Intelligence: 8
  • Wisdom: 16
  • Charisma: 10

Druid Build: Talents at All Levels

How do talents work? In Baldur’s Gate 3, you can choose a talent at levels 4, 8, and 12 to complement your build. However, if you dislike any talent, you can instead invest 2 points into your desired attributes.

Which talents do I need? In this case, we recommend focusing on the following talents per level:

  • Level 4: Alert
    • Function: You can no longer be surprised and gain +5 to Initiative. However, you can also choose any talent of your choice.
  • Level 8: No talent, but improve abilities
    • Wisdom should be increased to level 18.
  • Level 12: No talent, but improve abilities
    • Wisdom should now be pushed up to level 20. The talents in this level range are not optimal, and by improving your ability, you can strengthen yourself without taking risks.

In our overview, you can find a ranking of all talents and which are the best for all classes.

Best Druid Build: How to Level Halsin

As a Druid of the Circle of the Moon, spells that you can maintain with your concentration are especially worthwhile. You can cast a concentration spell before you transform into an animal of your choice. The transformation does not break the spell.

The good thing is: As a Druid, you can swap your spells freely before each battle. You do not have to run to Lazarus and reset your level. You don’t have a fixed loadout but can adjust your spells according to the situation. Thus, you can constantly swap out your spells and try out what works best for you.

The following spells and cantrips are worthwhile as a Druid of the Circle of the Moon:

Level 1

  • Cantrips: Guidance and Thorn Whip

Guidance is one of the strongest cantrips in Baldur’s Gate 3. With Guidance, the target receives a bonus of 1d4 on ability checks, which is particularly useful in conversations and for picking locks.

  • Spells you have at Level 1: Ice Knife, Thunderwave, Cure Wounds, Healing Word, Enhance Jump

You only get your animal form at Level 2, so at Level 1, you mainly use the damage spells Ice Knife, Thunderwave, and the cantrip Thorn Whip to deal damage. With Cure Wounds and Healing Word, you can heal yourself or allies.

Level 2

  • Spells that are worthwhile: Speak with Animals, Entangle, Healing Word, Thunderwave, Faerie Fire
  • Choose subclass: Circle of the Moon
  • Cantrip: Resistance
  • Animal form: Now you can transform into animals. The options available at Level 2 are: A badger, a wolf, a spider, and a cat. Through your subclass, you gain an additional animal form, the bear, which is quite tanky.

Faerie Fire is a handy concentration spell that you can use before transforming into an animal. All targets in the light become visible, and your attack rolls have an advantage.

Speak with Animals is not practical in combat, but it is very worthwhile in Baldur’s Gate 3 because you encounter numerous animals and thus engage in some fun dialogues.

Level 3

  • Spells that are worthwhile: Flame Sphere, Moonbeam, Hold Person, Entangle, Healing Word

Flame Sphere is a strong spell that creates a burning sphere. This sphere can be moved over a certain distance and causes fire damage to targets that come into contact with it or are immediately nearby.

You can conjure the sphere before you transform into an animal of your choice. Your concentration is not interrupted by the transformation. The sphere will support you in combat until your concentration is broken (or up to 10 turns).

Hold Person is also a very strong spell, especially if you have melee fighters on your team. If the spell is successful, the humanoid target becomes incapacitated and cannot perform any actions or reactions. All melee attacks against the target are automatically critical hits, allowing you to deal massive damage.

Level 4

  • Spells that are worthwhile: Here you could also prepare the concentration spell Heat Metal or Thorn Whip. Just see which spells you find useful. You can swap them out before each battle.
  • Cantrip: Pick your favorite
  • New animal forms: Deep Rothé and Nightmare Crow
  • You can choose your first talent (see above)

Level 5

  • Spells that are worthwhile: Call Lightning, Snowstorm, or Plant Growth

All three spells are strong. With Call Lightning, you hit multiple targets with lightning that are within radius. You can cast the spell with good concentration up to ten rounds each time without wasting a spell slot. Therefore, it would be worthwhile to always choose the highest spell level to get the most benefit from the feature.

The spells Snowstorm and Plant Growth give you plenty of crowd control effects (CC).

  • You can make a second attack after your first unarmed strike in your animal form.

Level 6

  • Prepare spells: Pick your favorites
  • First strike: You gain a new passive feature from the Circle of the Moon, making your attacks in animal form count as magical damage.
  • New animal forms: Owlbear and Panther
baldur's gate 3 owlbear guide title
You heard right: You can turn into an owlbear, but you’re not as cute as this little owlbear cub!

As an owlbear, you become the ultimate tank that can also deal massive damage. Some Druids have discovered how to take down their opponents in one hit with the owlbear. As a panther, you act as a pure damage machine, just like with the wolf.

Level 7

  • New spells that are worthwhile: Wall of Fire and Summon Forest Creature

Wall of Fire is considered one of the most powerful AoE spells in the game. The spell can be flexibly placed as long as there is visibility to the entire area. All within the area take immediate 5d8 fire damage and catch fire. The spell covers large areas, is good for long distances or narrow corridors, and can deal damage to enemies over several rounds when positioned well tactically.

Summon Forest Creature allows you to call a dryad that follows you and supports you in battle. The cool thing is: it’s not a concentration spell. It’s best to summon her before the fight so that you don’t use an action in combat. And what’s even more practical is that your dryad can also summon another creature. A great two-for-one deal.

Level 8

  • Prepare spells: Pick your favorites
  • You can choose your second talent (see above)
  • New animal form: Saber-toothed Tiger

The saber-toothed tiger also focuses entirely on damage, just like the panther and the wolf. However, they have different abilities. See what you like best.

Level 9

  • New spells that are worthwhile: Summon Elemental and Insect Plague

With Summon Elemental, you can summon an elemental of your choice that supports you in battle.

Level 10

  • Cantrip: Pick your favorite
  • Prepare spells: Pick your favorites
  • You can now make two extra attacks after your first unarmed strike in your animal form.
  • New animal forms: Dilophosaurus and Myrmidon

You can transform into a dino and a Myrmidon of your choice. The Myrmidon comes in four different variants, each with different abilities. Overall, the 4 forms are very strong. To transform into a Myrmidon, you need two animal form charges.

Level 11

  • New spells that are worthwhile: Hero’s Feast, Wall of Thorns, and Sunbeam

Hero’s Feast gives your party strong buffs. You can no longer be sick, frightened, or poisoned. Additionally, your health increases, and you gain an advantage on Wisdom checks. The buff lasts until the next long rest.

Sunbeam is a far-reaching concentration spell that is worthwhile in combat. The beam deals a lot of damage and blinds enemies. You can use the spell once each turn (up to a maximum of 10 turns) as long as your concentration holds – without needing to use another spell slot again.

Level 12

  • Prepare spells: Pick your favorites
  • You can choose your third talent (see above)

These were the most important things. You can also swap spells as you like, depending on what you feel like in combat. So feel free to try out new spells. What do you think of the Druid? Have you tested it yet? If so, how strong do you find it? Let us know in the comments!

What animals can the Druid transform into?

To transform into an animal, you need animal form charges. You regain these through a short or long rest. You can also dispel the transformation yourself. If your hit points in animal form drop to 0, you automatically transform back.

Each animal form has different abilities and has its own attribute points. In total, there are 15 animals that the Druid of the Circle of the Moon can transform into:

  • Cat (from Level 1)
  • Badger (from Level 1)
  • Bear (from Level 1)
  • Wolf (from Level 1)
  • Spider (from Level 1)
  • Nightmare Crow (from Level 4)
  • Deep Rothé (from Level 4)
  • Owlbear (from Level 6)
  • Panther (from Level 6)
  • Saber-toothed Tiger (from Level 8)
  • Dilophosaurus (from Level 10)
  • 4 types of Myrmidon (from Level 10)
    • Earth
    • Water
    • Air
    • Fire

If you love trying out something new repeatedly, you should check out the Bard. This class is considered one of the best in Baldur’s Gate 3, excelling not only in combat but also in conversations with other characters. Need tips for the Bard? Author Fabienne Kissel from MeinMMO presents a multiclass build that allows you to defeat the strongest opponents in one go.

This is an AI-powered translation. Some inaccuracies might exist.

Baldur’s Gate 3: Finding the Night Song – Here’s how to solve the puzzles and make your choices

One of the biggest quests in Baldur’s Gate 3 is “Finding the Nightsong.” We will show you what you need to do for the quest – and how to complete it.

Baldur’s Gate 3 is full of quests that may seem small at the beginning, but stretch over many hours and multiple acts. One of these missions is “Finding the Nightsong.” We will tell you everything you need to know about this quest, how to start it, and where it ends.

Spoiler Warning: The article contains some spoilers regarding the questline surrounding the Shadowsong and its possible outcomes. However, the summary with initial hints is spoiler-free.

Update on April 7, 2025: We have adjusted the structure of the article and updated information.

[toc]

The Essentials About the Nightsong at a Glance

  • You receive the quest as early as Act 1.
  • You can complete the quest at the earliest in Act 2, but it may extend into Act 3.
  • The questline has multiple different endings depending on your choices.
  • The questline is particularly significant for Shadowheart and her personal story.

How do you start the Nightsong questline? You will inevitably encounter the questline “Finding the Nightsong” during the first act of the game. After your first visit to the Druid Grove, you may meet Liam. Either in the grove itself, outside the grove with his crew, or – if he has died – the quest begins through a letter from his corpse.

Typically, you will find him when you leave the grove and head towards the swamp.

Alternatively, you can also receive the first hint about the quest from Halsin or Aradin, usually in connection with your mission to attack and take out the goblin camp.

In summary, the quest asks you to find the legendary “Nightsong” for a powerful wizard in Baldur’s Gate and bring it to him. Details about this Nightsong are initially unknown, but it is said to be a powerful weapon of the followers of Shar.

At first glance, the mission may seem like a simple side quest, but it holds great significance for the story of the game and extends throughout the longest part of your adventure.

Tip: Since the questline surrounding the Nightsong is particularly significant for Shadowheart, we recommend having her with you at all steps of the quest. While it is not strictly necessary for completion, Shadowheart has special dialogues and may unlock unique events and options during this questline. Additionally, Shadowheart may become very unhappy if you do not take her with you while fulfilling the quest.
Start video
There are secret rooms in Baldur’s Gate 3 that only a few of you will ever see

Act 1: Finding the Nightsong – Searching for More Clues

The Nightsong is supposed to be located somewhere in the Underdark; accordingly, that is your first clue.

Note that you basically have no time pressure for this questline. You will encounter many other side missions while searching for the Nightsong – especially in the Underdark – which you can all complete at your leisure.

You have several ways to enter the Underdark during Act 1:

  • Head to the Ruined Sanctum (the “Goblin Camp”). In the healer’s room Gut, one of the three leaders of the camp, you may discover a staircase with a perception check. The staircase leads into the defiled temple. There, you need to solve a small puzzle with moon discs or alternatively discover and unlock a lock (for example, with Astarion). Once done, a long ladder leads directly into the Underdark to the Selunite outpost.
  • In the small village controlled by the goblins, you can climb into the well. Down there, you will fight a large spider matriarch and see a deep hole in the ground. Cast the spell Feather Fall or use a corresponding potion to jump into the hole and thus fall into the Underdark.
  • Another access point can be found at Aunt Ethel in her teahouse in the swamp. Climb through the chimney into her hideout and make sure to grab one of the eerie masks. In the room with the many gas traps, after the waterfall, you can jump onto an elevation. Put on the mask (after Ethel has been defeated!) and you can walk through the wall. A magical mushroom circle teleports you into the Underdark.
  • In a barn next to the inn “Waukeen’s Rest,” you will find the hideout of the Zhentarim behind a trapdoor. In the northwest of the hideout, you may discover a wall that is merely an illusion. You can simply pass through the wall, but conversations with the wolves may also draw your attention to it.

Once you reach the Underdark, you need to advance to the west. There you will find a small ship, which you can take to sail to the Grymschmiede. Explore the area thoroughly and follow the story. After you have completed the situation regarding the “True Soul Nere,” you can go through the hallway filled with poisonous gas and unlock a locked door.

From here, you can see an ancient temple of Shar, but there seems to be no way to enter the temple from here. The quest continues in Act 2.

Act 2: Finding the Nightsong – The Trials of Shar

Once you arrive in the Shadowlands, you can continue your search for the Nightsong.

Here’s a clear warning: Completing this quest will – depending on your choices – rapidly advance the story in this area and cause significant changes. If you want to experience the Shadowlands in their original state, you should explore a bit before turning your attention to finding the Nightsong.

Far to the northwest of the area, west of the river and north of the House of Healing, you can discover access to a mausoleum of the Thorm family. The mausoleum contains a secret entrance to the temple of Shar.

To reach the temple, you must click the paintings on the wall in the correct order in the back room of the mausoleum. The order is:

  1. The painting Towers of Moonrise
  2. The painting of Grief
  3. The painting of the General
Baldurs Gate 3 Moonrise Towers Picture
The paintings must be activated in the correct order.

If entered correctly, a hidden access point will open, leading down into the temple. If you make a mistake, traps will be triggered – but you can try again.

The Access to the Deeper Temple of Shar

In the temple of Shar, there is much to do. Not only can you meet Balthazar here, but you can also complete a mission for Raphael, acquire plenty of powerful scrolls and weapons, or uncover the mystery behind the many rats in the temple.

To access the deeper part of the temple, you need to solve a small puzzle at the beginning. In the side corridors, you will find different levers to raise and lower the lanterns and turn them off. Make sure the room is in complete darkness to reveal glowing runes on the floor, which are placed around the statue.

These runes are barriers that you cannot cross. However, each rune circle has a gap through which you can maneuver to reach the statue at the end. This will break the seal of the gate and allow access to the deeper levels of the temple.

The Path to the Sanctum

In the next hours, you will have to overcome the various trials of Shar to ultimately obtain four shadowy gemstones.

The individual trials consist of fights, logic puzzles, and a small stealth mission. You will receive the last gemstone from the demon Yurgir, who has also settled in the temple.

We have a detailed guide for the individual trials of Shar here.

Baldurs Gate 3 Shadow Gem Sockets

Once you have collected all the stones, you can activate the floating platform in the center of the temple and advance to the innermost sanctum. There, you can plunge into a water basin and enter the area “Shadowfell.” Make sure to save beforehand, as there is (for now) no return from there.

The Fate of the Nightsong – Make a Decision

What happens in Shadowfell strongly depends on your previous decisions. By now, you have revealed that the Nightsong is not a weapon but a person. A demigod being that is repeatedly killed by followers of Shar – as a final trial for ascension to the Dark Justiciar.

Depending on your previous choices and the ones you now make, there are different options:

  • You can hand the Nightsong over to Balthazar. Nightsong will then be brought to General Thorm. You maintain your disguise as members of the Cult of Absolute and gain more trust with the cult. If you do not choose this option and Balthazar is still alive, you will have to fight against him.
  • You can persuade Shadowheart to kill the Nightsong. In that case, she fully commits to Lady Shar and becomes a Dark Justiciar with new powers and equipment.
  • You can dissuade Shadowheart from killing the Nightsong. In that case, you disappoint the goddess Shar, but the Nightsong is freed and helps you throughout the story, potentially even becoming a guest in your camp.

Which decision you make here should mainly depend on your story preference, as it will have significant consequences for Shadowheart.

If this scene ends with the death of the Nightsong, the quest will also be concluded here, as delivering her to the wizard is no longer possible.

Act 3: Finding the Nightsong – Your Reward

Depending on the decisions you made earlier, the Nightsong and/or her partner is now one of your companions in the camp. If the Nightsong is present, in Act 3, you can decide how you want to proceed with her:

  • You can pledge your loyalty to the Nightsong and fight against the wizard who wanted to possess her.
  • You can betray the Nightsong and deliver her to the wizard.

You can meet the wizard Lorroakan in Baldur’s Gate. His wizard’s tower is above the large magic shop “Sorcerous Sundries.” You can enter the tower from the shop or the library.

No matter what you decide here, the questline about the Nightsong will inevitably come to an end. You can also determine your decision based on your preferred story outcome. Even if you deliver the Nightsong, you can still raid the wizard afterward and take his possessions if you wish. How did you handle the Nightsong in Baldur’s Gate 3? Tell us in the comments. And all other guides and tips for Baldur’s Gate 3 can be found here.

This is an AI-powered translation. Some inaccuracies might exist.

Baldur’s Gate 3: Trials of Shar – How to solve the 3 Shar trials

If you want to progress from Act 2 to Act 3 in Baldur’s Gate 3, you first need to successfully navigate through the Shadowlands. An essential part that is not optional are the Trials of Shar. We have the answers to all your questions about the Shar trials.

The Trials of Shar are one of the most important things you complete in Act 2. They are not optional and an important part of the personal quest of Shadowheart. Additionally, you need to pass them to find the Night Song and progress to the finale of Act 2.

You will find them in a hidden temple of Shar, which also turns out to be a real labyrinth. To avoid wandering aimlessly through the world and potentially getting lost, we have gathered everything you need here: namely where to find the trials, how to reach them, and how to master them.

Depending on which step you need support with, you can jump to it using the table of contents.

Update, April 7, 2025: We have adjusted the structure of the article and updated information.

[toc]

Start video
Baldur’s Gate 3 is coming to PS5 – Trailer prepares for console release

Trials of Shar – how to find the temple

How to reach the Trials of Shar in the Overworld

You can find the Trials of Shar north of Reithwin in Act 2. The entrance is located in the mausoleum of the Thorm family. If the devil Raphael has gotten in your way, you know it is nearby. Depending on the run, you might also meet the young Tiefling Arabella on your way there.

The easiest way for you is to go over the bridge to Reithwin and then head north. Leave the mausoleum on your right and continue north on its left until you reach the entrance of the mausoleum.

How to unlock the entrance to the Shar temple

In the mausoleum itself, you will face a few challenges. Once all opponents and traps are cleared, make your way to the northernmost chamber. Don’t forget to loot everything you can – you’ll find a lot of background story about Baldur’s Gate 3 and the Shadow Curse specifically. Not to mention the actual loot.

In the northernmost room, you will find a picture puzzle: Three large pictures hang on the walls. Each depicts a moment in the life of Ketheric Thorm. Below each picture is a button. You need to activate them in chronological order. To determine the correct order, you can read several books, notes, and stone tablets in the main chamber.

This is the correct order:

  1. The painting Towers of the Moonrise
  2. The painting of Grief
  3. The painting of the General

Once you solve the picture puzzle, the northern wall will open. You can now enter the temple of Shar.

Entering the Temple of Shar and unlocking the main part

Before you can delve deeper into the sanctuary, you need to solve another puzzle. If you go straight from your spawn point, you will reach a chamber with a statue.

To fully open the temple, you need to get to the statue. Unfortunately, you cannot do this as your characters keep getting thrown back. To circumvent this barrier, you need to lower the lamps from the ceiling and extinguish all lights – you must also not carry any light source with you.

You can lower the lamps with levers. These can be found on the sides of the corridors leading directly from the main chamber. Disarm the preceding traps and activate the levers. Each lever lowers a lantern to the ground, whose light you can then extinguish.

When it’s dark and you’ve done everything correctly, you should see a circle of runes around the statue. You cannot walk over the runes themselves. However, they have holes through which you can reach the statue like through a mini-labyrinth.

Once you reach the statue, interact with it and the gate to the temple should open.

This is what the room should look like when you have solved the puzzle.

Mastering the Trials of Shar – here’s how

The temple of Shar and the trials are on multiple levels. Navigation is therefore not particularly easy. Here we describe the path through the temple as suggested by the layout of the sanctuary.

Important: You do not have to complete the trials with Shadowheart or any other single character. You can have your whole party help, which at least makes the Gentle Step and Same trials easier.

We have walked through the temple for you to show you exactly where to find what:

Start video
Baldur’s Gate 3 Temple of Shar Runthrough

Trials of Shar: Find all Shadow Gems

To complete the temple, you must collect a Shadow Gem at the end of each trial. These spheres open the way to the final room and towards the Night Song.

The first three spheres can be found at the end of the trials described here. The fourth sphere, on the other hand, is hoarded by the Orthon Yurgir. If the devil Raphael encountered you at the beginning, the name might ring a bell. The encounter with the Orthon can happen in various ways. In the end, just make sure to search his belongings after the last Shadow Gem.

Trials of Shar 1: Gentle Step Trial – find & solve

The first trial takes place down the western stairs. Activate the waypoint and go down further stairs to the right from there. The door to the Gentle Step Trial is labeled Your Most Desired Treasure.

Once you go through the door, you are in the trial area. However, before you can start, you must make a blood sacrifice. This starts the challenge.

Trials of Shar: The entrance to the first trial.

How do you solve the trial? The fundamental goal for you is to obtain a crystal sphere at the other end of a labyrinth. The path through the labyrinth is not straightforward: with levers and buttons, you can adjust and change the layout. Watch out for traps and enemy shadows.

There are several ways to solve it. The easiest is to send a party member through the labyrinth and to the other end before you start the trial. This way, you can take your time to explore everything and find a safe path before the enemies spawn and make it harder for you.

If you don’t want to cheat, grab your character with the highest stealth score. Here is your route:

  • Start the trial.
  • Have the selected character use the Hide action.
  • Send this character through the gate to the left of the Shar statue where you started the trial.
  • Take the first left turn. Continue west until you reach the slimy ground.
  • Use the jump action to jump through the window.
  • Then continue west until the end of the trial.

Here are some additional tips:

  • Try to disarm the traps while passing through.
  • The skeleton to the left of the entrance to the trial has an invisibility potion that makes the trial much easier.

Don’t forget to collect the Shadow Gem at the end.

Trials of Shar 2: Same Trial – find & solve

The so-called Same Trial can be reached if you turn left after the Gentle Step Trial. It is the next door on the same wall as the first trial. Also start this trial by making a blood sacrifice at the statue of Shar.

Trials of Shar: The entrance to the second trial.

How do you solve the trial? This trial is relatively simple: Once you have started the trial and entered the area, doppelgangers of your current party will appear. They attack you, and what follows is a normal fight – only this time against yourselves.

The twist: Your evil selves can become invisible and distribute the debuff Cheater’s Folly. Cheater’s Folly, translated as Betrayer’s Folly, lowers an attribute by 1. The debuff is triggered when your character attacks a doppelganger that is not their own. The effect can be applied up to four times – so you can temporarily lose up to 4 attribute points.

To avoid the debuff, let your characters always fight their own doppelgänger first. Once a doppelgänger is defeated, its original can attack whoever they want.

Here are some tips to make it easier for you:

  • Once the trial has started, sneak into the battle area and overwhelm your opponents from the shadows.
  • Make sure to have Shadowheart with magic/weapons/attacks that deal radiant damage. This makes the invisible enemies visible. Just make sure they defeat their own doppelgänger first so the debuff is not transferred.

Also, don’t forget to take the Shadow Gem with you.

Trials of Shar 3: Trust Leap – find & solve

The third and final trial can be found one floor down. To do this, exit the second trial and go left down the stairs. There are a few more steps down on your right – that’s where you’ll find the trial.

Trials of Shar: The entrance to the second trial.

How do you solve the trial? Before you now stands a statue and behind it a deep abyss. The object of your desire, another Shadow Gem, is placed on a platform above the void. So now it’s about overcoming the abyss in order to collect the sphere.

So how to overcome the abyss?

On the floor in front of the statue where you start the trial, you will see a floor plate with weird patterns. They show you where there are invisible but walkable paths above the abyss. You can also make these paths visible with a lever next to the entrance door.

Alternatively, you can fly over the abyss. Or jump with a character who has a long jump distance from visible platform to visible platform.

However, if your character falls into the abyss, they are immediately dead. The corpse will reappear at the starting point and can be resurrected with the spell Revive or a scroll.

Once you have collected the gem, the Trials of Shar are finished. You can now return towards the entrance and continue the quest towards the Night Song. But if you want, you can also go one room further into the Silent Library – where you can obtain the Night Spear, among other things.

One last word of warning: When you make your way to the Night Song, you will be asked if you are sure you want to proceed. This decision can exclude you from a lot of content. All about it can be found here: A decision in Baldur’s Gate 3 costs you many quests – here’s how to prevent it

This is an AI-powered translation. Some inaccuracies might exist.

Baldur’s Gate 3: Find Lathander’s Blood and Use the Ceremonial Weapons

Already in Act 1 of Baldur’s Gate 3 there is a really powerful weapon. Where to find it and how to obtain the mace Blood of Lathander, you can read here.

Update from 07.04.2025: We have restructured the article and adjusted the designation of some items.

[toc]

When exploring the mountain pass in Act 1, it’s best to visit the Monastery of Rosenmorg. There you will find the Githyanki crib and can, among other things, obtain Blood of Lathander. The weapon has been blessed by Lathander, the god of the monastery.

It deals 8-13 damage per hit. With the ability Blessing of Lathander you can, once per long rest, resurrect: If the wielder’s hit points drop to 0, they and all allies within a radius of nine meters regain 2-12 and 2-6 hit points, respectively. Additionally, you can cast Sunbeam with the weapon and blind fiends and undead.

However, to unlock the mace, you need the so-called ceremonial weapons.

More reasons to visit the Gith crib can be found here: Baldur’s Gate 3: The 5 most important decisions in Act 1 and what they do

The steps at a glance:

  1. Collect the ceremonial weapons
  2. Activate the crest with the ceremonial weapons
  3. Enter the secret cellar
  4. Exchange the desired weapon for the crest

Step 1: Collect ceremonial weapons

To secure the Blood of Lathander, you need the three ceremonial weapons:

  • The ceremonial axe,
  • The ceremonial hammer
  • And the ceremonial mace

You can collect the ceremonial mace shortly after entering the monastery: When you stand in front of the entrance, you can climb through a shattered stained glass window. One of the goblins drinking there carries it with him.

If you continue climbing, you will find a magically sealed door. However, with a bit of dexterity, you can simply open it. Unfortunately, a ghostly guardian still blocks your way. He must be defeated to obtain the ceremonial axe .

The image shows the ghostly guardian from the Monastery of Rosenmorg in Baldur's Gate 3.
The ghostly guardian is tough, but defeatable.

On the roof of the monastery, you will eventually find two eagles. They have the ceremonial mace with them. The two are part of another quest that you can receive from a small bird.

A custom-made Tav from Baldur's Gate 3 in combat with the two Eagles on the roof of the Monastery of Rosenmorg.
If you touch the nest, the eagles will immediately attack you.

If you address that or even touch the nest, you will have to fight. Alternatively, you can also sneak invisibly to the nest and snatch the weapon.

Step 2: Use ceremonial weapons and unlock the crest

In the monastery, you will find a room with several altars and a stained glass window in the floor. Now you must place your spoils on the respective altars. Read the tablets: The hammer belongs to the Seed Altar, the axe to Vaseid, and the mace to Stockhalt.

The ceremonial room in the Monastery of Rosenmorg in Baldur's Gate 3.
The ceremonial room gives you more information about the original purpose of the monastery.

Theoretically, you could also take weapons of the required type that are not the specific ceremonial weapons. However, if you have already collected them, you can use them immediately and then take them back with you.

If you did everything correctly, a secret door will open. Take the crest hidden behind it.

Step 3: Enter the secret cellar

The next step takes you to the Githyanki crib in the cellar of the monastery. Make your way to the northernmost room. There on the left side, you will find two statues that need to be turned.

Unfortunately, the mechanism has not been used for a long time. Use the spell “Grease” or one or two vials of oil. The lubricant will allow you to use the statues again.

Step through the now opened door and follow the path. Next, a magical door will block your way. You can disable it by destroying the blue crystal on the wall.

Step 4: Obtain Blood of Lathander without blowing up the monastery

If you continue down the path to the left, you need to eliminate a second such crystal. There are a few traps that you can skip or disarm. Finally, you need to destroy a third crystal.

Now you stand before the object of your desire: Blood of Lathander.

To prevent triggering the security mechanism when stealing the weapon, you must take the mace and place the previously collected seal on the pedestal.

Important: If you do not receive the seal, you can still retrieve the mace. However, the mechanism recognizes you with the seal as the so-called “Twilight Master” and cancels the self-destruction. If you don’t have it with you, you need to leave the monastery within four turns to avoid being blown up.

Alternatively, you can also try to shoot down the four energy cores in time. Where there is no energy, there is no explosion. Now you are in possession of the weapon. If you do not want to give it to your own character, it works particularly well in Shadowheart’s hands. How to skill the cleric best, you can read here: Baldur’s Gate 3: Best Shadowheart Build – How to play your cleric correctly

This is an AI-powered translation. Some inaccuracies might exist.

Baldur’s Gate 3: Best Wizard Build – Which Subclass and Skills Should I Choose?

If you want to deal significant magic damage in Baldur’s Gate 3, the Wizard class is a great choice. But what is the best Wizard build? You will find out in this guide.

What can the Wizard do? The Wizard is one of the few classes not represented by any of the potential companions in Baldur’s Gate 3 by default. Nevertheless, it is very worthwhile to take a closer look at the class.

As a Wizard, you have the power to cast and even modify powerful spells. You prefer to stay in the back rows and deal a lot of damage from there.

Compared to their mage counterparts, Wizards cannot change their spells at will. Instead, they receive powerful bonuses that vary depending on the subclass, as well as the ability to make their spells even stronger through Metamagic.

This makes the Wizard one of the more complex classes in Baldur’s Gate 3. In contrast, you can find out here which class is particularly beginner-friendly.

Start video
The best class for beginners in Baldur’s Gate 3

[toc]

Update on April 7, 2025: We have adjusted the structure of the article and updated information.

Wizard Build – Best Subclass

Even at level 1, you need to choose one of three subclasses as a Wizard.

  • Wild Magic
  • Draconic Bloodline
  • Storm Sorcery

One of the most fun subclasses in the entire game is probably Wild Magic. Its unpredictability can lead to chaotic and hilariously funny situations.

However, if you want a truly reliable damage beast for your team, you should go for the Draconic Bloodline. This gives you the option to specialize in an element. Additionally, you will become significantly more resilient. In this guide, we will therefore delve further into this subclass.

Which element should I choose? As a member of the Draconic Bloodline, you can choose a Dragon Ancestor for your character. This determines which element you specialize in.

To create a powerful fire mage, we will choose Red (Fire) here. This gives you the strong spell Burning Hands right from the start. Starting at level 6, not only will fire damage increase, but your character can also become immune to fire damage. Since this type of damage occurs quite frequently in Baldur’s Gate 3, that’s pretty handy.

Character Creation in the Wizard Build: Which Race?

Just through the initial character creation, you can receive some bonuses that make life as a Wizard easier and should not be underestimated.

The following options are recommended when choosing your race:

  • Half-elf
    • Darkvision: Helps you stay at a distance even in darkness.
    • Fey Ancestry: You have an advantage on saving throws against being charmed and cannot be magically put to sleep.
    • Human Militia: You gain proficiency with some weapons, light armor, and shields, making you somewhat more resilient.
    • Subrace: Here, either the Half-Orc for the additional cantrip, or the Half-Wood Elf for the increased movement speed is advisable.
  • Drow
    • Superior Darkvision: Even better darkvision than the Half-Elf.
    • Fey Ancestry
    • Cantrips: Additional spells that can be helpful in certain situations.

A background that suits your character particularly well:

  • Sage: Skills Arcana and History
  • Noble: Skills History and Persuasion

Attributes in the Wizard Build: Focus on Charisma and Constitution

The most important attribute for any Wizard is Charisma. You should definitely invest the most points here. A high Constitution score also helps you strengthen your defenses. A good distribution for the start is:

  • Strength: 8
  • Dexterity: 14
  • Constitution: 16
  • Intelligence: 10
  • Wisdom: 10
  • Charisma: 16

For optimal selection, you should generally choose even numbers for point distribution. This is because the respective bonuses are only actually increased every two levels.

Baldur's Gate 3 - Draconic Bloodline Attributes
The high Charisma score helps us both in combat and outside of it.

Which skills should I choose? In addition to the attribute points, you can choose two skills for your character. You will receive two additional skills based on the background you’ve chosen.  

Make sure to possess the skill Persuasion, as it can be particularly useful in many situations.

Additionally, Deception and Intimidation are also good choices, as they are based on your (high) Charisma score.

Wizard Build – The Best Spells at Every Level

In Baldur’s Gate 3, you have a wide array of spells and cantrips available. Which ones you should choose depends on many factors, especially your team composition and personal play style.

Which spells are generally strong in the game can be found here:

As an Elemental Spellcaster, you should certainly place special emphasis on all spells of your chosen element, which in this case is fire. The spell selection across all levels and the choice of Metamagic could look like this:

1. Cantrips

  • Level 1: Fire Bolt; Blade Ward; Shocking Grasp; Mage Hand
    • If you have already chosen one of these cantrips through the subrace Half-Orc, choose another option like Poison Spray instead.
  • Level 4: Minor Illusion

2. Spells

  • Level 1: Magic Missile; Chromatic Orb
  • Level 2: Thunderwave
  • Level 3: Misty Step
  • Level 4: Cloud of Daggers
  • Level 5: Fireball
  • Level 6: Dispel Magic
  • Level 7: Wall of Fire
  • Level 8: Polymorph
  • Level 9: Telekinesis
  • Level 10: Cloudkill
  • Level 11: Disintegration
  • Level 12: Globe of Invulnerability

3. Metamagic

  • Level 2: Extended Spell; Twinned Spell
  • Level 3: Quickened Spell
  • Level 10: Focused Spell

Wizard Build – Talents at Every Level

At levels 4, 8, and 12, you have the opportunity to choose a talent. The following are recommended:

  • Level 4: Ability Score Improvement (Charisma +2)
  • Level 8: Elemental Adept: Fire
  • Level 12: Ability Score Improvement (Charisma + 2)

So by level 12, you should have brought your Charisma score to the maximum of 20.

Baldur's Gate 3 - Draconic Bloodline Talents
As Elemental Adept, you ignore opposing resistances to your element.

We hope we could help you with this guide. Have you ever tried the Wizard class? And if so, what were your experiences? Feel free to let us know in the comments.

In this guide, we focused on a pure Wizard build. However, in Baldur’s Gate 3, you also have the option of multiclassing. This allows you to mix multiple classes. For example, if you want to give your Wizard more supportive abilities, you could invest a few levels in Cleric. You can find all the important basics about multiclassing here: Why beginners should refrain from multiclassing in Baldur’s Gate 3 and when it makes sense

This is an AI-powered translation. Some inaccuracies might exist.

Baldur’s Gate 3: Best Weapons in Act 1 – The most powerful weapons for beginners

In Baldur’s Gate 3 has a ton of weapons. Since we want to make your choice easier, we will show you the best weapons for beginners that you can get early in Act 1.

With this guide, we aim to ease your introduction to the epic adventure of Baldur’s Gate 3 by presenting the best weapons for newcomers that you can obtain early in the first act of the game.

These weapons will provide you with a crucial advantage and are therefore a smart choice for the start of your journey. The weapons in this game feature a diverse range of properties, bonuses, and types of damage. Some of them even allow you to use useful spells and tricks that can expand your tactical options in combat.

[toc]

Best Melee Weapons in the Early Game

Below we present the best melee weapons that you can obtain early in the first act of Baldur’s Gate 3.

Everglow Blade

What can the weapon do? The Everglow Blade is an ideal weapon for Paladins, Barbarians, and Fighters. Its fire damage represents an impressive bonus and makes it an excellent choice.

Especially against enemies like Treants, who are resistant to slashing damage but vulnerable to fire damage, the blade shows its strength. Additionally, it looks damn cool.

Particularly suitable for the companion Lae’zel, the Everglow Blade is perfect. As a Githyanki warrior, she masters the use of greatswords.

Everglow Blade – Stats Overview:

  • Two-handed great sword
  • 2d6+4 slashing damage
  • Additional +1d4 fire damage

Where can I find the Everglow Blade? You receive the Everglow Blade at the start of the game from Commander Zhalk on the Nautiloid. In a duel against a Mind Flayer, he commands you to flee.

To obtain the blade more easily without defeating the enemies, you can use a clever strategy:

  • Use the spell “Command” to command the commander to drop the weapon. Tip: Save beforehand as it doesn’t always work the first time – the chance is 65%.
  • You can prepare this spell yourself if you play as a Wizard or Cleric. Alternatively, you can free her Shadowheart, who is located in a previous room.

Once you’ve done this, you can simply pick up the Everglow Blade and make your escape.

Sword of Justice

What can the weapon do? The Sword of Justice is a good alternative to the Everglow Blade if you want to equip two melee fighters. You get a spell called Tyr’s Protection, which gives you +2 to armor as long as you concentrate on it and wield the weapon.

Sword of Justice – Stats Overview:

  • Two-handed great sword
  • 2d6 slashing damage
  • +1 weapon enchantment
  • Spell “Tyr’s Protection”

Where can I find the Sword of Justice? Early in Act 1, you can recruit Karlach into your party and complete her quest “Hunt the Deviless.” You can find the Tiefling Barbarian hidden south of the Stiegstraße in Act 1.

For the quest, you need to go to a house that is nearby, where you found Karlach. There, you need to speak to Anders. Defeat Anders and you will receive the great sword.

Lightning Spear

What can the weapon do? When you deal damage with this weapon, the wielder gains two lightning charges. This is a buff that provides you with an additional +1 on attack rolls, and you deal an additional 1 lightning damage.

If you receive 5 charges, they are consumed, and on the next attack, you deal an additional 1-8 lightning damage. You lose one charge per turn.

Lightning Spear – Stats Overview:

  • Trident, one-handed or two-handed
  • 1d8 piercing damage

Where can I find the weapon? North of the waypoint “Waukeen’s Rest,” you will encounter a burning house.
Yeva urgently needs your help to rescue the people, including Advisor Florrick, from the burning house.

If you succeed in the task, you can then choose one of the three weapons as a reward. Further down in this guide, we will address the other two weapons that are suitable for ranged fighters.

Returning Pike

What can the weapon do? As the name suggests, this pike always returns to you when thrown. For starters, the weapon is strong because it automatically returns. If you enjoy throwing weapons, this pike is a good choice for beginners.

However, be aware that the pike is quite heavy, and its wielder should not be overloaded.

Returning Pike – Stats Overview:

  • Two-handed pike
  • +1 weapon enchantment
  • 1d10 piercing damage
  • Best suited for strength-based characters like Barbarian, Paladin, and Fighter.

Where can I find the Returning Pike? During Act 1, you will come across the Goblin Camp. There, you will find a merchant (right at the entrance) who sells the Returning Pike.

Sorrow

What can the weapon do? Sorrow is a two-handed glaive that grants you the cantrip “Painful Whip Stroke.” This weapon is particularly well-suited for strength-based characters like Paladins, Fighters, or Barbarians.

Sorrow – Stats Overview:

  • Two-handed glaive
  • +1 weapon enchantment
  • Cantrip: Painful Whip Stroke
  • +1d10+1 slashing damage

Where can I find the glaive Sorrow? To get the glaive, you need to rescue Halsin and return to the Emerald Grove and speak with the NPC Rath. After that, you will receive a “Rune of the Wolf.”

Alternatively, you can also steal the rune. This rune can then be used in the enclave library. Once you activate all four runes, you will find the weapon in the basement.

Bloody Two-Handed Axe

What can the weapon do? This two-handed axe is one of the best weapons for the beginning of the game. You can easily carry this weapon well into the second act of the game.

It inflicts slashing damage, and if someone who is proficient with two-handed axes wields it, the damage is increased. If your hit points drop to 50%, you inflict additional damage.

Bloody Two-Handed Axe – Stats Overview

  • Two-handed great axe
  • +1 weapon enchantment
  • 1d12+5 slashing damage
  • At hit points at 50%: Additional 1-4 damage.

Where can I find the weapon? You can easily buy this weapon. Go to the merchant Roah Moonglow inside the Goblin Camp. Coordinates – X: 274, Y: -32.

Here you can find 5 helpful tips for Baldur’s Gate 3:

Start video
5 helpful tips for Baldur’s Gate 3

Best Ranged Weapons in the Early Game

Next, we present to you a selection of the best ranged weapons that you can obtain early in the first act of Baldur’s Gate 3.

Harold

What can the weapon do? Harold is a ranged weapon and is one of the best weapons that players can obtain early in the game. Every hit with Harold has a chance to curse enemies, reducing their effectiveness and making them more vulnerable to damage.

Harold – Stats Overview:

  • Heavy crossbow, two-handed
  • Range: 18 m
  • 1d10 piercing damage
  • Weapon enchantment +1
  • Suitable for ranged characters like Rangers.

Where can I find the weapon? During the quest “Find the Missing Delivery,” the weapon is awarded by Zarys as a reward for recovering her lost delivery. Do not open the delivery, but bring it back unopened.

When you finally reach the Zhentarim hideout, there is a possibility to hand the delivery to Zarys. The hideout is located in the villa at the waypoint “Waukeen’s Rest.” This way, you receive gold and the rare crossbow called “Harold” as a reward for your integrity and commitment.

Titan String Bow

What can the weapon do? This longbow deals additional damage equal to your strength modifier, which can be quite powerful.

Titan String Bow – Stats Overview:

  • Two-handed longbow
  • +1 weapon enchantment
  • Effect Titan Weapon: Additional damage equal to the strength modifier.
  • 1d8+3 piercing damage
  • Range: 18 m

Where can I find the weapon? You can purchase this bow from the merchant at the Zhentarim hideout, it couldn’t be easier. Coordinates for the hideout – -65, Y: 566.

Spell Sniper, Shock Shooter

What can the weapons do? When you deal damage with one of these weapons, the wielder gains two lightning charges. This is a buff that gives you an additional +1 on attack rolls, and you deal an additional 1 lightning damage.

If you receive 5 charges, they are consumed, and on the next attack, you deal an additional 1-8 lightning damage. You lose one charge per turn.

Spell Sniper – Stats Overview:

  • Combat staff, one-handed or two-handed
  • 1d8 bludgeoning damage
  • Very suitable for wizards, sorcerers, and warlocks.

Shock Shooter – Stats Overview:

  • Two-handed longbow
  • 1d8 piercing damage
  • Range: 18 m
  • Suitable for dexterity-based characters such as Rogues (Astarion) and Rangers.

Where can I find the weapons? North of the waypoint “Waukeen’s Rest,” you will encounter a burning house.
Yeva urgently needs your support to rescue the people, including Advisor Florrick, from the burning house. If you successfully complete the task, you can then choose one of the three weapons as a reward.

Best Weapons for Beginners – Outlook: These weapons provide you with an excellent foundation to successfully start your adventure in Baldur’s Gate 3. The choice of the right weapon depends on your character and your preferred play style. Experiment with different weapons to find out which one suits your heroes best.

In the later part of Act 1, even stronger weapons await you. For now, these best weapons will help you along the way.

More about Baldur’s Gate 3: You can get a legendary sword in Act 1 if you’re a cowardly save scummer

This is an AI-powered translation. Some inaccuracies might exist.
Source(s):
  1. GameRant
  2. YouTube

Baldur’s Gate 3: Save the Owlbear Cub – How to Get the Cute Companion

With the owlbear cub, Baldur’s Gate 3 offers you a heartwarming animal companion. MeinMMO reveals how to secure this companion.

Update from 07.04.2025: We have slightly revised the article.

Where can you find the owlbear cub in Baldur’s Gate 3? You can win a cute owlbear cub as a friend. To do this, you must save it twice before it appears in your camp:

  • Owlbear Nest: X: 86, Y: 448
  • Goblin Camp: X: -112, Y: 430

Initially, you will find a helpful feature that makes life in Baldur’s Gate 3 easier:

Start video
A useful feature can make your life in Baldur’s Gate 3 much easier

Baldur’s Gate 3: Save the owlbear cub and find a friend for life

This is how you find the owlbear cub in the nest: The first time you encounter the owlbear cub in Baldur’s Gate 3, it is with its mother in the owlbear nest. The spell (or potion) “Speak with Animals” helps with most checks regarding the owlbear cub.

  • Go to these coordinates, west of the Emerald Grove: X: 86, Y: 448
  • Crawl into the cave to the owlbear nest
  • Keep the owlbear cub alive
  • Spar the owlbear mother or kill her
  • If you killed the mother, then interact with the cub afterwards

In the owlbear nest, you can also find a gilded chest that you can open.

This is how you rescue the owlbear cub from the goblin camp: If you kept the owlbear cub alive in the nest, you will encounter it again in the goblin camp. When you interact with the owlbear cub there, it leads to a discussion with the NPC “Krolla”.

  • Free the owlbear cub from the goblins’ clutches
  • Goblin camp coordinates: -112, Y: 430
  • Tell Krolla you are leaving and taking the cub with you
  • You have the following options:
    • Persuade
    • Intimidate
    • Illithid Mind Control
    • Bribe (500 gold)
  • Speak to the owlbear cub to have it pick up your trail: Pass the animal handling check, or use the spell (or potion) “Speak with Animals”

Alternatively: Slaughter all goblins and their allies in the goblin camp – after speaking with the owlbear cub. This way, the owlbear cub escapes and also returns to you.

A feared but also cute friend in the camp: On a random day, the owlbear cub will appear in your camp. To gain a new friend, you still have to go through a few trust tests. After that, the owlbear cub will gradually gain your trust and will appear at regular intervals in the camp.

This is what you need to do:

  • Pass the animal handling check – roll at least a 10
  • Feed the owlbear cub
  • At first, it will flee into the forest, but it will return
  • Heal the owlbear cub’s wound
  • Accept its food

What kind of animals are these? The owlbear is a creature from the Dungeons & Dragons universe. They are usually considered particularly bloodthirsty and one of the most feared predators. Owlbears are majestic beings and a cross between a bear and a giant owl.

With their sharp claws and pointed beaks, they are beings deserving of respect. However, our little feathered companion in the camp presents itself in a completely different light.

Are you also a bookworm in private? In Baldur’s Gate 3, there are numerous interesting books to discover: Players give 3 reasons why you should read every damn book in Baldur’s Gate 3

This is an AI-powered translation. Some inaccuracies might exist.

Monster Hunter Wilds: Alma Quest Guide – How to Start ‘The Apple of Her Eye’

In Monster Hunter Wilds, you can start the quest “The Apple of Her Eye” after downloading the first Title Update to give Alma a new pair of glasses. But where does the quest start, and what do you need to do for it? We will show you.

How do I start Alma’s quest? To start Alma’s quest, you must have downloaded Update 1.010.00 first. After that, log in to Monster Hunter Wilds and speak with Alma first. She will tell you about her glasses. Now the quest “Blurred Vision” begins. You can find all the quest steps here:

  1. Talk to Alma to start the quest (the location doesn’t matter, but we recommend the Crimson Forest)
  2. Now go from the base camp of the Crimson Forest to the marked river and talk to the Wudwud “Champel”
  3. Look around for a Wudwud with glasses
  4. Then go to the “Wudwud Hideout” in the Crimson Forest and talk to Donk
  5. Rest until “Night” and “Abundance” are active and then return to the Wudwud Hideout
  6. Talk to the Wudwud “Donk” at the entrance
  7. Gather information from the celebrating Wudwuds on the roof of the hideout (can be reached by vines)
    • Talk to 4 Wudwuds that are marked with exclamation points
  8. Visit Wilbrill, who is near the campfire in the Wudwud camp (not on the roof, but below in the covered camp)
    • Wilbrill is hanging in a nest of leaves and sleeping
  9. Obtain Eastland Honey
    • Can be acquired through trading with Ren
    • Can be obtained with some luck by collecting honey
  10. Deliver the Eastland Honey to Wilbrill to complete the quest

What rewards are there? Once you have completed the quest, you will have the opportunity to craft the Strategist Glasses and the Square Glasses for Alma. Additionally, you can now equip Alma with new skins and change her glasses. In the future, more skins for Alma may appear, which you can then add to her wardrobe.

Those were all the important steps for Alma’s quest. If you are looking for more guides on monsters or weapons, we have the right overview with all the help for you. You can find more about it here: Monster Hunter Wilds: All Guides, Starter Tips, and Information Overview

This is an AI-powered translation. Some inaccuracies might exist.
Source(s):
  1. rpgsite.net

Monster Hunter Wilds: Mizutsune Guide – How to Defeat the Elegant Leviathan

With the first major Title Update (TU1), Mizutsune moves in as a new monster in Monster Hunter Wilds. The agile leviathan is very cunning, so caution is required. We will show you how to defeat him safely.

Where can I find Mizutsune? To hunt Mizutsune, you must first have reached Hunter Rank 21. Then speak to the NPC Kanya in the Base Camp in the Crimson Forest. You will find her by the lake in your camp, recognizable by her fishing rod.

If Kanya does not have the quest for you, you must first complete at least the first fishing quest with her. If Kanya does not have the quest for you, you must first complete at least the first fishing quest with her.

Once you have spoken to her, the optional mission “Spirit in the Moonlight” will be unlocked, and you can go after Mizutsune. Once you have hunted him down, he will appear freely in the Crimson Forest and in Wyveria on the map, so you can hunt him there or you can start the optional 5-star quest “Flowers in Purple Foam” with Alma.

What you need to know about him and how to defeat him best can be read here. If you are interested in what loot you can get from him, you can take a look at our monster list: Monster Hunter Wilds: All monsters with weaknesses, locations, and loot in the list

Update from April 7, 2025: We have added information about the Soulseer-Mizutsune.

[toc]

Start video
Monster Hunter Wilds shows its first title update with a new monster

Exploiting Mizutsune’s Weaknesses

What weaknesses does Mizutsune have? You should focus on Dragon, Ice, or Thunder as your best elemental options. The leviathan has a weakness against these elements.

He is resistant to fire and water. He is also moderately weak to various status effects (2*).

What weak points does he have and what can be severed and broken? His mouth is his weak point. Head, claws, dorsal fin, and tail can be broken. You can also sever his tail.

Preparation is Key – Things to Consider

This is how you optimally prepare for the hunt: Before the hunt or when you have started the quest, you should eat a meal to strengthen yourself. In addition to healing potions, the following items in your bag will be helpful:

  • Pitfall Trap
  • Shock Trap
  • Thunderbombs
  • Cleaner against Bubbleblight
  • Tranquilizers or ammunition if you want to capture him

Sound bombs have no effect on him. Also, make sure to bring weapons that have an element that Mizutsune is weak to. Abilities like Earplugs or those that increase your resistances to water and fire damage are also helpful.

Mizutsune’s Attacks: How He Harms You

Mizutsune can hit you with the following attacks:

Basic Attacks

  • Body Slam: He stands on his hind legs and after a few seconds slams back down to the ground, burying everything underneath him – including you.
  • Claw Attack: Mizutsune raises his paws and lets them go at you after a short delay.
  • Spin Jump: Mizutsune can jump a large distance and spins, potentially knocking back the hunters hit by the attack.
  • Tail Attack: Mizutsune frequently resorts to this type of attack. He spins around and sweeps everything down with his tail.
  • Water Shot: Mizutsune shoots a stream of water forward or moves it sideways to hit his hunters.

Bubble Attacks

  • Bubble Breath: Mizutsune raises his head and shoots a series of bubbles from left to right (or from right to left). Typically, this movement is followed by an identical attack in the opposite direction.
  • Unstable Bubble Breath: Mizutsune jumps backward and expels a large, single bubble that deals moderate damage. This bubble can still be burst.
  • Bubble Launcher: Mizutsune spins quickly in place and expels many bubbles that spread out while circling around his original position. These bubbles can come in three colors:
    • Normal (White/Pink/Blue) – Deals damage and continuously stacks Bubbleblight
    • Red – Grants a damage boost
    • Green – Heals
  • Fire Bubbles: When Mizutsune is angry, he can also make bubbles explode, causing great damage.
  • Bubbleblight: If you collect too many bubbles, you will receive the Bubbleblight status. This causes you to move poorly and take more damage.

Soulseer-Mizutsune

If you break his head, Mizutsune will go blind and enter the Soulseer state. While in this state, he becomes enraged and his eyes glow blue. He then perceives his surroundings mainly through his bubbles. His attacks become faster and more intense. Additionally, he starts shooting larger, blue-burning bubbles that can explode.

Catch Your Chances: These Tips Will Help You Defeat Him Safely

When Mizutsune is angry, he spits out a large explosion-like bubble. After this, he is exhausted for a few seconds and his mouth becomes a weak point that you can immediately target with a focus attack to deal significant damage.

You can also dodge his water beam attacks and attack from the side, as he is well occupied at that moment and cannot inflict any damage otherwise. Additionally, you should focus on continuously inflicting injuries and maximizing them to extract the optimal damage.

You should also always pay attention to the colors of his bubbles and burst the green and red bubbles to gain their buffs.

Mizutsune is not the only new content that has come to Monster Hunter Wilds with Title Update 1. If you want to get an overview of what the first major update has brought, take a look here: Monster Wilds gets its first major Title Update and we get exactly what we all wanted

This is an AI-powered translation. Some inaccuracies might exist.

CoD Warzone: Meta – The best weapons with loadouts at a glance

If you want to play for the round victory in Call of Duty: Warzone, you should take the best weapons of the game. We show you what the current meta is.

What kind of overview is this? We looked at which weapons are played a lot in Call of Duty: Warzone. Based on that, we created an overview of the current meta weapons of the Battle Royale.

The 5 Best Weapons in CoD Warzone

These are the meta weapons: In selecting the 5 meta weapons, we focused on the 2 strongest assault rifles for medium to long-range combat and the strongest submachine guns for close-range combat, as well as the HDR as the currently best sniper rifle.

These are the top 5 meta weapons:

  1. SWAT 5.56 with the Grau upgrade (Assault Rifle)
  2. C9 (Submachine Gun)
  3. KRIG C (Assault Rifle)
  4. LADRA (Submachine Gun)
  5. HDR (Sniper Rifle)
Start video
CoD Black Ops 6: Prestige explained – Is it worth it?

The Meta Builds of the 5 Best Weapons

What are these builds? The individual weapons can, of course, be played with various attachments, resulting in quite different loadouts. Therefore, we list the loadout for each meta weapon from the top 5 that is currently played the most.

HDR (Sniper Rifle)

  • Muzzle: Silencer (Monolithic)
  • Barrel: Barrel with Progressive Twist
  • Grip: Command Grip
  • Magazine: Magazine Extension 1
  • Fire Modification: 108 mm Overpressure Ammo

SWAT 5.56 (Assault Rifle)

  • Sight: Reflex Sight Volzhskiy
  • Muzzle: Monolithic Silencer
  • Underbarrel: Vertical Foregrip
  • Magazine: Magazine Extension for Full Auto
  • Fire Modification: Grau Upgrade

C9 (Submachine Gun)

  • Muzzle: Compensator
  • Barrel: Long Barrel
  • Underbarrel: Ranger Foregrip
  • Magazine: Magazine Extension 2
  • Grip: Command Grip

Kilo 141 (Assault Rifle)

  • Sight: 3x Sight Willis
  • Muzzle: Compensator with Holes
  • Barrel: Reinforced Barrel
  • Underbarrel: Vertical Foregrip
  • Magazine: Magazine Extension 2

LADRA (Submachine Gun)

  • Muzzle: Compensator
  • Barrel: Long Barrel
  • Underbarrel: Vertical Foregrip
  • Magazine: Magazine Extension 2
  • Grip: Command Grip

Strong Loadouts for Warzone

Which loadouts are recommended? In Warzone, you have to be prepared for both long and short-range battles. Especially a combination of assault rifle and submachine gun is therefore recommended, such as:

  • SWAT 5.56 with Grau Upgrade + C9
  • KRIG-C + LADRA

If you want to play the HDR, it is advisable to pack an assault rifle as a secondary weapon. Currently, the strongest combination is HDR and SWAT 5.56 with Grau upgrade. Other assault rifles work as well. Various options would be:

  • HDR + SWAT 5.56 with Grau Upgrade
  • HDR + GPR 91
  • HDR + Kilo 141

That way you are equipped for both short and long distances.

If you are not only playing the Battle Royale of Call of Duty, but also regularly playing in the multiplayer of Black Ops 6, you are probably also interested in the best weapons of the most recent installment of the shooter series: CoD Black Ops 6: Meta – The Best Weapons

This is an AI-powered translation. Some inaccuracies might exist.
Source(s):
  1. wzstats.gg

Hunters in Monster Hunter Wilds worship a hidden bird that distributes gifts

The new update for Monster Hunter Wilds introduced a new NPC that is already being worshipped by players. We at MeinMMO will show you how to find the big, beautiful bird that is revered by players.

This is the situation: Anyone who reaches Hunter Rank 16 in Monster Hunter Wilds can gain access to “The Great Site”, a social hub that is much more suitable for experienced and successful hunters like you will be than the barren starting camp.

In this “The Great Site”, Capcom has hidden a bonus feature that hunters are increasingly discovering: a large, extremely round, yellow bird.

How exactly you get to this bird, we explain to you on MeinMMO in this short video:

Start video
So findet ihr das flauschige Huhn in Monster Hunter Wilds

Fluffy bird distributes gifts

What does the bird bring? The bird has chicks around it that collect items and deposit them in the nest. The bird has no use for them and instead gives the items away to players who pass by.

The site PCGamer reports that the bird distributes

  • Crafting items
  • Resources that can be shared with villagers
  • but also items that can be sold for cash.

He does admirable things

This is being discussed: On reddit, hunters are singing the praises of the new friend. Some even call him a bird-god. It is said:

“He is as kind as he is fluffy.”

“I ran around him and bumped into him and he stood up. I have never felt so much fear because I thought I had angered God. But luckily, he is a benevolent god and forgave me before lying back down.”

“If you hang around him for a while, he does a few things that are all fun and admirable. I won’t reveal what he does, but it’s great.”

More information about the new update in Monster Hunter Wilds and what it changes in the so successful monster hunt can be found in our article on MeinMMO: “What the hell was that?!” – Players found Monster Hunter Wilds too easy, new update now breaks hunters in droves

This is an AI-powered translation. Some inaccuracies might exist.

Dark Souls fans find mysterious bird in Monster Hunter Wilds: ‘I joined immediately, didn’t even read the fine print’

Players have discovered a mysterious giant bird in Monster Hunter Wilds. Fans of Dark Souls know immediately what to do and swear their loyalty to it.

What kind of strange bird is this? The giant bird is located in a hidden cave in Monster Hunter Wilds. There, it sits in a large nest surrounded by smaller birds. Its body resembles a fluffy egg, with eyes and a beak.

You can find out how to find this bird in this video:

Start video
So findet ihr das flauschige Huhn in Monster Hunter Wilds

A little secret brings players back to Dark Souls

A certain type of player feels transported to another world: Just as the light shines down on the bird, many a Dark Souls player feels compelled to pledge an oath to it. This is also the case for Reddit user angelXholika, who shared her first reaction to the bird in a post in the subreddit r/MHWilds:

“My first thoughts when I found this bird,” writes angelXholika, showing a screenshot with a pop-up from Dark Souls inserted at the bottom. This pop-up always appeared when a new Covenant was offered to you.

Recommended editorial content

At this point you will find external content from Reddit that complements the article.

I consent to external content being displayed to me. Personal data can be transmitted to third party platforms. Read more about our privacy policy.
Link to the Reddit content

What are Covenants? In the first Dark Souls, some NPCs offered so-called “Covenants” that players could join. The mysterious yet majestic presence of the bird makes it seem like one of those NPCs.

Even though this Covenant mechanic doesn’t exist in Monster Hunter Wilds, that doesn’t stop fans from pledging an oath anyway:

  • Metaruoreo89 comments on the post: “I joined immediately, didn’t even read the fine print, lol.” angelXholika then confirms that she and her team also pledged their oath to the bird. Both share pictures of this moment.
  • redshieldheroz reminds them of Snuggly the Crow, another famous bird from Dark Souls. angelXholika also immediately thought of Snuggly’s lines “You! You! Just give me…”.

Have you discovered this little secret yet? Feel free to let us know in the comments what went through your mind. If you need help with Monster Hunter Wilds, you can find all our guides, beginner tips, and information about Monster Hunter Wilds here.

This is an AI-powered translation. Some inaccuracies might exist.

The 5 Best Raid Mechanics in WoW of All Time

World of Warcraft had many raids – and even more mechanics. Here we present to you the 5 best among them.

Over the course of more than 20 years, World of Warcraft has released a lot of raids – more than 40 in total and several hundred bosses, each of which had dozens of mechanics that had to be played correctly. Although many mechanics have repeated themselves over the years or function very similarly, there are a few that have remained memorable due to their creativity or entertainment value.

In this article, we want to take a look back at 5 very special raid mechanics from the history of World of Warcraft that have remained memorable due to their creativity.

Start video
3 NPCs mit seltsamen Realvorbildern in WoW

Class Calls in Blackwing Lair

One of the first bosses in World of Warcraft was the great dragon Nefarian, who could be found at the end of Blackwing Lair. Not only was this one of the few bosses with clearly separated phases that differed drastically, but also the owner of one of the most interesting raid mechanics ever, the so-called “Class Calls”.

During the fight, Nefarian called forth individual classes repeatedly, forcing the respective characters to take action:

  • When Nefarian, for example, called the “Mages”, they began to transform their own allies into various animals using Polymorph.
  • If Paladins were called, they suddenly granted Nefarian a blessing, making him untouchable for a few seconds.
  • Warlocks suddenly summoned Infernal beasts that stunned player characters and then dealt high damage.
WoW 5 Bossmechaniken Nefarian Dragon
Nefarian was one of the most creative bosses from Classic.

This way, all classes had their own mechanic – a tradition that Blizzard continued even after introducing new classes (like Death Knights or Monks).

With Dragonflight, Blizzard wanted to bring this mechanic back in the renewed fight against Nefarian, but it proved to be difficult in terms of balance, as raids would then tend to leave the “worst” classes out of the fight.

Even today, Nefarian’s “Class Calls” hold a special place in the hearts of many WoW fans. It’s also one of the few Classic mechanics that was exceptionally complex and versatile.

This is an AI-powered translation. Some inaccuracies might exist.

The 5 Most Expensive Ships in Star Citizen

A short time ago, Star Citizen achieved the milestone of 800 million US dollars in crowdfunding revenue. This is made possible in part by the continuously new spaceships that are sold for real money. In this special, MeinMMO takes a look at the most expensive ships of the SciFi MMO.

Although Star Citizen has still not officially launched after 14 years of development, the MMO continues to enjoy steady millions in revenue in 2025. Recently, it even managed to surpass the historical threshold of 800 million US dollars.

The impetus for the uninterrupted flow of money that continues to this day was the Kickstarter campaign launched in 2012, which aimed to raise 500,000 US dollars but ended up bringing in 2,134,374 million US dollars. Since then, it has primarily been starter packs and spaceships from the store that have been contributing to the cash flow.

The Polaris was introduced in November 2024, is supposed to cost nearly 1,000 euros, and still does not make it into the top 5 of the most expensive ships from Star Citizen. Here is the trailer:

Start video
Star Citizen: The new capital ship Polaris in trailer

The developers are naturally aware of this and therefore seize every opportunity to offer new spaceships or special variants of well-known ships at sometimes enormous prices, and in return, remove older ships from the store. The five most expensive spaceships in Star Citizen’s history are presented to you by MeinMMO below.

[toc]

Rank 5: Idris-P

Star Citizen: Idris-P
The Idris-P from Star Citizen.
  • Price: 1,500 euros
  • Ship Type: Frigate (Combat)
  • Size: Capital / 240 meters long
  • Crew: Maximum 28 people

The Idris-P is a slightly more expensive version of the Idris-M, which costs 1,000 euros and is more suited for military operations. The P variant does not include “ship-to-ship guns” and the spine mounts instead features increased cargo capacity and speed.

The frigate is currently not available in the Star Citizen shop and is still in the production and testing phase before being implemented into the game. The last update apparently occurred three months ago.

Next up on the next page with ranks 4 and 3.

This is an AI-powered translation. Some inaccuracies might exist.

A face of German gaming is in financial trouble, facing harsh criticism

The influencer and host Simon Krätschmer is firmly rooted in German gaming and someone whom many gamers around 30 associate with their youth. In the 2000s, the now 46-year-old was a host at GIGA and later created the show GameOne. Since 2015, he has been with RocketBeans TV on and off. But now he is addressing the fans in a video.

These are his financial struggles: Krätschmer is facing similar financial difficulties as the Twitch streamer Tanzverbot:

Krätschmer earned well in previous years but did not immediately settle the tax bill back then.

In recent years, his income has significantly decreased.

Now the tax office is demanding a huge tax payment for the “good years”, which Krätschmer cannot easily pay.

Simon Krätschmer has about 440 viewers on Twitch – in 2021, it was an average of 2,000:

Start video
These are the 5 most relevant German streamers on Twitch in 2024, according to Google

He has the money, but doesn’t want to sell at a loss

This is what he says about his situation: Krätschmer says (via youtube) that while he has the money the tax wants, that money is tied up in investments, cryptocurrencies, stocks, and ETFs, in which he is currently at a loss because everything is crashing. Therefore, he is reluctant to sell the investments at this time.

The high demand from the tax office has caught him off guard and it weighs heavily on him; he hasn’t been able to sleep either. Although he names some individuals who have acted poorly and are involved in his current financial difficulties, he also says that ultimately, it was his mistake.

Therefore, he asks his community that if they ever wanted to buy something from him to support him, now is the ideal time for that:

You don’t have to help me, but right now I could really use some money. If you ever wanted to buy anything, now is a good time.

The 46-year-old says he thought: if others ask their fans for money, why shouldn’t he?

Then he talks about the “good years” when he earned €300,000. Times when he still had 4,000 viewers and plenty of advertising deals.

Viewers talk about the steep fall

How is this being discussed? In the comments on YouTube, Krätschmer has to hear quite a bit, and on Reddit, his video is discussed critically. It is often read that he is begging for money. A post on Reddit about Rocketbeans is titled “BeggarMon”.

In one YouTube comment, there is talk of a “steep fall”. Many say they have followed Krätschmer for 20 years, have been big fans, but the video and his behavior in recent years come off as unsympathetic. He, as someone with a lot of money, is asking his fans for support.

Some viewers in the comments on YouTube express their annoyance at the audacity of the influencer to ask his fans for money because he refuses to liquidate his assets. One says: “If I can live on €500, you can do it too.”

Another user states: “I don’t even know what’s worse. Rich people living off donations or the people who donate money to rich people.”

A consequence to save money is something Krätschmer is already doing:

Recommended editorial content

At this point you will find external content from Twitch that complements the article.

I consent to external content being displayed to me. Personal data can be transmitted to third party platforms. Read more about our privacy policy.
Link to the Twitch content

Krätschmer feels misunderstood and says on Twitter that it was not meant that way. His video is being used as a template to “trash talk about his life”. It is too exhausting for him. He is also a person. Several years ago, we reported about a colleague of Simon Krätschmer from RocketBeans on MeinMMO: German gaming influencer causes a shitstorm on Twitter

This is an AI-powered translation. Some inaccuracies might exist.

Ubisoft has a ‘creative’ idea to earn even more money with its most successful game

Ubisoft is reportedly planning a new installment of its most successful game, according to an insider report. Rainbow Six Siege is set to receive a completely new gameplay perspective.

Which game is it? The financially most successful game of Ubisoft is the tactical shooter Rainbow Six: Siege. This was revealed in a financial report on October 30, 2024.

It was stated that the company has earned over 3.5 billion euros with Rainbow Six Siege since its release in December 2015. This made the shooter almost as much as the entire Assassin’s Creed series, which at that time had earned Ubisoft 4 billion euros.

Game series such as Far Cry (2 billion €), Ghost Recon, and The Division (both 1 billion €) lag behind Rainbow Six: Siege, even though they released several new games during that period.

Start video
Rainbow Six Siege X – Trailer shows the biggest update to the Ubisoft shooter

New game for Rainbow Six with a new perspective

What kind of idea is it to earn even more money? As the well-connected industry insider Tom Henderson reports on his website Insider-Gaming, Ubisoft is currently developing a new game in the Universe of Rainbow Six, which could be released in one to two years.

The new game is supposed to be a turn-based strategy game from a top-down perspective. This means you look at the played character from above. According to Henderson, various operators from Rainbow Six: Siege will be available to you as playable characters. The gameplay loop is also said to resemble that of the tactical shooter. Players would choose operators with different abilities to storm buildings and complete objectives such as rescuing a hostage.

A source compared the game to the popular strategy game XCOM to Henderson. The insider quotes: “Just look at some XCOM games if you want to get a picture. I would say it’s an updated version of that, with cinematic cutscenes and so on.”

The new game is being developed for Xbox Series X|S, PlayStation 5, and PC and may also be released for the Nintendo Switch 2, for which Nintendo recently revealed the release date.

Has Ubisoft ever attempted such a spin-off before? The upcoming game for Rainbow Six is already the second attempt to leverage the success of Rainbow Six: Siege for a new game. In January 2022, they released the PvE shooter Rainbow Six: Extraction, which never really resonated well with players. In the meantime, the shooter is stagnating. The last major announcement regarding the game was the roadmap for the year 2023 (via ubisoft.com).

According to various industry experts and insiders, Ubisoft has been in a financial crisis for some time. A new game for Rainbow Six: Siege is likely to provide relief.

The tactical shooter is also part of the newly formed partnership between Ubisoft and the Chinese mega-corporation Tencent, which both companies first announced on March 27. They are establishing a subsidiary responsible for the development of Assassin’s Creed, Far Cry, and Rainbow Six. Tencent invested around 1.16 billion US dollars for a 25 percent stake: Ubisoft is now collaborating with Tencent, selling shares in 3 important game series for 1 billion euros.

This is an AI-powered translation. Some inaccuracies might exist.

The Art Director of WoW and Overwatch has unexpectedly passed away

On April 5, 2025, the death of William ‘Bill’ Petras was announced. A close friend and long-time colleague of the deceased made this known. Petras was the artistic director of World of Warcraft and Overwatch at Blizzard.

Who was Petras? Bill Petras was the artistic director of World of Warcraft at Blizzard Entertainment for 8 years, from 1997 to 2005, significantly influencing the style of WoW. Before that, Petras worked on Starcraft at Blizzard.

In 2005, Petras left Blizzard to work as a co-founder of the developer studio Red5 on the MMO Firefall. In 2010, Petras returned to Blizzard and was the artistic director of Overwatch and Overwatch 2 until 2021.

Former Employees Mourn

The news of Petras’s unexpected death reached the public through a LinkedIn post by Harley D. Huggins, a long-time friend and colleague of Petras. They had been good friends for about 28 years and started at Blizzard in the same week. Huggins writes:

I will miss our regular, long, rambling conversations about life, game development, games, art, comics, toys, monster movies, and Conan. He will be greatly missed by me and all who knew him.

Many other former employees of Petras are mourning their former colleague. Petras’s former companion at Blizzard, James Waugh, finds emotional words:

The loss of William Petras breaks my heart. Billy was someone I worked closely with during the transition from Titan to Overwatch, and he was an important partner in the short films and comics and building the world and all those things. He was incredible. Kind. Generous and sincere. He was the kind of person who built trust immediately, and you knew he really cared. […]. The industry has lost one of its masters, and the world has lost a great person.” – via LinkedIn

With Petras’s death, the world of gaming has lost a person who played a crucial role in what is perhaps the most important MMORPG in history. A game that has a long history of its own: The story of World of Warcraft to date – all the lore summarized

This is an AI-powered translation. Some inaccuracies might exist.

“I would rather go to work than play this” – Path of Exile 2 is no longer fun, complain fans

In Path of Exile 2 the new season started on April 4. This is now receiving sharp criticism from players. The game is no longer fun. One player even says: He would rather go to work than play.

What are the players criticizing? Path of Exile 2 has nerfed numerous skills and items with the new season “Dawn of the Hunt”. The patch notes make it clear: All the strongest builds have been destroyed. A part of the community is now criticizing this.

After the nerfs, the combat system no longer feels good, no longer fun, and the newly added or extended cooldowns do not help. And without the powerful builds, the game is too difficult for some players.

Start video
Path of Exile 2 presents gameplay trailer with the new Hunter class

“It feels like they forgot what makes a spear fun”

What exactly are the players saying about the nerfs? One player is so disappointed that he even canceled the vacation he had taken for the update, he explains on Reddit:

“I actually wanted to take a day or two off to play the game. But I canceled my vacation that I had submitted. I would rather go to work than play the game. […] Path of Exile should have exciting abilities that feel great when you use them. The fights should feel good. This does not feel good. Not at all. Every single nerf you made needs to be reversed.”

The post received over 7,000 upvotes and more than 1,400 comments within a day. Many players agree with him. One commenter says: “It feels like they forgot what makes a spear fun.”

Another says: “Jonathan [Note: Jonathan Rogers, game director of PoE 2] said he wanted the fights to be fun, but I just don’t see how any of this is supposed to be really fun. Zero damage, the areas are way too large, the movement speed is way too low.”

The opinion of many fans is: “You really messed it up.”

Developers respond to criticism

This is the latest status: Since the update on April 4, Path of Exile has received many angry reviews on Steam. 64% of all reviews since the start of the new season are negative.

The developers responded to some of the criticism and reduced the health points of numerous enemies. This is supposed to help make defeating the respective monsters easier despite the many damage nerfs.

The current situation of Path of Exile 2 is reminiscent of the developments of the co-op shooter Helldivers 2. After an impressive release, it was heavily criticized by players when several of the most popular weapons were nerfed. The community complained that the developers were patching the fun out of the game, and they responded with an elaborate plan to save the game: Head of Helldivers 2 promises to fix the game within 60 days

This is an AI-powered translation. Some inaccuracies might exist.
Source(s):
  1. PCGamesN

Developer Asks on Reddit if a Silly Name Will Hurt His Game, Now Has Huge Hit on Steam

In December 2024, a young developer asked in a forum on reddit if he might be jeopardizing his chances of success with his abstract name. Because the name of his game refers to a term from US law. Today we know: no. Because Schedule 1 became a massive hit on Steam.

That was the question: On December 12, 2024, the developer Tyler from “Tyler’s Video Game Studio” asked on reddit GameDev:

I’m a little worried that the name “Schedule 1” is too niche and vague and may limit my audience too much. Most games similar to it have “drugs” or “narco” in the title. I’m considering changing the name.

He was very grateful for feedback.

Start video
Schedule I shows in the trailer what the simulation of criminal life looks like

How important is a name for the success of a game on Steam?

What were the answers? The developer’s question sparked lively discussion on reddit. The responses were friendly but not particularly conclusive:

The answer with the most upvotes was: He thinks too much about this. The title isn’t that important; it only appears at the end of trailers.

Another said: Really bad names could harm games; particularly very long names are difficult.

Another one said: He likes the name “Schedule I,” he doesn’t even know what it means, but when he saw pictures of it, he could immediately associate the name with the game.

A fourth reddit user explicitly advised the developer to avoid something like “Drug Dealer Simulator.” That makes him yawn. Especially the images of his game are good. He will succeed with it.

What does “Schedule 1” even mean?

Where does the name come from? “Schedule 1” is a name from US law. The drug agency DEA classifies under “Schedule 1” all drugs that have the highest potential for abuse, so to speak, drugs of the highest hazard level.

In total, there are 5 different levels of danger.

One of the reddit users warned the Australian developer to take the name. It is very “US-specific.”

Another responded ironically that “Grand Theft Auto – GTA” also refers to a US law.

But the developer said that is true. The name is US-centric, but he hopes it can work if the name is established.

Developer is very successful with his game on Steam

This is how it really turned out: Schedule 1 is the hit of the month on Steam and peaked at 414,000 players. The actual number of players could be even higher. Rumor has it there are some pirated copies: A 63-year-old game has 138,000 players on Steam because pirates stole a popular game

This is an AI-powered translation. Some inaccuracies might exist.