
Kokomi Sangonomiya is available in the second banner of Patch 2.5 and is another healer in Genshin Impact. MeinMMO shows you suitable builds for her and how you can utilize Kokomi’s potential for your team.

Who is Kokomi Sangonomiya? Kokomi is the “Divine Priestess” from Watatsumi Island, which belongs to Inazuma. Additionally, her talent lies in developing strategies for military battles and leading her army.
On Watatsumi, she is celebrated by her followers and seen as a strong, cheerful ruler. However, she prefers to retreat and quietly read her books. Kokomi becomes nervous when social interactions or larger speeches arise.
When can you obtain Kokomi? Kokomi is available for the remainder of Patch 2.5. She will be available to you from March 8 for three weeks. Her banner also features other strong characters. You can get an impression of Kokomi in the character demo:
Hydro Healer Kokomi – Her Abilities
What attacks and abilities does Kokomi have? The healer Kokomi performs up to three attacks with her catalyst during her normal attack, inflicting Hydro damage. Her heavy blows consume stamina and summon a school of fish that deals Hydro area damage.
Her elemental skill named “Eid of the Kurage” summons a jellyfish called “Bakekurage.” When her skill is activated, Kokomi receives the Soaked status. Bakekurage has the following properties:
- Regularly deals Hydro damage to all opponents nearby
- Heals the active team member in the vicinity approximately every two seconds. The healing is based on Kokomi’s maximum HP (health points)
- Lasts on the field for 12 seconds
- Cooldown: 20 seconds
Kokomi’s special ability is called “Nereid Ascension” and deals Hydro damage to nearby opponents when triggered. “Ritualistic Feather Robe” then envelopes Kokomi. The robe has the following properties:
- Normal attacks, heavy strikes, and Bakekurage are enhanced. The damage is increased based on her maximum HP
- The HP of all team members is restored when Kokomi hits opponents with her normal attacks and heavy strikes. The HP regeneration is based on Kokomi’s maximum HP
- Increases Kokomi’s interruption resistance
- Can move on water surfaces
- The robe lasts for 10 seconds
- Cooldown: 18 seconds
- The effect ends immediately when Kokomi is switched out

Talents of Kokomi Sangonomiya
What important passive talents does Kokomi have? The talent “Flawless Strategy” is currently unique. It reduces Kokomi’s critical hit rate (CRT) by 100% and increases her healing bonus by 25%. However, this does not remove her ability to build CRT. It is possible to equip so much CRT on her that Kokomi can still land critical hits.
This build has become somewhat of a meme, but is hardly recommended in practice. It requires eternal farming for the right artifacts, additional food, and suitable teams to utilize it effectively. If you are curious: the well-known Genshin Impact YouTuber and Twitch streamer “TenhaTV” tested it for fun and caused about 20,000 damage (via Twitch).
Two other important passive talents are:
- “Tamanooya’s Box”: If Bakekurage is on the field, its duration resets when Kokomi uses her special ability
- “Song of the Pearls”: While Kokomi is enveloped in the ritualistic feather robe, normal attacks and heavy strikes are enhanced by an additional 15% of the healing bonus
Which talent should you prioritize? Each talent is equally important for Kokomi’s role in the team. However, her special ability provides the most benefits, so you should level that one up first.

Kokomi’s Most Important Constellations
What do the constellations bring? Constellations unlock new abilities and/or stats for characters. This list shows you the most important constellations and what bonuses they provide.
- 1st Constellation (C1) “By the Rivers Edge”: When Kokomi is enveloped in the ritualistic feather robe, she summons a fish with her last normal attack that deals damage equal to 30% of Kokomi’s maximum HP
- 2nd Constellation (C2) “Waves of the Sea of Clouds”: If characters are at 50% HP or less, this grants Kokomi healing bonuses:
- Bakekurage restores 4.5% more HP based on Kokomi’s maximum HP
- While in the ritualistic feather robe, normal attacks and heavy strikes restore 0.6% more HP based on Kokomi’s maximum HP
- 4th Constellation (C4) “Moon over the Streams”: Only when Kokomi is enveloped in the ritualistic feather robe:
- Normal attack speed is increased by 10%
- 0.8 points of elemental energy are restored when normal attacks hit opponents
- 0.2 seconds cooldown
- 6th Constellation (C6) “Sango Isshin”: Only when Kokomi is enveloped in the ritualistic feather robe:
- Kokomi receives a Hydro damage bonus of 40% for 4 seconds when normal attacks and heavy strikes restore HP of team members that have 80% HP or more
Kokomi’s C1, C4, and C6 increase her damage, while only C2 further enhances her support and healing capabilities.
Worthwhile Weapons for Kokomi
Which weapons make Kokomi shine? Kokomi particularly benefits from weapons that further increase her HP as a sub-stat. There are currently only three such weapons in Genshin Impact.
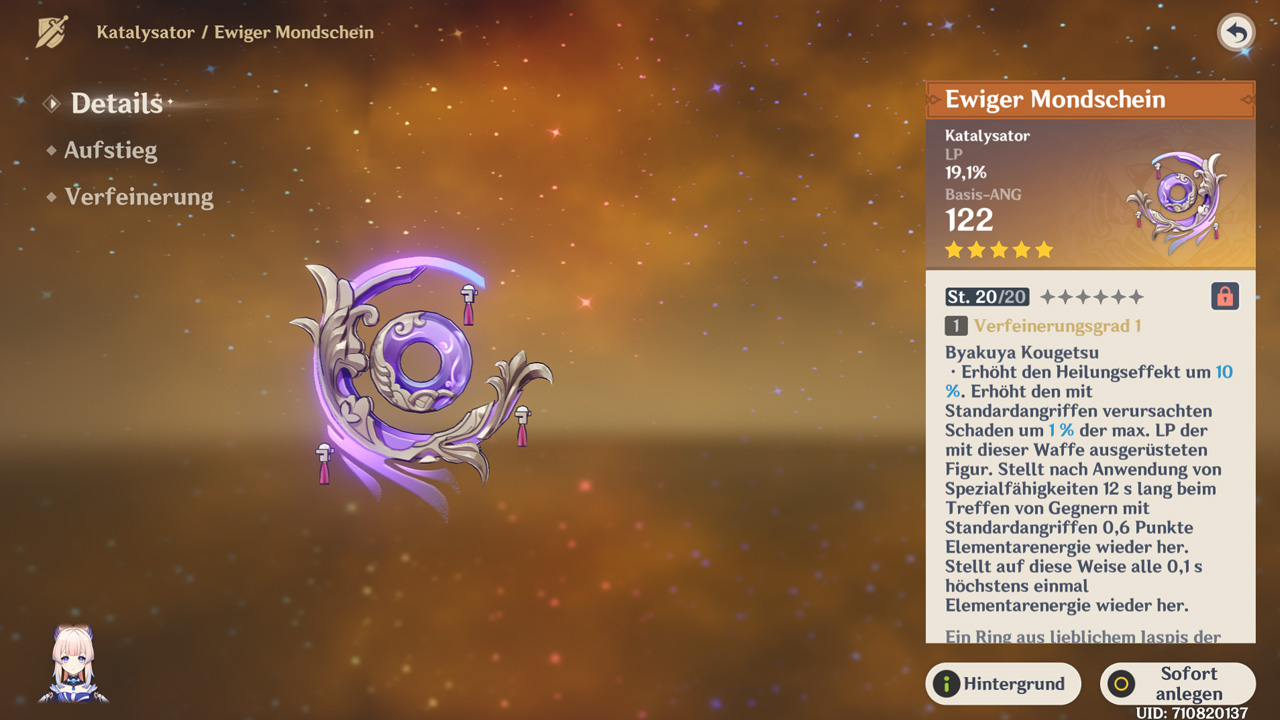
The best weapon for Kokomi is the 5-star catalyst “Eternal Moonglow,” specifically designed for Kokomi. The sub-stat that ensures the HP increase guarantees the enhancement of her support, elemental, and special abilities.
This also applies to the weapon’s effect, which restores 0.6 elemental energy once Kokomi triggers her special ability and hits opponents with normal attacks. The effect helps her to activate her special ability faster again.
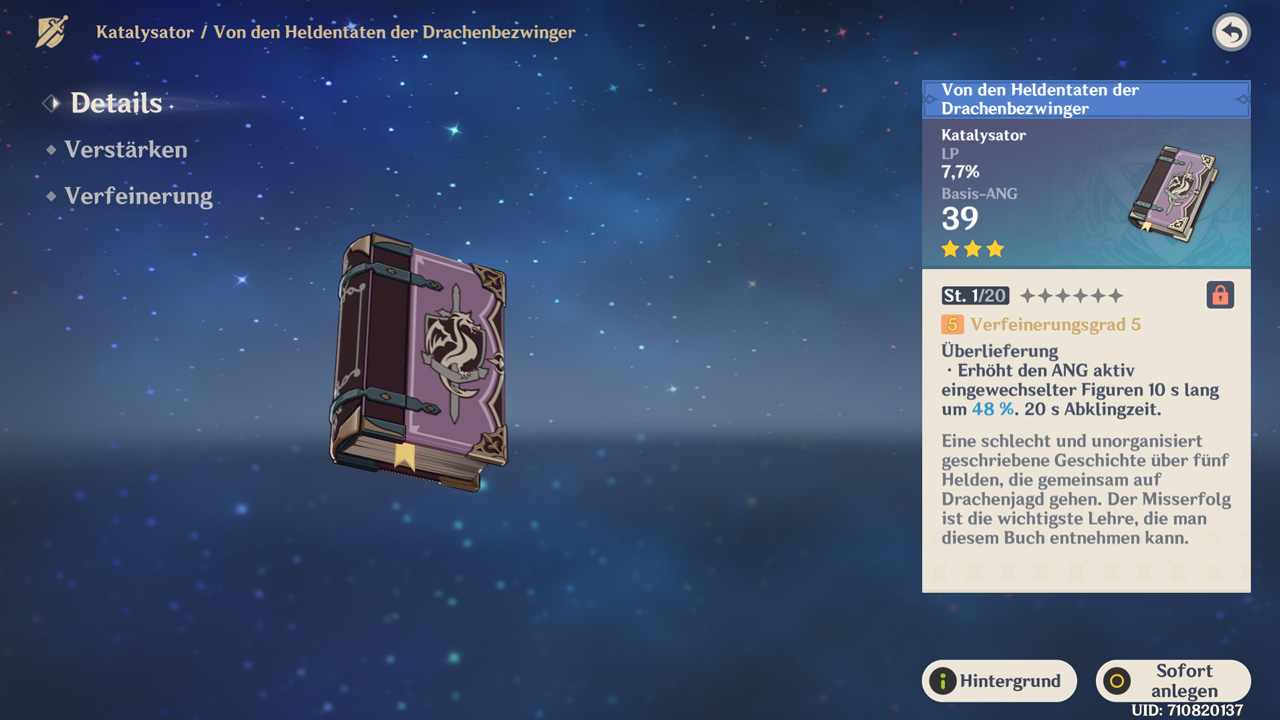
An alternative is the 3-star weapon “Tales of the Dragon Slayers”: It provides the sub-stat of HP and Kokomi gains another support ability through the weapon’s effect. When you switch from Kokomi to another character, that character receives a 24% increased attack for 10 seconds.
This way you can switch out Kokomi for her elemental and special abilities, deal damage and healing, and then switch back to perfectly equip your main DPS or sub-DPS with additional attack and full HP.
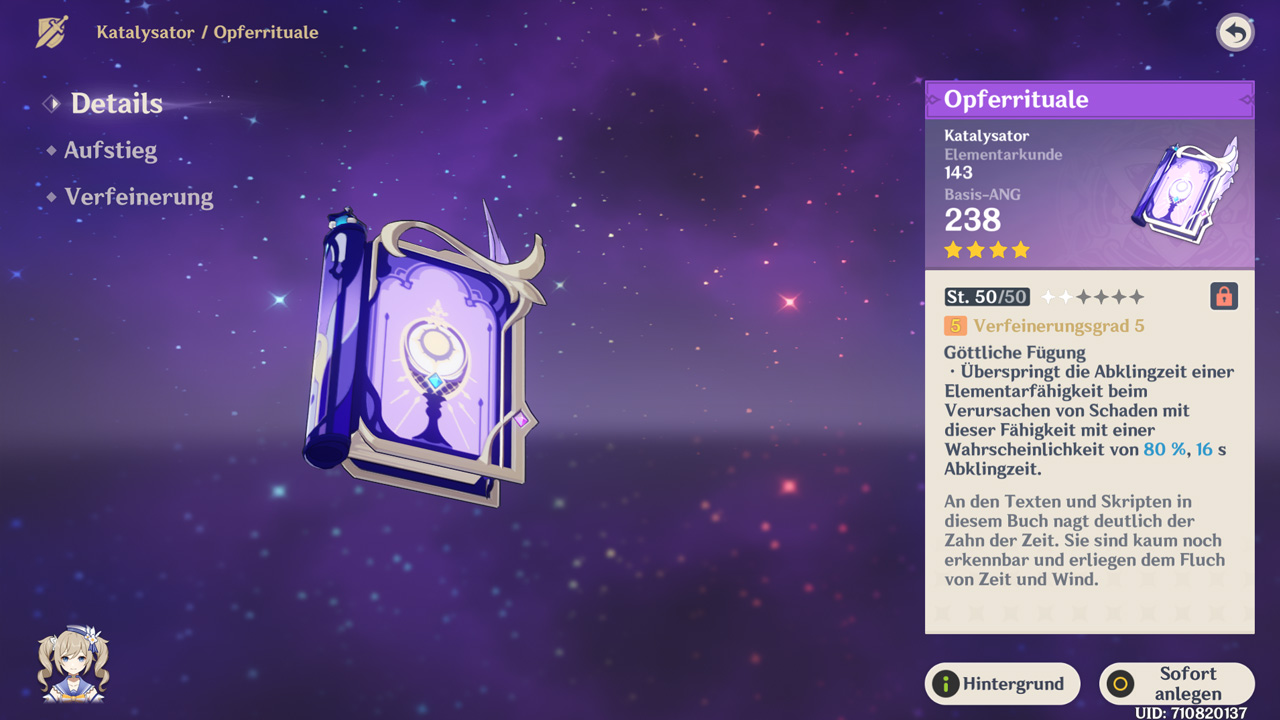
“Sacrificial Rituals” is another, slightly inferior alternative to the other two weapons. It gives you elemental mastery as a sub-stat, ensuring that Kokomi deals more damage with elemental reactions. Additionally, she has a 40% chance to use her elemental skill again.
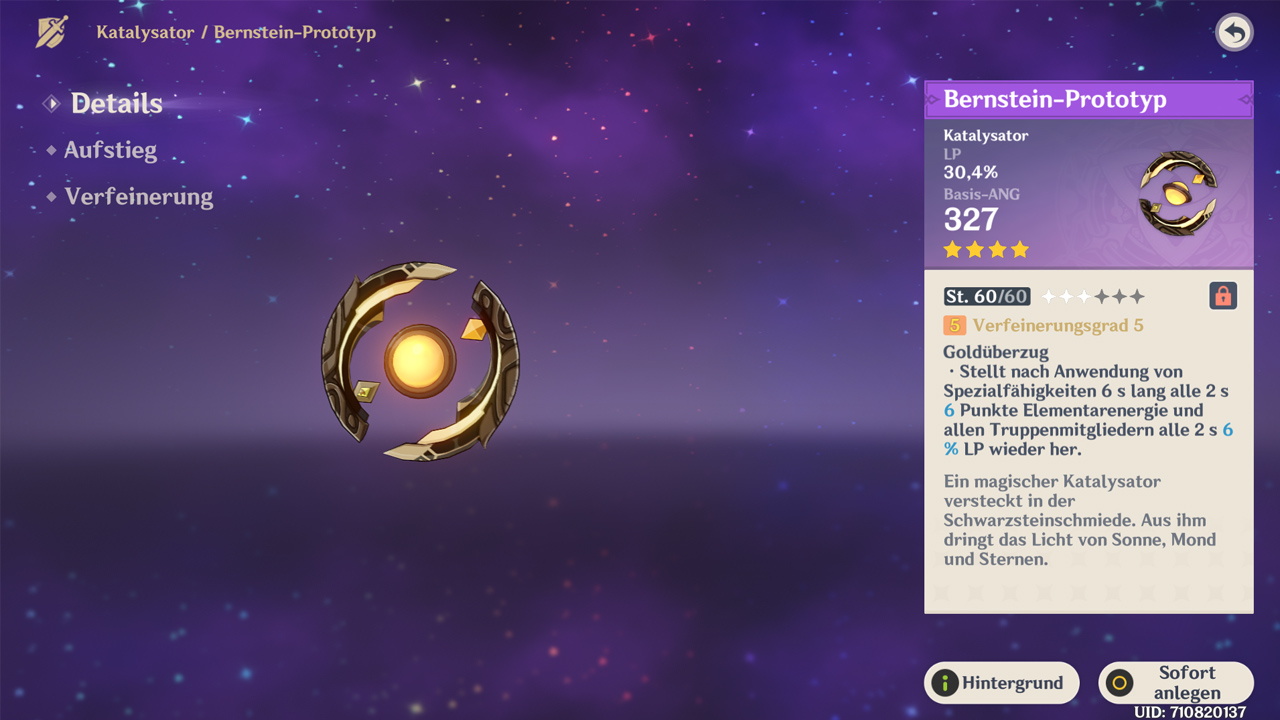
What free-to-play alternatives are there? The best free weapon is the “Prototype Amber,” which you can craft at the blacksmith. This weapon is the third one with the HP sub-stat as a bonus. Its effect also provides a benefit for Kokomi.
After using special abilities, it restores 4 elemental points and 4% HP to all team members every 2 seconds for 6 seconds.
If you are specifically looking to use Kokomi for electro reactions, the “Hakushin Ring” can also be a valuable alternative. With Kokomi’s elemental skill, there is a constant possibility to take advantage of this with an additional electro character.
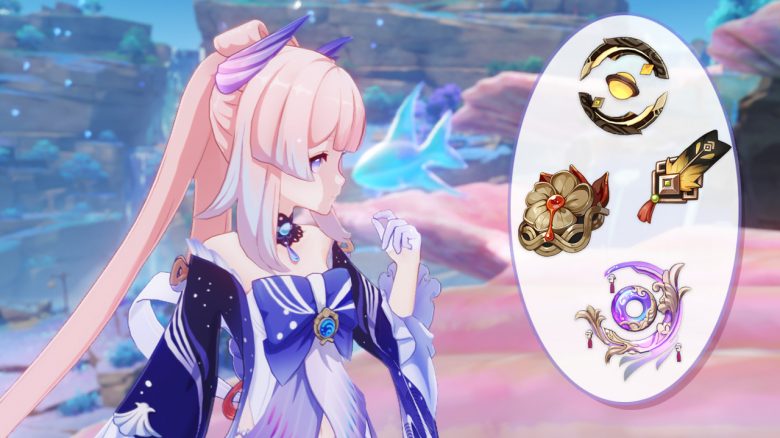
These Artifacts Suit Kokomi Best
Which artifacts benefit Kokomi the most? That depends on how you wish to play your Kokomi. Do you want to utilize Kokomi as a support for your main DPS and other characters? Then equip the artifact set “Tenacity of the Millelith”:
- 2-piece set bonus: Increases HP by 20%
- 4-piece set bonus: When the elemental skill hits opponents, it increases the attack of all nearby team members by 20%. This also applies to shield efficiency, which is increased by 30%. The effect lasts for 3 seconds and has a 0.5-second cooldown. If the character with this set is inactive in the group, it can still trigger the effect
If you also have the weapon “Tales of the Dragon Slayers” at refinement level 5, you can pass on an attack boost of 68% to the next character after switching out Kokomi. Especially due to the HP bonus and attack boost, this set is equipped on Kokomi. The shield efficiency is only relevant if you have a character in the team who provides you with a shield.
Do you wish to keep Kokomi on the field longer and deal more damage with her? Then it’s best to use the “Sea-Dyed Foam” set:
- 2-piece set bonus: Increases healing bonus by 15%
- 4-piece set bonus: When the character equipped with the artifact set heals someone, a “Sea Bubble” will appear every 3.5 seconds, collecting the restored HP. It then explodes, dealing 90% damage based on the restored HP. “Sea-Dyed Foam” can collect up to 30000 HP. The damage is calculated similarly to elemental reactions but cannot be influenced by elemental mastery, character level, or reaction damage bonuses. The set effect can be triggered even when the character equipped with it is not on the field.


What stats are important for the artifacts? On the goblet, the stat HP % is recommended. Additionally, the chalice can be equipped with Hydro damage bonus. If you are unlucky and do not get such a chalice, you can temporarily rely on the HP % stat. The crown should ideally have healing bonus % as a priority. If you do not get this, you can also use HP % for that.
Kokomi is very accommodating with her sub-stats. Focus especially on HP % and HP as a flat stat (not percentage). She also greatly benefits from recharge rate, as this ensures that she can use her special ability again soon.
Kokomi Sangonomiya as a Team Member
In which teams does Kokomi fit? Kokomi fits in any team that needs a healer.
With her elemental and special ability, she continuously and reliably heals the team. Additionally, she can consistently trigger reactions through her elemental abilities. We want to show you some examples of useful teams.
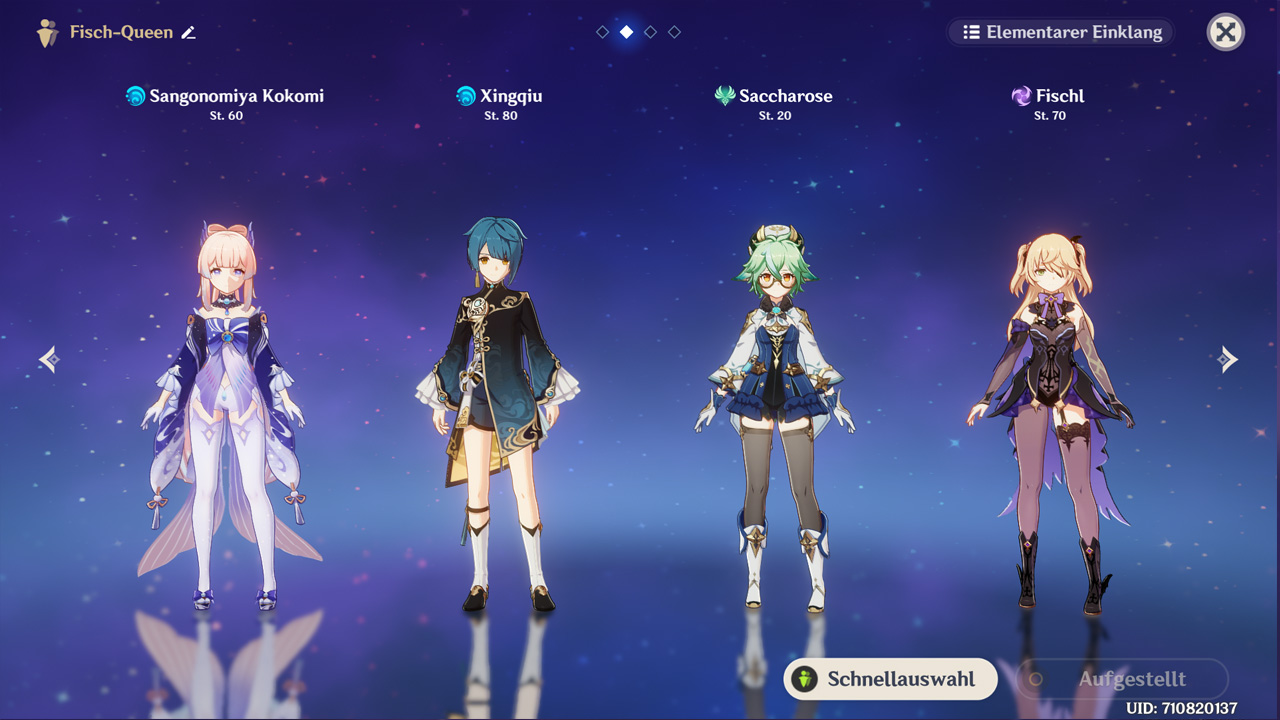
Support Team for Kokomi as an Attacker:
- Kokomi
- Xingqiu: Acts as a “Favonius Sword” battery for Kokomi. Through his abilities, Kokomi charges her special ability faster. He also passively deals additional Hydro damage with his special ability. Xingqiu may become unnecessary if you have Raiden Shogun
- Saccharose or Kazuha: Reduce resistance to Hydro or Electro by 40% through swirling when they are equipped with the artifact set “Viridescent Venerer.” Additionally, they provide elemental mastery for the rest of the team and ensure crowd control
- Beidou/Fischl/or Raiden Shogun: For triggering Electro reactions and additional damage. Raiden can also reliably charge the special abilities of all team members
Kokomi as Support in the Team:
- Kokomi: Equipped with the Millelith set and the Dragon Slayer should provide damage for the others. Also combines with cryo characters for freezing
- Ganyu or Ayaka: As main DPS
- Kaeya or Rosaria: As sub DPS and the cryo team effect that increases CRT by 15% when foes are frozen or affected by cryo effects
- Saccharose, Venti, or Kazuha: Reduce resistance to Hydro or Cryo by 40% through swirling when equipped with the artifact set “Viridescent Venerer.” Additionally, they provide elemental mastery for the rest of the team and ensure crowd control
Xiangling and Bennett Combo:
- Kokomi
- Kazuha or Saccharose: Reduce resistance to Hydro or Pyro by 40% through swirling when equipped with the artifact set “Viridescent Venerer.” Additionally, they provide elemental mastery for the rest of the team and ensure crowd control
- Xiangling: Her special ability along with Kokomi’s attacks constantly triggers strong vaporize reactions
- Bennett: For attack and team effect boosts
This is what you can expect from Kokomi: Do not expect from Kokomi the usual damage numbers in the six-figure range – she is not meant for that. She is a well-balanced character who brings a little bit of everything. She can reliably heal, distribute Hydro to enemies, and deal passive damage with her elemental skill.
Kokomi is essentially a complete package of Qiqi, Mona, Xingqiu, Barbara, and Childe, but is overall not better than any of the individual characters. However, she is not meant to replace them but is an independent and good character who can fit into a variety of teams. Additionally, she has a wonderful character design.
So, if you are looking for a useful healer with a cute design who can take a hit and provides plenty of support, Kokomi is surely a wonderful addition to your squad.
What do you think of Kokomi? Have you already pulled her or will you skip her? Are you perhaps saving for future characters? Feel free to write it down in the comments.
Genshin Impact: Raiden Shogun Build – How to maximize the Electro Goddess

Your opinion is important to us!
Do you like the article? Then let us know!