The new Exotic sword “The Lament” from Beyond Light can now be earned in Destiny 2. We will show you how the quest “Gigantic Expectations” unfolds and where you can find the dead Exos, the gigantic Exo, and the blade pieces on Europa.
What’s going on in Destiny 2? Recently, the Beyond Light raid launched in the Deep Stone Crypt in Destiny 2. And after the new raid was mastered, a lot has changed. For instance, two new weapon Exotics from the Beyond Light expansion can now be earned.
These include the Exotic sniper Wolkenschlag as well as the sword The Lament. And MeinMMO explains to you how to obtain this new exotic sword.

This is how the exotic quest “Gigantic Expectations” for “The Lament” unfolds
This new exotic quest consists of a total of 11 steps and revolves around the Clovis Bray AI as well as tasks related to the new location Europa.
Where do you get the quest? The quest was unlocked for all owners of Beyond Light after the first team cracked the new raid in the Deep Stone Crypt. You will receive the task from the gunsmith Banshee-44 in the Tower.
Here are the individual steps
- 1. Find 3 dead Exos: Right at the beginning of the new quest, you need to find 3 dead Exos on Europa. You will need to scan the bodies of the robots. MeinMMO presents you with the locations of all 9 hidden Exos – but for the Lament quest you only need any 3 of them. It starts in the video at minute 1:12:
- 2. Find the gigantic Exo: Now you need to find a gigantic Exo hidden in Bray Exo science. Just put a marker on the quest step and follow it along this route:
- 3. Gigantic Expectations: Now you must prove yourself worthy to the Clovis AI by taking out Vex all across Europa with swords. A total of 100 Vex must be defeated, of which 20 must be Minotaurs, Hydras, or Cyclopses.
- 4. Gigantic Expectations: It continues with the Clovis AI. You now need to obtain and complete the listed quests from Commander Zavala and Variks to prove yourself before the Clovis AI and continue “Lost Lament”. For this, you need to have completed “Fall of the Empire”, “Reclamation of Europa” and “The Priestess of Darkness” – these tasks you could have already completed before the Exo quest went live.
- 5. Gigantic Expectations: You are still working with the Clovis AI and still need to prove that you are worthy – this time by completing an Exo challenge. Currently, this is the new replayable mission called “Old Secrets, New Challenges” in Bray science (Power level 1.230, found on the map after the first playthrough as “Simulation: Survive”). Mark it on the map, then you should find it easily in the first large hall of the research complex. The mission is self-explanatory.

- 6. Gigantic Expectations: Now you have almost convinced the AI. You now need to eliminate 60 Vex with finishers to finally satisfy it. Powerful Vex grant greater progress.
- 7. Save the Past – Find Blade Pieces: Now the strike “The Corridor of Mirrors” awaits you on Europa. Simply select this on the Europa map. There you need to find the blade pieces for the sword. Don’t waste any time searching, the item is found at the very end in the boss room. You will get the parts dropped there by one of the Harpies with yellow health bars – and the entire team will get them if you have all progressed equally far in the quest.
- 8. Blade of Broken Dreams: After the strike, you will return to the Tower. There you should speak with Banshee-44 about the broken blade.
- 9. Blade of Broken Dreams: Next, you should search for an abandoned bunker in the Eventide ruins on Europa and explore its interior. Simply defeat the boss there and open the chest.
- 10. Complete “Reforging the Past”: Now you no longer need to impress the AI, but this time it is relying on you. You will go on the mission “Reforging the Past” to save the Clovis AI from destruction. The mission is self-explanatory and at the end, the finished sword will await you.
- 11. Last stop: Finally, return to the Tower to Banshee-44 to report your discoveries and complete the quest.
The entire quest in video:
What the new sword “The Lament” can do
This is what makes the weapon special: The Lament is an exotic sword, meaning it is a power weapon, and deals solar damage.
The exotic perk is called Banshee’s Wail. This is how the sword works:
- Hold the light attack button to intensify the blade. This increases damage, bypasses shields, and adds “shield-piercing” to all attacks.
- The sword gains stacks when damage is dealt through intensified attacks. Additional stacks increase the damage and damage resistance of heavy attacks.
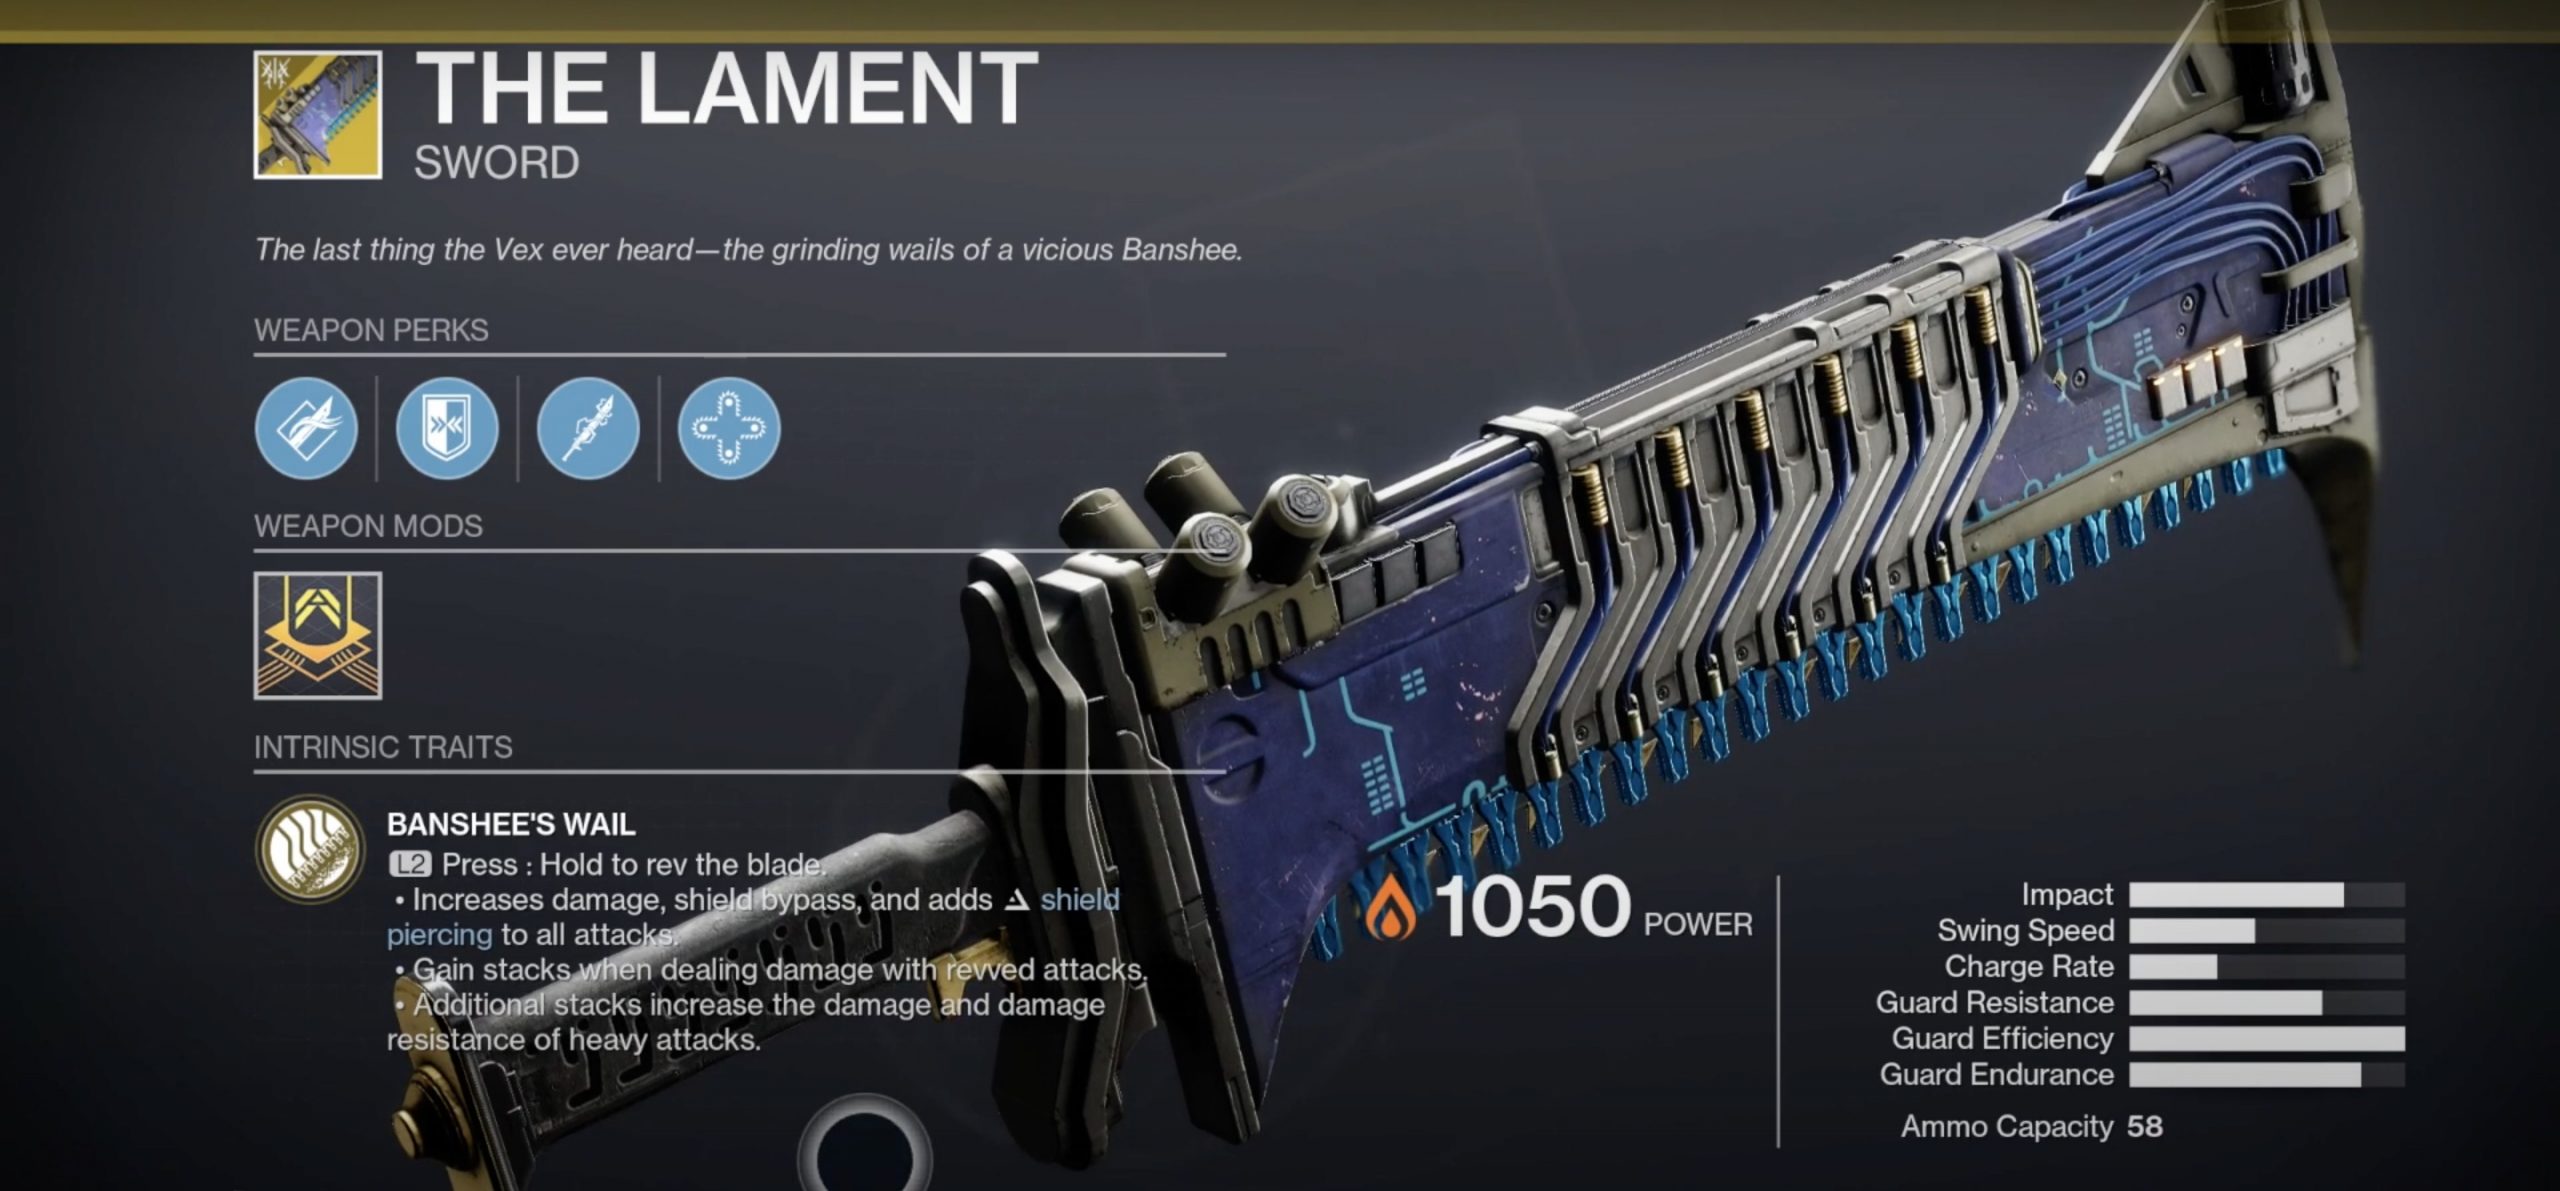
Additionally, there is the special perk “Intensified Consumption”. It heals the sword bearer for damage dealt to enemies.
Furthermore, it is already known that The Lament will receive an exotic masterwork catalyst, presumably also from Banshee shortly after mastering the quest. However, it is still unknown how the catalyst will improve the new weapon exotic in detail.
By the way, it seems that a new raid exotic has already been discovered: Completely unknown exotic discovered – reminiscent of iconic weapon Gjallarhorn