
Maliwan Takedown is currently the hardest challenge in Borderlands 3. Yet some players attempt it solo – sometimes with impressive success.
Players achieve the impossible: The Maliwan Takedown is actually designed as a challenge for four players at level 50. So it’s quite difficult.
Nevertheless, some players managed to complete the raid solo. Resourceful players have found suitable builds for Amara, Zane, and FL4K. What about Moze – how does the Gunner perform?
This Moze Solo Build doesn’t even go down
This is what the build looks like: YouTuber Joltzdude139 has created a build that allows him to defeat the Maliwan Takedown on Mayhem 4 in exactly 17:38 minutes. And he does it solo! He primarily relies on shield regeneration, constant movement, and clever use of skills. How did he distribute his points?
Bottomless Magazines Skill Tree

These skills are needed from Bottomless Magazines: This tree requires a lot of points. The YouTuber utilizes the following skills:
- Perfect Set
- Affectionate
- Hot Swaps
- Swift Offensive
- The Iron Bank
- Drained
This distribution favors weapon swap speed, allows Moze to sprint and shoot, and increases magazine size. Additionally, through Drained, there’s the possibility of receiving unlimited ammo after leaving Iron Bear. A skill that Joltzdude frequently uses in his run.
Demolition Woman Skill Tree
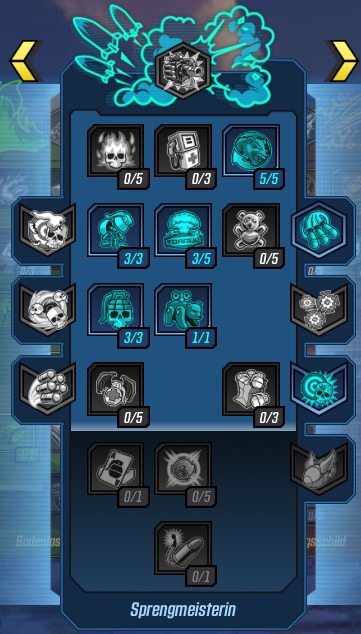
These skills are needed from Demolition Woman: From this tree, you obtain the launcher for Iron Bear. The following skills are also included:
- More and Less
- Destruction Methods
- Torgue-Cross-Promotion
- Pull the Holy Pin
- Auto Bear
From this tree, Moze receives ammo back, shortens the action skill cooldown, and enhances splash damage. Moreover, it grants Iron Bear the ability to take out your enemies solo.
Revenge Shield Skill Tree

These skills are needed from Revenge Shield: The remaining points go into the red skill tree. Acquire these skills:
- Security Bear
- Armored Infantry
- Up to the Neck in Casings
In addition to a shield for Iron Bear, Moze also receives damage reduction and increased gun damage while shields are active. This is crucial when paired with the right gear.
Weapons and Equipment
These items are utilized: The YouTuber employs a very specific setup for his run. The weapons and shields are especially important.
In the first part of the raid, he uses a Transformer shield and applies shock damage to himself with Tediore weapons. This is converted into shield points by the shield, resulting in extremely high shield points.
He uses the following weapons:
- Redundant Face Puncher with Terror Anointment
- Sacred Super Supercharged Everblast ++ – Allows for 120% more splash damage after leaving Iron Bear, and deals shock damage
- Sacred Super Poison Everblast ++ – Same effect, but with corrosive damage
- Potent Quickie – Rocket launcher, also with more splash damage
Against Wotan, he then uses a Big Shot Stop Gap shield instead of the Transformer. This provides a few seconds of immunity when the shield breaks.
Additionally, there are “Cutpurse” artifacts that keep him alive, as well as a Bloodletter Class Mod that ensures the shields recharge quickly. How effective that is can be seen in the video above – even though it sometimes gets tight, his health never drops to zero.
A strong performance to complete the takedown so quickly. Speaking of quickly:

Your opinion is important to us!
Do you like the article? Then let us know!