
The Motherboard
In English, it has two names: motherboard and mainboard. It is the connecting piece of the other hardware, as almost everything is mounted on it. Many functions are already integrated into it, such as sound and LAN connections or a basic graphics card.
When buying the motherboard, you must pay attention to the connections it has. For example, there are various processor sockets. If it is designed for AMD, Intel can hardly be connected to it. For this reason, the choice of motherboard sets the limits for future expansion of the PC.
Connections
Processor: Both AMD and Intel processors have their own sockets. These can be further subdivided, as almost every processor generation has its own. For example, FM2+, AM3+, and AM4 belong to AMD, while 1150, 1151, and 2011-v3 belong to Intel. Older motherboards may therefore not support a modern CPU.
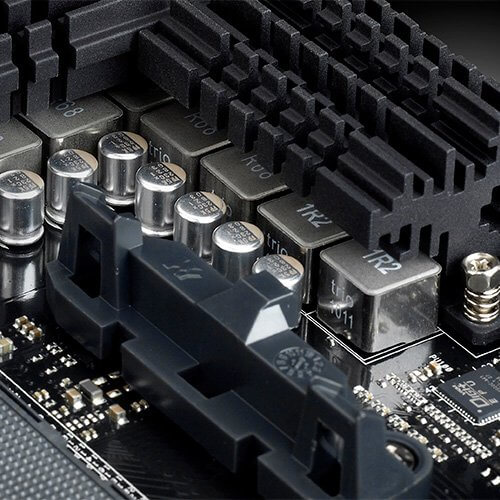
Graphics Card: PCIe (Peripheral Component Interconnect Express) displaces most connections. A bit older is PCI, and despite the similar name, they differ from one another. AGP (Accelerated Graphics Port) can only be found on very old models.
Drives: Serial AT Attachment or SATA is the common interface and has been continuously developed to SATA Express, which is compatible with its predecessor SATA 6G. Most drives are sufficient with SATA connections, but for SSDs, they are too slow. They prefer PCIe, given that there is space available.
USB: USB 2.0 was used for a long time; USB 3.0 is increasingly displacing it due to higher transfer speeds. Devices with 2.0 ports can be connected to 3.0, but vice versa – 3.0 to 2.0 – is not possible. Nowadays, there is also 3.1, which has a different connector and therefore requires adapters for backward compatibility.
RAM: There are several slots available. When purchasing, attention must be paid to the memory module and the memory clock. The first would include designations like DDR2 and DDR3, and the latter a four-digit number. DDR3-2400 is a RAM module that requires a DDR3 slot and achieves a performance of up to 2400 MHz. If the motherboard only supports 1333 MHz as the maximum frequency, the performance would be throttled accordingly. There is also a minimum frequency. The performance of the RAM module should not be lower than this.
Some values may be given with “O.C.” This stands for Overclocked and means that this frequency is reached by operating a component outside its normal operational range.
Dual Channel can also be supported by a motherboard. The slots are often arranged in pairs. If the same RAM memory is installed in these, meaning the same frequency, memory capacity, and manufacturer, the speed is theoretically doubled.
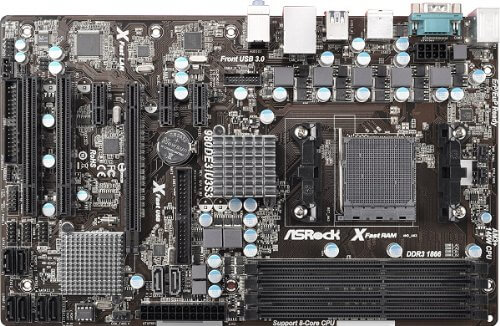
A Concrete Example
This model is somewhat older, but it provides all the important information at a glance. The socket is AM3. This means only AMD processors of the AM3 series can be connected. AM3+ is partially possible but not recommended by the manufacturer. Which specific processors can be installed is also listed on the Amazon page. If this information is missing, it can be viewed on Wikipedia under the designation “Socket AM3”.
For RAM, DDR3 is specified along with “2000(OC)/1800(OC)/1600(O.C.)/13333/1066”. The first value is the maximum frequency, and the last is the minimum. This means that DDR-2000 could function at full load, while something less than 1066 should not be connected anymore.
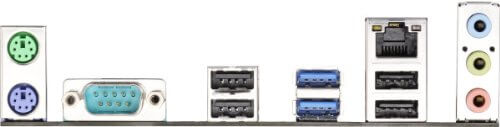
Scrolling a bit further down to the product information, you will find the indication of USB interfaces. That would be 7 times USB 2.0. “Ethernet Port” is the connection for the LAN cable. “PS-2” are the old round connectors in green and violet. Here we have a violet connector, so it is for the keyboard. They have largely been replaced by USB and are only relevant for NKRO. More on this topic can be found in our guide article on keyboards.
The Correct Installation
First, the power supply should be installed, as it can create space issues after the motherboard is installed. After that, the motherboard can be installed. It must not be screwed directly to the case; there must be a certain distance. So-called standoff screws should be included. For this reason, the case has numerous holes, as each motherboard requires different ones.
Now, it will initially be placed loosely. The connections should face the I/O panel. If this does not fit, it must also be replaced, and a corresponding one should be included. These panels are not screwed in, so they can be easily removed or installed with light pressure.
Next, look at the mounting holes of the motherboard that correspond with some of the case’s holes. You either mark these spots or memorize them. Then remove the motherboard and install the standoff screws. Now the motherboard can be placed and screwed in.
The reason for these screws is, by the way, that no current is conducted, as the holes are isolated from the rest of the conductive material. Only this prevents short circuits.

Your opinion is important to us!
Do you like the article? Then let us know!