

Monster Hunter Wilds offers a wide selection with 14 weapons. If you primarily want to focus on ranged combat, you can choose between the bow, the heavy and the light crossbow. Here, you will learn how to best play the bow and what to pay attention to.
The bow is a very versatile ranged weapon that you can use at both short and longer distances. At the same time, it offers you high flexibility and mobility, making it also suitable for more advanced beginners.
The bow offers the following advantages:
- High and fast damage output
- High mobility, allowing you to dodge attacks more easily and strike back quickly
- High flexibility through coatings that enable more targeted responses to specific situations
- Suitable for short and long distances
In this guide, we will introduce you to the most important mechanics, combos, and applications to ensure you are well-equipped for your fights with the bow.
The Basics: All About Attack Types, Combos & Resources
Stamina as the Main Resource
Unlike the other two ranged weapons, the bow requires stamina for you to use it. This means you do not have to worry about your ammunition and do not need to reload in between, allowing you to shoot continuously as long as you have enough stamina.
Different attacks cost different amounts of stamina. Stronger attacks require more stamina than light ones. So, it’s important to keep an eye on your stamina bar at all times to be able to dodge when necessary.
You should ensure that your stamina bar is always at its maximum length by resorting to rations or meals. You can also design your armor skills and decorations to increase your stamina regeneration.
Standard Attack Types and Combos
In Monster Hunter Wilds, the bow can fire different attacks and combos depending on the player’s input. In addition to the standard shots “Quick Shot” (tap the attack button quickly) and “Power Shot” (hold the attack button), there are also various shot types in combos. Each shot type offers different advantages – from area damage to targeted precision shots.
Here you can see how to play the most important combos:


The most important shots and combos you should master are:
- Dragonpiercer, which hits a monster with a piercing shot along its entire length and causes continuous damage
- Thousand Dragons, a powerful but very short-range salvo that deals massive burst damage
- Tracer, which, as the name suggests, marks the target and launches explosive arrows
- Parabola Shot, a hail of arrows that causes directed area damage
Almost all attacks can be charged by holding the input, resulting in higher damage.
Which attacks are suitable for short distances? In close combat, you can fire a “Spread Shot” that can deal increased damage at short distances. Quick Shots, Power Shots, and Thousand Dragons are attacks that also work well in close combat.
Which attacks are good with low stamina? If you have low stamina, it makes sense to focus on the combos Dragonpiercer or Thousand Dragons. You can use these as long as you have even a little stamina – no matter how much.
Focus Mode and Breaking Wounds
The focus attack of the bow differs from other weapons in that it can relatively easily break multiple wounds at once.
To do this, you enter Focus Mode and aim the circle at the monster. Automatically, open wounds of the monster and your placed explosive marking arrows are detected by small triangles.
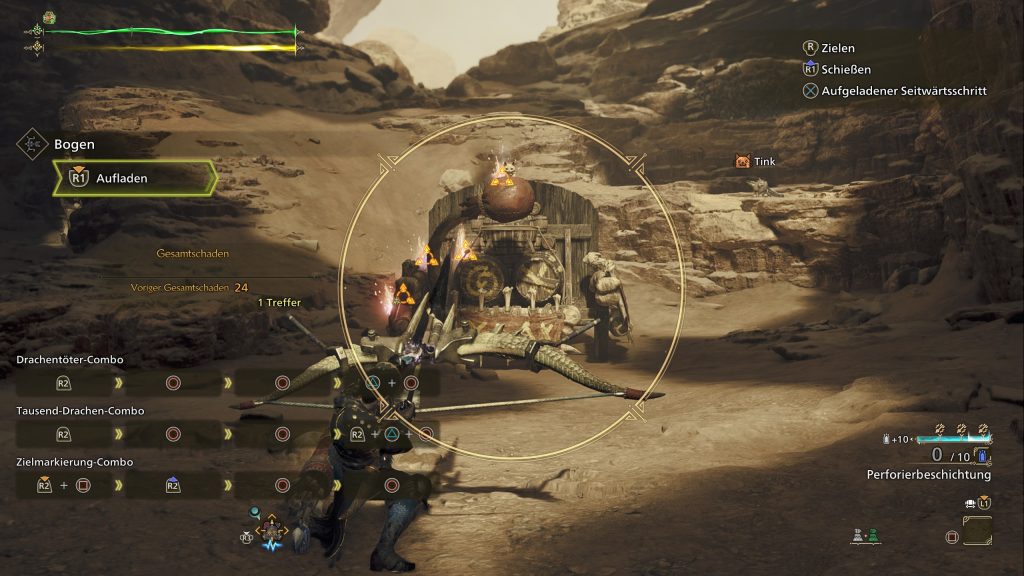
When you then shoot your focus attack, your bow releases homing arrows that break wounds and trigger explosions.
Coatings and Special Attacks
In addition to your stamina, you need to keep an eye on your charge level, which you can increase through successful combos or perfect dodges. You need these charges for special attacks and coatings.
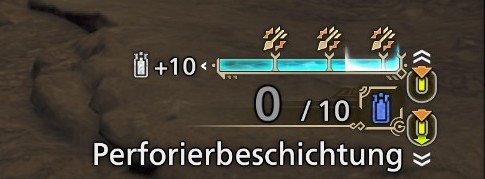
Each bow can use different coatings that can be replenished through the charge bar. However, it depends on the specific bow which coatings you can apply – you cannot always use all of them.
The following coatings are available:
| Coating | Effect |
| Power | Increases damage overall |
| Close Combat | Reduces range but increases damage |
| Paralysis | Can paralyze the monster |
| Poison | Can poison the monster |
| Sleep | Can put the monster to sleep |
| Explosion | Can cause explosive pestilence |
| Fatigue | Can stun and fatigue |
| Puncture Coating | Pierces the monster and hits multiple times |
You should use coatings when they fit the situation and as soon as they are charged to get the most out of your bow.
Utilize Critical Range
When you aim your bow at a monster, a distance indicator is shown to you. This displays 3 levels of your potential shot:
- Small with the label “Out of Range” – A shot from this distance does nothing for you
- Medium-sized, with a point in the middle – Suitable range without critical damage
- Glowing Orange with a second circle – Perfect distance for critical damage
The perfect distance can change with different applied coatings, so you should not overlook this display.
However, the indicator does not guarantee maximum damage. Even if the circle glows orange, it does not mean that you will automatically deal maximum damage.
Fill the Charge Bar by Dodging
In addition to the optimal distance, it is also important that you stay as mobile as possible. On one hand, dodging fills your charge bar, and on the other hand, it allows you to position yourself quickly and easily without having to interrupt your attacks.
However, you should be careful not to drain your stamina bar with this. Once it is depleted, you will not be able to attack for a short time and will be exhausted. This will make you unable to dodge during this time and vulnerable to your opponent’s attacks.
If you perform your dodge perfectly, it will automatically fill a segment of your charge bar.
Use Your Parabola Shot Frequently
Your hail of arrows is excellent for starting a fight or when the monster isn’t moving much. The many arrows will also automatically set explosive marking arrows, which you can then ignite with your focus attack.
Additionally, they build up stun and can stun a monster if you hit the head often enough. As a side effect, they also fill your charge bar.


Once you have mastered these mechanics, you can already set out on your hunt. To practice these things, you can easily visit the training area in the Wind Plane and experiment there.
Later, you might want to try out a suitable build. If you are looking for an appropriate build for the bow or one of the other weapons, you can check out our overview, which we continually update: Monster Hunter Wilds: The Best Builds for Greatsword, Hammer, Lance, and More

Your opinion is important to us!
Do you like the article? Then let us know!