Aside from video games, drawing and Dungeons & Dragons, MeinMMO editor Caro came across a new hobby that combined all her preferences. What initially seems a bit intimidating is actually very beginner-friendly, as she found out herself – and now she wants to convince you too.
Have you ever thought about starting to paint miniatures? But are you still unsure if this hobby is for you? Then please give me 10 minutes of your time to tell you how self-painted little colorful plastic figures can enrich your life.
When I started to become interested in D&D and our first campaign came about (shoutout to the Barden Bellas), I crafted our first homemade minis from cardboard. However, I slowly began to take an interest in how to make our heroes look even cooler.
One thing led to another and before I knew it, I was looking at a bunch of small gray plastic figures in my local tabletop and role-playing game store. I knew: Damn, this is going to be my new personality.
I could see the employee’s face light up when I told him that I was a newbie and needed help. And I want to be that enthusiastic helper for you now.
Here are my tips for other beginners who need that last push to start with this truly wonderful hobby.
In the trailer for the fourth campaign of Critical Role, you can see some miniatures of the heroes:
What do you need to get started?
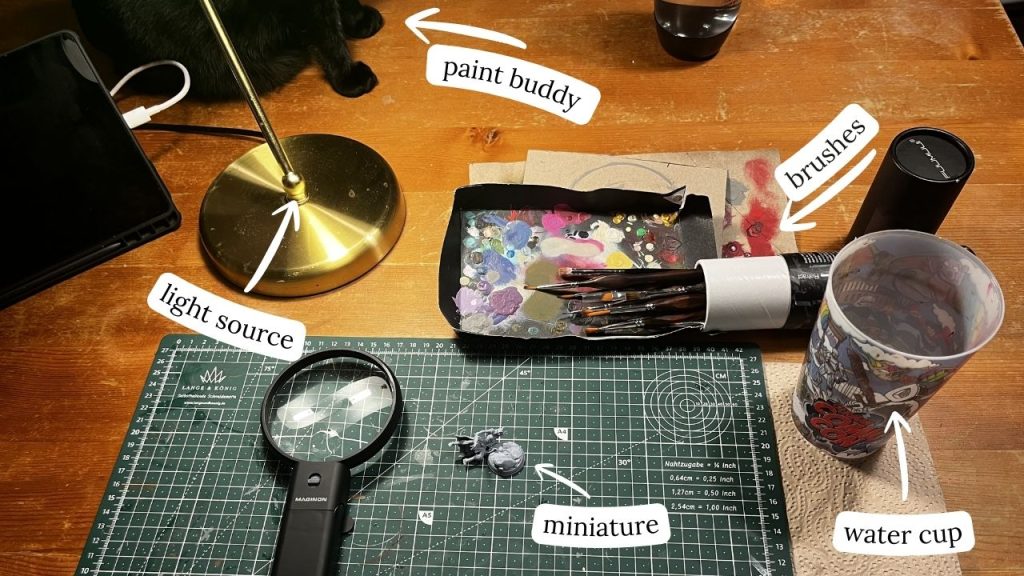
To get into the hobby, you need a few things to get started:
- Miniatures: whether from WizKidz, Warhammer or Etsy, whether adventurers or monsters, you can have fun here.
- Paints: There are different types you will need, including:
- a primer as a base so that the paint adheres to the miniature
- colorful paint for coloring (there are also metallic paints that are great for armor and weapons)
- effect paints as a nice nice-to-have
- washes for more details, shadows, depth, and wear
- A top-coat to better seal the paint (available in matte or glossy)
- Brushes: If you want to use different techniques, it makes sense to have different brushes. I personally use a pretty cheap set that includes everything I need and has served me well to this day. It doesn’t have to be high-end or expensive right away.
- Household items like a cup of water, paper towels to dry the brushes, and a palette for paints (it can also be cardboard or a box)
- Further nice-to-haves, but really not urgently needed:
- Mat like a cutting mat, a newspaper, or something similar will do just fine
- Plastic glue, if you need to glue larger miniatures together
- wet palette, which prevents your paint drops from drying out too quickly
- miniature holder where you can clamp the base of your miniature
Some of the products you buy once and can use for years or, with good care, forever. Other items like paints will be used up after a while. However, the minis that you generally paint are so small that you can be very sparing with the paints.
Probably the most important tip: There is a huge community – use it!
I quickly realized: Those who speak up can be helped. And it doesn’t have to be an employee at a tabletop store. You can also find a lot of artists online who share their tips and tricks, including Bubblegum Angels, whom I already interviewed for MeinMMO.
In the store, I was directly informed that you don’t need to invest so much money at the start. I was recommended a “Warpaints Fanatic” starter set from The Army Painter for about 30 euros. It provided everything for the first miniature to find out if I enjoy it. The set included a few paints, a primer, the wash, a brush, and of course a small miniature.
I still use the contents of this starter set today and therefore use products from the same company because I am A) simply satisfied and B) can buy the paints in the local store. Of course, a wide range of brands is available to you, perhaps even higher-quality paints. However, I just stuck with the products I started with and get along well.
You can also get started with Citadel paints, which are mainly associated with Warhammer, through a starter set at a similar price. But I am very satisfied with the paints I was recommended so far.
Since the first starter set, my hobby box has become significantly fuller. This also applies to my selection of miniatures, which are still eagerly waiting to be painted, while I have already ordered the next ones.
How does a gray figure become a stylish hero or a nasty monster?

First, there is an important note: I am absolutely still not a professional and have only just started less than a year ago, but with my methods I have already been able to achieve some nice results. There are different types and ways to paint minis. Speedpainting
, for example, which produces appealing results particularly quickly.
This is how I learned to paint minis:
Priming
With a primer, you create a base on your miniature so that the paints adhere better to the figure. Therefore, the primer must cover the entire figure – or at least everything you want to paint.
You can either spray it on or apply it with a brush. I use the brush as I don’t have a hobby room and don’t want to ruin my kitchen. If you want to use spray primer, it is best to do this outside in the air.
A tip: If you apply the primer with a brush, it’s better to use thinner layers rather than a fat load of primer. If you prime too much, small details could get lost under the layer.
Base colors
When your primed (and dried!) miniature is ready, you can apply the first colors. It is also advisable to work with several thin layers here. Even if it doesn’t cover immediately and takes longer with more layers, this way you will retain more details. The result will also be more even.
You can dilute your paints with a drop of water and mix several colors, or make them lighter and darker if you’re missing a certain shade.
First, paint the areas that are the hardest to reach. Here you can be a bit “messier” as the next colors will cover these areas. This way, you work your way until the entire miniature is painted.
Here I want to point out how to handle your brushes to avoid ruining them on the first try, because: Dried paints ruin your brushes!
Clean your brushes after each use and with each color change in a cup of cold water, but do not soak the bristles too long. You clean them, wipe the tip on your paper towel, and let them drain or dry there.
Another tip from me: Choose slightly lighter colors than what you want to see on your miniature at the end. With the next step, the washes, they will look a bit “fuller” and also perceive as a bit darker.
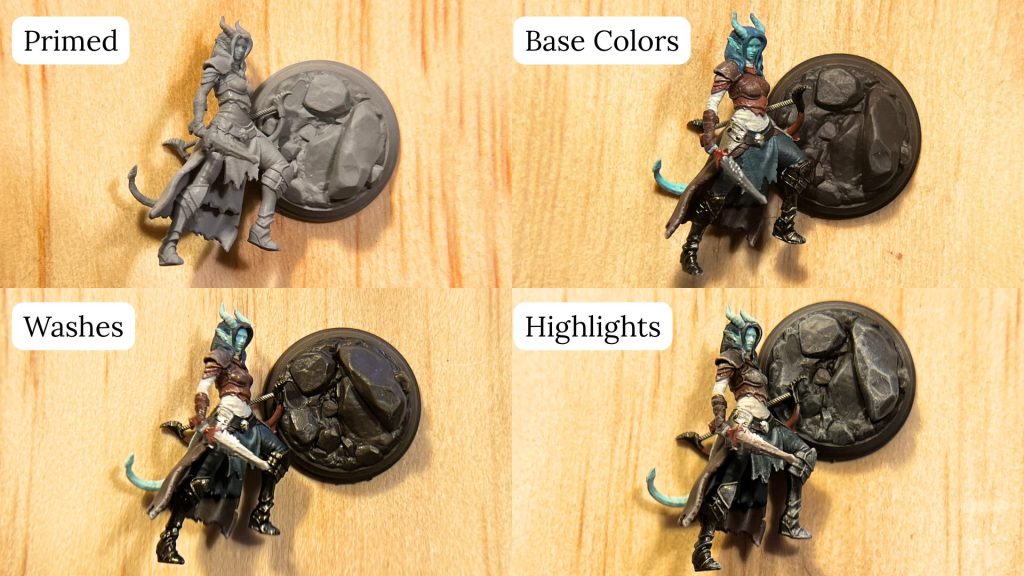
Washes
Here I had my first “Oh … okay, it’s all coming together” moment when I could see how much depth the initially somewhat bland-looking miniature could get.
Washes are very thin paints that bring a lot of life to a miniature. They bring out detail, create shadows, and make your heroes, armors, and weapons look like they are really alive:
You dip the brush in the colored liquid and apply it to your miniature. The watery paint then collects in the deeper crevices and corners, making details pop out, creating shadows and “controlled imperfections”.
If you don’t have much experience with washes, you can simply apply them to the entire miniature and still achieve a solid result. However, with some practice, you’ll find you can also control the liquid. Depending on where you place your brush, the most liquid will stay, and the effect will be stronger. However, this is best discovered through your own experimentation.
And if you made a mistake? Then that’s no problem at all. As long as the wash paint isn’t dry, you can simply “suck it up” with a brush as well.
Highlights and details
If you are already satisfied with the current state of your miniature but want to add a little “flair” and light accents, now is the right time.
Especially in the areas where most light should hit (head, shoulders, generally the places facing the sky) you can create an even nicer result with bright details.
You can add highlights with your brush by mixing your waiting color with a little water and carefully applying the diluted color. This creates beautiful accents and a painterly style.
However, there is another method to create a similar effect while emphasizing small details: the so-called dry brushing. This is a bit faster, a bit less intentional, but very effective with a little practice!
For this, you take a dry brush. It is much coarser and rounder, as it will only gently touch the surface of your miniature.
You apply only a little light color to the bristles and wipe most of it directly on a cloth until just a hint remains. This hint of color is gently brushed along the miniature, more as if you were dusting it off rather than painting it. Go especially along the edges and areas you want to highlight. The color will only be visible at the highest points of the desired area. Feel free to use a lighter tone of the base color for this.
The finishing touch
At this point, you should now have a fully painted miniature, Let’s go! I recommend using a top coat at the end so that you can enjoy your miniature for longer. There are matte and glossy effects available. The latter is particularly fitting for shiny armors, as well as moist maws or tentacle-like creatures.

My personal tips – from one beginner to another
In the months I have been painting minis, I have noticed a few things for myself and received tips from others that have helped me a lot. Even if I don’t implement them perfectly yet, I don’t want to withhold them from you:
- Don’t be held back by your level of practice and dare to take on the little detail. Even if your little figures aren’t perfect, they still look great when you take on details like rivets, highlights, and maybe even faces. They don’t have to be perfect to make your minis look more impressive.
- Even millimeters of a figure make a big difference! When ordering on Etsy, a really helpful seller explained to me that even the minimal difference between a 28mm miniature and a 32mm one makes a significant difference in detail and painting. I quickly noticed this myself. And don’t worry, the size difference is visible, but it can be easily used in the game due to the base.
- You don’t start as an absolute pro. This applies to many hobbies, but I want to emphasize it again. Your first minis will not be perfect, mine were and still are not. But being able to observe your progress is not only motivating but also rewarding.

I hope that I have been able to give those interested in the hobby the final push to give it a chance. If you have already started or have been hovering over your miniatures for years (hopefully with perfect posture), I would very much appreciate further tips and suggestions in the comments!
Dungeons & Dragons offers many other possibilities to expand the hobby around the role-playing game, in addition to the actual playing. Besides painting miniatures, my colleague and MeinMMO editor Sophia has also started a creative hobby that not only fulfills her but also allows her friends to benefit: Because three years ago I started a new hobby, I now give away self-designed dice that come from the heart