

The Tower Defense event “Theater of Devices” (“Theater Mechanicus”) returns to the game of Genshin Impact. MeinMMO shows you how to overcome all stages without difficulties and how the event works.

What do you think of the event? Longtime players may remember the tower defense game in Liyue. This time it can be found in Inazuma at Komakata, directly in the capital near the forge. To participate, you must reach Adventure Rank 30 and complete the quest “The Escape from Ritou”. You can also play the game cooperatively with one of your friends.

Here you will find an overview of what to expect in this guide. Just click on the respective title to get to the section you are interested in.
- Important information before a match
- The power of lucky sticks
- Recommended characters
- All stages and tips to master them
- Rewards

Important information before a match
Before you start a match, there are important things to know. This also applies to those of you who know the old event, as the current one differs significantly from the previous.
- The levels of devices cannot be increased outside of a match, unlike the predecessor.
- Only the theater level (Theater Tactics) provides bonuses for you. The higher the theater tactics, the more points, luck, and device points you receive.
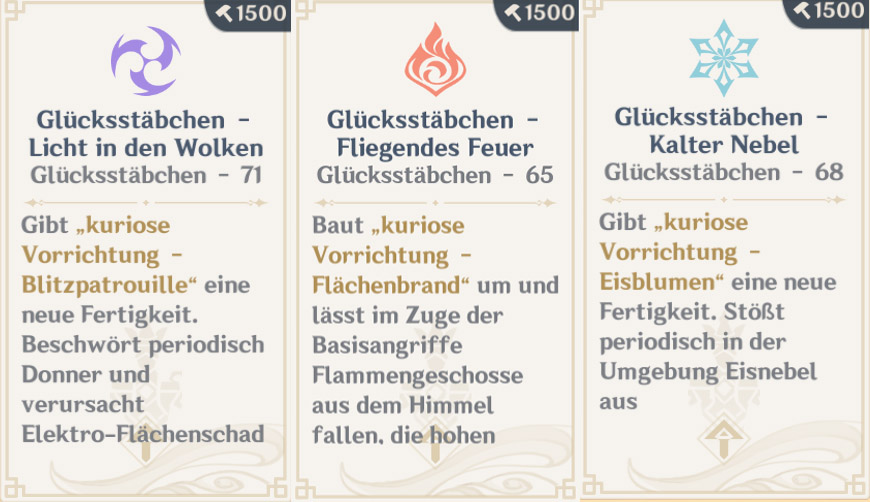
- There are four different types of amazing sticks that you can draw during a match:
- Lucky sticks: Provide bonuses and upgrade devices.
- Wonder sticks (from Theater Tactics: Level 4): Provide bonuses for you.
- Courage sticks: Strengthen enemies, but you receive more device points when defeating such an enemy.
- Deceitful stick: Luck-based. It costs less, but can result in negative effects, such as: Destroys a random device, the purchased deceitful stick has no effect, reduces the attack level of the device tower (…).
- You cannot accumulate elemental energy and activate special abilities; only the elemental ability and normal attacks are available.
- Your characters cannot deal damage to enemies but can destroy shields.

The power of lucky sticks
Why are these sticks so important? The devices alone will not bring you victory. It is important to not only have many devices on the field but also to upgrade those you have. Especially when you draw a lucky stick that costs 1500 device points. These are often the strongest of all, and it is worth getting one instead of building three new devices.
A lucky stick always pertains to an element that represents all devices of that element type. Thus, it may be better if you focus on two to three specific elements and continually upgrade them. The same sticks can be acquired multiple times. Once you do this, you upgrade the previous effect. For example:
- Sticks that increase the attack level provide 2000 attack per new drawn stick.
- Each stick that has an elemental customer bonus increases this by 75 points each time.
- 1500 device points sticks have a bonus of 100%. If you buy it again, you will receive 100% on top of that.
- You can read all stick effects in the event tab under “Action details”.
Take your time to read the effects of each stick during the match. When you press the “T” key, you bring up the stick menu and can switch to “available amazing sticks” at the top. There you can see which bonuses you have already received and how far they have been upgraded.
Recommended characters
Which characters are worth taking? There are certain troop members who are particularly helpful and can significantly assist you with their elemental abilities.
- Saccharose: Temporarily holds enemies in check and together.
- Sayu: For mobility and her sword strikes.
- Jean: Her elemental ability can be used to suck in enemies and throw them into the abyss.
- Geo Traveler: The elemental ability is useful to prevent enemies from moving further.
- Kazuha: Can hold enemies together with his elemental ability and stop them for a short time.
- Venti: Enemies are swept into the air with his elemental ability and temporarily held in place.
- Fischl: Can be used to distribute the Electro element on enemies.
- Xingqiu / Barbara / Mona: To apply the Hydro element to enemies.
- Yanfei / Klee / Yoimiya: Effortlessly distributes the Fire element on monsters.
- Ayaka / Kaeya: You can use both characters to bring the Cryo element to enemies.
If you do not possess certain characters, it is not a problem. From personal experience, I can report that you only need a swordsman to push back enemies with heavy blows when things get tough.
All stages and tips to master them
1st Stage: “Restless Adept Bridge”
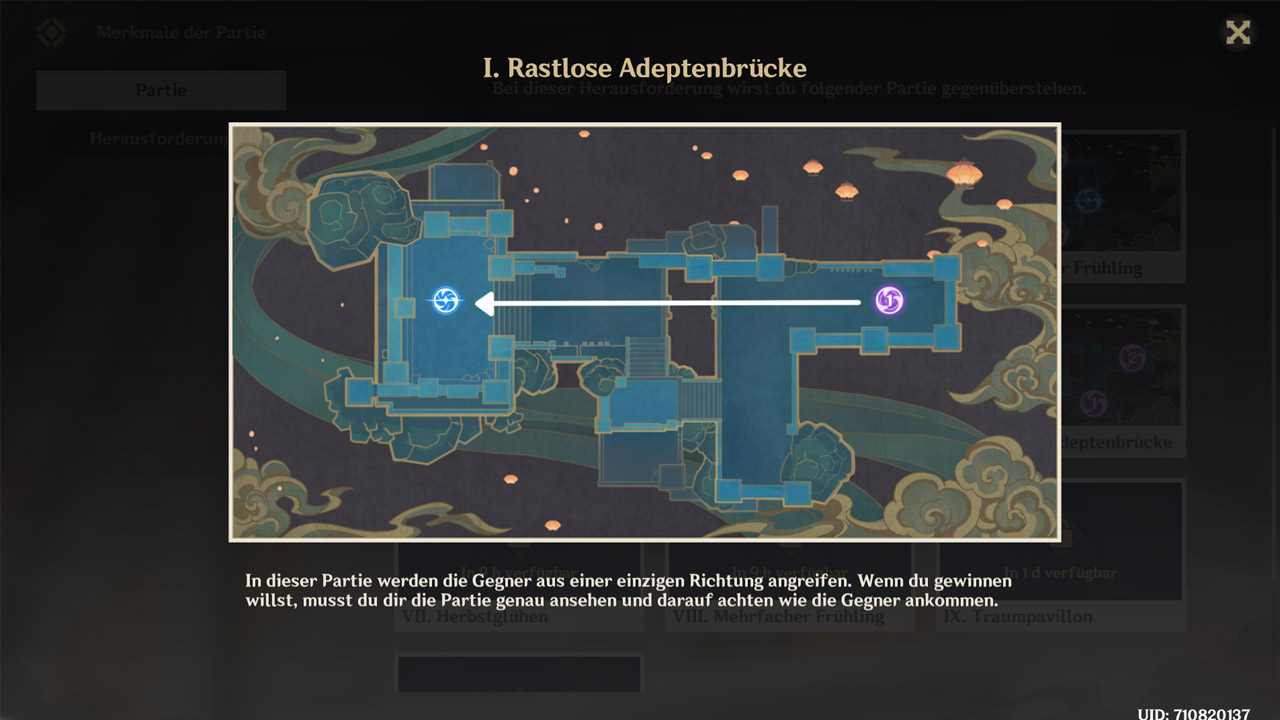
Tips for your possible victory:
- At the start, place a “Salvage Device – Charity” near the purple gate.
- A bit further behind, Pyro, Electro, Hydro, or Cryo devices can be placed. Ideally, stick to two to three different ones and take the remaining device points for lucky sticks.
- Combining Electro and Pyro, Hydro and Cryo, or Hydro and Electro devices is recommended for this stage.
- If you notice that individual enemies are escaping, you can either deactivate the bridge with the cube or push the enemies back with sword strikes or throw them into the abyss. This works especially well with Hydro Samachurls.
Which enemies can appear in this stage? The enemies differ from match to match. Each stage, except for this one, has two fixed final bosses that determine which sticks cannot be drawn.
- Final phase: Ruin Guard (Healing – Heals at 50% health if not defeated quickly enough).
Possible tower arrangement for the perfect victory

What approach was chosen? In the center, fire and electro devices were initially set up. Near the gate from which the enemies come, a “Salvage Device – Charity” was established at the start to gather many device points. Initially, existing towers were upgraded, and then several more were gradually added. The first two waves can be completed with two to four towers if you push enemies back with your sword.
2nd Stage: “Autumn Glow”
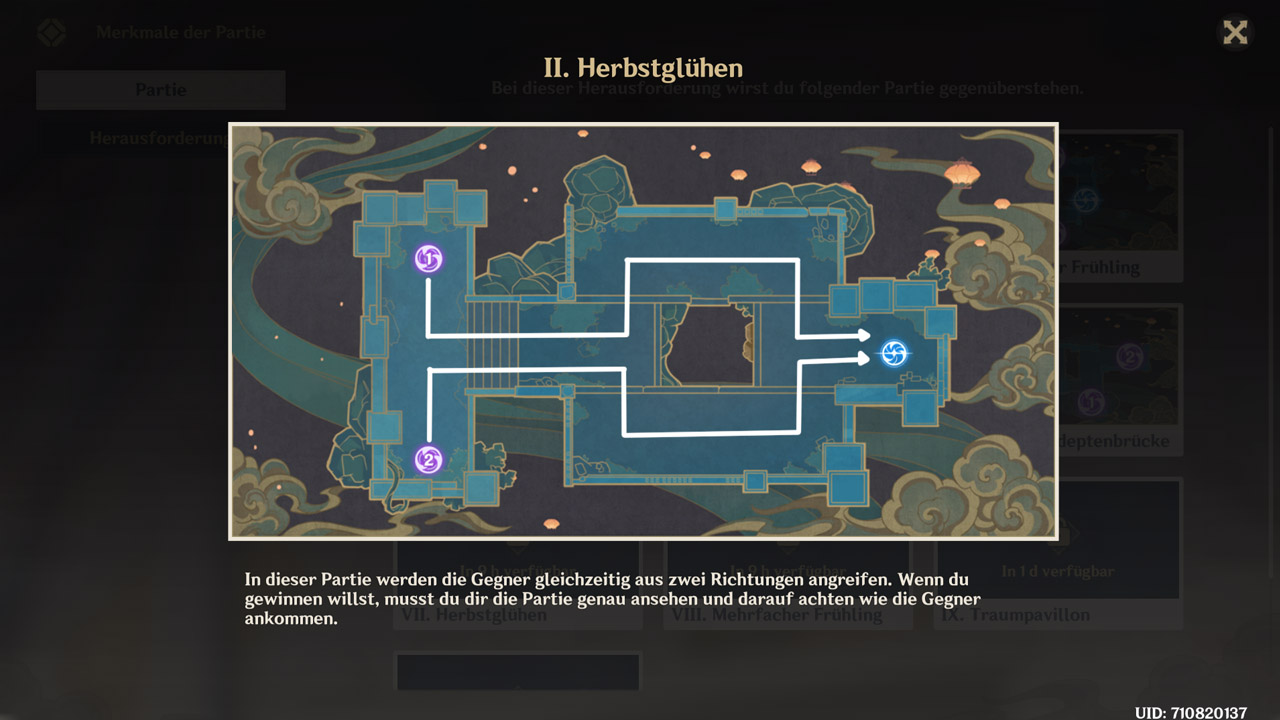
Tips for your possible victory:
- At the start, place a “Salvage Device – Charity” near the spot where enemies die. This depends on which devices you are using. Test this in the first phase and place the salvage device after the first Hilichurls are defeated.
- Electro and Pyro devices have an advantage in this stage.
- Pay attention to the Geo bonus on lucky sticks as there is a stick in the Pyro attribute that attributes fire Geo damage and thus destroys shields faster.
- It’s best to build (many) towers where both enemy paths converge, to eliminate all enemies from both purple gates.
Which enemies can appear in this stage? From this stage onward, two different patterns can appear. The last enemies determine which devices cannot be upgraded with lucky sticks. You can reset the pattern by leaving the match with Escape and re-entering.
Pattern 2 is easier to defeat than pattern 1 as you can clear everything with just Pyro devices. Phase 1 with the Hilichurls is always the same.
- Pattern 1:
- No Hydro and Anemo sticks
- Stone Hide Lawachurl (Stonebreaker – Destroys all Geo devices in its vicinity every 15 seconds)
- Hydro Samachurl and Hilichurl Berserker (Both: Fleetfooted – Particularly fast movement speed)
- Pattern 2:
- No Hydro and Cryo sticks
- Frostarm Lawachurl
- Hydro Samachurl and Cryo Samachurl (Both: Fleetfooted – Particularly fast movement speed)
Possible tower arrangement for victory

What approach was chosen? Below the steps, the maximum number of Electro and Pyro devices were placed. Since all enemies above the stairs were defeated, initially, a “Salvage Device – Charity” was set up instead of the Cryo tower to start gathering device points early. During the rounds, additional Pyro and Electro towers were also set up on the right and left. Some monsters could escape, and others had to be shoved into the abyss, but with that, you can unlock the next stage.
However, ideally, without any escaped monsters, it would have been: Fewer devices, more upgrades right at the beginning. The first two phases can be easily completed with just two to three towers.
3rd Stage: “Multiple Springs”
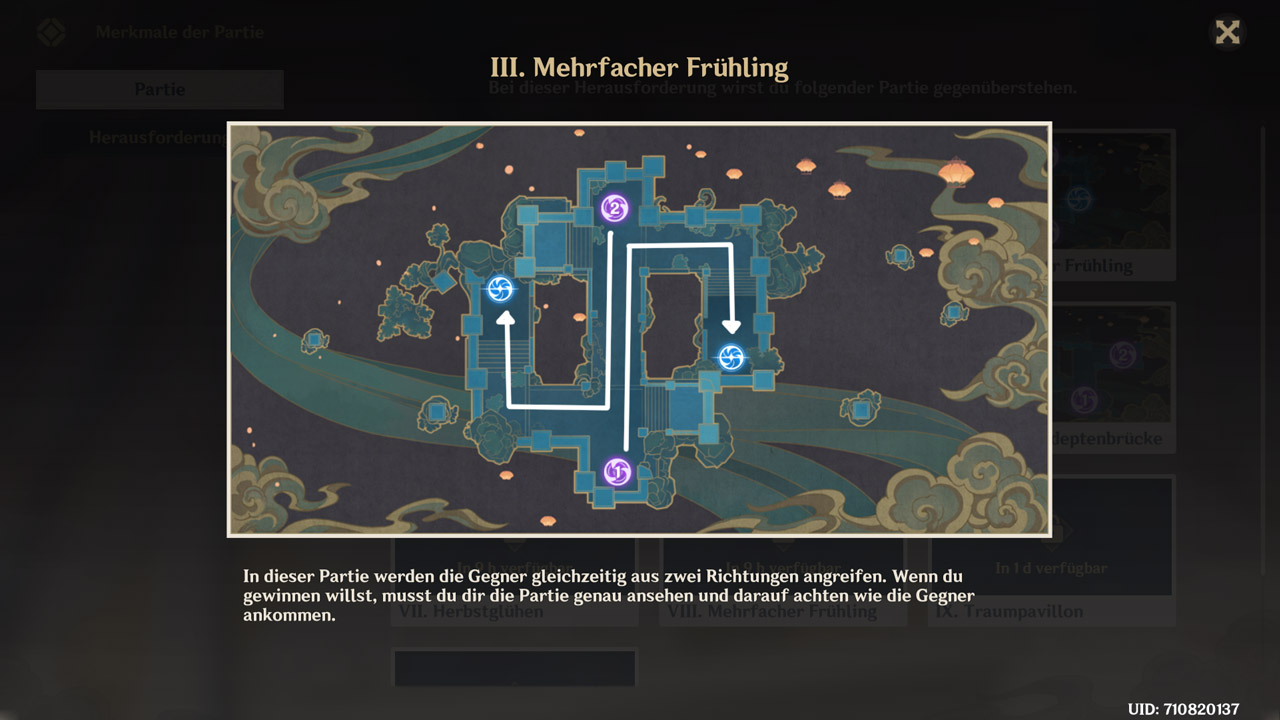
Tips for your possible victory:
- At the start, place a “Salvage Device – Charity” near the spot where enemies die. This depends on which devices you are using. Test this in the first phase and place the salvage device after the first Hilichurls are defeated. Usually, the spot is near the portals from which they come.
- Pyro devices for penetrating power against the final phases. Preferably in combination with Electro devices. Upgrade all with the remaining device points and always pay attention to the 1500-device points sticks.
- It’s best to place all devices in the middle lane, where both paths of enemies run parallel to one another.
- Optionally, you can place Anemo devices if you have pattern 1. Turn these in the opposite direction of both monster portals and you can watch the enemies being tossed back and forth.
Which enemies can appear in this stage? In this stage, two different patterns can appear. The last enemies determine which devices cannot be upgraded with lucky sticks. You can reset the pattern by leaving the match with Escape and re-entering.
Pattern 2 is easier to defeat than pattern 1, as the Mitachurls are fast on foot and might get away from the towers. Additionally, the upgrades for the strong Hydro and Electro devices are missing. Phase 1, with the Hilichurls, is the same for both patterns.
- Pattern 1:
- No Hydro and Electro sticks.
- Mitachurl with Fire Axe (Stonebreaker – Destroys all Geo devices in its vicinity every 15 seconds) and Mitachurl with Lightning Axe (Both: Fleetfooted – Particularly fast movement speed)
- Pattern 2:
- No Hydro and Anemo sticks
- Stone Hide Lawachurl (Stonebreaker – Destroys all Geo devices in its vicinity every 15 seconds)
Possible tower arrangement for victory

What approach was chosen? In the center, several Pyro and Electro devices were built and were only partially upgraded. The Cryo tower was there to slow down the enemies. Furthermore, at the beginning, in the vicinity of the enemy portals, a “Salvage Device – Charity” was placed, and later replaced with several Pyro and Electro devices. Some enemies could escape, yet the match ended successfully.
Ideally, so without escaped monsters, it would have been: Fewer devices and more upgrades directly at the start. The first two phases are very safe to complete with just two to three towers if things get tight, you can help with elemental abilities and a swordsman. In addition, no Cryo device and its upgrade are needed.
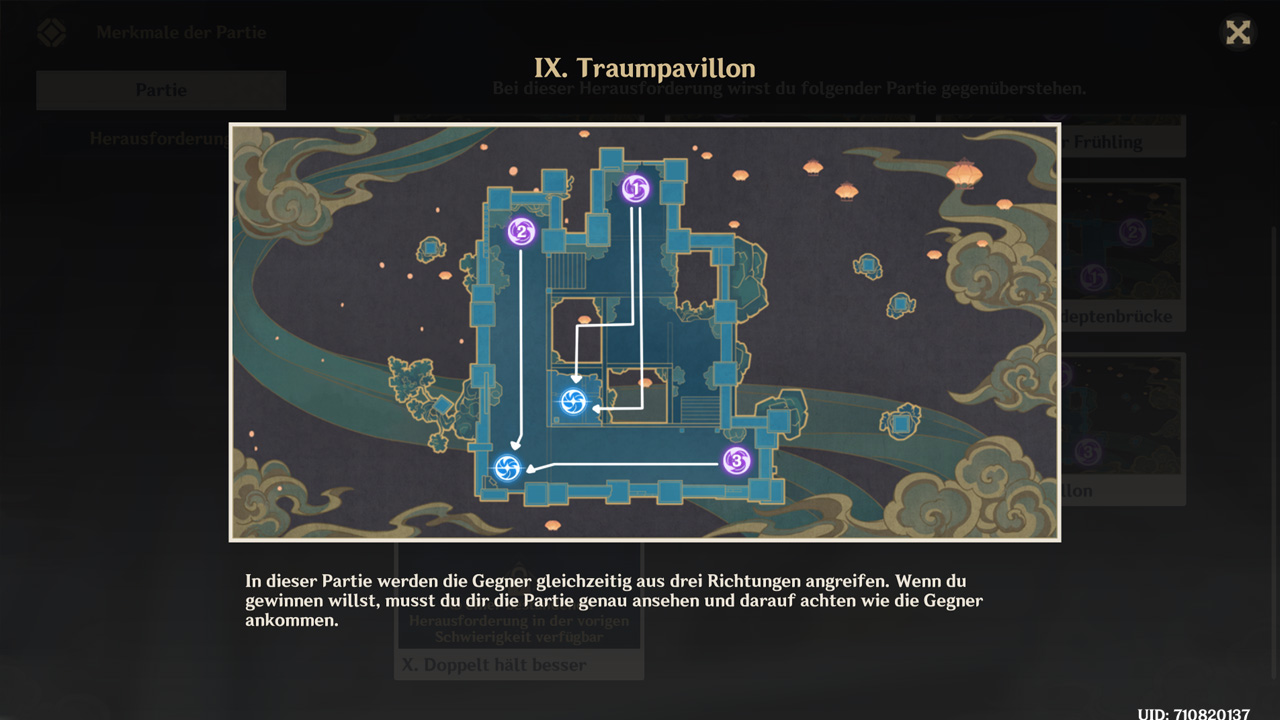
4th Stage: “Dream Pavilion”
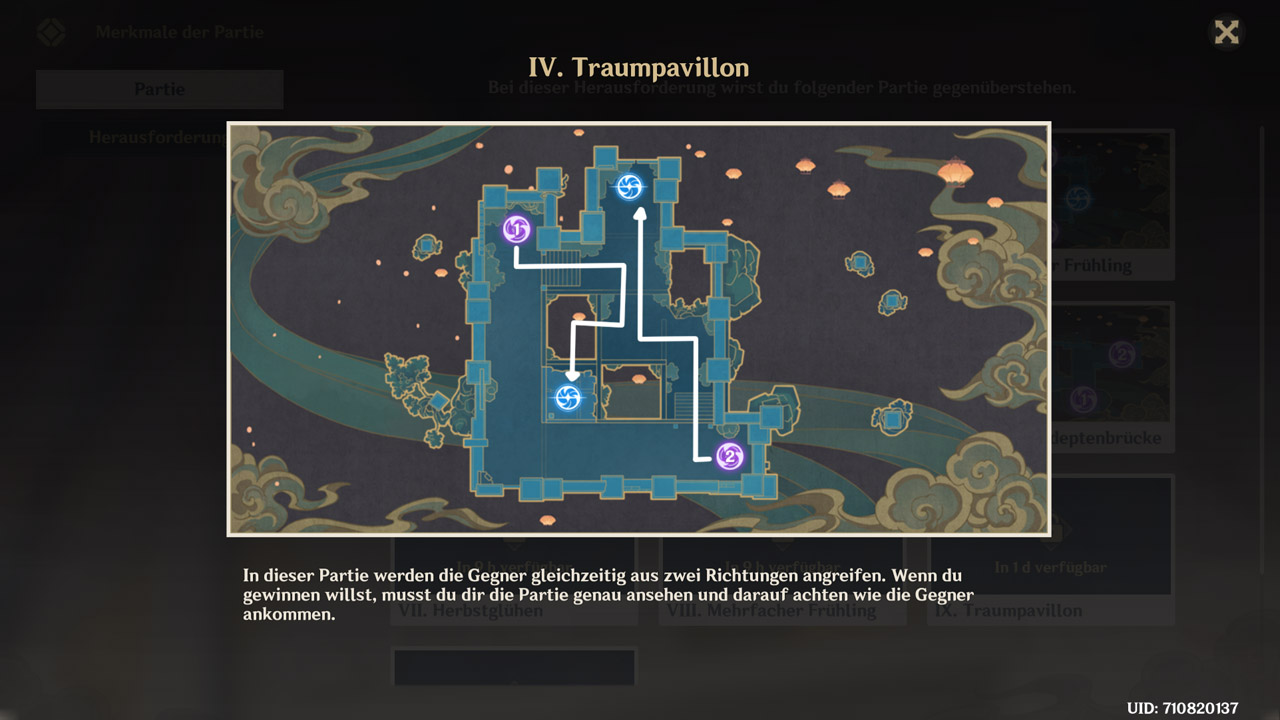
Tips for your possible victory: From now on, you can acquire the “Mystical Device – Arcanum”. This strengthens the devices around it and increases their attack by 50%.
- Place your devices in the center of the stage, preferably where both enemies must pass.
- At the start, place a “Salvage Device – Charity” in front of the steps below, where only four fields are available for building; in that area, many enemies should fall if you build just in the middle.
- Always upgrade your devices and always pay attention to the 1500-device points sticks. Also take the sticks that can upgrade Arcanum. The attack boost is particularly valuable.
- If you want to conquer pattern 1, Pyro and Electro devices and their upgrades are again recommended. If you want to master pattern 2, you can resort to Pyro and Cryo devices. Additionally, single Anemo devices are also helpful to toss back enemies and cause swirling damage.
- If necessary, add additional elemental devices in front of the stairs where you placed the salvage device.

Which enemies can appear in this stage? In this stage, two different patterns can appear. The last enemies determine which devices cannot be upgraded with lucky sticks. You can reset the pattern by leaving the match with Escape and re-entering.
Pattern 1 is easier to defeat than pattern 2 as the possible Cryo and Pyro combination in pattern 2 does not work as well as the possible Pyro and Electro combination in pattern 1. Phase 1 with the Hilichurls is the same for both patterns.
- Pattern 1:
- No Cryo and Hydro sticks.
- Frostarm Lawachurl (Stonebreaker – Destroys all Geo devices in its vicinity every 15 seconds)
- Pattern 2:
- No Hydro and Electro sticks.
- Lightning Helmet Lawachurl (Stonebreaker – Destroys all Geo devices in its vicinity every 15 seconds).
Possible tower arrangement for the perfect victory

What approach was chosen? It was reset as long as needed, until pattern 1 came up. Afterwards, Pyro and Electro devices were placed in the middle and could be upgraded directly with the 1500-device points sticks. Subsequently, the Arcanum devices were also upgraded, leading to everything running smoothly. Initially, a “Salvage Device – Charity” was placed in front of the steps to farm enough device points.
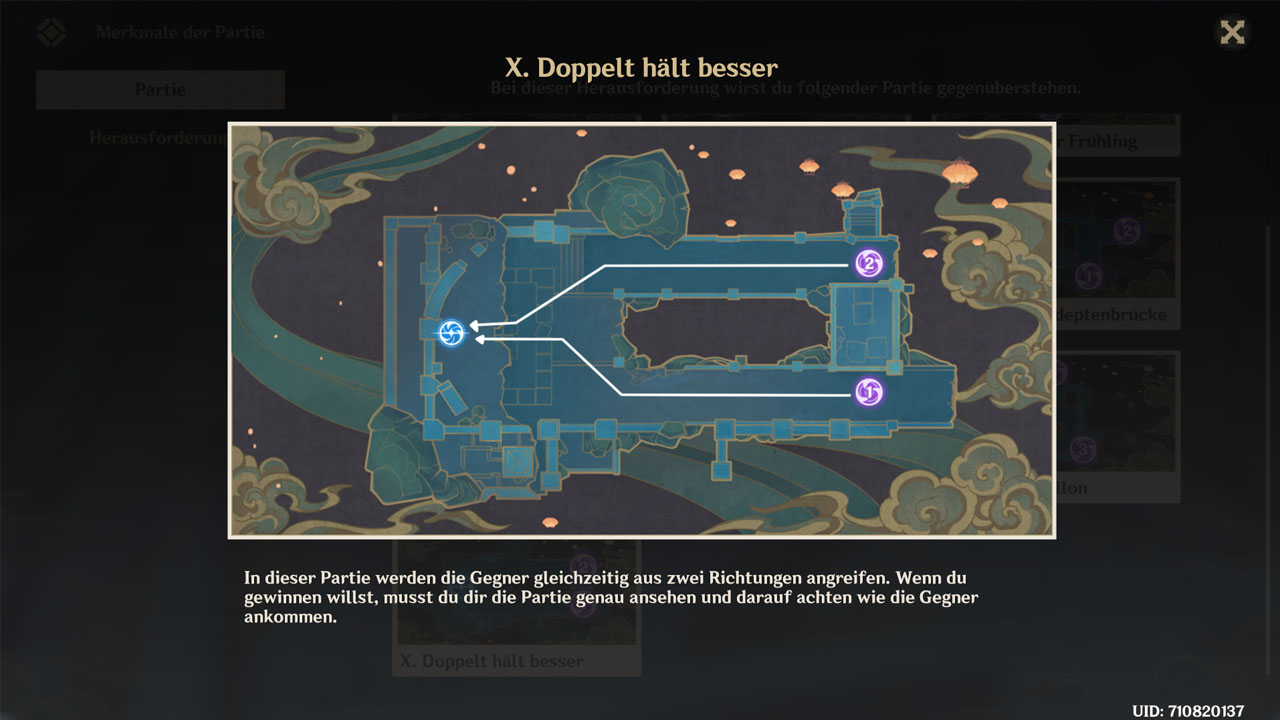
5th Stage: “Double Trouble”
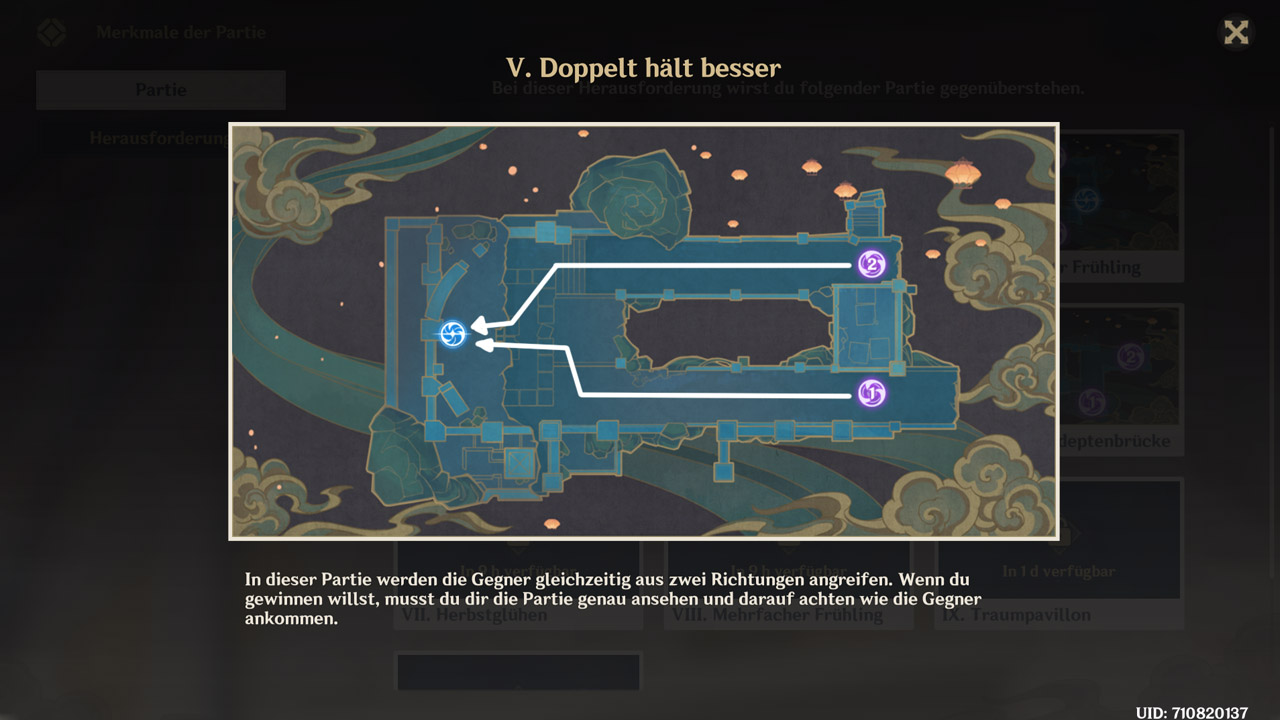
Tips for your possible victory: Stage 5 could be a bit tricky, as you should ideally place some devices directly in front of the blue portal. That’s where both enemy paths converge.
- At first, two to three towers are enough to keep the Hilichurls at bay.
- Place a “Salvage Device – Charity” in the direction of the path without stairs, where you can more easily gather device points.
- Pattern 2 is easier to defeat than pattern 1 because the Ruin Hunters can take a lot of damage and move incredibly fast. However, with many upgraded Hydro and Cryo/Electro devices and centrally placed Arcanum devices, this is feasible.
- You can overcome pattern 2 with both the Pyro and Electro device combination as well as especially with an Electro and Hydro device combination.
- Don’t forget to upgrade the towers with lucky sticks.
- If the devices in front of the blue gate are not sufficient, you can place additional devices below the steps, so you only have to pay attention to the path without stairs.
Which enemies can appear in this stage? In this stage, two different patterns can appear. The last enemies determine which devices cannot be upgraded with lucky sticks. You can reset the pattern by leaving the match with Escape and re-entering.
- Pattern 1:
- No Anemo and curious device sticks that have no elements.
- Ruin Hunter (Fleetfooted – Particularly fast movement speed).
- Pattern 2:
- No sticks for devices that do not contain elements.
- Ruin Colossus (Stonebreaker – Destroys all Geo devices in its vicinity every 15 seconds and Healing – Heals at 50% health if not defeated quickly).
Possible tower arrangement for the perfect victory

What approach was chosen? For the first phases, several Pyro and Electro devices were placed in front of the blue portal, reinforced by an Arcanum device. Furthermore, a “Salvage Device – Charity” was placed at the edge of the path. The devices were then upgraded. As it became necessary and the monsters advanced too far, new devices were built and at the end, some were also placed below the stairs. After retesting, the Hydro and Electro device combination performed better in both patterns.
6th Stage: “Restless Adept Bridge 2”
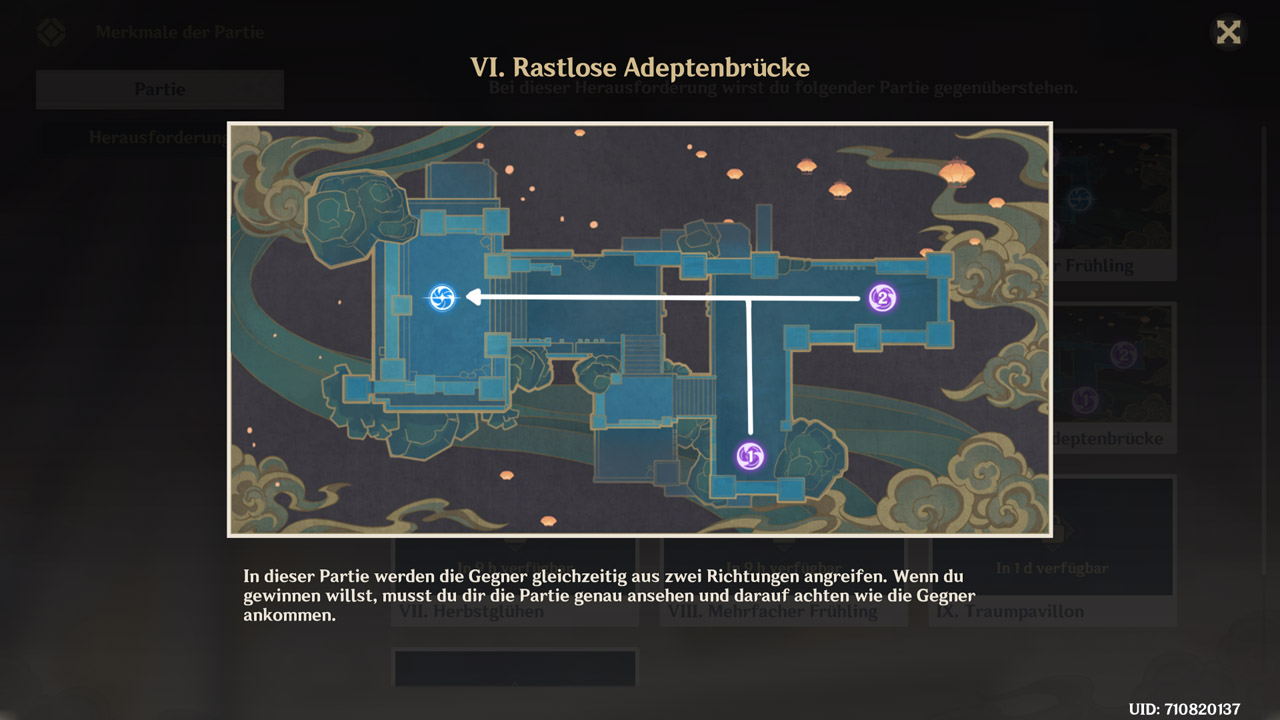
Tips for your possible victory:
- Place two “Salvage Device – Charity” in the directions of the two purple portals.
- Behind them, you can place Electro and Pyro devices with a central Arcanum device for pattern 1.
- For pattern 2, it is best to place Hydro and Cryo/Electro devices along with a centrally placed Arcanum device.
- If it gets too tight in both patterns, you can place additional elemental devices behind the yellow bridge and/or use the cube to disable the bridge briefly, once per phase.
Which enemies can appear in this stage? In this stage, two different patterns can appear. The last enemies determine which devices cannot be upgraded with lucky sticks. You can reset the pattern by leaving the match with Escape and re-entering.
Pattern 1 is easier to defeat than pattern 2 because the Ruin Hunters can take a lot of damage and move incredibly fast. Phase 1, with the Hilichurls, is the same for both patterns.
- Pattern 1:
- No Hydro and Anemo sticks.
- Stone Hide Lawachurl (Stonebreaker – Destroys all Geo devices in its vicinity every 15 seconds).
- Pattern 2:
- No Anemo and curious device sticks that have no elements.
- Ruin Hunter (Fleetfooted – Particularly fast movement speed).
Possible tower arrangement for the perfect victory

What approach was chosen? I received pattern 2. Hydro and Cryo devices were built gradually in the middle and behind the yellow bridge. Centrally stood an Arcanum device each time. Initially, two “Salvage Device – Charity” were placed towards the purple portals to gather device points. Both elements were heavily upgraded, causing the enemies to be permanently frozen and slow.
7th Stage: “Autumn Glow 2”
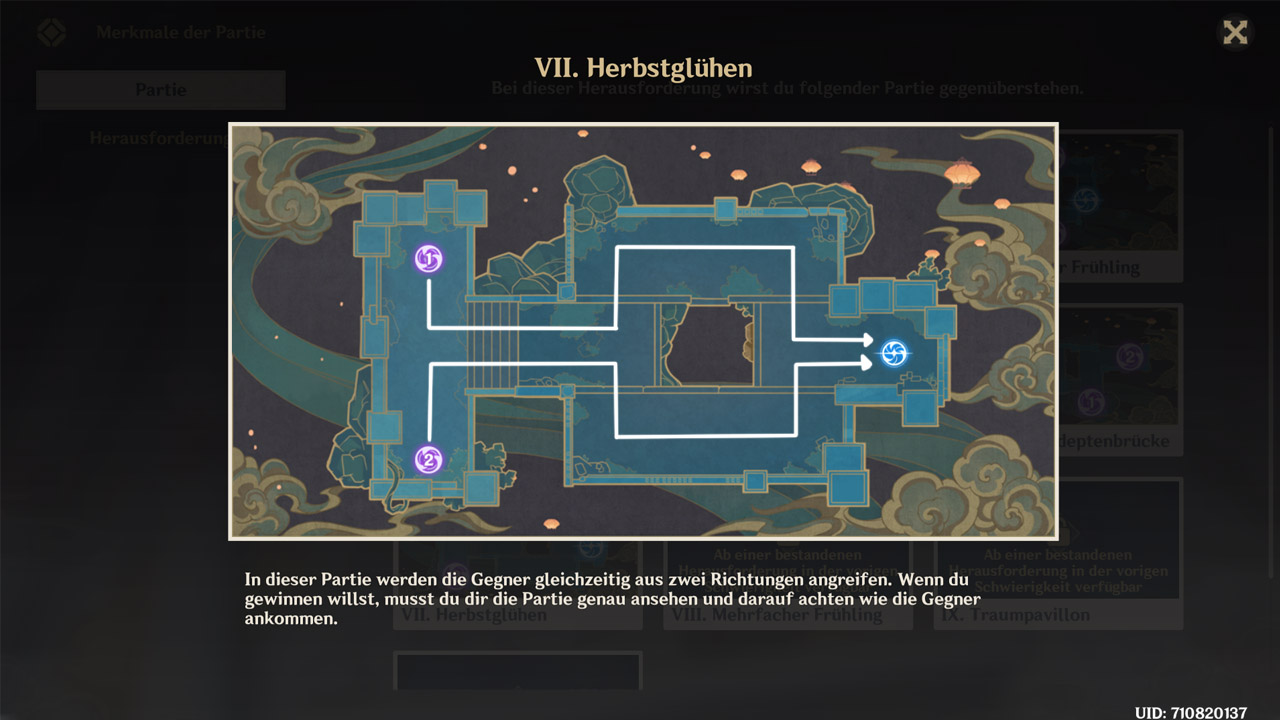
Tips for your possible victory:
- Build a “Salvage Device – Charity” at the spot where the enemies fall.
- In pattern 1, Pyro and Cryo devices in front of the stairs are recommended as both paths meet there. You can also set up Anemo towers to push back fast enemies.
- Pattern 2 can best be solved with Hydro and Cryo devices.
- Remember to upgrade your devices using Arcanum and/or sticks.
Which enemies can appear in this stage? In this stage, two different patterns can appear. The last enemies determine which devices cannot be upgraded with lucky sticks. You can reset the pattern by leaving the match with Escape and re-entering.
Pattern 1 is harder to master perfectly than pattern 2. Due to the mass of enemies and their speed, some enemies may be able to escape. Phase 1, with the Hilichurls, is the same for both patterns.
- Pattern 1:
- No Hydro and Electro sticks.
- Mitachurl with Fire Axe (Stonebreaker – Destroys all Geo devices in its vicinity every 15 seconds) and Mitachurl with Lightning Axe (Both: Fleetfooted – Particularly fast movement speed).
- Pattern 2:
- No Pyro and Electro sticks.
- Geo Dragon Lizard (Stonebreaker – Destroys all Geo devices in its vicinity every 15 seconds and Fire of Wrath).
Possible tower arrangement for the perfect victory

What approach was chosen? I intentionally chose pattern 2 as the previous stages were almost exclusively won with the Pyro and Electro combination. First, a “Salvage Device – Charity” was placed directly in front of the stairs on the lower level. Then, two Hydro and Cryo devices were added, rounded off with an Arcanum device in the middle. After that, the towers were upgraded as much as possible. As it became necessary, additional towers were built on the right and left side, but these were not needed after the Salvage Device was replaced by a Hydro Tower.
8th Stage: “Multiple Springs 2”

Tips for your possible victory: Stage 8 is the first that has three purple gates from which enemies escape. Unfortunately, the paths only meet just before the blue portal, requiring a slightly different strategy.
- Ideally, build two “Salvage Device – Charity” towards the third, as well as towards the first and second purple gates, to gather device points early.
- In pattern 1, you can use Hydro and Cryo, Hydro and Electro, or other combinations with Pyro. The Hydro and Electro combination is particularly successful.
- In pattern 2, you can choose a Cryo and Pyro combination. Additionally, Anemo devices can prove useful to push back fast enemies. Individual Hydro devices can pay off to hold enemies in place with the freezing effect through the combination with Cryo devices.
- Don’t forget to upgrade your devices with sticks and place Arcanum devices.
Which enemies can appear in this stage? In this stage, two different patterns can appear. The last enemies determine which devices cannot be upgraded with lucky sticks. You can reset the pattern by leaving the match with Escape and re-entering.
Pattern 2 is harder to master perfectly than pattern 1. Due to the mass of enemies and their speed, some enemies may escape. Phase 1, with the Hilichurls, is the same for both patterns.
- Pattern 1:
- No Anemo and curious device sticks that have no elements.
- Ruin Hunter (Fleetfooted – Particularly fast movement speed and Stonebreaker – Destroys all Geo devices in its vicinity every 15 seconds).
- Pattern 2:
- No Hydro and Electro sticks.
- Mitachurl with Fire Axe (Stonebreaker – Destroys all Geo devices in its vicinity every 15 seconds) and Mitachurl with Lightning Axe (Both: Fleetfooted – Particularly fast movement speed).
Possible tower arrangement for the perfect victory

What approach was chosen? I fought against pattern 1. At the beginning, “Salvage Device – Charity” was placed in both directions. Additionally, as many devices as possible were built close to the center and towards gate three. Electro devices predominated. Individual Hydro devices were only built for reactions. Until the third phase, only the initial towers were upgraded before new ones were added. In the last phase, the salvage devices were replaced with additional Electro devices to maximize damage.
9th Stage: “Dream Pavilion 2”
Tips for your possible victory: In addition to the three purple gates of Stage 8, a second blue portal is now added that you must protect.
- Place a “Salvage Device – Charity” in front of each purple gate and upgrade it. Make sure to give it the buff that restricts the movement speed of the enemies.
- For particularly fast enemies, you can place Anemo devices near the purple gates to hurl them back into the salvage devices.
- If this is not enough, you can also use the “Devil Device – Expulsion” as help.
- In pattern 1, Cryo and Hydro combinations have the advantage.
- In pattern 2, Electro and/or Pyro devices can be beneficial as attack towers. Pay attention to the Pyro-Geo stick during upgrades.
- Pattern 3 can best be mastered with Pyro devices as the attacking variant.
- In the last phase of all patterns, make sure to remove shields and replace them with attack towers, as the final bosses do not bounce off them.
Which enemies can appear in this stage? In this stage, three different patterns can appear for one time only. The last enemies determine which devices cannot be upgraded with lucky sticks. You can reset the pattern by leaving the match with Escape and re-entering.
Patterns 2 and 3 can be completed most easily, as in pattern 1, you must do without strong attack towers. Phase 1, with the Hilichurls, is the same for all patterns.
- Pattern 1:
- No Pyro and Electro sticks.
- Geo Dragon Lizard (Stonebreaker – Destroys all Geo devices in its vicinity every 15 seconds and Fire of Wrath).
- Pattern 2:
- No Hydro and Anemo sticks.
- Stone Hide Lawachurl (Stonebreaker – Destroys all Geo devices in its vicinity every 15 seconds and Energy Drain – All curious devices affected by this attack cannot perform their base attacks. Happens every 30 seconds).
- Pattern 3:
- No Hydro and Electro sticks.
- Lightning Helmet Lawachurl (Stonebreaker – Destroys all Geo devices in its vicinity every 15 seconds).
Possible tower arrangement for the perfect victory

Phase 1-4 
Phase 5
What approach was chosen? As the fast enemies escaped repeatedly and the restraints were insufficient, “Devil Device – Expulsion” was placed in front of all purple gates. Additionally, an Anemo device was built in front of gate two and three, while two were erected at gate one. The highest monster population occurs at gate one, requiring more towers for defense.
As an attack method, Pyro devices were used, which were deployed as soon as an enemy could escape the shield and Anemo tower. The most important part of the setup were the “Salvage Device – Charity” at each purple gate. It was extremely important to invest in at least one to two upgrades that reduce the enemies’ movement speed by 20%. In phase five, all devices that were not Pyro devices were replaced, except for the salvage devices.
10th Stage: “Double Trouble 2”
Tips for your possible victory:
- Adjust your devices to the different monster types at the two gates. This means that you should build Hydro and/or Electro devices below the stairs, for example, against Pyro enemies.
- “Devil Device – Expulsion” in combination with “Salvage Device – Charity” and/or Anemo devices can keep fast enemies at bay.
- Set up more towers in front of the blue portal, as both paths that the enemies take meet there.
- In pattern 1 and 2, you are well equipped with Hydro and Pyro devices.
- Make sure to upgrade all your devices. If you use the Devil device, you can exclude it from upgrades as it should be exchanged in the last phase.
Which enemies can appear in this stage? In this stage, two different patterns can appear. The last enemies determine which devices cannot be upgraded with lucky sticks. You can reset the pattern by leaving the match with Escape and re-entering.
This time, you need to be aware that gate one and two send different types of monsters to the battlefield. Phase 1, with the Hilichurls, is the same for all patterns and gates.
- Pattern 1:
- No Anemo and curious device sticks that have no elements.
- Gate 1: Lightning Helmet Lawachurl (Stonebreaker – Destroys all Geo devices in its vicinity every 15 seconds).
- Gate 2: Geo Dragon Lizard (Stonebreaker – Destroys all Geo devices in its vicinity every 15 seconds).
- Pattern 2:
- No Electro and curious device sticks that have no elements.
- Gate 1: Frostarm Lawachurl (Stonebreaker – Destroys all Geo devices in its vicinity every 15 seconds).
- Gate 2: Geo Dragon Lizard (Stonebreaker – Destroys all Geo devices in its vicinity every 15 seconds).
Possible tower arrangement for the perfect victory

What approach was chosen? The first two phases were completed with few devices. First, a few Pyro devices were set along with salvage devices. The salvage devices had upgrades that increased their range and slow the enemies by 40%. As different monsters with different elements came out of both gates, additional Hydro devices were built on the appropriate side. During the match, more towers were added until the maximum number of 14 was reached. In the last phase, all devices that did not have the element Pyro or Hydro were exchanged. The salvage devices were excluded.
Rewards

What rewards are there? In addition to Mora, original stones, EXP cards, and materials to enhance talents, there is a name card for your profile that you can’t get otherwise. The green coins (“Wondrous Talisman”) to buy rewards at the action trader can be obtained by mastering the challenges under “Action Rewards” in the event tab.
All name cards that the community has been able to receive at events so far were event-specific. If you are a collector, you have until August 26 to grab this card.
Did you enjoy the guide or was something unclear? What do you think of this event? Do you like this kind of mini-games or would you wish for something else? Feel free to write it in the comments below.

Your opinion is important to us!
Do you like the article? Then let us know!