

The MMORPG The Elder Scrolls Online (ESO) now offers you a choice of up to 6 classes to choose from. In this guide, we want to show you some Magicka builds that will help you master the beginnings of ESO.

What is this about? In a series of guides, we want to introduce you to builds that beginners can use to start well in ESO. In this first article, everything revolves around Magicka builds. As a Magicka player, you focus on magical damage, taking on the role of a DD (Damage Dealer) and can thus perform well in the open world and in dungeons.
In this guide, we want to explain to you how the various builds work. Not only the choice of classes is important, but also that of races. In this guide, you will find out which race is best suited for which role.
In upcoming guides, we will cover the following topics:
Before we really dive into the guide, we want to briefly introduce some important vocabulary that will be used throughout the guide and in the game.

Important vocabulary you should know for this guide
- What is a Dot? This refers to a skill that causes damage over time (Damage over Time = DoT). The enemy cannot dodge it like area attacks by changing position.
- What is an Execute? These refer to skills that deal exceptionally high damage when the target has low health.
- What is a Spammable? This term describes a skill that does not deal damage over time and can be used frequently in succession, i.e., “spammed”. It primarily deals initial damage and is used whenever area attacks or DoTs do not need to be applied.
- What does the word Morph mean? This refers to a different version of a skill. In ESO, you have the option to change a skill (morph) once it reaches level IV. You then have 2 selectable options that differ slightly.
- What does prebuffing mean? This refers to preparing for a fight. Before it begins, you activate abilities that grant you buffs (advantages) from the start.
Skills for the Magicka Damage Dealer (DD)
DDs can be built following a fairly similar scheme regardless of the class. On the back bar (2nd skill bar), you play a two-handed weapon or fire staff, and for the front bar (1st skill bar), you can use daggers or a fire staff. Daggers have less range but are stronger.
Daggers can also be used for AOE damage (area damage). However, you have to stand right in the middle of the add groups. The fire staff or lightning staff is a bit safer, but also somewhat weaker. With the fire staff, you have increased damage on single targets. The frost staff is mainly played by tanks or healers in PvE.
Since the overhaul of the champion point system with the Update 29 – Flames of Ambition, Magicka DDs can again play with daggers on the front bar, but that becomes relevant only in the endgame for you.
For beginners, I recommend a build with a fire staff on both the front and back bar.
You use your attribute points solely to increase your Magicka.
Magicka Nightblade
The Magicka Nightblade is quite practical in the open world due to its good self-heal (self-healing abilities) and its ability to become invisible. Here are the skills you can use for this situation:
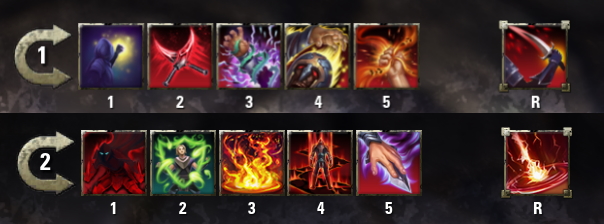
On the 1st bar (front bar):
- 1: Inner Light (Mage’s Guild): Increases your maximum Magicka by 7% and gives you the buff greater prophecy: Increases critical damage rating for magic hits, i.e., your chance to deal critical damage. However, you do not need to activate the skill, but simply equip it. Activating the skill reveals hidden enemies, which is only interesting in PvP.
- 2: Impale (Assassination): This skill deals magic damage. Additionally, enemies with less than 25% health take 300% additional damage. This skill is therefore a very strong execute.
- 3: Crippling Grasp (Siphoning): You deal magic damage once and then every 2 seconds for 10 seconds, additional magic damage. Additionally, the target’s movement speed is reduced by 30%.
- 4: Soul Harvest (Siphoning): This is your spammable. You deal magic damage each time and heal yourself every 2 seconds for 35% of the damage dealt in the next 10 seconds.
- 5: Relentless Focus (Assassination): You use this skill before you enter combat. With each light & heavy attack, you increase your critical damage and healing by up to 5 times by 2%. After 5 light or heavy attacks, you can reactivate the skill. This will fire a projectile that deals magic damage and heals you for 50% of the damage dealt. However, once the opponent’s health falls below 25%, you should no longer use the skill for the projectile.
- R: Soul Reaping (Assassination): Deals magic damage and increases your damage dealt for 6 seconds by 11%. Additionally, you debuff the opponent with this effect: “Greater Scorn”, reducing healing applied to them by 16%. As long as this skill is equipped, you gain 10 ultimate power for each killing blow.
On the 2nd bar (back bar):
- 1: Shadow Cloak (Shadow): You become invisible for 3 seconds. During this time, your next attack is guaranteed to critically hit. Your crit chance is thus 100%.
- 2: Suppressive Magic (Light Armor): You receive a damage shield for 6 seconds that absorbs a certain amount of damage. However, the damage shield can reach a maximum value of 60% of your maximum health. You can increase the amount of damage absorbed through each piece of light armor.
- 3: Unstable Elemental Wall (Destruction Staff): An area damage in front of you that deals magic damage every second for 10 seconds. After that, it explodes, dealing additional magic damage. You can thus also use it as a spammable since the wall keeps exploding every time you reapply it.
- 4: Whirling Path (Shadow): An area attack in front of you that deals magic damage every second in the area. Additionally, you receive the buff: Greater Alacrity, which increases your movement speed by 30% in the area.
- 5: Siphoning Attacks (Siphoning): When you activate this skill, your light and heavy attacks heal you and restore Magicka. If the skill expires or you reactivate it, you regain additional Magicka. The longer the skill was active, the more Magicka you get back.
- R: Elemental Wrath (Destruction Staff): You place an area that deals magic damage for 2 seconds over 7 seconds. Using a fire staff increases the damage by 15%.
However, you will only unlock elemental wrath after reaching level 50 of the destruction staff skill line. Until then, you can simply use soul harvest on both bars.
Make sure to always have a skill from the siphoning skill line on the front bar. A passive ability in this tree increases your maximum Magicka.
When you unlock damage-dealing skills, you can replace defensive skills like shadow cloak or suppressive magic with them. You will find further info on the following: Additional skill lines and skills for Magicka DDs.
Additionally, the following skills from the class trees will also become interesting once you have unlocked them:
- Essence Drain (Siphoning): A strong area damage that heals you at the same time. You use it as a spammable. Alternatively, you can also use the Elemental Ring and use Essence Drain once beforehand for a buff: Greater Brutality & Greater Sorcery – Increases your magic & weapon power by 20%.
- Dark Shade (Shadow): You summon a shade that assists you in combat with single-target & area attacks. Additionally, it debuffs affected enemies, reducing damage they take by 5% for 4 seconds.

The ultimate compendium for ESO Blackwood
148 pages of guides for new and returning players, including free extra: ESO main game, Morrowind, and 25% off Blackwood at Gamesplanet.
Magicka Templar
Many players associate the Templar solely with the healer role. However, this is a rather outdated view. Any class can be used as a DD, and strength depends on each patch. The Magplar (short for Magicka Templar) is quite enjoyable to play in the open world due to its spammable. This skill deals area damage while healing you at the same time.
Here are the skills I recommend for you to start:

On the 1st bar (front bar):
- 1: Inner Light (Mage’s Guild): Increases your maximum Magicka by 7% and gives you the buff greater prophecy: Increases critical damage rating for magic hits, i.e., your chance to deal critical damage. However, you do not need to activate the skill, but simply equip it. Activating the skill reveals hidden enemies, which is only interesting in PvP.
- 2: Purifying Light (Dawn’s Wrath): You deal magic damage. After 6 seconds, you deal additional damage equal to 20% of the damage you inflicted on the opponent during that time. Additionally, you heal yourself and your allies every 2 seconds for 6 seconds.
- 3: Breath of Light (Restoring Light): You heal yourself or an ally with the lowest health. You also heal another target.
- 4: Piercing Strike (Aedric Spear): You use this skill as a spammable. It deals magic damage and a portion of the magic damage to nearby enemies. You also reduce the target’s movement speed and heal yourself for 40% of the damage dealt.
- 5: Radiant Suppression (Dawn’s Wrath): You deal magic damage for 1.8 seconds. On opponents with less than 50% health, you deal 480% more damage and heal yourself for 20% of the damage you deal. This skill is therefore a very strong execute.
- R: Sickle Strike (Aedric Spear): You deal single-instance magic damage to nearby enemies around you and deal additional magic damage every 2 seconds for the next 6 seconds. Opponents in front of you take 35% more damage.
On the 2nd bar (back bar):
- 1: Suppressive Magic (Light Armor): You receive a damage shield for 6 seconds that absorbs a certain amount of damage. However, the damage shield can reach a maximum value of 60% of your maximum health. You can increase the amount of damage absorbed through each piece of light armor.
- 2: Unstable Elemental Wall (Destruction Staff): An area damage in front of you that deals magic damage every second for 10 seconds. After that, it explodes, dealing additional magic damage. You can thus also use it as a spammable since the wall keeps exploding every time you reapply it.
- 3: Vampiric Curse (Dawn’s Wrath): You deal flame damage once and leave a DoT with flame damage that deals damage to the opponent for 14 seconds. Additionally, you gain the buff: Greater Prophecy, which increases your crit chance.
- 4: Flaming Spear (Aedric Spear): Deals single-instance magic damage and additional magic damage every 10 seconds. Allies can use the Blessed Shard synergy to restore Magicka/Stamina.
- 5: Solar Eruption (Dawn’s Wrath): You deal magic damage every 2 seconds for 8 seconds. You also receive the buff: Empower, which increases the damage of your light and heavy attacks.
- R: Solar Prison (Dawn’s Wrath): Area damage that deals magic damage every 8 seconds. Additionally, allies can use the synergy to deal additional magic damage and stun opponents in the area for 5 seconds.
Once you reach level 50 on the destruction staff, you can swap Solar Prison for Elemental Wrath. This increases your damage output. Additionally, the following class skills will also become important once they are unlocked:
- Ritual of Retribution (Restoring Light): Area damage over time that increases gradually. Allies can also cleanse themselves with the synergy.
- Concentrated Focus (Restoring Light): You gain greater resolve: Increased physical and magical resistance. You also receive resources back. As long as you are within the placed rune, the resistance is increased by 50%.
Magicka Sorcerer
The Magicka Sorcerer is often regarded as a good beginner’s combination. However, I personally wouldn’t necessarily agree with that. It has very strong self-healing and can summon 2 companions that partially absorb damage.
So if you prefer to learn with less difficulty, then maybe a class like the Nightblade or a stamina character is right for you. Here are the skills I suggest for you to start:
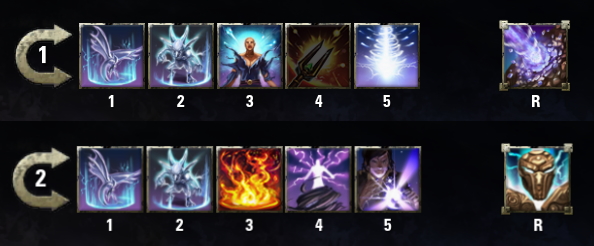
On the 1st bar (front bar):
- 1: Twilight Wraith (Daedric Summoning): You summon a Twilight Wraith that deals shock damage. By reactivating the ability, it deals 53% more damage to enemies with more than 50% health for 15 seconds. You activate this skill only until the enemy has lost half of its health.
- 2: Exploding Atronach (Daedric Summoning): You also summon this companion before the fight starts. It deals shock damage. By reactivating the ability, it deals additional area damage every 2 seconds for the next 10 seconds. The last impulse stuns affected enemies for 3 seconds.
- 3: Daedric Prey (Daedric Summoning): You place a curse on the opponent that deals magic damage after 6 seconds. Nearby enemies will also be hit with a portion of the magic damage. While the curse is active, your companions deal 11% additional damage. This skill is therefore worth it exclusively when playing with pets.
- 4: Power Surge (Destruction Staff): Deals damage of all elements and hits nearby enemies with magic damage. This skill is your spammable.
- 5: Crystal Fragments (Dark Magic): This skill has an actual casting time. However, each Magicka ability has a 35% chance to ignore this cast time. You only use this skill when this happens. You notice this because the skill changes in your bar. You can also use Add-ons like Srendarr for assistance.
- R: Starfall (Mage’s Guild): You allow a comet to fall that causes flame damage in the effective area and stuns enemies for 2 seconds. Additionally, the enemies take Flame damage every second for 11 seconds, and you gain 12 ultimate power for each hit enemy.
On the 2nd bar (back bar):
- 1: Twilight Wraith (Daedric Summoning): You summon a Twilight Wraith that deals shock damage. By reactivating the ability, it deals 53% more damage to enemies with more than 50% health for 15 seconds. You will activate this skill only until the enemy has lost half of its health.
- 2: Exploding Atronach (Daedric Summoning): You also summon this companion before the fight starts. It deals shock damage. By reactivating the ability, it deals additional area damage every 2 seconds for the next 10 seconds. The last impulse stuns affected enemies for 3 seconds.
- 3: Unstable Elemental Wall (Destruction Staff): An area damage in front of you that deals magic damage every second for 10 seconds. After that, it explodes, dealing additional magic damage. You can thus also use it as a spammable since the wall keeps exploding every time you reapply it.
- 4: Boundless Storm (Stormcalling): You deal shock damage to nearby enemies every second for 23 seconds. You also receive the buff: Greater Resolve, which increases your physical and magical resistance. The buff: Greater Alacrity grants you 30% increased movement speed for 4 seconds.
- 5: Critical Surge (Stormcalling): You receive the buff: Greater Brutality / Greater Sorcery, which increases your magic & weapon power by 20%. Additionally, you heal yourself for every second in connection with your critical damage dealt.
- R: Greater Storm Atronach (Daedric Summoning): You summon a storm atronach that deals 1630 shock damage at the chosen position and stuns enemies for 3 seconds. Each second, it deals 815 shock damage to a foe for 28 seconds. An ally can activate the synergy “Charged Lightning”. As a result, both the Atronach and the ally receive the buff: Greater Frenzy, which increases the damage dealt by 8% for 8 seconds.
The Starfall can only be unlocked at rank 10 of the Mage’s Guild. Until then, you can play the Greater Storm Atronach on both bars. You summon the pets (Twilight Wraith and Explosive Atronach) before the fight begins. To deal additional damage, you must continually reactivate them.
These skills will also become important for the Magcro:
- Daedric Minefield (Dark Magic): You place 5 mines that explode after 3 seconds. They deal magic damage and immobilize enemies.
- Bound Aegis (Daedric Summoning): This skill increases your maximum Magicka by 11% while equipped. Additionally, you can absorb greater incoming damage by activating it.
Magicka Dragon Knight
The MagDK (short for Magicka Dragon Knight) is a Magicka class that has strikingly many melee skills. These are skills with short range. And it has many DoTs (skills that cause damage over time). The skills sometimes feel somewhat sluggish as you have to play them well-controlled.
In other classes, you can often hammer on the keys until the global cooldown is finished and the skill is triggered. I would not recommend this approach for this class. It is not uncommon for skills like the Eruption to be accidentally used twice.
Here are the skills I recommend for the beginning:
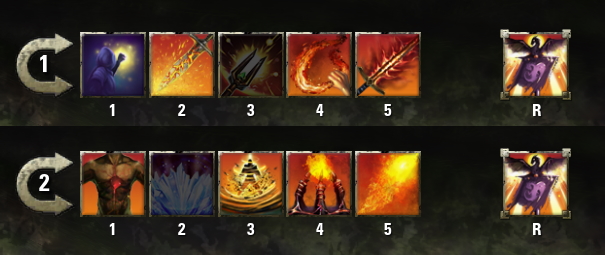
On the 1st bar (front bar):
- 1: Inner Light (Mage’s Guild): Increases your maximum Magicka by 7% and gives you the buff greater prophecy: Increases critical damage rating for magic hits, i.e., your chance to deal critical damage. However, you do not need to activate the skill, but simply equip it. Activating the skill reveals hidden enemies, which is only interesting in PvP.
- 2: Eruptive Weapons (Draconic Might): You gain the buff greater brutality and greater sorcery: Increases weapon & magic power by 20%.
- 3: Power Surge (Destruction Staff): Deals damage of all elements and hits nearby enemies with magic damage. You use this skill if you can’t reach enemies with the molten whip or if several enemies are in front of you. Additionally, you need to level the destruction staff’s skill line, and to do that, you must equip a skill from the line.
- 4: Molten Whip (Consuming Flames): This is your spammable. It deals flame damage. If you previously used another skill from the same line on the same bar, the damage of the next whip increases and your magic power rises. At first, it’s more important that you have one skill equipped from each skill line of the Dragon Knight class. You only level up in the skill line when the skill is in your bar while gaining experience points.
- 5: Burning Embers (Consuming Flames): You deal initial flame damage and flame damage that deals damage over 10 seconds. Simultaneously, you heal for 75% of the damage dealt when the effect ends. Affected enemies will be burned.
- R: Standards of Power (Consuming Flames): You create an area where enemies take flame damage every second for 16 seconds. Additionally, you debuff them with the negative effect: Greater Shame, which reduces the healing and life regeneration applied to them by 16%. If you are within the area of the standard, your damage is increased by 15%, and the damage taken is reduced by 15%. Allies can use the binding synergy to deal additional flame damage in the area and immobilize enemies for 5 seconds.
On the 2nd bar (back bar):
- 1: Coagulating Blood (Draconic Might): You heal for a fixed amount of health. You receive additional healing depending on your missing health up to 33%. You also gain the buff greater bravery, which increases your health regeneration by 40% for 20 seconds.
- 2: Unstable Elemental Wall (Destruction Staff): An area damage in front of you that deals magic damage every second for 10 seconds. After that, it explodes, dealing additional magic damage. You can thus also use it as a spammable since the wall keeps exploding every time you reapply it.
- 3: Eruption (Draconic Might): An area-based ability that deals flame damage every second and reduces the movement speed of enemies by 70%. There is also initial damage.
- 4: Burning Talons (Draconic Might): You deal initial flame damage and follow-up flame damage for 4 seconds. Simultaneously, you immobilize enemies for 4 seconds. Allies can use the Ignition synergy to deal additional magic damage to immobilized enemies.
- 5: Enveloping Flames (Consuming Flames): You deal initial flame damage and additional flame damage over 10 seconds. Affected enemies receive up to 10% additional flame damage if they are already under the effect of flame damage.
- R: Standards of Power (Consuming Flames): You create an area where enemies take flame damage every second for 16 seconds. Additionally, you debuff them with the negative effect: Greater Shame, which reduces the healing and life regeneration applied to them by 16%. If you are within the area of the standard, your damage is increased by 15%, and the damage taken is reduced by 15%. Allies can use the binding synergy to deal additional flame damage in the area and immobilize enemies for 5 seconds.
Once you reach rank 50 on the destruction staff, you can exchange Solar Prison for Standards of Power. This way, your damage increases. Additionally, the following class skills will become essential once unlocked:
- Ritual of Vengeance (Restoring Light): Area damage over time that increases gradually. Allies can cleanse themselves with the synergy.
- Concentrated Focus (Restoring Light): You gain greater resolve: Increased physical and magical resistance. You also receive resources back. As long as you are within the placed rune, the resistance is increased by 50%.
Magicka Warden
These skills can be used at the beginning with a Magden (short for Magicka Warden):

On the 1st bar (front bar):
- 1: Inner Light (Mage’s Guild): Increases your maximum Magicka by 7% and gives you the buff greater prophecy: Increases critical damage rating for magic hits, i.e., your chance to deal critical damage. However, you do not need to activate the skill, but simply equip it. Activating the skill reveals hidden enemies, which is only interesting in PvP.
- 2: Power Surge (Destruction Staff): Details damage of all elements and hits nearby enemies with magic damage. This skill is used when there are multiple enemies in front of you and you need to level the destruction staff skill line, equipping a skill from the line.
- 3: Wrath of Winter (Winter’s Embrace): This is an area attack that deals frost damage every second for 12 seconds. Additionally, it reduces the movement speed of enemies within the area by 30% for 3 seconds. You also have an increased chance to freeze enemies.
- 4: Screeching Cliffrunner (Animal Companions): This is your spammable. It deals magic damage. At a distance of 7m, you also knock the target off balance. The farther away you are, the more damage this skill deals. You can thus increase your damage by up to 15%.
- 5: Improved Growth (Green Balance): You heal yourself and allies in front of you. Allies also receive the buff: Lesser Intellect & Lesser Stamina. This increases Magicka & Stamina regeneration by 20%.
- R: Eternal Guardian (Animal Companions): You summon a bear. You can do this before the fight starts. The bear deals magic damage and stuns enemies for 2 seconds. For 75 ultimate power, you can reactivate the bear. This activates the ability “Wrath of the Guardian,” and the bear deals additional magic damage. Additionally, targets with less than 25% health take 100% additional damage. The eternal guardian serves as an execute.
On the 2nd bar (back bar):
- 1: Suppressive Magic (Light Armor): You gain a damage shield for 6 seconds that absorbs a certain amount of damage. However, the damage shield can reach a maximum value of 60% of your maximum health. You can increase the amount of damage absorbed through each piece of light armor.
- 2: Soul Trapping (Soul Magic): Deals magic damage to your target and additional enemies over 10 seconds. This damage is dependent on the highest offensive value.
- 3: Unstable Elemental Wall (Destruction Staff): An area damage in front of you that deals magic damage every second for 10 seconds. After that, it explodes, dealing additional magic damage. You can thus also use it as a spammable since the wall keeps exploding every time you reapply it.
- 4: Deep Rift (Animal Companions): After 3 seconds, you deal area damage in front of you. Additionally, you debuff enemies in the area with the negative effect: Greater Rift, reducing their physical resistance and magic resistance for 6 seconds.
- 5: Corrupted Infection (Animal Companions): You deal magic damage to the opponent for 10 seconds. Every second activation of the skill deals 29% additional damage. Additionally, the opponent is debuffed with: Lesser Vulnerability, increasing the damage they take by 5%.
- R: Eternal Guardian (Animal Companions): You summon a bear. You can do this before the fight starts. The bear deals magic damage and stuns enemies for 2 seconds. For 75 ultimate power, you can reactivate the bear. This activates the ability “Wrath of the Guardian,” and the bear deals additional magic damage. Additionally, targets with less than 25% health take 100% additional damage. The eternal guardian serves as an execute.
Magicka Necromancer
The MagCro (short for Magicka Necromancer) is characterized by strong area damage. The necromancer is the most recent class in ESO. Their ultimate ability applies a strong debuff to enemies. Therefore, raid groups often seek necromancers. If you master this class well, you will be in high demand.
Be cautious with the necromancer when you’re in a city. Some necromancer skills are frowned upon and considered a crime. You receive a bounty if you’re seen doing so.
For starting, I recommend the following skills:

On the 1st bar (front bar):
- 1: Power Surge (Destruction Staff): Deals damage of all elements and hits nearby enemies with magic damage. This skill is used if you can’t reach enemies with the molten whip or if several enemies are positioned in front of you. Additionally, you need to level the destruction staff’s skill line, and you must have a skill equipped from that line.
- 2: Resistant Flesh (Living Death): You heal yourself and an ally. However, you apply a debuff to yourself: Lesser Scorn, which reduces your healing received and your health regeneration by 8%. For 3 seconds, you grant the target physical resistance and magic resistance.
- 3: Pursuing Bone Exploder (Grave Lord): You summon a flaming skeleton that runs towards the target after 2.5 seconds and explodes. It deals flame damage to all nearby enemies. The explosion damage increases by 10% per second up to a maximum of 50% when the skeleton rushes to the target. It leaves a corpse behind and is considered a crime.
- 4: Transverse Skull (Grave Lord): This is your spammable. You deal flame damage. Every third execution deals 20% increased damage and jumps to up to 2 nearby enemies.
- 5: Detonating Siphon (Grave Lord): You absorb energy from a corpse, allowing you to deal damage in the area between you and the corpse for 12 seconds.
- R: Starfall (Mage’s Guild): You let a comet fall that deals flame damage in the effective area and stuns enemies for 2 seconds. Additionally, enemies take flame damage every second for 11 seconds, and you gain 12 ultimate power for each enemy hit. If you haven’t unlocked this skill yet, then use the Colossus on both bars.
On the 2nd bar (back bar):
- 1: Skeleton Arcanist (Grave Lord): You summon a skeleton mage that attacks the nearest enemy for 16 seconds. It deals 596 shock damage every 2 seconds and counts as a crime.
- 2: Unstable Elemental Wall (Destruction Staff): An area damage in front of you that deals magic damage every second for 10 seconds. After that, it explodes, dealing additional magic damage. You can thus also use it as a spammable since the wall keeps exploding every time you reapply it.
- 3: Devouring Graveyard (Grave Lord): You deal frost area damage for 10 seconds. Additionally, you debuff enemies within the area with the effect: Greater Rupture, reducing their physical resistance and magic resistance. Consuming a corpse causes this damage to increase by 50%. An ally can activate the Grave Robber synergy to deal additional frost damage to nearby enemies and consequently heal themselves.
- 4: Trapping Souls (Soul Magic): This deals magic damage to your target and other enemies over 10 seconds. This is dependent on the highest offensive value.
- 5: Intensive Healers (Living Death): You summon a spirit for 8 seconds that heals you or an ally with the lowest health every 2 seconds for 1987 health. This counts as a crime.
- R: Pestilence Colossus (Grave Lord): You summon a flesh colossus that hits the ground three times over 3 seconds. In the surrounding area, it deals plague damage: 2087 with the first hit, 2192 with the second, and 2301 with the third. Moreover, it applies the debuff: Greater Vulnerability, meaning that damage received is increased by 10% for 12 seconds. This also counts as a crime.
You will only unlock the Skeleton Arcanist and Intensive Healers at level 30 of their respective skill lines. You will unlock the detonating siphon at level 42. Until then, you can use Inner Light of the Mage’s Guild or the Hungry Scythe (Bone Tyrant).
Later, the following skills will also become important for the Magcro:
- Degeneration (Mage’s Guild): A DoT that deals 2520 magic damage over 10 seconds. It grants you the buff: Greater Sorcery, increasing your magic power by 20% for 20 seconds.
- Sengrune: A rune that takes 2 seconds to deal single flame damage and leave a flame damage DoT for 12 seconds.
Additional skill lines and skills for Magicka DDs
With the beginner builds, you are, of course, still not at the optimal level of your DD build. There are several skill lines you can unlock as you level up. However, since some skills require many shrines, a specific level, and time, I will list them separately:
Undaunted
You obtain this skill line by completing the first quest of the Undaunted. You will find it in the starting zones Stone Falls (Davon’s Watch), Auridon (Vulkhel Guard), and Glenumbra (Daggerfall). Starting from level 10, you can use the dungeon finder for dungeons.
Every achievement you complete in a dungeon gives you experience points for the Undaunted skill line. At level 45, you will also receive an invitation to the Undaunted Enclave. You can start accepting new dungeon quests from the Undaunted there every day. For that, you will naturally also gain experience points for the skill line.
Which skill does the Magicka DD need? For Magicka DDs, the last active skill of the skill line is of interest. The Mystic Orb deals area damage, and allies can use the synergy to deal damage and restore resources.
The passive abilities of the Undaunted are essential for any character, regardless of type.
Psijic Order
You receive this skill line when you first encounter the Psijic Order and complete the first quest. To do this, head to Summerset and follow the main quest until you reach Artaeum. The progress in this skill line can be quite tedious and requires some shrines.
It’s best to combine the Psijic quests with collecting Skyshards and Mage Guild books in the respective area. Discovering locations will also give you experience for leveling up.
I personally recommend leveling this skill line directly for Magicka DDs. If you collect everything alongside, you will almost reach the maximum level by the time you hit level 10. Additionally, you will have a good portion of Tamriel’s entire map discovered. Plus, this saves you from doubling back multiple times.
Which skills does the Magicka DD need from the Psijic Order? There are several active skills of interest:
- Elemental Weapon: The next light attack deals additional magic damage when you do it in the next 2 seconds. This skill is a strong spammable. For most classes, it’s even the strongest for single target. However, the downside is that the skill itself does no damage. So if you experience performance issues and cannot reliably execute light attacks, you should consider using a different skill.
- Concentrated Acceleration: This skill grants you several buffs: Greater Alacrity increases your movement speed by 30%, and Lesser Power increases your critical damage by 10%. This buff is very important and an absolute must. An alternative for this skill is the Spike Trap (Fighter’s Guild).
As almost always, I recommend you level all the passive skills in this skill line as well. You will need quite a few skill points again. For collecting the Skyshards, which give you 1/3 skill points, I recommend the Map Pins addon by Hoft.
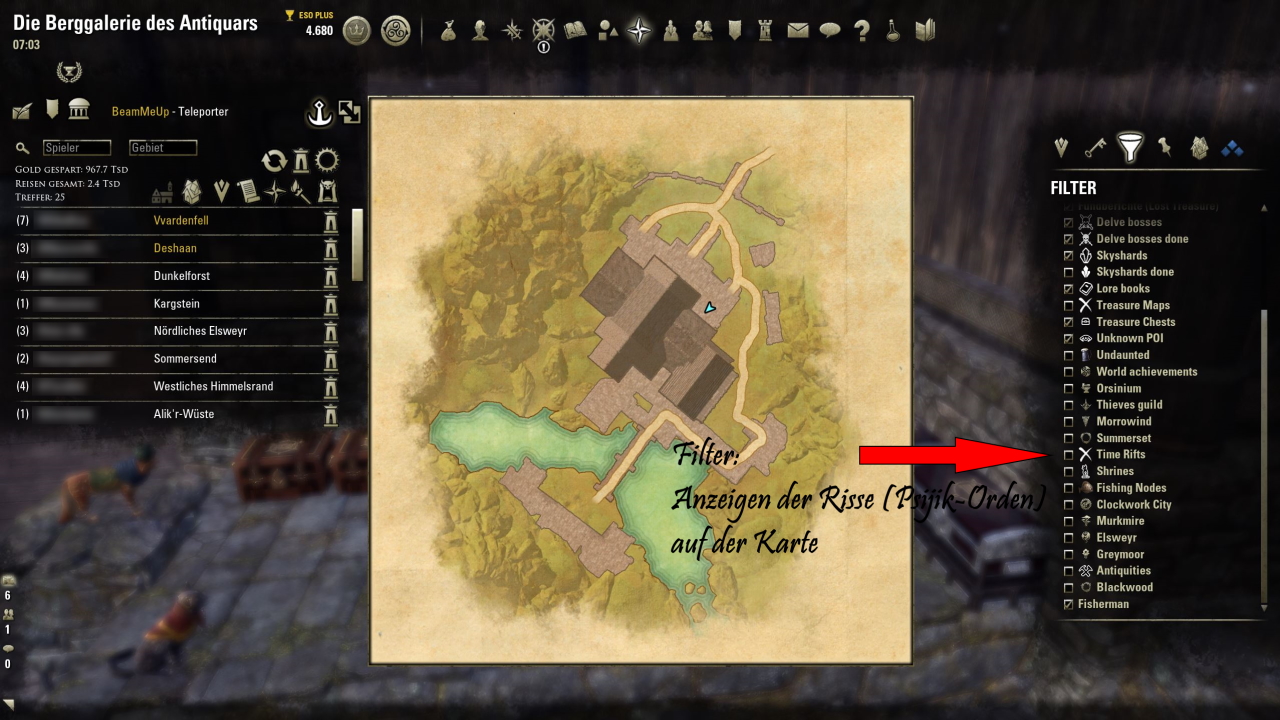
In the map view (M), you can also display the exact locations of the rifts that you need to seal in the Psijic Order quests. To do this, click on the filter icon on the right side in the window. This will open a list of additional filters from Map Pins where you can activate the icons for the rifts.
Mage’s Guild
The skill line of the Mage’s Guild is quite tedious to level compared to others. You have to read (or select and deselect with E, as you will do eventually) Mage’s Guild books in Tamriel. You can find the books in the open world and in dungeons.
Whenever you discover all the books in an area, you receive additional experience points. I therefore recommend always searching for all books. You can help with an addon like LoreBooks or Map Pins.
As for the skills of this skill line:
- Inner Light: Increases your maximum Magicka by 7% and gives you the buff greater prophecy: Increases critical damage rating for magic hits, i.e., your chance to deal critical damage. You do not need to activate the skill, but merely equip it. Activating the skill reveals hidden enemies, which is only interesting in PvP.
- Structured Entropy: Deals damage to an enemy for 10 seconds. Every 2 seconds, you receive a bit of healing.
- Degeneration: This is the other morph of the structured entropy. Instead of healing you, it grants you the buff: Greater Sorcery, increasing your magic power by 20% for 20 seconds.
- Sengrune: A rune that takes 2 seconds to deal single flame damage and leaves a flame damage DoT for 12 seconds.
Here, you should also level almost all passive abilities. The only exception is the convincing will because you don’t need this passive ability in combat.
Fighter’s Guild
The rank of this skill line rises as you defeat undead or Daedra. Don’t forget to accept the skill line as early as possible. Unlike the Mage’s Guild, your level here only rises once you have the skill line. In the Mage’s Guild, your level increases in the background even if you haven’t unlocked the skill line yet.
You can specifically level the Fighter’s Guild skill line. For example, the dolmen circle in the Alik’r Desert is great for this. In the community, a farm group has established itself that almost constantly farms the 3 dolmens in this area.
To join, you usually just need to type “+dolmen” in the zone chat, and you will receive an invitation to the group.
Which skills are interesting for Magicka DDs? Although it initially seems that this skill line is more aimed at stamina DDs, there are important skills for Magicka DDs:
- Concealed Hunter: When equipped, this skill grants you the buff: Lesser Frenzy, increasing your critical damage when you flank an opponent. Additionally, you can reveal hidden enemies. But similar to Inner Light, this effect is only relevant in PvP.
- Spike Trap: This skill grants you the same buff as the Concentrated Acceleration from the Psijic Order skill line. The trap grants you the buff: Lesser Power, which increases your critical damage by 10% for 18 seconds. The trap takes 1.5 seconds to trigger, after which it deals single damage and damage over 18 seconds.
For maximum damage, you should level this passive skill:
- Exile of the Sinned: You generate 9 ultimate power when you kill an undead, Daedra, or werewolf.
If you have an active skill equipped (Concealed Hunter) or use it (Spike Trap), then these passives are also important:
- Butcher: Increases your weapon power for each equipped Fighter’s Guild ability by 4%.
- Trained Tracker: Your Fighter’s Guild abilities deal 20% additional damage to undead, Daedra, and werewolves.
Storm Assault (Alliance War)
This is a skill line you improve through activities in PvP. However, there are also skills that are useful for PvE:
- Distance Detonation: You activate a bomb that explodes after 8 seconds, dealing damage to enemies in an area around you. The damage increases by 25% for every enemy you hit. This skill is particularly useful in trials (group content for 12 players). Between bosses, there are usually plenty of smaller enemies (trash mobs). Due to the mass of enemies, this skill is particularly strong.
- Sharfened Crow’s Feet: You deal damage in the target area every second for 10 seconds and reduce the movement speed of enemies by 50%. You also debuff enemies that take damage with the effect: Greater Break, reducing physical resistance and magic resistance for 4 seconds by 5948. – This ability is ideal for dealing out more area damage and is usually used on the back bar.
- Resolving Momentum: You heal for 3620 over 4 seconds. – If you need additional healing, this skill can be used.
Vampirism
You must get bitten by another player at a vampire shrine and complete the quest. Then you unlock the skill line. Alternatively, you can also simply buy the Vampire skill line or the vampire curse in the Crown Store.
Here, too, be cautious, as every vampire skill is a crime. So do not get caught.
Here are the skills of interest for your Magicka DD:
- Boiling Frenzy: Increases your magic & weapon power by 660. As long as active, health costs (1920 health per second) increase by 20%. Additionally, the bonus to magic & weapon power increases by 10% per second. However, this is a crime. – You should have adequate healing for this skill. You will be surprised how quickly this skill can take you out. But it is quite strong.
- Blood for Blood: You deal 1684 magic damage for 2295 of your health. Depending on your missing health, you deal up to 75% additional damage. After use, you cannot be healed by allies for 5 seconds. – Good self-healing is required here.
Soul Magic
You obtain this skill line as part of the main quest. You have it from the start.
This skill is of interest for you:
- Restorative Soul Trap: You deal 2520 magic damage to the target for 10 seconds (or damage depending on the highest offensive value). If the enemy dies during the effect duration, an empty soul gem is filled. Additionally, you regain 3281 health, 3045 Magicka, and 3045 Stamina. This scales with your maximum health, Maximum Magicka, and Stamina. – This skill is very useful when you have resource issues against many smaller enemies.
Two Weapons
If you want to play with daggers on the front bar, you can alternatively use some abilities from the associated skill line:
- Death Shroud: Every second, you deal 236 damage to enemies within 5 meters. You gain the buff: Greater Evasion, receiving 11% less area damage for 10 seconds.
Greatsword
For optimal damage, you can play a greatsword (from the Maelstrom Arena in Wrothgar) on the back bar.
- Critical Roar: You charge forward and deal 1,999 physical damage to all nearby enemies. This attack always critically hits. If you reach your target, you tear the ground beneath you, causing every enemy in the area to take 544 physical damage every second for 10 seconds.
Equipment for a Magicka DD
Before reaching level 50 and champion point level 160, you do not need to start collecting equipment. When you find set items, add them to your collection by binding, selling (after they disappear from the buyback), analyzing, or refining them.
Good starter sets can be crafted by other players. Typically, the community is very friendly, and if you ask a player nicely, they will certainly craft armor for you. The following craftable sets are suitable for Magicka DDs:
- The Law of Julianos (Wrothgar)
- Acolyte of the New Moon (Southern Elsweyr)
- Mechanic’s Eye (Clockwork City)
- Diamond Might (Darkshade)
As a trait, you can choose “learning,” which increases your experience gain when killing enemies (the value depends on the quality of your armor: Gold – 9% per piece of armor). For jewelry, choose the traits arcane or infused.
Once you reach level 50 with your character, you unlock a new leveling system: The Champion Points. You can use these across characters, even if another character has not yet reached level 50. In this article, you can learn more about the Champion Points system.

Your opinion is important to us!
Do you like the article? Then let us know!