

With the Update 33 Ascending Tide, the MMORPG The Elder Scrolls Online received two new dungeons. This includes the dungeon Coralhorn. Here you will learn everything about the mechanics with tips from MeinMMO author MiezeMelli.

What kind of dungeon is this? The Coralhorn is located in the area Summerset, as you can immediately recognize from the environment upon entering. You will face not only the regular 3 bosses but also secret bosses that will give you bonuses for the normal boss fights.
This guide describes the mechanics in Veteran Hardmode (without secret boss advantages). The regular Veteran mode is significantly easier, and in normal difficulty, you can ignore many mechanics. So you can apply guides of this difficulty level to all other levels, but not vice versa.
In contrast to the other dungeon from Update 33: Gram of the Shipbuilder, you will need to run around quite a bit with the bosses and avoid many small AOEs.
Everything about the new DLC can be found in our ESO Special on Ascending Tide.
Important vocabulary you should know for this guide
- What is a synergy? A synergy can be activated with X (default assignment). This triggers a specific effect. Here, it’s the crystals that summon a secret boss or the flames that you can interact with using synergy. However, there are also abilities from allied players that you can synergize with. This often activates a positive effect on you or an additional negative effect on the opponent.
- What is an execute? This refers to skills that deal particularly high damage when the target has low health.
- What does spawnen mean? This term comes from English and means “to appear” or “to spawn.”
- What does the term Cleave-Damage mean? This refers to damage that does not only hit the primary target but also additional targets nearby.
- What does rezen mean? Reviving a player in the group with a soulstone.
- What does Rez-Ulti mean? This term refers to the ultimate ability of the necromancer class. This ability revives all dead group members.
- What is a taunt? This refers to a skill that taunts the opponent. This means that only the player who applied this skill will be attacked.
- What does HM mean? HM stands for Hardmode.
- What does stacking mean? This means that you and your group members stand at the same point. This allows you to receive important buffs safely that the healer or tank casts on you. The same applies for AOE healing.
- What is a K.O. mechanic? As soon as this mechanic appears, the group will die. Therefore, you must absolutely prevent this.
- What does dodgen mean? This is the English term for the dodge roll in ESO. By default, you activate it with a double-click on your movement keys W, A, S, and D. However, you can also adjust this control in the settings so that you only need to click once.
- What does RNG mean? It stands for “Random Number Generator” and simply translates to: Random Number Generator.
The secret bosses in the Coralhorn in ESO
As in other ESO dungeons, there are secret bosses here. They are not particularly difficult, but they provide specific advantages for the regular boss fights, making the combat easier. However, there are also achievements if you intentionally forego these advantages.
Here is an overview of the secret bosses:
- Sword Guardian: This boss spawns lightning fields around each player. So you should not stack and get consistent healing. After defeating the Sword Guardian, you will receive the buff “Sword Alliance.”
- Staff Guardian: This boss spawns areas across most of the arena that will kill you when they explode. After defeating the Staff Guardian, you will receive the buff “Staff Alliance.”
- Shield Guardian: This boss spawns duplicates of itself during the fight and barricades itself inside an ice shield. Here you need to defeat the duplicates before you can further damage the boss itself. After defeating the Shield Guardian, you will receive the buff “Shield Alliance.”
Here you can watch the Hardmodes without the secret bosses as a video. This gives a special achievement and makes the bosses more difficult, as you have no effects from the secret bosses to support you:
The 1st Boss Maligalig in the Coralhorn in ESO
For this boss, you should always stick together but not stack.
These are the mechanics of Maligalig:
- Toxic Eruption: Every once in a while, multiple Yaghralarvenbreakers appear. If you have the aggro, meaning they are focused on you, they will chase you and explode at your location. You will recognize this by a red flower-like symbol appearing over your character. You must always avoid the explosions and react quickly, as they deal about 31,000 damage.
- Surging Waters: At 70% and 30%, the boss floods the room with water. A vortex moves you in a circular motion across the room. In this phase, you need to defeat adds on the three outer platforms. Use the synergy: surging waters, to be launched out of the vortex. You should always use the synergy as a whole group at the same point.
- Static Discharge: constant damage on the platforms that must be healed against.
- Insatiable Vortex: Continuous damage within the vortex.
- Wave of Maligalig: You must defeat this monster during the surging waters phase on each of the three platforms. At the same time, Yaghrascrapers and -spewers also spawn, but these will die as soon as the wave of Maligalig is defeated. The DDs should therefore focus fully on the wave. However, the tank should taunt all adds.
Play the mechanics carefully.
Nightblades are well-suited for this boss due to their good self-healing and strong burst damage.
You will need a lot of healing, so a strong healer is also advantageous. (This applies to all bosses)
The 2nd Boss Sarydil in the Coralhorn in ESO
For this boss, you should bring patience and concentration. A lot happens in a short time during the fight, and the boss jumps around constantly, with damage seemingly coming from everywhere.
These are the mechanics of Sarydil:
- Opening: Sarydil jumps around the room and spreads many small ground effects. She needs to be interrupted as quickly as possible.
- Cut: Autoattack with a chance to apply the dot “Gutted” to the target.
- Targeted: Sarydil targets you, shoots at you, and leaves a small area at your position that causes damage. After the areas disappear, the daggers thrown remain.
- Explosive Powder: Sarydil ignites all existing daggers in the room, causing them to explode in larger patches.
- Dagger Storm: Sarydil throws burning daggers in a circular motion, which then stay on the ground for a short time.
- Hail: New AOEs appear that you must avoid.
- Smoke Bomb: Sarydil throws a smoke bomb on the ground and disappears. This is followed by one of two mechanics:
- She summons her minions in waves. The add waves need to be defeated one after another.
- She splits into duplicates. These need to be interrupted until the real Sarydil is found.
- Storm Attack: Sarydil jumps on you.
- Ignition: Heavy attack that should either be blocked or dodged.
A ranged interrupt skill is recommended for this boss.
The final boss Varallion in the Coralhorn in ESO
Be prepared for some unpleasant area effects with this boss.

These are the mechanics of Varallion:
- Tidal Force: Wide AOE areas will appear that you must avoid.
- Blending Puddle: Two players are connected by a purple beam. Stay as close to each other as possible but avoid other mechanics as well. As soon as another player touches this beam, it will explode and both connected players will be affected.
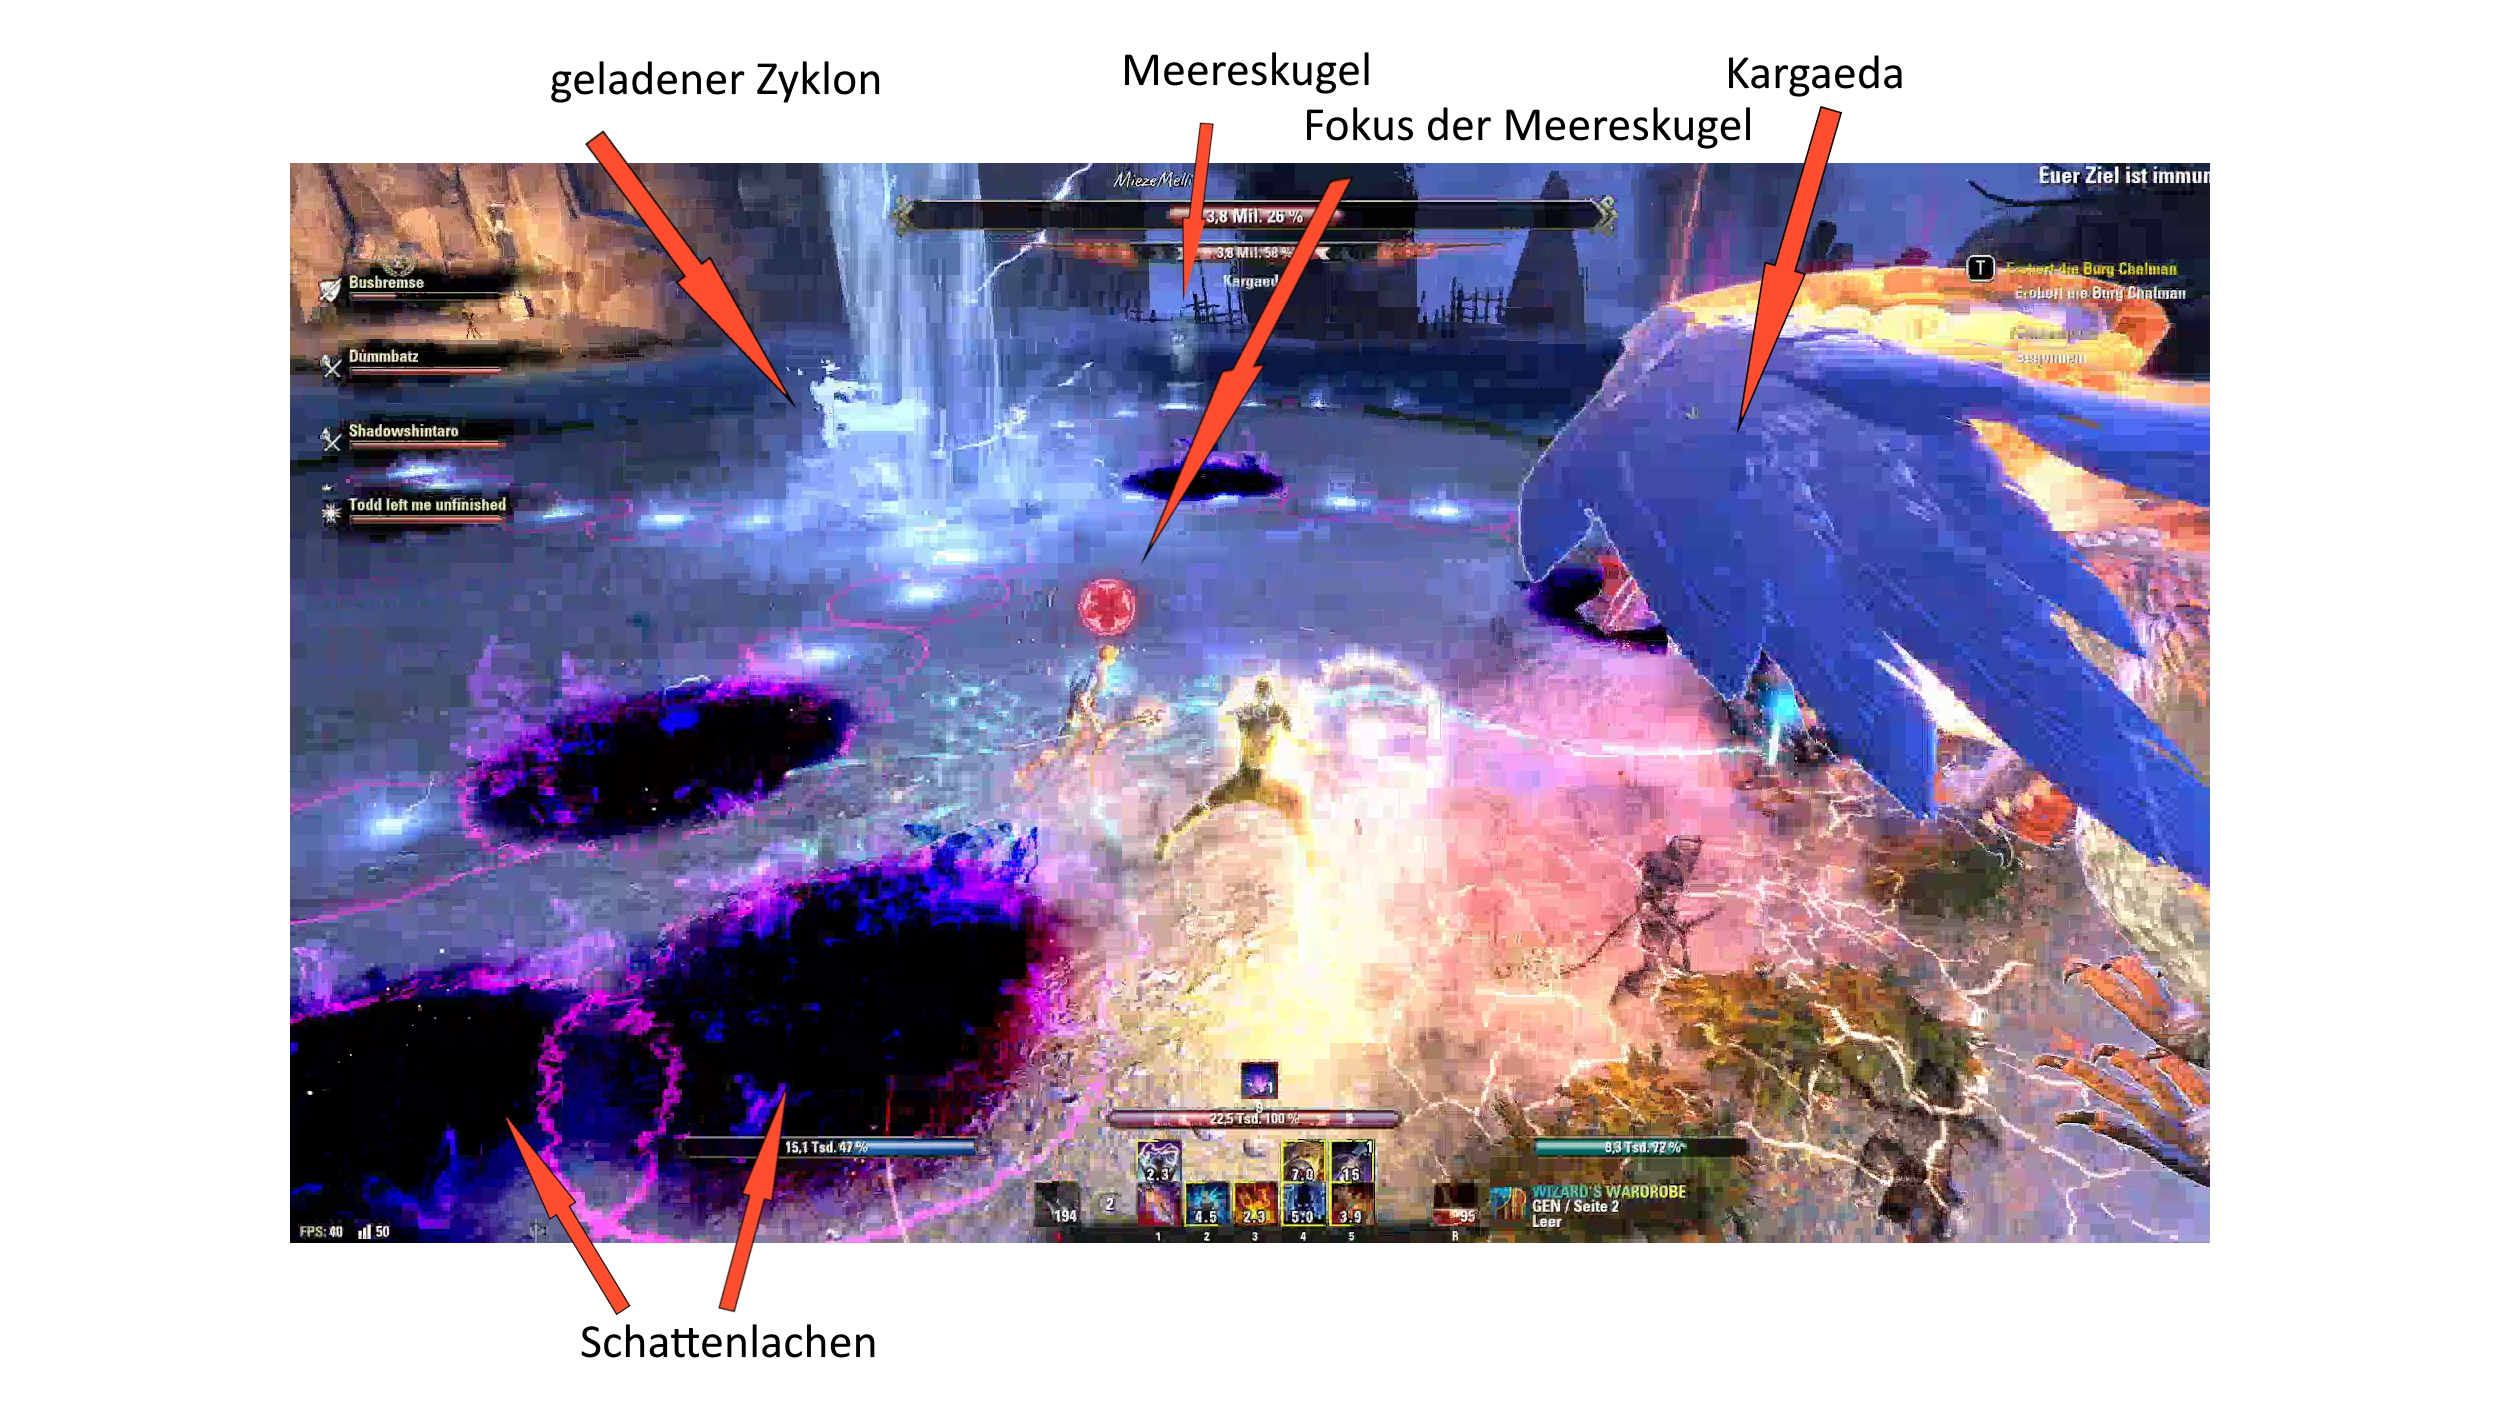
- Sea Sphere: A sphere of water spawns at the edge of the arena, slowly moving towards a player. You can tell if you are in the focus of the sphere by a flower-like red symbol above your character. You must either kill it quickly, or the player who is focused should quickly approach the sphere and dodge through it. This player should have full health, and a shield is also recommended. If it reaches the group another way, it will explode.
- Blending Shadows: A dark animation appears under each player, turning into an area after a few seconds that will remain as AOE at the player’s position at that time. Try to place these areas at the edge and as close together as possible. You should not walk back into them.
Additionally, from about 90%, 80%, and 60% boss health, griffins will spawn multiple times. As DDs, you should direct all your damage to them. Because they are very unpleasant for the tank and cause additional mechanics. The boss also receives a 35% speed buff as long as one griffin is fighting him.
And here ESO has built in a lot of RNG, as which griffin spawns when is pure chance and actually makes a difference. The griffin Iliata is significantly more difficult than the other two griffins. The easiest is the griffin Mafremare.
- Iliata: The griffin spawns a huge and many small lightning areas that you must avoid. The huge lightning area slowly tracks one player. Be careful not to get pushed into other AOE areas. The small lightning areas track each player and must be kited.
- Ofallo: The griffin applies a strong healing debuff to the tank.
- Mafremare: This griffin causes moving whirlwinds to appear that you must avoid. DDs can stand relatively relaxed directly near the boss without being hit by the whirlwinds.
At 30% boss health, the critical phase begins. The boss becomes invulnerable and the griffin “Kargaeda” with significantly more life than the previous griffins appears. This griffin always appears at 30%. Additionally, the following additional mechanics come into play:
- Charged Cyclone: Small AOE areas will move outward in a line from the center. A total of 4 such “line arrangements” will appear, additionally rotating in a circle.
This final phase is particularly tricky, as the mechanics can overlap based on RNG principles.
As DD, save your ultimate abilities for the griffins and use single-target skills.
General achievements in the Coralhorn
These achievements exist in every difficulty mode:
How to achieve the “And another round” achievement
Travel 2 kilometers during the vortex at the 1st boss Maligalig. So rotate with the vortex often during the flood.
How to achieve the “Scout of the Rising Tide” achievement
Complete both the Coralhorn and the Gram of the Shipbuilder. The difficulty mode doesn’t matter.
How to achieve the “Conqueror of the Coralhorn” achievement
Complete the Coralhorn (including the 3 regular bosses). The difficulty level does not matter here either.
How to achieve the “Coral Accord” achievement
Collect all alliances, so defeat all secret bosses in the Coralhorn.
How to achieve the “Ship Sniffer” achievement
Uncover all secrets in the Coralhorn and in Gram of the Shipbuilder. This includes the achievements “Coral Accord” and “Last Blessing.” As a reward, you will receive a keepsake: Maormer Ocean Pearl.
Veterans’ achievements in the Coralhorn
For these achievements, you must enter the veteran mode. For some, hardmode is also required. This is stated in the achievement.
How to achieve the “Griffin Slayer” achievement
This achievement can be done in Veteran mode without hardmode. You will probably need multiple runs for this, as you must defeat a total of 50 griffins. You will likely not encounter that many griffins in a single run unless you frequently wipe.
How to achieve the “Yaghra Slayer” achievement
The same applies to this achievement, as you must also defeat a total of 200 Yaghra.
How to achieve the “Not the sharpest knife” achievement
Complete the 2nd boss Sarydil in hardmode. For this, you must use the synergy at the challenge banner.
How to achieve the “Crusty Cracker” achievement
Complete the 1st boss Maligalig in hardmode. For this, you must use the synergy at the challenge banner.
How to achieve the “Out of service” achievement
Find all prisoners and free them from the Coralhorn.
How to achieve the “Cave Explorer of the Rising Tide” achievement
Complete both the Coralhorn and the Gram of the Shipbuilder in veteran mode.
How to achieve the “Conqueror of the Coralhorn” achievement
Defeat all 3 regular bosses in veteran mode (hardmode not necessary).
How to achieve the “Summerset Preservation Society” achievement
Defeat the 2nd boss Sarydil without any stone pillar breaking. Therefore, their exploding areas must not lie outside in the room by the pillars. Stay in the middle of the room.
How to achieve the “Low-Pressure Zone” achievement
Complete the 1st boss Maligalig and stay on a platform for no longer than 5 seconds.
How to achieve the “Challenger of the Coralhorn” achievement
Complete the following achievements:
- Conqueror of the Coralhorn
- Superior Lineage
- Seabear
- Cave Glider
How to achieve the “Superior Lineage” achievement
Complete the final boss Varallion in hardmode. For this, you must use the synergy at the challenge banner.
How to achieve the “Tentacle-free Triumph” achievement
Complete the final boss Varallion in hardmode without the buff from the secret bosses. For this, you must use the synergy at the challenge banner.
How to achieve the “Cave Glider” achievement
Defeat all 3 regular bosses in veteran mode (hardmode not necessary) within 25 minutes.
How to achieve the “Seabear” achievement
Defeat all 3 regular bosses in veteran mode (hardmode not necessary) without any group member dying.
How to achieve the “Supremacy on land, in the air, and at sea” achievement
This is the triple – Veteran HM, Speedrun, No Death. As a reward, you will receive the title: Coral Guardian.
How to achieve the “Outstanding Splash” achievement
Complete the final boss Varallion and destroy 2 or more sea spheres in combat within 5 seconds.
How to achieve the “Tentacle Basher” achievement
This achievement can be done in veteran mode without hardmode. You will probably need multiple runs for this as you must hit a total of 250 enemies with tentacles.
How to achieve the “Roller Collar” achievement
Collect 30 alchemical globules.
Have you checked out the Coralhorn? Do you like it, or are you not interested in fighting griffins anymore? Then take a look at our ESO Event Ticker. There might also be something else interesting to do in ESO right now.

Your opinion is important to us!
Do you like the article? Then let us know!