
In Call of Duty: Warzone, you have a colorful arsenal of grenades available. Here you will learn everything about the values of the explosive materials and how to best use them to put pressure on your enemies.

If you want to be successful in the Warzone, it’s helpful to know everything about the weapons and deadly tools of the Battle Royale. The text here will help you understand and use the “Lethal Equipment” better.
MeinMMO shows you the values of the “Primary Equipment” and gives tips on when a Molotov cocktail is more useful and when a sticky explosive is more advantageous.
Many of the following values and insights come from the English videos of the YouTuber and CoD expert “TheXclusiveAce” who has thoroughly reviewed all primary equipment in recent months. Here you can find his YouTube channel. You can find links to individual videos in the image descriptions and below in the sources.
Primary Equipment in the Warzone – How to Use Them Properly
What grenades does the Battle Royale offer? In the Warzone, you will find a total of 7 grenades, each having a greater effect after being thrown. We will leave the “Throwing Knives” and “Flaming Throwing Knives” aside. While you can also do really crazy things with them, this overview is about the “explosive” grenades:
- Claymore – Targeted proximity mine
- Proximity Mine – All-around proximity mine
- Molotov Cocktail – Firebomb
- Thermite – Persistent spark-spitter
- C4 – Manually detonated explosive bomb
- Fragmentation Grenade – Standard grenade
- Semtex – Sticky grenade
All 7 grenades come with special properties and differ significantly from their counterparts. You can find an analysis of each explosive device here.
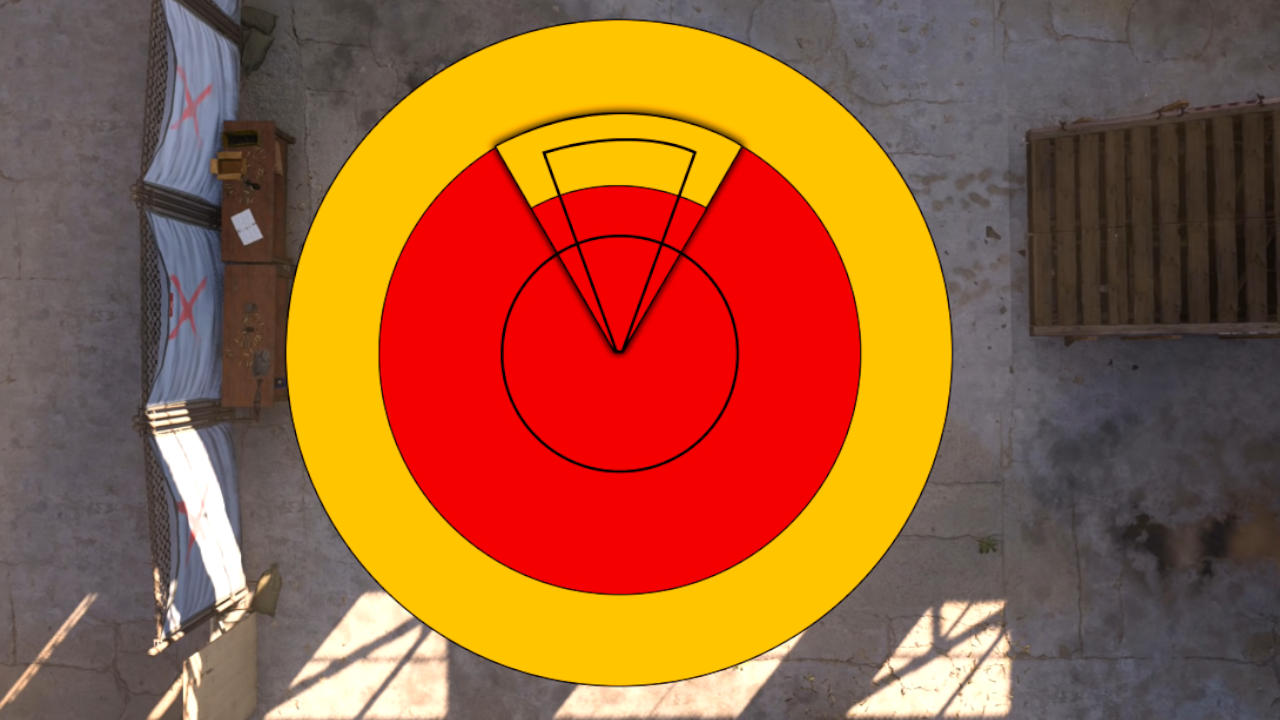
Claymore & Proximity Mine for Sneaky Traps
These two grenades provide you with proximity mines that allow you to secure areas and deal a hefty blow to enemies. The Claymore operates with precision while the Proximity Mine covers a complete area. Here are the values:
Trigger Area
- Claymore: 20° up to 4.5 meters
- Proximity Mine: 360° up to 4.5 meters
Explosion Timer
- Claymore: 300 ms
- Proximity Mine: approx. 900 ms
Effective Range and Damage
- Claymore: 30° / 0 – 3.5 meters – 140 damage / 3.5 – 5 meters 80 damage
- Proximity Mine: 360° / 200 damage at center, decreasing at greater distances / 80 damage at the edge at 7 meters
When is the best time to use proximity mines? These mines are excellent for covering an area that you cannot constantly observe. Place the nasty devices behind doors, at stairs, and use them for reconnaissance.
You will see a “Hitmarker” when an enemy carelessly walks through the trip mines, and you will be prepared for the enemy that has already received a hefty blow from you. Remember where you positioned the devices and “push” the area where the opponent is currently applying new armor plates.
The mines also work great when you are being chased. If your armor is broken and you want to escape a firefight, lay a mine behind you and let your enemies run into the damage. This way, you will know immediately if you are being chased and deal a hefty blow to the opponent’s armor.
The Claymore is more suitable for covering a narrow area, while the Proximity Mine is better for a larger area, like entire rooms.
How does KRD work? The anti-grenade perk reduces the damage of both mines to a maximum of 80. So in the Warzone, it would take 4 mines to knock you out.
Can I dodge? Only in the rarest cases; the Claymore is quite reliable here. If triggered by you, you typically take the damage as well. In the current CoD, the “Trigger Lasers” are quite accurate. If you don’t touch the beams, the mine won’t activate. So you can try to get past it.
The Proximity Mine is not as reliable. If you see the “Warning Symbol” of the mine on your screen, crouch or even better: lie down. While crouching, the center damage drops from 200 to 80, and if you lie down, you receive almost no damage.
Extra Tip: The two sneaky explosive traps can be found frequently in the Warzone and you should always pick them up and deploy them: pick up, deploy, collect your own equipment again, and continue. It only takes a few seconds and allows you to set nasty traps everywhere on your way through Verdansk that your opponents won’t expect.

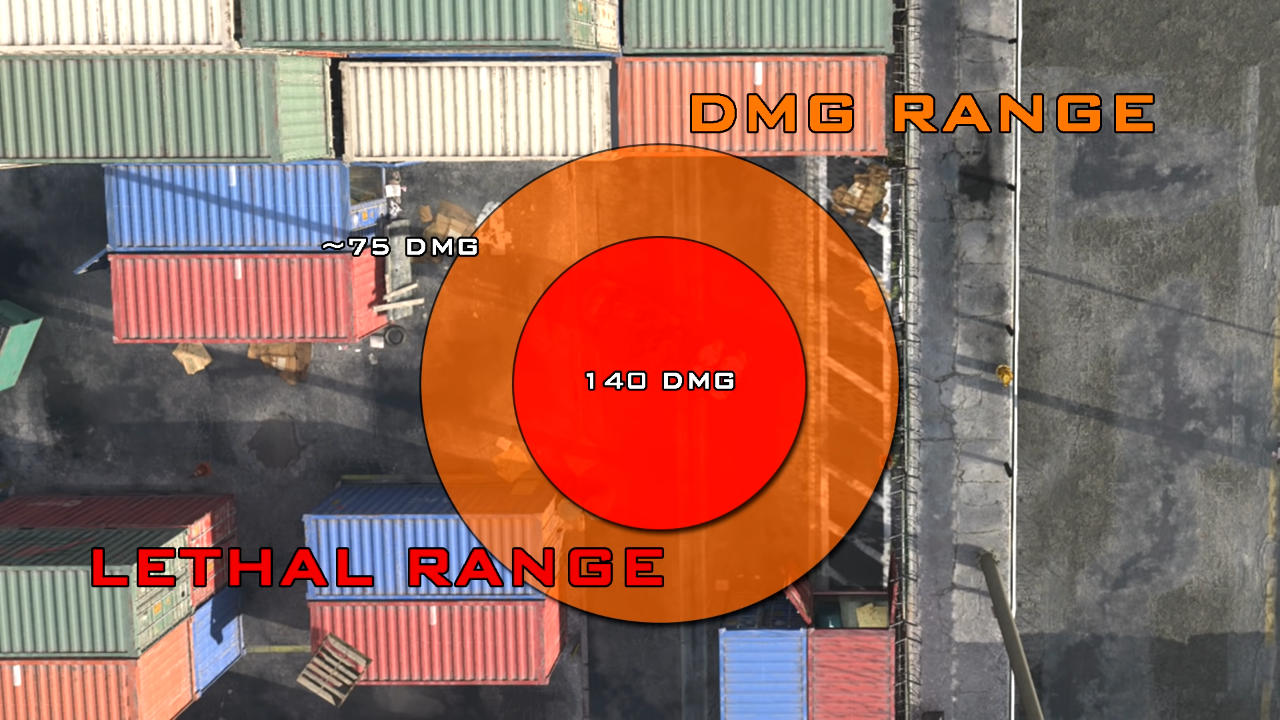
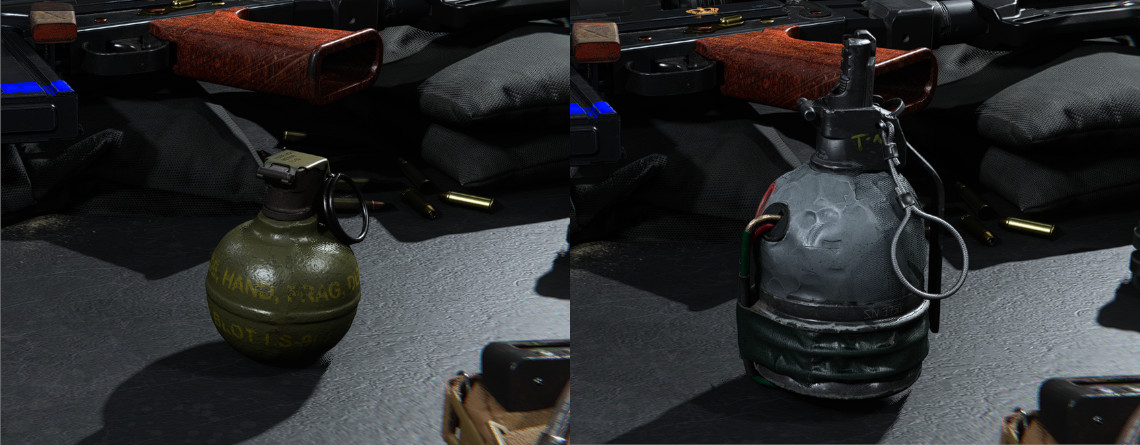
Fragmentation Grenade & Semtex for Aggressive Play
Here you have the two standard grenades, similar to Stun & Flash among tactical equipment, that you send on their way to your enemies with a powerful throw. The Semtex is a sticky grenade that stays stuck where it hits, while the Fragmentation Grenade bounces off surfaces and jumps around. You can “cook” the Fragmentation Grenade, and after pulling the pin, the countdown to the explosion starts immediately. For the Semtex, the timer only starts on throw. Here are the values:
Effective Range and Damage
- Fragmentation: 8 meter radius / center damage 140, decreasing to a minimum of 75 damage at the edge
- Semtex: 8 meter radius / center damage 140, decreasing to a minimum of 75 damage at the edge
Explosion Timer
- Fragmentation: 3.5 seconds after the pin is pulled
- Semtex: 2 seconds after being thrown
Throw Range and Time
- Fragmentation: approx. 30 meters, bouncing up to approx. 50 meters
- Semtex: approx. 30 meters
When is the best time to use the grenades? These two throwing grenades are strong items for an aggressive playstyle. They often force enemies to leave their position, giving you a window of time in which the opponents lose focus on you.
The Fragmentation Grenade is usually stronger in the Warzone because you can throw it against surfaces and it will bounce in the desired direction. For example, if a camper is sitting in the attic, you need to briefly show yourself for a Semtex throw to hit the grenade directly at the camper, risking some shots or even getting knocked out.
In contrast, you can throw the Semtex precisely to the desired location, and it triggers its deadly effect right there. The enemies can even be the ones who can no longer get rid of the grenade.
How does KRD work? The anti-grenade perk reduces the damage of both grenades to a maximum of 80. So it would take 4 grenades to knock you out in the Warzone.
Can I dodge? Both grenades offer good opportunities to escape from them. No one can escape a “cooked” Fragmentation Grenade, and a stuck Semtex cannot be evaded either.
However, if the Fragmentation Grenade was simply thrown at you, you can even throw it back. For this, you will see a prompt on your screen “Throw Grenade Back.” By default, you throw the Fragmentation Grenades back with your grenade button.
If the Semtex is not stuck to you, you can easily get away from this grenade. If you react quickly, you can often escape the 8-meter explosion radius without taking damage. Even if you just move a little, the damage decreases significantly.
If you want to know more about explosive weapons of the Warzone, check out our analysis of the rocket launchers.
C4 – The Vehicle Killer and Strongest Primary Equipment in the Warzone
Here you get a load of plastic explosive that you must manually detonate, unlike the other primary grenades. C4 is one of the most versatile pieces of equipment: you can use it as a type of proximity mine, as Semtex, or for a quick explosion already within the throw. Here are the damage values:
Effective Range and Damage
- 140 damage at the center, decreasing towards the edge
- 70 damage as a minimum at 6.5 meters distance
When is the best time to use C4? As mentioned before, the application areas of C4 are larger than those of the other grenades. Due to the short throw range and the smaller effective radius of C4, it is also harder to handle. However, if you have mastered C4, it is the best primary equipment in the Warzone.
This is also due to the effect of C4 on vehicles. With the exception of the large truck, vehicles in the Warzone react extremely sensitively to C4, and as long as they are within the effective area, SUVs, Rovers, quads, and helicopters fly directly into the air. Even the truck takes considerable damage but still requires about 20 shots from one of the popular 5.56 caliber assault rifles (M4A1, Grau 5.56, or Kili 141) to be disabled.
How does KRD work? The perk works strongly against C4. Like with the other grenades, C4 bombs only deal a maximum of 80 damage, and furthermore, it will always only destroy your armor as long as you have even a bit of it left. For example, if you are left with only 20 armor points after a firefight (50 would be a full plate), a C4 explosion will only destroy the remaining armor rather than distributing the full 80 damage.
Extra Tip: C4 can also be detonated individually, even if you have 2 packs in your pocket. Here are the standard controls:
- PS4: 2x Square button
- Xbox One: 2x X button
- PC: 2x F key
If you throw the pack, you can quickly detonate it in front of you and create precise explosions right in front of your opponents’ surprised faces.
Molotov Cocktail & Thermite
These two specialists unleash hellfire at the point of impact. The Molotov shatters and spreads its flammable contents everywhere in the area, while the Thermite sticks in place and deals damage within the area. Both cause “damage over time” instead of unleashing their full power all at once. Here are the values:
Effective Range
- Molotov: approx. 2.5 meters
- Thermite: approx. 3 meters
Damage Over Time
- Molotov
- 45 on impact
- Every 300 – 400 ms between 15 – 35 damage
- Thermite
- 30 on impact
- Every 500 ms 25 damage for 10 ticks
- Damage decreases towards the outer edge of the radius, with a minimum of 10 per tick
Total Duration and Damage
- Molotov: Over 400 damage in approx. 6 seconds of effect duration
- Thermite: 280 damage in approx. 5.5 seconds of effect duration
When is the best time to use the firebombs? The two fire breathers provide strong area damage and are excellent for putting pressure on enemies behind cover.
Especially the Molotov literally “melts” your enemies and deals a lot of damage in the shortest time. There’s hardly anything better against entrenched soldiers, as you not only cause damage but also make the burning enemies have worse visibility.
If you catch the enemy directly with Thermite, you also get a kill in the Warzone. However, it is not the damage monster like the Molotov, but it can leave a greater impression on vehicles. The “Moly” only deals damage upon impact, while Thermite deals damage to vehicles throughout the duration and usually disables them. You need 2 Thermite charges for the truck.
Thermite can also be combined with a smoke grenade to create a crazy rocket.
Extra Tip: Both fire grenades can be thrown far and only bring their deadly effect when they hit something. Practice throwing with these two, and you will get strong grenades that will momentarily stun any enemy when they land next to them.

Overview of Grenade Application Areas
Now that you know the most important data of the primary equipment, here are all grenades with their areas of application:
- Claymore – Cover narrow passages
- Proximity Mine – Cover entire rooms
- Molotov Cocktail – Large area damage against covered enemies
- Thermite – Area damage against covered enemies and anti-vehicle bomb
- C4 – Versatile application areas
- Fragmentation Grenade – Strong for putting pressure on enemies
- Semtex – Strong for putting pressure on a specific area
All primary equipment comes with advantages and disadvantages. Choose them according to your play style and take the grenade that you feel most comfortable with. Here is more about the equipment in the Warzone:

Before you head back to Verdansk with your Molotov, try out the C4 for a round or two. The bag of plastic explosive holds unforeseen application possibilities and can be a real lifesaver, especially in vehicle encounters. Currently, C4 is therefore the strongest primary equipment in the Warzone. The best shooting weapons of the Warzone can be found here.

Your opinion is important to us!
Do you like the article? Then let us know!