
The MMORPG The Elder Scrolls Online (ESO) is versatile and can be quite overwhelming at the beginning. We want to suggest some builds that are suitable for beginners and help you through the leveling phase in this guide.

Update June 25, 2021: We at MeinMMO have decided to completely revise and expand the guide. You can now find the beginner builds for ESO here:
- Beginner Builds for Magicka DD
- Beginner Builds for Stamina DD
- Beginner Builds for Tanks
- Beginner Builds for Healers
Original article: In The Elder Scrolls Online, it is very difficult to make suggestions for builds. You can play any class in any role in ESO. We from MeinMMO have suggestions for you which class fits well with which role.
Furthermore, you can combine everything with any armor and weapon. And that is also the beauty of ESO, that you can simply try everything and discover it for yourself.
However, this can be very overwhelming, especially at the beginning. Therefore, we have selected some builds from popular YouTubers to make your start a bit easier. This way, you can gain experience and maybe even adapt the builds to your needs.
Is there also suitable equipment? We also provide you with some equipment suggestions. The builds are playable with mixed gear that you can find, but it is easier with the right set.
This should also be equipped with “Training.” With this trait, you gain more experience. Just kindly ask in your guild or chat. ESO players are often beginner-friendly, and for many, crafting is no problem.
ESO and its Skills
How does it work with skills? In ESO, you unlock skill lines or can improve them by playing weapons, using abilities, completing quests for guilds, and wearing armor. The more you play with a setup, the faster it goes.
Even one piece or one skill from a line is enough to improve it. However, if you have equipped multiple skills from a line or multiple pieces of armor, it develops faster.
When you can skill which ability or talent depends on the equipment you find or which skills you equip first. We have written down for you from which abilities the skills can develop.
You should also take the quests of the various guilds from the start. Especially the Mages Guild and the Fighters Guild already have useful skills for beginners. Especially for the skill Momentum, it is worth visiting Cyrodiil for a few rounds at the beginning.
Where do you get points? Skill points are obtained with level-ups, some quests, or through sky shards that you can collect in the world. So try to always collect these shards. You can increase your attributes health, Magicka, and stamina with level-ups.
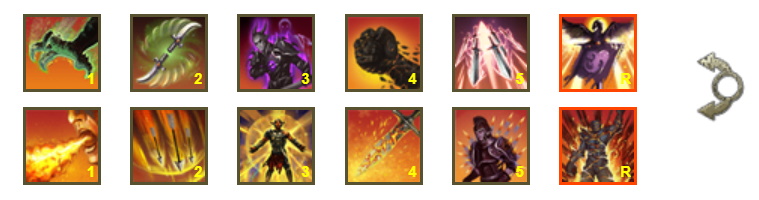
Magicka Necromancer with Staff and Explosions

The Magicka Necromancer provides good survivability. You will use two staves. A destruction staff for damage and a healing staff, as you have probably already guessed, for healing.
You throw skeletons around you and work with area and single-target attacks. The Necromancer offers a lot of fun and unique skills. However, some of them you should not use in a city, as they are considered illegal.
The build comes from Naranarra (via alcasthq.com). She streams on Twitch and loves to take care of new players. She also reads lore books on YouTube.
Which race is recommended? For Magicka DDs, races like High Elves, Dark Elves, and Bretons are recommended. Which race fits well with which play style you can find out at MeinMMO. However, you can also go by your taste if you are not necessarily after maximum performance.
Skills and Talents
Destruction Staff Bar
- Cleave Skull (from Flame Skull)
- You hurl an enemy with an explosive skull that deals fire damage.
- Hungry Scythe (from Death Scythe)
- You deal magic damage, heal yourself for the first hit enemy, and additionally for each further enemy hit up to five enemies. Also provides healing over time.
- Shape Flesh
- You heal yourself and an ally in front of you. However, it reduces your received healing and health regeneration.
- Unstable Elemental Wall (from Elemental Wall)
- You deal magic damage to enemies in the effect area every 1 second before it explodes with additional magic damage. Depending on the element of your staff, there is an additional effect.
- Tracking Explosive Bones (from Explosive Bones)
- You summon a flame skeleton. The skeleton runs to the target and explodes when it gets close, doing fire damage to all nearby enemies. The longer it lives, the higher the damage.
- Ultimate: Frozen Colossus
- The colossus hits the ground three times in 3 seconds, dealing frost damage each time. It also gives enemies a debuff.
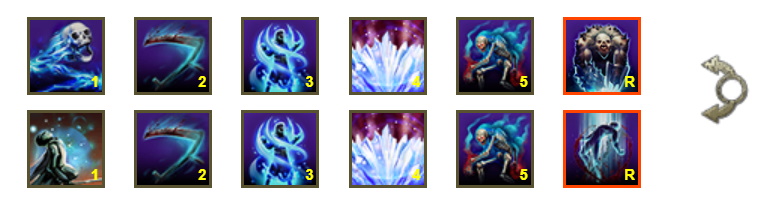
Healing Staff Bar
- Healing Springs (from Greater Healing)
- You heal yourself and your allies in the chosen area for 8 seconds every second and additionally for a fixed amount. Also gives you back Magicka.
- Hungry Scythe (from Death Scythe)
- You deal magic damage, heal yourself for the first hit enemy, and additionally for each further enemy hit up to five enemies. Also provides healing over time.
- Shape Flesh
- You heal yourself and an ally in front of you. However, it regenerates your received healing and health regeneration.
- Unstable Elemental Wall (from Elemental Wall)
- You deal magic damage to enemies in the effect area every 1 second before it explodes with additional magic damage. Depending on the element of your staff, there is an additional effect.
- Tracking Explosive Bones (from Explosive Bones)
- You summon a flame skeleton. The skeleton runs to the target and explodes when it gets close, doing fire damage to all nearby enemies. The longer it lives, the higher the damage.
- Ultimate: Revive
- You resurrect up to 3 allies at the chosen position.
Meaningful Passive Traits
- Class
- Bone Collector – When your Explosive Bones, a Skeleton Mage, or a Spirit Caretaker dies, the costs for your next Explosive Bones, Skeleton Mage, or Spirit Caretaker are reduced.
- Deathbell – Increases your chance for critical hits against enemies with less than 25% health per equipped Grave Lord ability.
- Last Breath – Increases your maximum health.
- Undead Ally – As long as you have Explosive Bones, a Skeleton Mage, or a Spirit Caretaker active, your Magicka and stamina regeneration increases.
- Penetrating Magic – your spells for destruction staves ignore [5/10]% of your enemy’s magic resistance.
- Destruction Expert – When you kill an enemy with a destruction staff ability, you restore Magicka.
- Light Armor
- Invocation – Reduces your Magicka costs for each piece of light armor worn.
- Recovery – Increases your Magicka regeneration for each piece of light armor worn.
- Concentration – Increases your magic penetration.
- Heavy Armor
- Determination – Increases your physical resistance and magic resistance for each piece of heavy armor worn.
- Constitution – Increases your health regeneration for each piece of heavy armor worn. Also gives you stamina and Magicka back.
The Equipment
Set of Seduction
- (2 items) Grants 129 Magicka regeneration
- (3 items) Grants 1096 maximum Magicka
- (4 items) Grants 129 Magicka regeneration
- (5 items) Reduces the costs of your Magicka abilities by 10 %.
Stamina Dragonknight for DOTs
This build relies on skills from the bow and two weapons. You will work a lot with damage over time. It works both in PvP and PvE.
The build was created by the YouTuber Hack the Minotaur. He has a lot of current builds that work well in 2020. Not only for beginners but also for solo builds and videos for maximizing DPS.
Which race is recommended? Orcs, Redguards, or Dark Elves are excellent races for Stamina DDs. Otherwise, Khajiit or Wood Elves are also suitable or simply according to your taste.
Skills and Talents
Two Weapon Bar
- Poison Claw (from Burning Strike)
- Deals poison damage and additional poison damage for 10 seconds. The poison does more damage the longer it lasts. Initially hit enemies become poisoned.
- Steel Tornado (from Whirlwind)
- You initiate a deadly whirlwind that deals damage to nearby enemies.
- Hidden Hunter (from Master Hunter)
- You can detect hidden and invisible targets for 5 seconds. Unveiled enemies cannot become hidden or invisible for 3 seconds. Increases critical weapon strike while equipped. You also gain a damage boost.
- Stone Giant (from Stone Fist)
- You deal damage to all enemies within 6 meters. Raised debris surrounds you for 10 seconds. When activated again, you hurl the debris. This deals damage, stuns, and knocks back.
- Death Cloak (from Blade Cloak)
- You gain greater evasion for 10 seconds, reducing damage taken from area attacks. Every second, the debris pulses and deals damage to enemies within 5 meters.
- Ultimate: Banners of Might (from Dragonknight Banner)
- You summon a battle banner that deals damage to enemies and applies a debuff to them. While you stand in the area, your damage dealt is increased, and your damage taken is decreased. An ally near the banner can activate the tether synergy.
Bow Bar
- Poison Breath (from Fiery Breath)
- You unleash a corrosive wave that deals poison damage and additional poison damage for 10 seconds to all enemies in front of you. Applies a debuff to enemies.
- Arrow Rain (from Arrow Barrage)
- You fire several fire arrows into the air so that they rain down on enemies in a selected area after a 2-second delay, dealing damage every second for 8 seconds.
- Reverberating Momentum (from Momentum)
- You heal yourself and your allies for 10 seconds.
- Molten Arsenal (from Molten Weapons)
- Increases your magic and weapon power. Your own heavy attack damage is increased while active.
- Explosive Armor (Spiked Armor)
- Your physical resistance and your magic resistance are increased for 20 seconds. You deal magic damage to enemies around you. Additionally, you reflect magic damage back at attackers who deal you direct damage.
- Ultimate: Magma Shell or Corrosive Armor (both from Molten Armor)
- Magma Shell reduces damage taken, and enemies take fire damage. Additionally, allies gain a damage shield.
- Corrosive Armor deals poison damage and instead of a damage shield, reduces the physical resistance of your enemies.

Meaningful Passive Traits
- Class
- Battle Cry – When you perform an ultimate ability, you restore health, Magicka, and stamina for every point of ultimate power that the ability costs.
- Burning – When you apply a burn to an enemy, you restore Magicka. If you apply a poison to an enemy, you restore stamina.
- Blessing of the Mountain – If you cast an ability from the Earthen Heart, you and group members gain increased weapon power. If you are in combat, you also gain ultimate power.
- Scorching Heat – Increases the duration of Fiery Breath, Burning Strike, and Dragonknight Banner and increases the damage and duration.
- Two Weapons
- Targeted Wrath – Reduces the stamina costs of all two weapon abilities.
- Weapon Mastery – Grants different bonuses based on the equipped weapon type.
- Medium Armor
- Dexterity – Increases your critical weapon strike chance rating for each piece of medium armor worn.
- Windrunner – Increases your stamina regeneration and stamina costs of abilities for each piece of medium armor worn.
- Agility – Increases your weapon damage.
The Equipment
Poison Strike
- (2 items) Grants 833 critical weapon strikes
- (3 items) Grants 833 critical weapon strikes
- (4 items) Grants 129 weapon power
- (5 items) Critical damage applies your enemies with the Hunter’s Poison for 10 seconds, which deals 2913 poison damage every second to them and all nearby enemies. This effect can occur once every 15 seconds.
Thorns of the Branchling
- (2 items) Grants 1096 maximum stamina
- (3 items) Grants 1096 maximum stamina
- (4 items) Grants 129 weapon power
- (5 items) Grants 3450 armor penetration
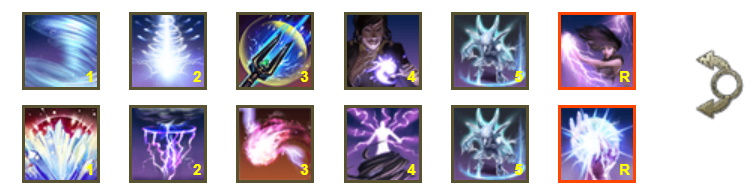
Magicka Sorcerer with Daedric Companion
A Magicka Sorcerer is a powerful class with which you can also solo through dungeons. It is also excellent for beginners.
With this build, you have good healing abilities and thus a good chance of survival. You also have a daedric companion by your side that can deal damage and stun enemies. The damage over time is also impressive, making you more flexible with blocking and dodging.
The build comes from Alcast. This player has been playing ESO since beta, is an official partner, and knows almost every detail very well. He runs his own homepage (via alcasthq.com) where you can always get tips.
Which race is recommended? For maximum performance of your Magicka DD, races like High Elves, Dark Elves, and Bretons are recommended.
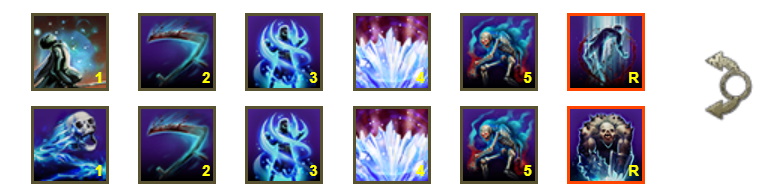
Skills and Talents
Destruction Staff Bar
- Neutralizing Magic
- You create a damage shield.
- Crystal Fragments (from Crystal Shard)
- You deal magic damage. Other Magicka abilities have a chance to instantly allow the next casting of Crystal Fragments, deal more damage, and consume less Magicka.
- Crushing Blow (from Power Strike)
- You deal elemental damage to an enemy. It also interrupts enemies and unbalances them.
- Elemental Blockade (from Elemental Wall)
- You create an elemental barrier in front of you that deals magic damage to enemies in the effect area every 1 second. Depending on the element, there is an additional effect.
- Summon Explosive Companion (from Instable Companion)
- You call upon the powers of the realm of oblivion to summon a daedric companion by your side. It attacks, has a stun, and accompanies you until it dies or you send it away.
- Ultimate: Magic Negation
- You create a dome that nullifies area effects, stuns enemies, and silences enemy players.

Healing Staff Bar
- Blessing of Protection
- You heal allies and grant them and yourself physical resistance and magic resistance.
- Boundless Storm (from Lightning Form)
- You manifest yourself as pure lightning energy and deal shock damage to enemies. You also have more resistances and movement speed.
- Regeneration (from Regeneration)
- You heal yourself and allies over time.
- Shock Flow (from Shock Field)
- You deal shock damage over time to enemies in the effect area. Additionally, allies can activate the Redirect synergy for extra shock damage.
- Summon Explosive Companion (from Instable Companion)
- You call upon the powers of the realm of oblivion to summon a daedric companion by your side. It attacks, has a stun, and accompanies you until it dies or you send it away.
- Ultimate: Overload
- You charge your fists with the power of the storms and replace your light and heavy attacks with stronger variants.

Your skill bars should look like this at level 30. From level 40, a build with two destruction staffs is recommended:
First Destruction Staff Bar
- Summoned Protection
- You summon spheres of daedric energy as a damage shield for you and your companions that absorbs damage.
- Crystal Fragments (from Crystal Shard)
- You deal magic damage. Other Magicka abilities have a chance to instantly allow the casting of Crystal Fragments, deal more damage, and consume less Magicka.
- Crushing Blow (from Power Strike)
- You deal elemental damage to an enemy. It also interrupts enemies and unbalances them.
- Surge (if possible upgrade to Power Surge)
- Increases your magic and weapon power for 33 seconds. Additionally, your crits heal you.
- Summon Explosive Companion (from Instable Companion)
- You call upon the powers of the realm of oblivion to summon a daedric companion by your side. It attacks, has a stun, and accompanies you until it dies or you send it away.
- Ultimate: Suppression Field (from Magic Negation)
- You create a dome that nullifies area effects, stuns enemies, and silences enemy players. Additionally, it deals magic damage.
Second Destruction Staff Bar
- Elemental Blockade (from Elemental Wall)
- You create an elemental barrier in front of you that deals magic damage to enemies in the effect area every 1 second. Depending on the element, there is an additional effect.
- Shock Flow (from Shock Field)
- You deal shock damage over time to enemies in the effect area. Additionally, allies can activate the Redirect synergy for extra shock damage.
- Weakness to Elements
- You reduce the magic resistance of an enemy.
- Boundless Storm (from Lightning Form)
- You manifest yourself as pure lightning energy and deal shock damage to enemies. You also have increased resistances and movement speed.
- Summon Explosive Companion (from Instable Companion)
- You call upon the powers of the realm of oblivion to summon a daedric companion by your side. It attacks, has a stun, and accompanies you until it dies or you send it away.
- Ultimate: Energy Overload (from Overload)
- You charge your fists with the power of the storms and replace your light and heavy attacks with stronger variants. Each attack restores Magicka.
Meaningful Passive Traits
- Class
- Unholy Knowledge – Reduces the health, Magicka, and stamina costs of all abilities
- Light Armor
- Invocation – Reduces your Magicka costs for each piece of light armor worn
- Recovery – Increases your Magicka regeneration for each piece of light armor worn
The Equipment
Set of Seduction
- (2 items) Grants 129 Magicka regeneration
- (3 items) Grants 1096 maximum Magicka
- (4 items) Grants 129 Magicka regeneration
- (5 items) Reduces the costs of your Magicka abilities by 10 %.
And how do you play it now?
Ultimately, how you play your class is up to you. Especially at the beginning, it’s important to just experiment a bit. With the builds suggested here, you can dive into the adventure without much frustration.
Just pay attention to your survival. Switch to your healer weapon or use your self-heal skills when you take damage. You should also maintain your damage-over-time spells. For this, it is important that you use your weapon swap regularly starting at level 15.
Of course, there are still tips and tricks for maximizing your damage. This includes the controversial weaving, where you alternate between automatic attacks and skills to interrupt the animations. However, this is not necessarily necessary at the beginning, and you can certainly manage without it later on.
If you really don’t want to read guides or builds, there is another simple way. In the game, a skill advisor is implemented. ESO itself suggests ways for you to skill and which talents and abilities are important and helpful. You can easily find this skill advisor displayed in your menu under the skills.

Your opinion is important to us!
Do you like the article? Then let us know!