
Rust offers survival players the option to rent servers or create their own dedicated servers. MeinMMO explains how this works and what you need to consider.
Rust was released on December 11, 2013, in Early Access and left the test phase at the end of 2018. Facepunch Studios regularly releases new, free content for Rust.
What are the benefits of having my own server? With your own server, you have complete control over who can play on the Rust server. You can also choose various options to shape the game according to your own preferences.
What options do I have? On your own server, you can choose whether you want to play PvP or PvE. That is, player versus player or player versus the “environment.” If you rent a server, only the options of the game server provider are available to you. You have less effort, don’t have to worry about updates, and the server is easier to administer. With a dedicated server, you have more setup and management effort, but you have full control over all settings.
Rent your own Rust server
Many game server providers offer Rust servers for rent. The installation and setup are handled by the provider, and you can make the most important settings with a mouse click via a web interface in your internet browser.
This saves a lot of work, and if something doesn’t work, you can contact the respective support team of the provider.
Rent Rust servers – these providers are available: We have chosen three German-speaking providers. When choosing a provider, pay attention to your requirements. Mod support, duration, and number of slots can vary. Therefore, compare the different providers and costs.
- ZAP-Hosting: Slot from 0.36 Euro, from 24 slots for 8.64 Euro per month
- Nitrado: Slot from 0.75 Euro, from 20 slots for 15.50 Euro per month
- DeinServerHost.de: Only RAM is charged, 4 GB from 10 Euro per month
There are new offers online every day, and you may find a provider that better suits your personal needs.
What to consider when renting a Rust server: Administering a Rust server can take a lot of time. Facepunch, the developer studio behind Rust, regularly wipes all servers with new content updates. This usually happens about once a month. If you want to play the new update, you always have to wipe your own server, i.e., completely restart it.
When installing your own server, you can decide whether it should appear in the official in-game list. To play stress-free on your server, we recommend considering the following points when choosing the game server provider:
- Sufficient slots: With the slots, you determine how many players can come to your server at most. More than 200 slots are not recommended. On average, a Rust server has 50 slots.
- Prepaid payment: If you want to rent your own Rust server without a minimum term, you must pay in advance. If you no longer want to continue with Rust, you can let the server expire and are not bound to a contract duration. However, you must pay attention to sufficient credit if it should continue running.
- DDoS protection: A good rental server has a certain level of protection against malicious attacks. Many providers offer DDoS protection.
- Mod support: Mods like “Rust Oxide” allow you to adjust the collection rates. If you want to play with mods, check whether the respective provider supports mods.
- Additional storage space for mods: If you don’t want to play “Vanilla,” you should check whether there is sufficient storage for mods when placing your order. In Rust, you should plan around 5 GB of storage space for mods.
- Server location in Germany: Most game servers in Germany are located in Frankfurt. A short and direct connection to the server location guarantees you a low ping and fewer lags.
Create a Rust Dedicated Server
For a dedicated Rust server, you need a virtual server with Linux or Windows installed.
If you want to create your own Rust server, we will explain step by step how it works. A virtual server with Linux or Windows installed is a prerequisite. In this guide, we will focus on installation under Windows.
If you want to see the steps in a video, check out the German video by YouTuber “ZargoZ”:
These requirements should be met by your server: The standard size of the Rust map is 3 square kilometers. The Windows server should therefore have at least 8 GB RAM. Depending on the size and load, you should reserve at least 7 GB RAM for Rust. If you have a larger map and use mods, you should plan for at least 16 GB RAM.
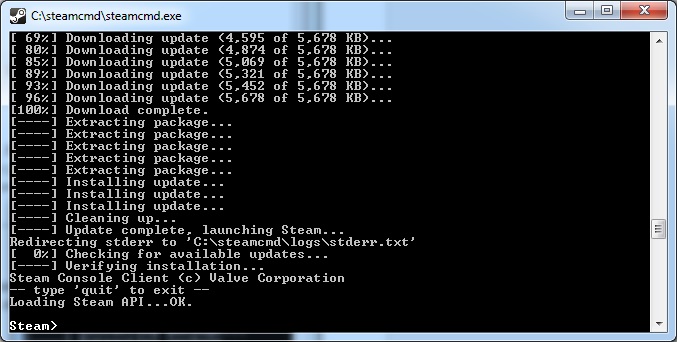
Installation of SteamCMD: SteamCMD is a free Steam application and the most important tool for installing your own Rust server.
- Create a folder for SteamCMD, for example on c:steamcmd
- Create a folder for the Rust server, for example c:rustserver
- Download SteamCMD for Windows from Steam
- Extract SteamCMD into the folder you created
- Run steamcmd.exe
Installation of Rust Dedicated Server: To install the Rust server, enter the following commands one after the other in SteamCMD:
- login anonymous
- force_install_dir “c:rustserver”
- app_update 258550
- quit
With this, you have downloaded all the necessary files for a Vanilla server. Additional steps are necessary to install mods.
Switch Rust Server Branch
Rust has a “Staging Branch” where you can play new updates in advance. These versions may still contain bugs and lead to performance issues and crashes. Only switch to the Staging Branch if you are aware of the risks.
To switch to the Staging Branch, run SteamCMD and use the following commands:
For the Staging Branch:
- login anonymous
- but force_install_dir “c:rustserver”
- app_update 258550 -beta staging
- quit
For the Pre-Release Branch:
- login anonymous
- force_install_dir “c:rustserver”
- app_update 258550 -beta prerelease
- quit
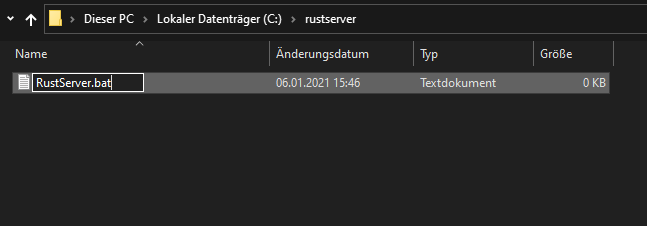
Automatically start and update Rust Server: To have your Rust server start automatically, a “.bat file” is needed on Windows servers. This can be created by right-clicking in the directory – New – Text Document.
Create this in your server installation directory (“c:rustserver”) and name it “RustServer.bat”. Then right-click on it and select “Edit.”
Enter the following code into the .bat file and edit the server name, “Description Website” and server image. The website and server image can also remain empty alternatively.
- echo off
- :start
- C:steamcmdsteamcmd.exe +login anonymous +force_install_dir c:rustserver +app_update 258550 +quit
- RustDedicated.exe -batchmode +server.port 28015 +server.level “Procedural Map” +server.seed 1234 +server.worldsize 4000 +server.maxplayers 10 +server.hostname “Name of the server, how it should appear in the server list” +server.description “Description of the server that is displayed when connecting” +server.url “http://yourwebsite.com” +server.headerimage “http://yourwebsite.com/serverimage.jpg” +server.identity “server1” +rcon.port 28016 +rcon.password letmein +rcon.web 1
- goto start
Explanation of individual parameters of the .bat:
- +server.level “Procedural Map”: Determines the type of map. You can choose between: “Procedural Map”,”Barren”,”HapisIsland”,”SavasIsland” and “SavasIsland_koth”
- +server.seed 1234: Defines the seed of the map. Values from 0 to 2147483647 are possible
- +server.worldsize 4000: Determines the size of the procedurally generated map and the map “Barren”. Values from 1000 to 6000 are possible.
Connecting to the Rust server: Note down the IP and port of your Rust server. 28015 is the default port, 28016 for RCON. Launch Rust and search in the game either for your server’s IP or the name you set.
Make sure that both your game and the server version are up to date. Otherwise, you won’t find the server. The easiest way to find the server in the game is under the respective name.
Becoming admin on Rust server: To become an admin, connect to your server and open the console with F1. With the command “users,” you can see all active players on the server. To become an admin, you need the 17-digit SteamID. The website SteamID.io allows you to find your Steam64ID for free.
Copy this from the game and enter the following command in SteamCMD:
- ownerid 12345678901234567 “Admin Name”

Rust Admin Commands
The vanilla version of Rust has some admin commands that we will explain to you below. <UID> stands for the SteamID64 of the respective user.
- kick <UID> “Player name” “Reason”
- kickall “” “Reason”
- ban “Player name” “Reason”
- banid <UID> “Player name” “Reason”
- status ; Information about all players on the server.
- say “Message” ; Sends a message in the chat.
- users ; Displays user information for all players on the server.
- banlist ; List of banned players.
- banlistex ; List of banned players with additional information.
- listid ; List of banned players, sorted by SteamID64.
- event.run ; Sends an airdrop from a random direction.
Why has Rust suddenly become so popular?
Despite its age, Rust has been able to secure a strong player base over the years and has been the largest survival MMO on Steam for some time. Since the end of 2020, even more players have flocked to Rust. The reason for this is likely a sudden hype triggered by a quirky plan from several streamers:
- 50 streamers played together at the end of 2020 and brought Rust to the top of Twitch
- Shortly thereafter the Twitch rascal xQc joined and caused a commotion
- However, the “Sheriff” shroud put a stop to that and cleaned up
- Meanwhile, viewers are even joining in and ruining everything without even playing
The trend started in the USA and is spreading further and further. Currently, Rust has more players on Steam than ever before.
MeinMMO author Benedict Grothaus has taken 23 hours of beatings in Rust. In his guide, he explains how you can do better. He was also able to rely on the help of a Rust veteran who has spent over 4,000 hours distributing beatings in Rust.

Your opinion is important to us!
Do you like the article? Then let us know!