

The MMORPG The Elder Scrolls Online (ESO) now offers you a selection of up to 6 classes to choose from. In this guide, we want to show you some healer builds that can help you master the beginnings in ESO.

What is this about? This is part 4 of a series of guides where we would like to introduce builds that beginners can use to start well in ESO. This article is all about healer builds. As a healer, you must ensure that your group stays alive and, ideally, distribute buffs and debuffs.
In this guide, we want to explain how the various builds work. It is not only the choice of classes that plays an important role, but also the choice of races. In this guide, you will learn which race is best suited for which role.
In the other guides, we also cover the following topics:
Before we dive deeper into the guide, we would like to briefly introduce important vocabulary that is often used in the guide and also in the game.
Important vocabulary you should know for this guide
- What is a DoT? This refers to a skill that causes damage over time (Damage over Time = DoT). The opponent cannot evade this like area attacks by changing their position.
- What is an Execute? This refers to skills that deal especially high damage when the target has low health.
- What is a Spammable? This refers to a skill that does not deal damage over time and can be executed frequently, i.e., “spammed”. It primarily deals initial damage and is used whenever area attacks or DoTs do not need to be applied.
- What does the word Morph mean? This refers to a different version of a skill. In ESO, you have the option to modify (morph) a skill once it reaches level IV. You will then always have 2 selectable options that differ slightly.
- What does prebuffing mean? This refers to preparation for a fight. Before it starts, you activate abilities that grant you buffs (advantages) from the beginning.
- What does outranging mean? This means moving away from an opponent/mechanic until you are out of the range of effect. Opponents will follow you until they can target you again. Mechanics often stop or find another target.

Skills for the healer in ESO
Similar to the tank, the healer in ESO is also a group supporter. This means that you should of course provide your group with enough healing so that none of the group members dies. However, it is also becoming increasingly important that you distribute buffs to your allies and debuffs to the opponent.
However, at first, focus only on healing. Once you master this well, you can take a step further and venture into buffs and debuffs. You will notice that with each step further towards the endgame, you will bid farewell to the “classic healer”.
In optimized groups, healers often take on the role of an additional DD with armor sets that increase the group’s damage. But until then, you still have time to grow into the role.
What skills does a healer absolutely need? One thing is clear: you have a large responsibility for the survival of the group, similar to the tank. For reliable healing, you should use the following skills for the healing staff:
- Restoration (Healing Staff): You summon healing spirits with your staff that heal you and your allies in the selected area for 580 health and 580 health every second for 12 seconds.
- Combat Prayer (Healing Staff): You slam your staff into the ground, blessing allies in front of you and healing them for 1,916 health. It also grants you and your allies minor Berserk and minor Resolve, increasing attack damage by 5% and physical and spell resistance by 2,974 for 8 seconds.
- Energy Ball (Unyielding): You throw a ball forward that slowly hovers and heals nearby allies and yourself by 860 health every second. Nearby allies can activate the healing combustion synergy, healing nearby allies for 3,917 health and restoring 3,960 Magicka or Stamina (depending on which attribute has the highest maximum value).
On the back bar, the healer usually carries a destruction staff. This skill is particularly important:
- Elemental Blockade (Destruction Staff): Area damage in front of you that deals magic damage every second for 14 seconds. If you place the elemental blockade with a frost staff, nearby allies gain a shield against ranged attacks. However, you can also use a lightning staff and unbalance enemies in the area of effect. For extra damage, you can also use a fire staff. Ideally, you coordinate with the tank when making your selection. This skill triggers the effect of your enchantment, which is important for the group.
What ultimate ability do I use as a healer in ESO? The most important ability can be found in the Storm Calling skill line. Unfortunately, you will have to spend some time in PvP to unlock and use the skills:
- Aggressive Signal (Storm Calling): Increases maximum Stamina and maximum Magicka by 10% for 30 seconds. Additionally, the group receives the buff: Major Sorcery. This increases critical damage by 20% for 10 seconds.
In some situations, it is also advisable for the healer to take on tasks of a tank:
- Silver Lining (Fighter’s Guild): You deal negligible damage and pull enemies toward you. They are also slowed by 30% for 4 seconds. Note that enemies will be stunned when pulled. Recently stunned enemies cannot be pulled while they are immune.
- Inner Fury (Unyielding): Deals magic damage once and taunts the enemy for 15 seconds. Allies can use the Radiate synergy to deal magic damage to the opponent for 3 seconds and then again as magic damage to all nearby enemies.
Or you can use the other morph:
- Inner Beast (Unyielding): This is the other morph of Inner Fury. Unlike this, this ability becomes a stamina skill. It deals slightly less initial damage, but the opponent takes 2% more damage from your attacks. The synergy effects remain the same (as with Inner Fury).
You may be wondering what these abilities have to do with a healer? Usually, they can primarily be found with tanks. However, there are also certain situations in which healers need these skills.
A good example is the Dragonstar Arena. There is a tactic to play the final boss, in which the healer has to take over the boss. For this, they naturally need a skill to draw the boss’s attention. Additionally, it often occurs in raids that healers help pull adds together.
Another typical example of using these skills is the raid Sunspire. During the last boss Naviintas, adds keep spawning that need to be pulled together. Since some ranged attackers are among them, they must be taunted and outranged so they move to the right place.
This job is often taken over by healers, as tanks are busy with the remaining adds or statues.
You must be flexible as a supporter – As you can see from the situations, the supporter role requires you to play unusual skills and adapt your abilities to the given situation.
What class should I choose as a healer?
In the endgame, you will notice that the class often varies. For example, supporters (tanks and healers) in a group have to align their class choice with the DDs. The DDs in optimized groups play the classes that deal the most damage, and the supporters must fill in the missing classes.
The reason for this is the passive abilities of the individual classes. Almost every class can additionally buff the group with passive class abilities. Therefore, it is highly recommended to have every class represented in a group.
In general, for any class:
- You will typically need all passive abilities of your class.
- You should have one corresponding skill from the 3 class abilities equipped for leveling the skill lines.
Nightblade
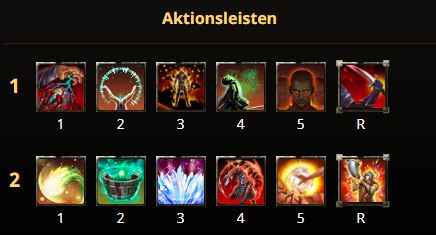
On the 1st bar (front bar):
- 1: Life Stream (Siphoning – Level 1): You drain the life force of an enemy, dealing 1,498 magic damage and healing yourself or 2 nearby allies for 50% of the damage dealt every 2 seconds for 10 seconds.
- 2: Radiant Regeneration (Healing Staff): You share the life-giving energy of your staff and heal yourself or up to 3 nearby allies for a total of 5,988 over 10 seconds.
- 3: Restorative Path (Shadow): You create a pathway of shadow. You and allies in the area are granted increased speed, increasing your movement speed by 30%. The effect persists for 4 seconds after leaving the path. Heals you and allies in the area for 612 health every second (level 20).
- 4: Restoration (Healing Staff): You summon healing spirits with your staff that heal you and your allies in the selected area for 580 health and 580 health every second for 12 seconds.
- 5: Combat Prayer (Healing Staff): You slam your staff into the ground, blessing allies in front of you and healing them for 1,916 health. It also grants you and your allies minor Berserk and minor Resolve, increasing attack damage by 5% and physical and spell resistance by 2,974 for 8 seconds.
- R: Soul Harvest (Assassination – Level 12): You devastate an enemy with a whirlwind attack, dealing 4,131 magic damage and increasing your damage against them by 20% for 6 seconds. They also suffer greater desecration, reducing the effectiveness of healing applied to them and their health regeneration by 16%. While equipped, you earn 10 ultimate power for each kill. – This ability is not actively used but benefits from the passive effect.
On the 2nd bar (back bar):
- 1: Elemental Drain: The target receives the debuff: Greater Breach, reducing their physical and spell resistance by 5,948 for 23 seconds. The target receives the debuff: Lesser Magicka Drain, you and your allies regain 168 Magicka every second.
- 2: Overflowing Altar (Unyielding): This is the other morph of the blood-red altar, it has higher life costs. You sacrifice health and debuff enemies in the area for 30 seconds with Lesser Life Drain. Your allies and you regain 600 health every second when you deal damage to the target. Allies can use the

Your opinion is important to us!
Do you like the article? Then let us know!